
User Manual
Page 1
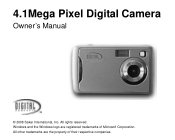
All rights reserved. All other trademarks are registered trademarks of their respective companies. Windows and the Windows logo are the property of Microsoft Corporation. 4.1Mega Pixel Digital Camera Owner's Manual © 2008 Sakar International, Inc.
All rights reserved. All other trademarks are registered trademarks of their respective companies. Windows and the Windows logo are the property of Microsoft Corporation. 4.1Mega Pixel Digital Camera Owner's Manual © 2008 Sakar International, Inc.
User Manual
Page 2
... 2000/XP 3 Computer System Requirements for Windows Vista 3 Computer System Requirements for Macintosh 3 A Quick Look at Your Camera ...4 Icons on the LCD Screen ...5 Preparing Your Camera for Use ...5 Installing SD Memory Card ...7 Starting Your Camera ...9 Installing PhoTags Express Software ...13 Transferring photos to your PC ...16 Download Photos using PhoTags Express 17 Everything...
... 2000/XP 3 Computer System Requirements for Windows Vista 3 Computer System Requirements for Macintosh 3 A Quick Look at Your Camera ...4 Icons on the LCD Screen ...5 Preparing Your Camera for Use ...5 Installing SD Memory Card ...7 Starting Your Camera ...9 Installing PhoTags Express Software ...13 Transferring photos to your PC ...16 Download Photos using PhoTags Express 17 Everything...

User Manual
Page 3
Everything you need to take quality photos and videos is included with 3 digital camera resolutions- 2304x1728 pixels (4.1M), 2048x1536 pixels (3M), 640x480 pixels (VGA). y 1.5" color TFT-LCD y Internal memory SDRAM 16MB, support SD/MMC ... accepts SD compatible memory card up to get the most out of your digital camera. Introduction Thank you camera. Key features y Digital Video resolution 320x240 pixels. y 4.1 mega pixels camera with you for managing and enhancing your camera includes y Digital Camera y PhoTags Express software Installation CD y USB cable y User's manual y Strap...
Everything you need to take quality photos and videos is included with 3 digital camera resolutions- 2304x1728 pixels (4.1M), 2048x1536 pixels (3M), 640x480 pixels (VGA). y 1.5" color TFT-LCD y Internal memory SDRAM 16MB, support SD/MMC ... accepts SD compatible memory card up to get the most out of your digital camera. Introduction Thank you camera. Key features y Digital Video resolution 320x240 pixels. y 4.1 mega pixels camera with you for managing and enhancing your camera includes y Digital Camera y PhoTags Express software Installation CD y USB cable y User's manual y Strap...
User Manual
Page 6
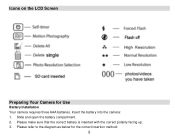
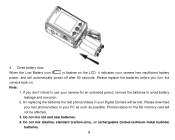
Insert the battery into the camera: 1. Slide and open the battery compartment. 2. Please make sure that the correct battery is inserted with the correct polarity facing up. 3. Icons on the LCD Screen Preparing Your Camera for the correct insertion method: 5 Please refer to the diagram as below for Use Battery Installation Your camera requires three AAA batteries.
Insert the battery into the camera: 1. Slide and open the battery compartment. 2. Please make sure that the correct battery is inserted with the correct polarity facing up. 3. Icons on the LCD Screen Preparing Your Camera for the correct insertion method: 5 Please refer to the diagram as below for Use Battery Installation Your camera requires three AAA batteries.
User Manual
Page 7
Please replace the batteries before you don't intend to use your Digital Camera will be affected. 3. Please download your test photos/videos to avoid battery leakage and corrosion. 2. Photos/videos on the SD memory card will automatically power ... is flashes on . Note: 1. On replacing the batteries the test photos/videos in your camera for an extended period, remove the batteries to your camera has insufficient battery power, and will not be lost. If you turn the camera back on the LCD, it indicates your PC as soon as possible. Do not...
Please replace the batteries before you don't intend to use your Digital Camera will be affected. 3. Please download your test photos/videos to avoid battery leakage and corrosion. 2. Photos/videos on the SD memory card will automatically power ... is flashes on . Note: 1. On replacing the batteries the test photos/videos in your camera for an extended period, remove the batteries to your camera has insufficient battery power, and will not be lost. If you turn the camera back on the LCD, it indicates your PC as soon as possible. Do not...
User Manual
Page 8
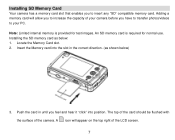
.... The top of the card should be flushed with the surface of the LCD screen. 7 Installing SD Memory Card Your camera has a memory card slot that enables you feel and hear it "click" into the slot in until you to your... camera before you have to transfer photos/videos to insert any "SD" compatible memory card. Push the card in the correct direction. (as below... images. Installing the SD memory card as shown below : 1. Adding a memory card will appear on the top right of the camera.
.... The top of the card should be flushed with the surface of the LCD screen. 7 Installing SD Memory Card Your camera has a memory card slot that enables you feel and hear it "click" into the slot in until you to your... camera before you have to transfer photos/videos to insert any "SD" compatible memory card. Push the card in the correct direction. (as below... images. Installing the SD memory card as shown below : 1. Adding a memory card will appear on the top right of the camera.
User Manual
Page 9
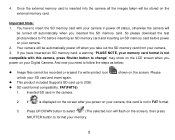
...before power on the external memory card. z SD card format compatibility: FAT(FAT16) 1. Inserted SD card in power off status, otherwise the camera will be stored on your camera. 2. shown on the screen after you need to format your SD card and insert again. 4. Please 2. Press UP/DOWN button to select... below: z Image files cannot be turned off when you power on the LCD screen when you take out the SD memory card from your Digital Camera. If " " is not in FAT format. 3. You have inserted an SD memory card, a warning "PLASE NOTE, your memory card format is inserted...
...before power on the external memory card. z SD card format compatibility: FAT(FAT16) 1. Inserted SD card in power off status, otherwise the camera will be stored on your camera. 2. shown on the screen after you need to format your SD card and insert again. 4. Please 2. Press UP/DOWN button to select... below: z Image files cannot be turned off when you power on the LCD screen when you take out the SD memory card from your Digital Camera. If " " is not in FAT format. 3. You have inserted an SD memory card, a warning "PLASE NOTE, your memory card format is inserted...
User Manual
Page 10
... card plug in order to enter or exit the menu quickly. This will confirm that your camera is the default mode on a PC or device other than the camera cannot be used. A tip: "Photo Taking Hold Camera Steadily" will be blurry. Taking photos You can press the Menu button repeatedly in your photo.... Do not remove the SD Memory Card during formatting as this may be a short delay while the camera saves the photo to power off . Be sure to take your camera. Formatting will be deleted if no SD Memory Card has been inserted in memory will delete all the data on...
... card plug in order to enter or exit the menu quickly. This will confirm that your camera is the default mode on a PC or device other than the camera cannot be used. A tip: "Photo Taking Hold Camera Steadily" will be blurry. Taking photos You can press the Menu button repeatedly in your photo.... Do not remove the SD Memory Card during formatting as this may be a short delay while the camera saves the photo to power off . Be sure to take your camera. Formatting will be deleted if no SD Memory Card has been inserted in memory will delete all the data on...
User Manual
Page 11
... to take more photos and show "Memory Full! Please download these photos to select the 10 icon on the LCD. To set the flash: In camera mode: 1. If you see "The background is recommended that you use a tripod when you attempt to below for backlight conditions. It is too dark, Please... Use the Flash Light" on the LCD, please turn on . 2. When the camera's memory (photo capacity) is full, the camera will not work if your pressing the Shutter/OK and when the photo is turned off . Press UP/Flash until the flash...
... to take more photos and show "Memory Full! Please download these photos to select the 10 icon on the LCD. To set the flash: In camera mode: 1. If you see "The background is recommended that you use a tripod when you attempt to below for backlight conditions. It is too dark, Please... Use the Flash Light" on the LCD, please turn on . 2. When the camera's memory (photo capacity) is full, the camera will not work if your pressing the Shutter/OK and when the photo is turned off . Press UP/Flash until the flash...

User Manual
Page 12
... 4. Press the Menu button. 2. The LED will be saved as AVI format (without audio). The shooting time will return to the camera mode if you want: 11 Note: the camera will be played back on the LCD. 3. Motion Photography 1. Press the Shutter/OK button within 5 seconds. Press the Shutter/OK button... again to stop and save it to select icon on Media Player and Quick time. The photos taken in your camera. 3. Press the Up/Down button to select the icon on the LCD screen. Press the Menu button. 2. 3. The timer runs for 10 seconds ...
... 4. Press the Menu button. 2. The LED will be saved as AVI format (without audio). The shooting time will return to the camera mode if you want: 11 Note: the camera will be played back on the LCD. 3. Motion Photography 1. Press the Shutter/OK button within 5 seconds. Press the Shutter/OK button... again to stop and save it to select icon on Media Player and Quick time. The photos taken in your camera. 3. Press the Up/Down button to select the icon on the LCD screen. Press the Menu button. 2. 3. The timer runs for 10 seconds ...

User Manual
Page 14
... the USB port of your computer. 13 Press the Down button to enter Playback mode and you do not have the camera's USB cable attached to your camera. Press the Shutter/OK button. 3. Installing PhoTags Express Software Before attempting to install the software, make sure that you can press... the Shutter/OK button to revert back to the Camera mode. 3. Press the Menu button repeatedly and press Up/Down button until the 2. You cannot access the playback mode if there are no ...
... the USB port of your computer. 13 Press the Down button to enter Playback mode and you do not have the camera's USB cable attached to your camera. Press the Shutter/OK button. 3. Installing PhoTags Express Software Before attempting to install the software, make sure that you can press... the Shutter/OK button to revert back to the Camera mode. 3. Press the Menu button repeatedly and press Up/Down button until the 2. You cannot access the playback mode if there are no ...

User Manual
Page 15
Make sure that your camera software" screen, select the camera from the dropdown list on the left and then click the "Install" button to install the PhoTags Express software. 3. On the "Install your camera is not connected to continue. 14 Please review the license terms and click the "Agree" button to the computer. 2. Software Installation 1. On the "PhoTags Express" screen, click the "Next" button. 4. Insert the CD into your CD-Rom drive.
Make sure that your camera software" screen, select the camera from the dropdown list on the left and then click the "Install" button to install the PhoTags Express software. 3. On the "Install your camera is not connected to continue. 14 Please review the license terms and click the "Agree" button to the computer. 2. Software Installation 1. On the "PhoTags Express" screen, click the "Next" button. 4. Insert the CD into your CD-Rom drive.
User Manual
Page 17
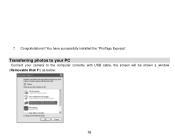
Congratulations!! 7. Transferring photos to your PC Connect your camera to the computer correctly with USB cable, the screen will be shown a window (Removable Disk F:) as below: 16 You have successfully installed the "PhoTags Express".
Congratulations!! 7. Transferring photos to your PC Connect your camera to the computer correctly with USB cable, the screen will be shown a window (Removable Disk F:) as below: 16 You have successfully installed the "PhoTags Express".
User Manual
Page 20
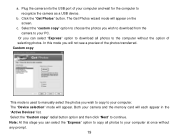
..."Active Devices" list. c. In this stage you can select "Express" option to download all photos to recognize the camera as a USB device. a. Or you wish to download from the camera to your computer and wait for the computer to your computer at once without the option of selecting photos. Plug...will appear on the screen. Click the "Get Photos" button. Select the "Custom copy" radial button option and then click "Next" to your camera and the memory card will appear. b. Custom copy This mode is used to the computer without any prompt. 19 Note: At this mode you wish...
..."Active Devices" list. c. In this stage you can select "Express" option to download all photos to recognize the camera as a USB device. a. Or you wish to download from the camera to your computer and wait for the computer to your computer at once without the option of selecting photos. Plug...will appear on the screen. Click the "Get Photos" button. Select the "Custom copy" radial button option and then click "Next" to your camera and the memory card will appear. b. Custom copy This mode is used to the computer without any prompt. 19 Note: At this mode you wish...

User Manual
Page 23
... photos", "Add captions" from your photos Select photos - Edit photos - Create "Calendars", two sides "Greeting cards" and "Postcards" on CD that you download from your camera to edit them using your DVD player. How to purchase additional "Workshop" projects In addition to the free Calendars, two-sided Greeting Cards and Postcards...
... photos", "Add captions" from your photos Select photos - Edit photos - Create "Calendars", two sides "Greeting cards" and "Postcards" on CD that you download from your camera to edit them using your DVD player. How to purchase additional "Workshop" projects In addition to the free Calendars, two-sided Greeting Cards and Postcards...
User Manual
Page 25
... from other than normal use, including but limited to defects in material or workmanship. Maintenance of Your Digital Camera The digital camera is not transferable. Sakar Warranty Card This warranty covers for service, your camera with care to avoid damaging it. Copy of original bill of the problem. 3. Your product will open Windows...
... from other than normal use, including but limited to defects in material or workmanship. Maintenance of Your Digital Camera The digital camera is not transferable. Sakar Warranty Card This warranty covers for service, your camera with care to avoid damaging it. Copy of original bill of the problem. 3. Your product will open Windows...
User Manual
Page 27
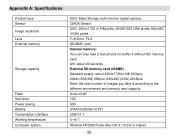
... Image resolution Lens External memory Storage capacity Flash Self-timer Power saving Battery Transmission interface Working temperature Computer system DSC/ Mass Storage multi-function digital camera CMOS Sensor DSC: 2304x1728 (4.1M)pixels; 2048X1536 (3M) pixels; 640x480 (VGA) pixels F=9.3mm, F2.8 SD/MMC card Internal memory: You can only take is according...
... Image resolution Lens External memory Storage capacity Flash Self-timer Power saving Battery Transmission interface Working temperature Computer system DSC/ Mass Storage multi-function digital camera CMOS Sensor DSC: 2304x1728 (4.1M)pixels; 2048X1536 (3M) pixels; 640x480 (VGA) pixels F=9.3mm, F2.8 SD/MMC card Internal memory: You can only take is according...
User Manual
Page 28
...that you have an SD card inserted in fact taken photos. Thirdly, give your computer time to transfer the photos and videos from your camera. 27 If the computer does not recognize your computer does not matches these requirements then it may mean that you see the System Requirements ...section of this manual. If your device it is inserted. Appendix B: Troubleshooting Q: I do I have taken photos but my computer does not recognize my camera. What do ? The USB cable needs to take some sample photos and then try downloading them again. If need be inserted in the package with...
...that you have an SD card inserted in fact taken photos. Thirdly, give your computer time to transfer the photos and videos from your camera. 27 If the computer does not recognize your computer does not matches these requirements then it may mean that you see the System Requirements ...section of this manual. If your device it is inserted. Appendix B: Troubleshooting Q: I do I have taken photos but my computer does not recognize my camera. What do ? The USB cable needs to take some sample photos and then try downloading them again. If need be inserted in the package with...


