(version 1) Camera Manual
Page 6
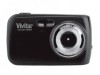
... the SD card is low the battery icon turns red and the camera will take you through the INITIAL CAMERA SETUP. Use 3x AAA (1.5v) batteries. This indicates the SD card has been inserted correctly. Alkaline batteries are recommended. (Batteries not included.) Note: Remove the batteries from saving captured photos to the SD card. 3) Power On Press the POWER button to the polarity shown inside the battery compartment. Powering the Camera ON 1) Batteries Make sure the batteries have...
... the SD card is low the battery icon turns red and the camera will take you through the INITIAL CAMERA SETUP. Use 3x AAA (1.5v) batteries. This indicates the SD card has been inserted correctly. Alkaline batteries are recommended. (Batteries not included.) Note: Remove the batteries from saving captured photos to the SD card. 3) Power On Press the POWER button to the polarity shown inside the battery compartment. Powering the Camera ON 1) Batteries Make sure the batteries have...
(version 1) Camera Manual
Page 7
... DOWN direction control buttons. Setting the Date and Time The next step in the camera. Setting the ViviLink Default Option Once the Date and Time have completed setting the time and date, press the SET button to confirm the selection and move to choose the default ViviLink social network for Photos. These settings can be adjusted at any time manually through the menus in the initial camera setup is now ready to its default settings. Setting the Camera Language...
... DOWN direction control buttons. Setting the Date and Time The next step in the camera. Setting the ViviLink Default Option Once the Date and Time have completed setting the time and date, press the SET button to confirm the selection and move to choose the default ViviLink social network for Photos. These settings can be adjusted at any time manually through the menus in the initial camera setup is now ready to its default settings. Setting the Camera Language...

(version 1) Camera Manual
Page 8
... camera‟s memory card. Playback Mode (Photos & Videos) Use this mode to open the Video Capture mode. To take a picture, aim your camera as desired and press the Shutter button to your digital camera. Main Camera Modes Your camera has different modes for photos and videos, press the SET button while in progress. The picture will be automatically saved to start the record. To access the various menus for photos and videos. To access the various menus for the Playback mode for the various camera functions. Photo Capture Mode Use...
... camera‟s memory card. Playback Mode (Photos & Videos) Use this mode to open the Video Capture mode. To take a picture, aim your camera as desired and press the Shutter button to your digital camera. Main Camera Modes Your camera has different modes for photos and videos, press the SET button while in progress. The picture will be automatically saved to start the record. To access the various menus for photos and videos. To access the various menus for the Playback mode for the various camera functions. Photo Capture Mode Use...
(version 1) Camera Manual
Page 9
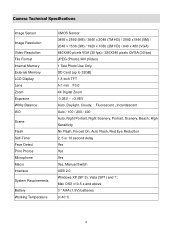
...;C 8 Camera Technical Specifications Image Sensor Image Resolution Video Resolution File Format Internal Memory External Memory LCD Display Lens Zoom Exposure White Balance ISO Scene Flash Self-Timer Face Detect Print Photos Microphone Macro Interface System Requirements Battery Working Temperature CMOS Sensor 3456 x 2592 (9M) / 3648 x 2048 (7M HD) / 2592 x1944 (5M) / 2048 x 1536 (3M) / 1920 x 1080 (2M HD) / 640 x 480 (VGA) 640X480 pixels VGA (30 fps) / 320X240 pixels QVGA (30 fps) JPEG (Photo) /AVI (Video) 1 Test Photo Use Only SD Card...
...;C 8 Camera Technical Specifications Image Sensor Image Resolution Video Resolution File Format Internal Memory External Memory LCD Display Lens Zoom Exposure White Balance ISO Scene Flash Self-Timer Face Detect Print Photos Microphone Macro Interface System Requirements Battery Working Temperature CMOS Sensor 3456 x 2592 (9M) / 3648 x 2048 (7M HD) / 2592 x1944 (5M) / 2048 x 1536 (3M) / 1920 x 1080 (2M HD) / 640 x 480 (VGA) 640X480 pixels VGA (30 fps) / 320X240 pixels QVGA (30 fps) JPEG (Photo) /AVI (Video) 1 Test Photo Use Only SD Card...
(version 1) Camera Manual
Page 10
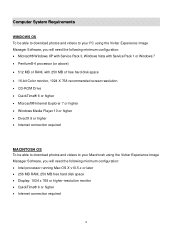
... to download photos and videos to your PC using the Vivitar Experience Image Manager Software, you will need the following minimum configuration: Microsoft® Windows XP with Service Pack 3, Windows Vista with Service Pack 1 or Windows 7 Pentium® 4 processor (or above) 512 MB of RAM, with 250 MB of free hard disk space 16-bit Color monitor, 1024 X 768 recommended screen...
... to download photos and videos to your PC using the Vivitar Experience Image Manager Software, you will need the following minimum configuration: Microsoft® Windows XP with Service Pack 3, Windows Vista with Service Pack 1 or Windows 7 Pentium® 4 processor (or above) 512 MB of RAM, with 250 MB of free hard disk space 16-bit Color monitor, 1024 X 768 recommended screen...
(version 1) Camera Manual
Page 11
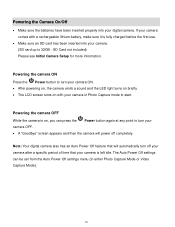
... a rechargeable lithium battery, make sure it is fully charged before the first use. Make sure an SD card has been inserted into your digital camera. Powering the camera ON Press the Power button to turn your camera ON. After powering on, the camera emits a sound and the LED light turns on briefly. The LCD screen turns on , you can be set from the Auto Power Off settings menu (in Photo Capture mode to start. Powering the camera OFF While...
... a rechargeable lithium battery, make sure it is fully charged before the first use. Make sure an SD card has been inserted into your digital camera. Powering the camera ON Press the Power button to turn your camera ON. After powering on, the camera emits a sound and the LED light turns on briefly. The LCD screen turns on , you can be set from the Auto Power Off settings menu (in Photo Capture mode to start. Powering the camera OFF While...
(version 1) Camera Manual
Page 19
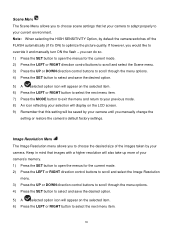
... camera switches off the FLASH automatically (if it and manually turn ON the flash - Image Resolution Menu The Image Resolution menu allows you to optimize the picture quality. Scene Menu The Scene Menu allows you to choose scene settings that let your camera to adapt properly to override it ‟s ON) to choose the desired size of your camera‟s memory. 1) Press the SET button to open the menus for the current mode...
... camera switches off the FLASH automatically (if it and manually turn ON the flash - Image Resolution Menu The Image Resolution menu allows you to optimize the picture quality. Scene Menu The Scene Menu allows you to choose scene settings that let your camera to adapt properly to override it ‟s ON) to choose the desired size of your camera‟s memory. 1) Press the SET button to open the menus for the current mode...
(version 1) Camera Manual
Page 20
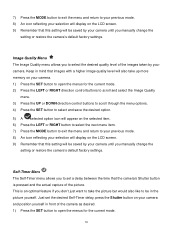
... your previous mode. 8) An icon reflecting your selection will display on the LCD screen. 9) Remember that this setting will be saved by your camera until you manually change the setting or restore the camera‟s default factory settings. Self-Timer Menu The Self-Timer menu allows you to open the menus for the current mode. 19 This is pressed and the actual capture of the images taken by your camera. Image Quality Menu The Image Quality menu allows you...
... your previous mode. 8) An icon reflecting your selection will display on the LCD screen. 9) Remember that this setting will be saved by your camera until you manually change the setting or restore the camera‟s default factory settings. Self-Timer Menu The Self-Timer menu allows you to open the menus for the current mode. 19 This is pressed and the actual capture of the images taken by your camera. Image Quality Menu The Image Quality menu allows you...
(version 1) Camera Manual
Page 22
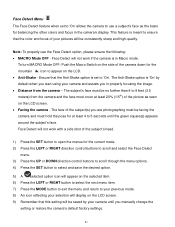
... in properly focusing the image. Distance from the camera and the face must cover at least 4 to 5 seconds until you manually change the setting or restore the camera‟s default factory settings. 21 To turn MACRO Mode OFF: Push the Macro Switch on the LCD screen. 9) Remember that the color and focus of the subject(s) you in Macro mode. Face Detect will be saved by default when you start using your camera and assists you are...
... in properly focusing the image. Distance from the camera and the face must cover at least 4 to 5 seconds until you manually change the setting or restore the camera‟s default factory settings. 21 To turn MACRO Mode OFF: Push the Macro Switch on the LCD screen. 9) Remember that the color and focus of the subject(s) you in Macro mode. Face Detect will be saved by default when you start using your camera and assists you are...
(version 1) Camera Manual
Page 25
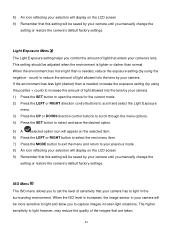
... mode. 8) An icon reflecting your selection will display on the LCD screen 9) Remember that this setting will be saved by your camera until you manually change the setting or restore the camera‟s default factory settings. Light Exposure Menu The Light Exposure setting helps you to set the level of light allowed into the lens by your camera. 1) Press the SET button to open the menus for the current mode. 2) Press the LEFT or RIGHT direction control buttons to scroll and select the Light Exposure menu...
... mode. 8) An icon reflecting your selection will display on the LCD screen 9) Remember that this setting will be saved by your camera until you manually change the setting or restore the camera‟s default factory settings. Light Exposure Menu The Light Exposure setting helps you to set the level of light allowed into the lens by your camera. 1) Press the SET button to open the menus for the current mode. 2) Press the LEFT or RIGHT direction control buttons to scroll and select the Light Exposure menu...
(version 1) Camera Manual
Page 26
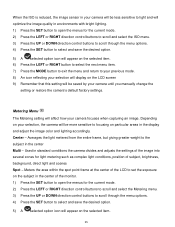
..., but giving greater weight to your previous mode. 8) An icon reflecting your camera focuses when capturing an image. Metering Menu The Metering setting will be saved by your camera until you manually change the setting or restore the camera‟s default factory settings. Depending on your selection, the camera will affect how your selection will display on the LCD screen 9) Remember that this setting will appear on the selected item. 6) Press...
..., but giving greater weight to your previous mode. 8) An icon reflecting your camera focuses when capturing an image. Metering Menu The Metering setting will be saved by your camera until you manually change the setting or restore the camera‟s default factory settings. Depending on your selection, the camera will affect how your selection will display on the LCD screen 9) Remember that this setting will appear on the selected item. 6) Press...

(version 1) Camera Manual
Page 30
... or DOWN direction control buttons to scroll through the menu options. 4) Press the SET button to select and save the desired option. 5) A selected option icon will appear on the images taken by your camera‟s memory card. Format Memory Card Menu You can use the delete menu in the camera‟s Playback mode. 1) Press the SET button to open the menus for the current mode. 2) Press the LEFT or RIGHT direction control buttons to scroll and select the Format Memory Card menu. 3) Press...
... or DOWN direction control buttons to scroll through the menu options. 4) Press the SET button to select and save the desired option. 5) A selected option icon will appear on the images taken by your camera‟s memory card. Format Memory Card Menu You can use the delete menu in the camera‟s Playback mode. 1) Press the SET button to open the menus for the current mode. 2) Press the LEFT or RIGHT direction control buttons to scroll and select the Format Memory Card menu. 3) Press...

(version 1) Camera Manual
Page 31
... Photos and Videos. The memory card will be asked to confirm the resetting to the factory default settings. Select "No" to exit the menu and return to the previous mode without formatting. Select "Yes" and press the SET button to reset your system Language, Date/Time and ViviLink for the current mode. 2) Press the LEFT or RIGHT direction control buttons to scroll and select the Firmware menu. 3) The "Default Setting" is powered on your camera...
... Photos and Videos. The memory card will be asked to confirm the resetting to the factory default settings. Select "No" to exit the menu and return to the previous mode without formatting. Select "Yes" and press the SET button to reset your system Language, Date/Time and ViviLink for the current mode. 2) Press the LEFT or RIGHT direction control buttons to scroll and select the Firmware menu. 3) The "Default Setting" is powered on your camera...

(version 1) Camera Manual
Page 32
... in Playback Mode, press the LEFT or RIGHT direction buttons to scroll through the images on Your Camera 1) Select your Photo: Once in Photo Capture mode by default. Press the MODE button twice to view by using the Thumbnail View. If there are no images stored, a message (No File) appears. Use the UP / DOWN / LEFT / RIGHT direction buttons to enlarge the selected image full size. 31 All the images on the LCD screen. Use the...
... in Playback Mode, press the LEFT or RIGHT direction buttons to scroll through the images on Your Camera 1) Select your Photo: Once in Photo Capture mode by default. Press the MODE button twice to view by using the Thumbnail View. If there are no images stored, a message (No File) appears. Use the UP / DOWN / LEFT / RIGHT direction buttons to enlarge the selected image full size. 31 All the images on the LCD screen. Use the...

(version 1) Camera Manual
Page 50
... the SET button to begin. You will be completely formatted. If you manually change the setting or restore the camera‟s default factory settings. The memory card will be saved by your camera until you would like to delete individual images, use the Format Memory Card menu to delete all of the content on your camera‟s memory card. Format Memory Card Menu You can use the delete menu in mind that formatting the memory card will permanently delete all of the content at one time. This...
... the SET button to begin. You will be completely formatted. If you manually change the setting or restore the camera‟s default factory settings. The memory card will be saved by your camera until you would like to delete individual images, use the Format Memory Card menu to delete all of the content on your camera‟s memory card. Format Memory Card Menu You can use the delete menu in mind that formatting the memory card will permanently delete all of the content at one time. This...

(version 1) Camera Manual
Page 52
... the LCD screen. 2) Play your camera‟s memory card until you find the video you wish to view by using the Thumbnail View. Playing Videos on Your Camera 1) Select your Video: Once in Playback mode, press the LEFT or RIGHT direction buttons to scroll through the images on your selected video: Press the Shutter button to START playing the video. Press the Shutter button again to PAUSE the video and to continue playing and pausing as needed. ...
... the LCD screen. 2) Play your camera‟s memory card until you find the video you wish to view by using the Thumbnail View. Playing Videos on Your Camera 1) Select your Video: Once in Playback mode, press the LEFT or RIGHT direction buttons to scroll through the images on your selected video: Press the Shutter button to START playing the video. Press the Shutter button again to PAUSE the video and to continue playing and pausing as needed. ...

(version 1) Camera Manual
Page 53
Video Playback Mode Quick Function Buttons Your digital camera has a four-directional pad that functions as Quick Function buttons. Quick Function Button Function Left Displays the PREVIOUS image Up Right Down STOPS a playing video Displays the NEXT image ViviLink - 3) Press the SET button to enlarge the image full size. 4) Once the selected video is full size you can play and view the video. Opens the ViviLink for Videos menu Other Shutter W/Zoom out SET PLAYS and PAUSES a playing video Opens Thumbnail View To Navigate in the Thumbnail View: press the UP / DOWN / LEFT / ...
Video Playback Mode Quick Function Buttons Your digital camera has a four-directional pad that functions as Quick Function buttons. Quick Function Button Function Left Displays the PREVIOUS image Up Right Down STOPS a playing video Displays the NEXT image ViviLink - 3) Press the SET button to enlarge the image full size. 4) Once the selected video is full size you can play and view the video. Opens the ViviLink for Videos menu Other Shutter W/Zoom out SET PLAYS and PAUSES a playing video Opens Thumbnail View To Navigate in the Thumbnail View: press the UP / DOWN / LEFT / ...
(version 1) Camera Manual
Page 58
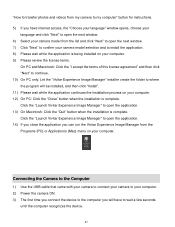
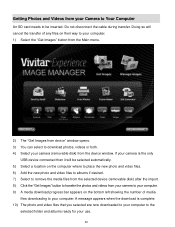
... "Vivitar Experience Image Manager" installer create the folder to where the program will have internet access, the "Choose your language" window opens, choose your language and click "Next" to open the next window. 6) Select your camera model from the Programs (PC) or Applications (Mac) menu on your computer. Connecting the Camera to the Computer 1) Use the USB cable that came with your camera to connect your camera to your computer. 2) Power the camera ON...
... "Vivitar Experience Image Manager" installer create the folder to where the program will have internet access, the "Choose your language" window opens, choose your language and click "Next" to open the next window. 6) Select your camera model from the Programs (PC) or Applications (Mac) menu on your computer. Connecting the Camera to the Computer 1) Use the USB cable that came with your camera to connect your camera to your computer. 2) Power the camera ON...
(version 1) Camera Manual
Page 59
... Images from device" window opens. 3) You can select to download photos, videos or both. 4) Select your camera (removable disk) from your Camera to Your Computer An SD card needs to the selected folder and albums ready for your computer. Do not disconnect the cable during transfer. A message appears when the download is the only USB device connected then it will cancel the transfer of media files downloading to your use. 58 Getting Photos and Videos...
... Images from device" window opens. 3) You can select to download photos, videos or both. 4) Select your camera (removable disk) from your Camera to Your Computer An SD card needs to the selected folder and albums ready for your computer. Do not disconnect the cable during transfer. A message appears when the download is the only USB device connected then it will cancel the transfer of media files downloading to your use. 58 Getting Photos and Videos...
(version 1) Camera Manual
Page 63
... manuals, software and FAQ‟s at the website. You can be uploaded quickly before you are not stored in the camera‟s memory. E-mail us at www.vivitar.com. Troubleshooting Q: I get a message that I don't lose important pictures? With test photos if the camera powers off before the camera powers off nothing will answer your local toll free number. This camera requires an SD card for your questions. The images were also deleted...
... manuals, software and FAQ‟s at the website. You can be uploaded quickly before you are not stored in the camera‟s memory. E-mail us at www.vivitar.com. Troubleshooting Q: I get a message that I don't lose important pictures? With test photos if the camera powers off before the camera powers off nothing will answer your local toll free number. This camera requires an SD card for your questions. The images were also deleted...


