Camera Manual
Page 2
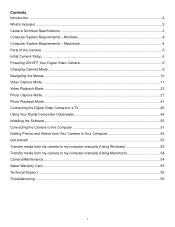
...4 Parts of the Camera ...5 Initial Camera Setup ...6 Powering ON/OFF Your Digital Video Camera 9 Changing Camera Mode ...9 Navigating the Menus ...10 Video Capture Mode ...11 Video Playback Mode ...23 Photo Capture Mode...27 Photo Playback Mode ...41 Connecting the Digital Video Camera to a TV 46 Using Your Digital Camcorder Underwater 46 Installing the Software...50 Connecting the Camera to the Computer 51 Getting Photos and Videos from Your Camera to Your Computer 52 Get started! ...53 Transfer media from my camera to my computer manually (Using Windows 53 Transfer media from my camera...
...4 Parts of the Camera ...5 Initial Camera Setup ...6 Powering ON/OFF Your Digital Video Camera 9 Changing Camera Mode ...9 Navigating the Menus ...10 Video Capture Mode ...11 Video Playback Mode ...23 Photo Capture Mode...27 Photo Playback Mode ...41 Connecting the Digital Video Camera to a TV 46 Using Your Digital Camcorder Underwater 46 Installing the Software...50 Connecting the Camera to the Computer 51 Getting Photos and Videos from Your Camera to Your Computer 52 Get started! ...53 Transfer media from my camera to my computer manually (Using Windows 53 Transfer media from my camera...

Camera Manual
Page 3
Introduction Thank you need to use . Vivitar makes capturing those special moments as easy as possible. Note: Your digital video camera needs an SD Memory card (up to 32GB) for purchasing this manual carefully first in Lithium Battery (not shown) Note: SDHC Class 4 (or higher) Memory card not included. 2 What‟s Included 1) Digital Video Camera 2) AV Cable 3) USB Cable 4) Vivitar Experience Image Manager Software Installation CD 5) Wrist Strap 6) AC Charger 7) Built-in order to get the...
Introduction Thank you need to use . Vivitar makes capturing those special moments as easy as possible. Note: Your digital video camera needs an SD Memory card (up to 32GB) for purchasing this manual carefully first in Lithium Battery (not shown) Note: SDHC Class 4 (or higher) Memory card not included. 2 What‟s Included 1) Digital Video Camera 2) AV Cable 3) USB Cable 4) Vivitar Experience Image Manager Software Installation CD 5) Wrist Strap 6) AC Charger 7) Built-in order to get the...

Camera Manual
Page 4
Camera Technical Specifications Image Sensor Image Resolution Video Resolution File Format External Memory LCD Display Lens Zoom Exposure White Balance ISO Scene Language Flash Self-Timer Anti-Shake Print Photos Interface System Requirements Battery Working Temperature CMOS Sensor 2592x1944(5M) / 2048x1536(3M) / 1600x1200(2M) / 1280x1024(1M) / 640x480(VGA) 1280X720 (HD), VGA 640X480, QVGA 320X240 JPEG/AVI SDHC Card (up to 32GB) 2.0 Inch TFT f=6.5mm, F3.0 4X Digital Zoom -3.0EV ~ +3.0EV Auto, Daylight, Cloudy, Incandescent , Fluorescent...
Camera Technical Specifications Image Sensor Image Resolution Video Resolution File Format External Memory LCD Display Lens Zoom Exposure White Balance ISO Scene Language Flash Self-Timer Anti-Shake Print Photos Interface System Requirements Battery Working Temperature CMOS Sensor 2592x1944(5M) / 2048x1536(3M) / 1600x1200(2M) / 1280x1024(1M) / 640x480(VGA) 1280X720 (HD), VGA 640X480, QVGA 320X240 JPEG/AVI SDHC Card (up to 32GB) 2.0 Inch TFT f=6.5mm, F3.0 4X Digital Zoom -3.0EV ~ +3.0EV Auto, Daylight, Cloudy, Incandescent , Fluorescent...

Camera Manual
Page 8
... the battery has been fully charged (see the SD icon on the display, please check if the card was inserted properly. Make sure the SD card is not locked (check the lock switch on the side of the power is powered on LCD as shown below: Full battery power Medium battery power Low battery power 2) Installing the SD Memory Card Push the lever to open the SD/USB and AV Cable cover...
... the battery has been fully charged (see the SD icon on the display, please check if the card was inserted properly. Make sure the SD card is not locked (check the lock switch on the side of the power is powered on LCD as shown below: Full battery power Medium battery power Low battery power 2) Installing the SD Memory Card Push the lever to open the SD/USB and AV Cable cover...

Camera Manual
Page 10
... camera will be in Video Capture mode to capture photos with your camera. 3) Playback Mode (for photos and videos) - You will see a "Goodbye" splash screen and then the camera will be set from the Auto Power Off settings menu. The icons that you have been inserted properly into your camera. (SDHC card up to view the photos and videos you can be active. Use this mode to 32GB - Powering ON/OFF Your Digital Video Camera Make sure the batteries...
... camera will be in Video Capture mode to capture photos with your camera. 3) Playback Mode (for photos and videos) - You will see a "Goodbye" splash screen and then the camera will be set from the Auto Power Off settings menu. The icons that you have been inserted properly into your camera. (SDHC card up to view the photos and videos you can be active. Use this mode to 32GB - Powering ON/OFF Your Digital Video Camera Make sure the batteries...

Camera Manual
Page 12
... 11 Opens the menu options for Videos menu Up Right Zooms In Turns on video. 4) Press the Shutter button in the center of the digital video camera to start the video capture. 5) You will see a red blinking red circle at the scene you to capture videos with your selected option in Video Capture Mode use the LCD display to direct your digital video recorder at the top of the LCD indicating that functions as Quick Function buttons. Video Capture Mode Quick Function Buttons Your digital video camera has a four-directional control button that the record is first powered...
... 11 Opens the menu options for Videos menu Up Right Zooms In Turns on video. 4) Press the Shutter button in the center of the digital video camera to start the video capture. 5) You will see a red blinking red circle at the scene you to capture videos with your selected option in Video Capture Mode use the LCD display to direct your digital video recorder at the top of the LCD indicating that functions as Quick Function buttons. Video Capture Mode Quick Function Buttons Your digital video camera has a four-directional control button that the record is first powered...
Camera Manual
Page 14
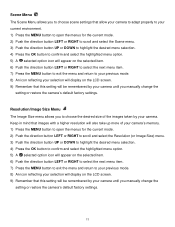
... previous mode. 8) An icon reflecting your selection will display on the LCD screen. 9) Remember that this setting will appear on the selected item. 6) Push the direction button LEFT or RIGHT to select the next menu item. 7) Press the MENU button to exit the menu and return to choose the desired size of the images taken by your camera. Resolution/Image Size Menu The Image Size menu allows you manually change the setting or...
... previous mode. 8) An icon reflecting your selection will display on the LCD screen. 9) Remember that this setting will appear on the selected item. 6) Push the direction button LEFT or RIGHT to select the next menu item. 7) Press the MENU button to exit the menu and return to choose the desired size of the images taken by your camera. Resolution/Image Size Menu The Image Size menu allows you manually change the setting or...

Camera Manual
Page 17
Light Exposure Menu The Light Exposure setting helps you manually change the setting or restore the camera‟s default factory settings. This setting should be remembered by your camera until you control the amount of light that this setting will display on the selected item. 6) Push the direction button LEFT or RIGHT to select the next menu item. 7) Press the MENU button to exit the menu and return to your previous mode. 16 count) to...
Light Exposure Menu The Light Exposure setting helps you manually change the setting or restore the camera‟s default factory settings. This setting should be remembered by your camera until you control the amount of light that this setting will display on the selected item. 6) Push the direction button LEFT or RIGHT to select the next menu item. 7) Press the MENU button to exit the menu and return to your previous mode. 16 count) to...
Camera Manual
Page 23
... the OK button to view your captured images on your camera or to reset your camera settings to the Factory Default Settings. 1) Press the MENU button to open the menus for further information on how to connect your digital video camera to begin. NTSC - television and video standard used in Europe 1) Press the MENU button to open the menus for you to select the TV option appropriate for the current mode. 2) Push the direction button LEFT...
... the OK button to view your captured images on your camera or to reset your camera settings to the Factory Default Settings. 1) Press the MENU button to open the menus for further information on how to connect your digital video camera to begin. NTSC - television and video standard used in Europe 1) Press the MENU button to open the menus for you to select the TV option appropriate for the current mode. 2) Push the direction button LEFT...

Camera Manual
Page 25
... to scroll and select the image you wish to enlarge the selected image full size. 5) Once the selected video is full size you can play and view the video. 1) Press the DOWN/Zoom Out button 2) All the images on the bottom left of the thumbnail. 4) Press the OK button to view. Exits the menu screen Toggles between the Video Capture Mode, Photo Capture Mode, and Playback Mode 24 Video Playback Mode Quick Function Buttons Your digital video camera has a four-directional direction control button that functions as Quick Function buttons.
... to scroll and select the image you wish to enlarge the selected image full size. 5) Once the selected video is full size you can play and view the video. 1) Press the DOWN/Zoom Out button 2) All the images on the bottom left of the thumbnail. 4) Press the OK button to view. Exits the menu screen Toggles between the Video Capture Mode, Photo Capture Mode, and Playback Mode 24 Video Playback Mode Quick Function Buttons Your digital video camera has a four-directional direction control button that functions as Quick Function buttons.

Camera Manual
Page 26
... Delete quick function button. 1) View the image you would like to delete. 2) Press the MENU button to open the menus for the current mode. 3) Push the direction button LEFT or RIGHT to scroll and select the Delete menu. 4) Push the direction button UP or DOWN to scroll through the Delete menu. ViviLink Menu The ViviLink technology allows you to quickly and easily upload your camera‟s photos and videos to the social networks of your digital video camera...
... Delete quick function button. 1) View the image you would like to delete. 2) Press the MENU button to open the menus for the current mode. 3) Push the direction button LEFT or RIGHT to scroll and select the Delete menu. 4) Push the direction button UP or DOWN to scroll through the Delete menu. ViviLink Menu The ViviLink technology allows you to quickly and easily upload your camera‟s photos and videos to the social networks of your digital video camera...

Camera Manual
Page 28
... Out buttons to better set the camera display 3) Press the RIGHT/LED ON-OFF button to turn the LED light On to better illuminate the area you would like to capture. 4) Press the Shutter button in Photo Capture mode, use the LCD display on and off the LED light Zooms out Other Shutter/OK Captures your photo 27 Photo Capture Mode Quick Function Buttons Your digital video camera has a four-directional direction control button that functions as Quick Function buttons. Photo Capture Mode The Photo Capture mode allows you would like to open the Photo Capture Mode. Taking a Picture...
... Out buttons to better set the camera display 3) Press the RIGHT/LED ON-OFF button to turn the LED light On to better illuminate the area you would like to capture. 4) Press the Shutter button in Photo Capture mode, use the LCD display on and off the LED light Zooms out Other Shutter/OK Captures your photo 27 Photo Capture Mode Quick Function Buttons Your digital video camera has a four-directional direction control button that functions as Quick Function buttons. Photo Capture Mode The Photo Capture mode allows you would like to open the Photo Capture Mode. Taking a Picture...

Camera Manual
Page 31
... direction button LEFT or RIGHT to select the next menu item. 7) Press the MENU button to exit the menu and return to your previous mode. 8) An icon reflecting your selection will display on the LCD screen. 9) Remember that this setting will be remembered by your camera until you manually change the setting or restore the camera‟s default factory settings. 30 Image Resolution Menu The Image Size menu allows you to your previous mode...
... direction button LEFT or RIGHT to select the next menu item. 7) Press the MENU button to exit the menu and return to your previous mode. 8) An icon reflecting your selection will display on the LCD screen. 9) Remember that this setting will be remembered by your camera until you manually change the setting or restore the camera‟s default factory settings. 30 Image Resolution Menu The Image Size menu allows you to your previous mode...

Camera Manual
Page 35
... you control the amount of light that this setting will be adjusted when the environment is lighter or darker than normal. When the environment has more light than is needed , increase the exposure setting (by using the negative - Light Exposure Menu The Light Exposure setting helps you manually change the setting or restore the camera‟s default factory settings. The sharpness level dictates if the edges of light allowed into the lens...
... you control the amount of light that this setting will be adjusted when the environment is lighter or darker than normal. When the environment has more light than is needed , increase the exposure setting (by using the negative - Light Exposure Menu The Light Exposure setting helps you manually change the setting or restore the camera‟s default factory settings. The sharpness level dictates if the edges of light allowed into the lens...

Camera Manual
Page 41
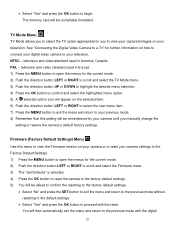
... and video standard used in America, Canada PAL - NTSC - Firmware (Factory Default Settings) Menu Use this menu to view the Firmware version on your camera or to reset your camera settings to the Factory Default Settings. 1) Press the MENU button to open the menus for you manually change the setting or restore the camera‟s default factory settings. See "Connecting the Digital Video Camera to a TV" for the current mode. 2) Push the direction button LEFT or RIGHT to scroll and select the Firmware menu. 3) The "Set...
... and video standard used in America, Canada PAL - NTSC - Firmware (Factory Default Settings) Menu Use this menu to view the Firmware version on your camera or to reset your camera settings to the Factory Default Settings. 1) Press the MENU button to open the menus for you manually change the setting or restore the camera‟s default factory settings. See "Connecting the Digital Video Camera to a TV" for the current mode. 2) Push the direction button LEFT or RIGHT to scroll and select the Firmware menu. 3) The "Set...

Camera Manual
Page 43
Photo Playback Mode Quick Function Buttons Your digital video camera has a four-directional direction control button that functions as Quick Function buttons. Zooms Out of the zoomed in photo Other Shutter/OK Delete MENU MODE Selects Thumbnail image Saves your camera, both videos and photos, will be displayed in a 3 X 3 matrix where you can Zoom In or Zoom Out of the selected photo. Quick Function Button Function Left Displays the PREVIOUS image Up Zooms In to the photo Right Displays the NEXT image Down - Opens Thumbnail view To Navigate in the Thumbnail View: ...
Photo Playback Mode Quick Function Buttons Your digital video camera has a four-directional direction control button that functions as Quick Function buttons. Zooms Out of the zoomed in photo Other Shutter/OK Delete MENU MODE Selects Thumbnail image Saves your camera, both videos and photos, will be displayed in a 3 X 3 matrix where you can Zoom In or Zoom Out of the selected photo. Quick Function Button Function Left Displays the PREVIOUS image Up Zooms In to the photo Right Displays the NEXT image Down - Opens Thumbnail view To Navigate in the Thumbnail View: ...
Camera Manual
Page 47
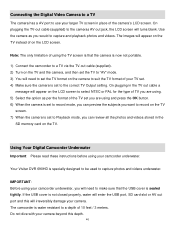
... are using your camcorder underwater. On plugging in the TV out cable a message will appear on the TV instead of the camera‟s LCD screen. Your Vivitar DVR 690HD is now not portable. 1) Connect the camcorder to a TV via the TV-out cable (supplied). 2) Turn on the camera to the cameras AV out jack, the LCD screen will irreversibly damage your camcorder underwater, you want to the correct TV Output setting. Connecting the Digital Video Camera...
... are using your camcorder underwater. On plugging in the TV out cable a message will appear on the TV instead of the camera‟s LCD screen. Your Vivitar DVR 690HD is now not portable. 1) Connect the camcorder to a TV via the TV-out cable (supplied). 2) Turn on the camera to the cameras AV out jack, the LCD screen will irreversibly damage your camcorder underwater, you want to the correct TV Output setting. Connecting the Digital Video Camera...

Camera Manual
Page 49
...; Do not open the USB cover while underwater. Use the camcorder as you get to know how the camcorder works. Read through the camera User Manual to help you normally would to capture photos and videos. 4. Any water in the camcorder will not damage the camcorder or the images captured. Once out of the camcorder. This will eventually dry out by itself . Turn and rest...
...; Do not open the USB cover while underwater. Use the camcorder as you get to know how the camcorder works. Read through the camera User Manual to help you normally would to capture photos and videos. 4. Any water in the camcorder will not damage the camcorder or the images captured. Once out of the camcorder. This will eventually dry out by itself . Turn and rest...

Camera Manual
Page 51
... to transfer photos and videos from the camera. Installing the Software You must be connected to the internet to my computer" button for instructions. 50 If the window does not appear, open . 2) On PC: The Vivitar Experience Image Manager Installer window appears. Note: If you can still download media from my camera to install and run the Vivitar Experience Image Manager software. 1) Insert the installation CD into your CD-ROM drive. The installation screen should automatically open the...
... to transfer photos and videos from the camera. Installing the Software You must be connected to the internet to my computer" button for instructions. 50 If the window does not appear, open . 2) On PC: The Vivitar Experience Image Manager Installer window appears. Note: If you can still download media from my camera to install and run the Vivitar Experience Image Manager software. 1) Insert the installation CD into your CD-ROM drive. The installation screen should automatically open the...

Camera Manual
Page 55
... your digital video camera with your camera to connect your camera to your computer. 2) MSDC appear on the LCD. 3) The camera‟s device icon appears on the desktop. 4) Click on their way to your digital video camera to view the media files. 5) Select the files and drag them into the Movies folder. 7) Do not disconnect the cable during transfer. Do not use you copy the images into the Pictures folder and the videos into...
... your digital video camera with your camera to connect your camera to your computer. 2) MSDC appear on the LCD. 3) The camera‟s device icon appears on the desktop. 4) Click on their way to your digital video camera to view the media files. 5) Select the files and drag them into the Movies folder. 7) Do not disconnect the cable during transfer. Do not use you copy the images into the Pictures folder and the videos into...


