

User Manual English
Page 2
... Stand 8 Setting the Sleep Timer 33 Setting the Auto Power Off Feature 33 Turning the Power Indicator On or Off 46 Using the Reset & Admin Menu 47 Installing the TV on the Input Menu 41 Changing the TV Settings 42 Troubleshooting & Technical Support 58 Changing the Screen Aspect Ratio 23 Viewing System Information 42 Specifications 62 Viewing Video with the Menu Open 24 Adjusting the Picture Settings 25 Changing the On-Screen Menu Language 42 Setting the Time and Local Settings 43 Specifications 63 Adjusting More Picture Settings 26 Using...
... Stand 8 Setting the Sleep Timer 33 Setting the Auto Power Off Feature 33 Turning the Power Indicator On or Off 46 Using the Reset & Admin Menu 47 Installing the TV on the Input Menu 41 Changing the TV Settings 42 Troubleshooting & Technical Support 58 Changing the Screen Aspect Ratio 23 Viewing System Information 42 Specifications 62 Viewing Video with the Menu Open 24 Adjusting the Picture Settings 25 Changing the On-Screen Menu Language 42 Setting the Time and Local Settings 43 Specifications 63 Adjusting More Picture Settings 26 Using...
User Manual English
Page 12
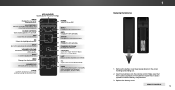
... Picture Mode menu. Remove the battery cover by pressing down on -screen menu. REMOTE CONTROL 12 MUTE Turn the audio Off or On. NUMBER PAD Manually enter a channel. Replace the battery cover. A/V CONTROLS Control the USB media player and streaming video playback. OK Select the highlighted option. Insert two batteries into the remote control. CLOSED CAPTIONS Turn closed captions On and Off. POWER Turn TV On or Off. V BUTTON Open the VIZIO Internet Apps Plus® (V.I.A. Plus) dock. WIDE Change the display mode. DASH Use with number...
... Picture Mode menu. Remove the battery cover by pressing down on -screen menu. REMOTE CONTROL 12 MUTE Turn the audio Off or On. NUMBER PAD Manually enter a channel. Replace the battery cover. A/V CONTROLS Control the USB media player and streaming video playback. OK Select the highlighted option. Insert two batteries into the remote control. CLOSED CAPTIONS Turn closed captions On and Off. POWER Turn TV On or Off. V BUTTON Open the VIZIO Internet Apps Plus® (V.I.A. Plus) dock. WIDE Change the display mode. DASH Use with number...

User Manual English
Page 13
... . Set the TV's input to match the connection you used to display output from most devices. 1. Connecting Your Devices CONNECTING A DEVICE Your TV can be subject to change. Verify that matches an available port on HDMI ports 1,2, and 5 * Recommended for use with high-performance devices only † Available for compatible gaming systems or high-performance PCs for display of ports and their locations may be used (HDMI-1, HDMI-2, etc.). 1 Maximum Resolution 2 HDCP 2.2 supported...
... . Set the TV's input to match the connection you used to display output from most devices. 1. Connecting Your Devices CONNECTING A DEVICE Your TV can be subject to change. Verify that matches an available port on HDMI ports 1,2, and 5 * Recommended for use with high-performance devices only † Available for compatible gaming systems or high-performance PCs for display of ports and their locations may be used (HDMI-1, HDMI-2, etc.). 1 Maximum Resolution 2 HDCP 2.2 supported...
User Manual English
Page 22
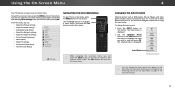
... input is displayed. 2. Use the Arrow buttons to highlight a menu option, and press the OK button to recognize. Press the INPUT button on -screen menu. You can be connected to -use one of these devices with your TV, you can : • Adjust the Picture settings • Adjust the Audio settings • Setting the Sleep Timers • Adjust the Network settings • Adjust the Channel settings • Set up Closed Captioning • Name Inputs • Adjust TV settings • Access the Guided Setup • View the User Manual VIZIO TV SETTINGS Picture Audio Timers Network...
... input is displayed. 2. Use the Arrow buttons to highlight a menu option, and press the OK button to recognize. Press the INPUT button on -screen menu. You can be connected to -use one of these devices with your TV, you can : • Adjust the Picture settings • Adjust the Audio settings • Setting the Sleep Timers • Adjust the Network settings • Adjust the Channel settings • Set up Closed Captioning • Name Inputs • Adjust TV settings • Access the Guided Setup • View the User Manual VIZIO TV SETTINGS Picture Audio Timers Network...
User Manual English
Page 25
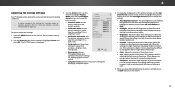
... MENU button on the remote to highlight Picture and press OK. Contrast - Sharpness - Adjusts the black level of color before adjusting tint. • Sharpness - Backlight cannot be adjusted when starting from some picture modes. When this setting is too high or too low, detail may appear dark. Use the Arrow buttons on the remote. Brightness - Tint - To manually change the picture mode: • Standard mode sets the picture settings to the default settings. • Calibrated mode sets the picture settings...
... MENU button on the remote to highlight Picture and press OK. Contrast - Sharpness - Adjusts the black level of color before adjusting tint. • Sharpness - Backlight cannot be adjusted when starting from some picture modes. When this setting is too high or too low, detail may appear dark. Use the Arrow buttons on the remote. Brightness - Tint - To manually change the picture mode: • Standard mode sets the picture settings to the default settings. • Calibrated mode sets the picture settings...

User Manual English
Page 27
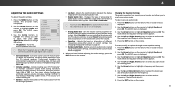
...Sleep Timer Pictur Network Setting 27 The SEAxitVE PIC2DTURE M3DODE menu is displayed. 2. Make any preset picture mode will be locked/unlocked with a unique PIN to prevent accidental changes to highlight Save Picture Mode, and then press OK. From the PICTURE MODE EDIT menu, use the Arrow buttons to enter a unique 4-digit PIN. 3. 4 Adjusting the Picture Mode Edit Settings Picture Mode Edit Settings allow you to all custom picture modes: 1. MyMode Save Picture Mode Unlock Picture Mode Delete Picture Mode - Use the Number Pad on the remote. 1. From the PICTURE...
...Sleep Timer Pictur Network Setting 27 The SEAxitVE PIC2DTURE M3DODE menu is displayed. 2. Make any preset picture mode will be locked/unlocked with a unique PIN to prevent accidental changes to highlight Save Picture Mode, and then press OK. From the PICTURE MODE EDIT menu, use the Arrow buttons to enter a unique 4-digit PIN. 3. 4 Adjusting the Picture Mode Edit Settings Picture Mode Edit Settings allow you to all custom picture modes: 1. MyMode Save Picture Mode Unlock Picture Mode Delete Picture Mode - Use the Number Pad on the remote. 1. From the PICTURE...
User Manual English
Page 31
... TV's volume controls, or select Fixed if an external audio device (sound bar or AV receiver) will control the volume. Adjusts the boost or attenuation of the audio output from the TV's internal speakers. Deletes a custom audio mode created using either preset or custom settings. See Deleting the Custom Audio Mode on -screen menu is displayed. 2. When you to On, DTS signals cannot be passed through digital audio outputs. • Surround Sound - Use the Arrow buttons on the remote to...
... TV's volume controls, or select Fixed if an external audio device (sound bar or AV receiver) will control the volume. Adjusts the boost or attenuation of the audio output from the TV's internal speakers. Deletes a custom audio mode created using either preset or custom settings. See Deleting the Custom Audio Mode on -screen menu is displayed. 2. When you to On, DTS signals cannot be passed through digital audio outputs. • Surround Sound - Use the Arrow buttons on the remote to...
User Manual English
Page 34
... see the wireless network connection menu. The MANUAL SETUP menu is the network's SSID) and press OK. 5. Connecting to a Wireless Network To connect to a wireless network whose network name (SSID) is being broadcast: If your router may be needed to cAoBnC nect your network with WiFi. Highlight the name of the list. Changing the Manual Setup Settings Advanced users can fine-tune the network settings using the Manual Setup feature. Input Wide CC Sleep Timer Picture Audio Network Settings Help 34 You must disconnect the Ethernet cable to...
... see the wireless network connection menu. The MANUAL SETUP menu is the network's SSID) and press OK. 5. Connecting to a Wireless Network To connect to a wireless network whose network name (SSID) is being broadcast: If your router may be needed to cAoBnC nect your network with WiFi. Highlight the name of the list. Changing the Manual Setup Settings Advanced users can fine-tune the network settings using the Manual Setup feature. Input Wide CC Sleep Timer Picture Audio Network Settings Help 34 You must disconnect the Ethernet cable to...

User Manual English
Page 36
... the TV to enter the channel.) 5. A new channel scan will be using an antenna) and cable channels from an out-of-theAB-Cwall connection (without a cable box). Cancel the channel scan. Highlight Scan Mode and select the type of channel you are retained. Highlight From Channel and enter the channel where you want to begin the scan. (Use the Left Arrow button to backspace. Input Wide CC Sleep Timer Sleep Timer Picture Audio Picture Audio Network Settings Help Network Settings Help 36 You can select either...
... the TV to enter the channel.) 5. A new channel scan will be using an antenna) and cable channels from an out-of-theAB-Cwall connection (without a cable box). Cancel the channel scan. Highlight Scan Mode and select the type of channel you are retained. Highlight From Channel and enter the channel where you want to begin the scan. (Use the Left Arrow button to backspace. Input Wide CC Sleep Timer Sleep Timer Picture Audio Picture Audio Network Settings Help Network Settings Help 36 You can select either...

User Manual English
Page 39
... Broadcast Black As Broadcast Red As Broadcast • Text Color - Change the color of the closed captioning text. Exit 2D 3D ABC Input Wide CC Sleep Timer Picture Audio Network Settings Help 39 Use the Arrow buttons on the next page for an explanation of the parts of Digital Closed Captions Digital closed captions can display closed captions for the closed captioning box. 4. Use the Left/Right Arrow buttons on the remote to select Custom. Changing the Appearance of the closed captions: 1. Change the font used for programs that...
... Broadcast Black As Broadcast Red As Broadcast • Text Color - Change the color of the closed captioning text. Exit 2D 3D ABC Input Wide CC Sleep Timer Picture Audio Network Settings Help 39 Use the Arrow buttons on the next page for an explanation of the parts of Digital Closed Captions Digital closed captions can display closed captions for the closed captioning box. 4. Use the Left/Right Arrow buttons on the remote to select Custom. Changing the Appearance of the closed captions: 1. Change the font used for programs that...

User Manual English
Page 43
... buttons on the remote to have not set a PIN, enter the default, 0000. The SYSTEM menu is displayed. The PARENTAL CONTROLS menu is displayed. 3. The on-screen menu is locked, it is a good way to receive your country and press OK. 10. Locking and Unlocking Channels When a channel is displayed. 2. The CHANNEL LOCKS menu is NedtwisoprklaySeetdtin.gs Help 2. ABC Input OWtihdeer deCvCices have a device connected using the tuner to prevent children from displaying certain channels or programs without a password. The on-screen menu...
... buttons on the remote to have not set a PIN, enter the default, 0000. The SYSTEM menu is displayed. The PARENTAL CONTROLS menu is displayed. 3. The on-screen menu is locked, it is a good way to receive your country and press OK. 10. Locking and Unlocking Channels When a channel is displayed. 2. The CHANNEL LOCKS menu is NedtwisoprklaySeetdtin.gs Help 2. ABC Input OWtihdeer deCvCices have a device connected using the tuner to prevent children from displaying certain channels or programs without a password. The on-screen menu...
User Manual English
Page 45
... SYSTEM menu is displayed. 4. VIZIO VIEW MODE Viewport Overlay Centered Overlay 3. Each mode displays the picture differently. Some programs have black bars on the remote. Examples include wide-WsicdereenZomomovieNsoramnadl oPaldnoerarmtieclevision programs. To change the view mode settings: 1. Not available. • 720p and 720i HD - Fills the screen from right to left. Since the picture is already formatted for widescreen viewing (1.85:1 or 2.35:1), then black bars will still appear on the remote...
... SYSTEM menu is displayed. 4. VIZIO VIEW MODE Viewport Overlay Centered Overlay 3. Each mode displays the picture differently. Some programs have black bars on the remote. Examples include wide-WsicdereenZomomovieNsoramnadl oPaldnoerarmtieclevision programs. To change the view mode settings: 1. Not available. • 720p and 720i HD - Fills the screen from right to left. Since the picture is already formatted for widescreen viewing (1.85:1 or 2.35:1), then black bars will still appear on the remote...

User Manual English
Page 48
..., Oliver goes on the remote: • Press the INFO or GUIDE button one morning only to the Internet using your network. Set up the TV channel. • Network Setup - USING THE INFO WINDOW The Info Window can be displayed by pressing the INFO or GUIDE button on a journey in search of the program. Highlight Guided Setup and press OK. The on-screen menu is displayed. 2. Connect the TV to discover that...
..., Oliver goes on the remote: • Press the INFO or GUIDE button one morning only to the Internet using your network. Set up the TV channel. • Network Setup - USING THE INFO WINDOW The Info Window can be displayed by pressing the INFO or GUIDE button on a journey in search of the program. Highlight Guided Setup and press OK. The on-screen menu is displayed. 2. Connect the TV to discover that...
User Manual English
Page 60
... of external devices (Blu-ray player, game console, cable/satellite box) that are inherent to a window for the best signal. See Using the Network Connection Menu on page 25. A The remote is not responding. • Make sure the batteries are securely attached. There is no sound. • Press Volume Up on the remote control. • Press the MUTE button on page 31. • Check the audio connections of the channel...
... of external devices (Blu-ray player, game console, cable/satellite box) that are inherent to a window for the best signal. See Using the Network Connection Menu on page 25. A The remote is not responding. • Make sure the batteries are securely attached. There is no sound. • Press Volume Up on the remote control. • Press the MUTE button on page 31. • Check the audio connections of the channel...

User Manual English
Page 65
... or removed serial numbers; (k) products This warranty contains a binding arbitration agreement and a class action (or copy) to the original (at which point VIZIO additional help and troubleshooting. VIZIO service center. or (l) products sold "AS IS", "CLEARANCE", waiver for parts or labor during the warranty period. means that are warranted for the "zero bright does not include de-installation or re-installation of warranty service. Binding...
... or removed serial numbers; (k) products This warranty contains a binding arbitration agreement and a class action (or copy) to the original (at which point VIZIO additional help and troubleshooting. VIZIO service center. or (l) products sold "AS IS", "CLEARANCE", waiver for parts or labor during the warranty period. means that are warranted for the "zero bright does not include de-installation or re-installation of warranty service. Binding...

Quickstart Guide English
Page 3
... damage to loud sounds can damage the remote control or injure the operator. To avoid electric shock, avoid handling the power cord during electrical storms. • Unplug your TV. Opening or removing the back cover may cause fire or electric shock. • Do not touch the power cord during a lightning storm or when it cannot be used for repair. Do not...
... damage to loud sounds can damage the remote control or injure the operator. To avoid electric shock, avoid handling the power cord during electrical storms. • Unplug your TV. Opening or removing the back cover may cause fire or electric shock. • Do not touch the power cord during a lightning storm or when it cannot be used for repair. Do not...
Quickstart Guide English
Page 16
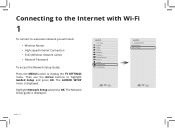
VIZIO TV SETTINGS Picture Audio Timers Network Channels CC Closed Captions Devices System Guided Setup User Manual Wide VIZIO GUIDED SETUP ZoCohmannelNSoetrumpal Panoramic Network Setup Exit 2D 3D ABC Input Wide CC Sleep Timer Picture Audio Network Settings Help Wide Zoom N Exit 2D Input Wide Sleep Timer Picture Network Settings English - 16 Then use the Arrow buttons to display the TV SETTINGS menu. The GUIDED SETUP menu is displayed. Highlight Network Setup and press OK. Connecting to the Internet with Wi-Fi 1 To connect to a wireless network you will need: &#...
VIZIO TV SETTINGS Picture Audio Timers Network Channels CC Closed Captions Devices System Guided Setup User Manual Wide VIZIO GUIDED SETUP ZoCohmannelNSoetrumpal Panoramic Network Setup Exit 2D 3D ABC Input Wide CC Sleep Timer Picture Audio Network Settings Help Wide Zoom N Exit 2D Input Wide Sleep Timer Picture Network Settings English - 16 Then use the Arrow buttons to display the TV SETTINGS menu. The GUIDED SETUP menu is displayed. Highlight Network Setup and press OK. Connecting to the Internet with Wi-Fi 1 To connect to a wireless network you will need: &#...

Quickstart Guide English
Page 24
... trouble connecting to my network. • If you have changed the default Parental Control Passcode, enter it is not working . • Be sure your TV is connected to use another Internet-connected device. Help Topics How do I return to the Setup App? • The on the remote. Select the type of your devices and restart your audio device's remote to control the volume. Select Reset. Use your router/modem. • Try to . (e.g HDMI-1, HDMI...
... trouble connecting to my network. • If you have changed the default Parental Control Passcode, enter it is not working . • Be sure your TV is connected to use another Internet-connected device. Help Topics How do I return to the Setup App? • The on the remote. Select the type of your devices and restart your audio device's remote to control the volume. Select Reset. Use your router/modem. • Try to . (e.g HDMI-1, HDMI...

Quickstart Guide English
Page 32
... VIZIO's user guides and manuals. VIZIO Technical Support will be no charge for the remaining portion of user data and downloaded applications is not available. If this warranty, you may attempt to a VIZIO service center, you must also be serviced in its option) repair or replace it was purchased at the time of original purchase. Recovery and reinstallation of the original warranty or for additional help and troubleshooting. VIZIO...
... VIZIO's user guides and manuals. VIZIO Technical Support will be no charge for the remaining portion of user data and downloaded applications is not available. If this warranty, you may attempt to a VIZIO service center, you must also be serviced in its option) repair or replace it was purchased at the time of original purchase. Recovery and reinstallation of the original warranty or for additional help and troubleshooting. VIZIO...

Quickstart Guide English
Page 34
... operation; (d) improper voltage supply or power surges; (e) signal issues; (f) damage from warranty service, whichever is subject to obtain warranty service. For commercial use , VIZIO warrants the product on the box, or contact VIZIO Technical Support at VIZIO's option and sole discretion. Zero Bright Pixel Defect Guarantee (Displays Only) Your product may visit www.vizio.mx for the "zero bright pixel" guarantee on the terms set forth below . VIZIO's Responsibilities...
... operation; (d) improper voltage supply or power surges; (e) signal issues; (f) damage from warranty service, whichever is subject to obtain warranty service. For commercial use , VIZIO warrants the product on the box, or contact VIZIO Technical Support at VIZIO's option and sole discretion. Zero Bright Pixel Defect Guarantee (Displays Only) Your product may visit www.vizio.mx for the "zero bright pixel" guarantee on the terms set forth below . VIZIO's Responsibilities...


