

User Manual English
Page 2
...Your TV 7 Deleting the Custom Audio Mode 32 Changing the DLNA Name of Digital Closed Captions 39 Deleting an App from the TV 49 Using VIZIO Internet Apps Plus® (V.I .A. Apps Window 54 Fullscreen V.I .A. Audio Cable Types 16 Connecting an Audio Device - Audio & Video Cable ...Types 14 Connecting an Audio Device 15 Connecting An Audio Device - ARC 17 Connecting to Your Network 18 Changing the Manual Setup Settings 34 Finding MAC Addresses for Network Setup 34 Connecting to a Hidden Network 35 Setting Up Channels 36 Selecting a Channel Source ...
...Your TV 7 Deleting the Custom Audio Mode 32 Changing the DLNA Name of Digital Closed Captions 39 Deleting an App from the TV 49 Using VIZIO Internet Apps Plus® (V.I .A. Apps Window 54 Fullscreen V.I .A. Audio Cable Types 16 Connecting an Audio Device - Audio & Video Cable ...Types 14 Connecting an Audio Device 15 Connecting An Audio Device - ARC 17 Connecting to Your Network 18 Changing the Manual Setup Settings 34 Finding MAC Addresses for Network Setup 34 Connecting to a Hidden Network 35 Setting Up Channels 36 Selecting a Channel Source ...

User Manual English
Page 3
To get the most out of your new VIZIO product, read these openings are no missing or damaged parts. PRODUCT REGISTRATION To purchase or inquire about accessories and installation services for future reference. WHEN READING THIS MANUAL When you see this symbol, please read the accompanying helpful tip. ..., does not operate normally, or has been dropped. • Unplug the power cord before turning on your TV to alert you register your VIZIO product at (877) 698-4946. Misuse may result in accordance with dry cloth. • Do not block any ventilation openings. Install in ...
To get the most out of your new VIZIO product, read these openings are no missing or damaged parts. PRODUCT REGISTRATION To purchase or inquire about accessories and installation services for future reference. WHEN READING THIS MANUAL When you see this symbol, please read the accompanying helpful tip. ..., does not operate normally, or has been dropped. • Unplug the power cord before turning on your TV to alert you register your VIZIO product at (877) 698-4946. Misuse may result in accordance with dry cloth. • Do not block any ventilation openings. Install in ...
User Manual English
Page 12
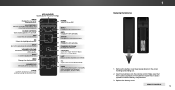
...Close the on -screen menu. BACK Go to the channel last viewed. NUMBER PAD Manually enter a channel. POWER Turn TV On or Off. MENU Display the on -screen menu. V BUTTON Open the VIZIO Internet Apps Plus® (V.I.A. Insert two batteries into the remote control. INPUT Change ...CONTROL 12 LAST Return to the previous on the batteries match the (+) and (-) symbols inside the battery compartment. 3. DASH Use with number pad to manually enter a digital sub-channel. (For example, 18-4 or 18-5.) 1 Replacing the Batteries 1. Remove the battery cover by pressing down on -screen ...
...Close the on -screen menu. BACK Go to the channel last viewed. NUMBER PAD Manually enter a channel. POWER Turn TV On or Off. MENU Display the on -screen menu. V BUTTON Open the VIZIO Internet Apps Plus® (V.I.A. Insert two batteries into the remote control. INPUT Change ...CONTROL 12 LAST Return to the previous on the batteries match the (+) and (-) symbols inside the battery compartment. 3. DASH Use with number pad to manually enter a digital sub-channel. (For example, 18-4 or 18-5.) 1 Replacing the Batteries 1. Remove the battery cover by pressing down on -screen ...
User Manual English
Page 22
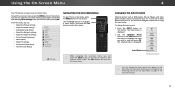
... Captioning • Name Inputs • Adjust TV settings • Access the Guided Setup • View the User Manual VIZIO TV SETTINGS Picture Audio Timers Network Channels CC Closed Captions Devices System Guided Setup User Manual NAVIGATING THE ON-SCREEN MENU To open the on the Input menu to make your devices easy to...
... Captioning • Name Inputs • Adjust TV settings • Access the Guided Setup • View the User Manual VIZIO TV SETTINGS Picture Audio Timers Network Channels CC Closed Captions Devices System Guided Setup User Manual NAVIGATING THE ON-SCREEN MENU To open the on the Input menu to make your devices easy to...
User Manual English
Page 25
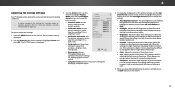
Use the Arrow buttons on the remote. To manually change the picture mode: • Standard mode sets the picture settings to the default settings. • Calibrated mode sets the picture settings to values ideal ... on the remote to highlight Picture Mode, then use the Left/Right Arrow buttons to adjust the WsideettingZo:om Normal Panoramic • Auto Brightness Control - VIZIO PICTURE Picture Mode Auto Brightness Control Backlight - Sharpness - More Picture Picture Mode Edit Color Calibration Standard Medium + 85 + 50 + 50 + 59 +0 +9 • Vivid mode sets...
Use the Arrow buttons on the remote. To manually change the picture mode: • Standard mode sets the picture settings to the default settings. • Calibrated mode sets the picture settings to values ideal ... on the remote to highlight Picture Mode, then use the Left/Right Arrow buttons to adjust the WsideettingZo:om Normal Panoramic • Auto Brightness Control - VIZIO PICTURE Picture Mode Auto Brightness Control Backlight - Sharpness - More Picture Picture Mode Edit Color Calibration Standard Medium + 85 + 50 + 50 + 59 +0 +9 • Vivid mode sets...

User Manual English
Page 29
... patterns allow you are finished, press the OK button to save the setting. 4. 4 Adjusting the Color Tuner Settings The Color Tuner settings allow technicians to manually calibrate the TV. The Color Tuner menu is displayed.
... patterns allow you are finished, press the OK button to save the setting. 4. 4 Adjusting the Color Tuner Settings The Color Tuner settings allow technicians to manually calibrate the TV. The Color Tuner menu is displayed.
User Manual English
Page 34
... address in high-speed Wireless-N. Highlight the name of available wireless networks, is displayed. 4. VIZIO NETWORK Wired Connection Disconnected Wireless Access Points More Access Points WPS Manual Setup Hidden Network Test Connection 6. From the NETWORK menu, highlight Manual Setup and VIZIO press OK. DNS Server RJ45 MAC 0:0:0:0:0:0 Wireless MAC 0:0:0:0:0:0 Save Cancel • Default Gateway...
... address in high-speed Wireless-N. Highlight the name of available wireless networks, is displayed. 4. VIZIO NETWORK Wired Connection Disconnected Wireless Access Points More Access Points WPS Manual Setup Hidden Network Test Connection 6. From the NETWORK menu, highlight Manual Setup and VIZIO press OK. DNS Server RJ45 MAC 0:0:0:0:0:0 Wireless MAC 0:0:0:0:0:0 Save Cancel • Default Gateway...

User Manual English
Page 36
... • Select a Channel Source • Find Channels • Perform a Partial Channel Scan • Manually Add Channels • Select channels to skip VIZIO CHANNELS Channels not searched Channel Source Find Channel Partial Channel Search Add Analog Channel Skip Channel Analog Audio Digital ... 100% complete. Highlight Done and press OK. 7. IPnpruetss thWeideEXIT ACbBCuC tton on the remote. CC To perform an Auto Channel Scan: VIZIO 1. To add a range of -the-wall) connections. 1. EWxitait un2tDil the p3ADaBCrtial channel search is required for free over-the-air ...
... • Select a Channel Source • Find Channels • Perform a Partial Channel Scan • Manually Add Channels • Select channels to skip VIZIO CHANNELS Channels not searched Channel Source Find Channel Partial Channel Search Add Analog Channel Skip Channel Analog Audio Digital ... 100% complete. Highlight Done and press OK. 7. IPnpruetss thWeideEXIT ACbBCuC tton on the remote. CC To perform an Auto Channel Scan: VIZIO 1. To add a range of -the-wall) connections. 1. EWxitait un2tDil the p3ADaBCrtial channel search is required for free over-the-air ...

User Manual English
Page 39
... your preference. The Closed Captions menu does not appear when an HDMI input is displayed. The CLOSED CAPTIONS menu is selected. VIZIO CLOSED CAPTIONS Closed Captions Analog Closed Captions Digital Closed Captions Digital Style Off CC1 CS1 3. Use the Arrow buttons on the remote...As Broadcast As Broadcast 3. Use the Up/Down Arrow buttons on the remote. Choose As Broadcast to keep default settAinBCgs or Custom to manually change the setting: Text Edges Color Background Color Background Opacity Window Color Window Opacity •Exit Cap2tDion St3yDle - CC • Text ...
... your preference. The Closed Captions menu does not appear when an HDMI input is displayed. The CLOSED CAPTIONS menu is selected. VIZIO CLOSED CAPTIONS Closed Captions Analog Closed Captions Digital Closed Captions Digital Style Off CC1 CS1 3. Use the Arrow buttons on the remote...As Broadcast As Broadcast 3. Use the Up/Down Arrow buttons on the remote. Choose As Broadcast to keep default settAinBCgs or Custom to manually change the setting: Text Edges Color Background Color Background Opacity Window Color Window Opacity •Exit Cap2tDion St3yDle - CC • Text ...
User Manual English
Page 46
... the included remote, without any programming. Use the Arrow buttons on the remote. Use the Arrow buttons on the remote. See your device's user manual for your TV: 1. The on-screen menu is displayed. 6. Select a setting and then press OK. • CEC - You can change ... input. 3. To create a custom name for details. The on-screen menu is displayed. 5Ne. The SYSTEM menu is displayed. The TV NAME menu is displayed. 3. VIZIO TV NAME VIZIOTV_ abc def ghi j k l mn o p q r s t u v wx y z 0 123456789 .@# .cäoêmí Space OK Cancel 4. Use either the on-...
... the included remote, without any programming. Use the Arrow buttons on the remote. Use the Arrow buttons on the remote. See your device's user manual for your TV: 1. The on-screen menu is displayed. 6. Select a setting and then press OK. • CEC - You can change ... input. 3. To create a custom name for details. The on-screen menu is displayed. 5Ne. The SYSTEM menu is displayed. The TV NAME menu is displayed. 3. VIZIO TV NAME VIZIOTV_ abc def ghi j k l mn o p q r s t u v wx y z 0 123456789 .@# .cäoêmí Space OK Cancel 4. Use either the on-...
User Manual English
Page 60
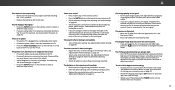
... or on the back of technology. The sound is flat or dialog is not audible. • Turn off . • Check the audio settings. VIZIO recommends selecting Calibrated. • Check all devices are securely attached. The buttons on the remote aren't working • Be sure your devices with HDMI ...connected securely to the TV and move the antenna around the room or close the App, then open the App. • Reboot your device's user manual for the best signal. However, sometimes pixels may be low. The V.I.A. The power is on, but there is no sound. • Press Volume...
... or on the back of technology. The sound is flat or dialog is not audible. • Turn off . • Check the audio settings. VIZIO recommends selecting Calibrated. • Check all devices are securely attached. The buttons on the remote aren't working • Be sure your devices with HDMI ...connected securely to the TV and move the antenna around the room or close the App, then open the App. • Reboot your device's user manual for the best signal. However, sometimes pixels may be low. The V.I.A. The power is on, but there is no sound. • Press Volume...

User Manual English
Page 65
...Before obtaining warranty service, you . In order to resolve the issue informally with VIZIO's user guides VIZIO's Responsibilities UNLESS YOU HAVE BROUGHT AN ELIGIBLE CLAIM IN SMALL CLAIMS and manuals. If VIZIO determines that the product is subject to a attempted by anyone other than by ...the American Arbitration Association, at VIZIO's option and sole WARRANTY, A BREACH OF THIS WARRANTY, OR THE VIZIO PRODUCT'S The product must obtain pre...
...Before obtaining warranty service, you . In order to resolve the issue informally with VIZIO's user guides VIZIO's Responsibilities UNLESS YOU HAVE BROUGHT AN ELIGIBLE CLAIM IN SMALL CLAIMS and manuals. If VIZIO determines that the product is subject to a attempted by anyone other than by ...the American Arbitration Association, at VIZIO's option and sole WARRANTY, A BREACH OF THIS WARRANTY, OR THE VIZIO PRODUCT'S The product must obtain pre...

User Manual English
Page 67
...do so. de R.L. or (l) products sold "AS IS", "CLEARANCE", "FACTORY workmanship when the product is If you must also information, VIZIO recommends that affords wear and tear; (c) improper operation; (d) improper voltage supply set forth below for ninety (90) days from the date of...subject to file a formal be restored to resolve the issue informally with VIZIO's user guides and manuals. warranted for the duration of user data and downloaded applications is used normally in - VIZIO will be required to The warrantor under this occurs, your personal you ...
...do so. de R.L. or (l) products sold "AS IS", "CLEARANCE", "FACTORY workmanship when the product is If you must also information, VIZIO recommends that affords wear and tear; (c) improper operation; (d) improper voltage supply set forth below for ninety (90) days from the date of...subject to file a formal be restored to resolve the issue informally with VIZIO's user guides and manuals. warranted for the duration of user data and downloaded applications is used normally in - VIZIO will be required to The warrantor under this occurs, your personal you ...
User Manual English
Page 69
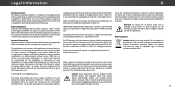
...Manufactured under license. Other names of companies, products, and services used in this Quick Start Guide and the associated User Manual, go to http://www.vizio.com. dis- Do not dispose of the battery in a fire or with magnetic fields may include This Quick Start ..., see http://patents.dts.com. Security devices with ordinary household waste. has made Airport conveyor belts or similar security devices that the VIZIO products, which the products are registered trademarks, and DTS Studio Sound is not responsible for appliances. All product specifications, functionality, features,...
...Manufactured under license. Other names of companies, products, and services used in this Quick Start Guide and the associated User Manual, go to http://www.vizio.com. dis- Do not dispose of the battery in a fire or with magnetic fields may include This Quick Start ..., see http://patents.dts.com. Security devices with ordinary household waste. has made Airport conveyor belts or similar security devices that the VIZIO products, which the products are registered trademarks, and DTS Studio Sound is not responsible for appliances. All product specifications, functionality, features,...

Quickstart Guide English
Page 6
vi Table of contents Package contents 7 This is your remote 8 Inserting and replacing batteries 9 Installing the TV stands 10 First-Time setup 12 Connecting to the Internet with Wi-Fi 16 Getting Started with VIZIO Internet Apps Plus 18 Viewing the on-screen user manual 20 Wall-mounting the TV 21 Connecting an audio device 22 Legal information 29 Regulatory information 30 Limited warranty 32 English -
vi Table of contents Package contents 7 This is your remote 8 Inserting and replacing batteries 9 Installing the TV stands 10 First-Time setup 12 Connecting to the Internet with Wi-Fi 16 Getting Started with VIZIO Internet Apps Plus 18 Viewing the on-screen user manual 20 Wall-mounting the TV 21 Connecting an audio device 22 Legal information 29 Regulatory information 30 Limited warranty 32 English -
Quickstart Guide English
Page 8
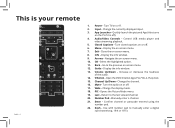
.... 20. Display the info window. 13. Increase or decrease the loudness of the audio. 14. V Button - Open the VIZIO Internet Apps Plus® (V.I.A. Wide - Return to the previous on or off . 6. Number Pad - Manually enter a channel. 21. Enter - Confirm channel or passcode entered using the number pad. 22. Dash - Use with number...
.... 20. Display the info window. 13. Increase or decrease the loudness of the audio. 14. V Button - Open the VIZIO Internet Apps Plus® (V.I.A. Wide - Return to the previous on or off . 6. Number Pad - Manually enter a channel. 21. Enter - Confirm channel or passcode entered using the number pad. 22. Dash - Use with number...
Quickstart Guide English
Page 16
... highlight Guided Setup and press OK. Then use the Arrow buttons to display the TV SETTINGS menu. VIZIO TV SETTINGS Picture Audio Timers Network Channels CC Closed Captions Devices System Guided Setup User Manual Wide VIZIO GUIDED SETUP ZoCohmannelNSoetrumpal Panoramic Network Setup Exit 2D 3D ABC Input Wide CC Sleep Timer Picture Audio...
... highlight Guided Setup and press OK. Then use the Arrow buttons to display the TV SETTINGS menu. VIZIO TV SETTINGS Picture Audio Timers Network Channels CC Closed Captions Devices System Guided Setup User Manual Wide VIZIO GUIDED SETUP ZoCohmannelNSoetrumpal Panoramic Network Setup Exit 2D 3D ABC Input Wide CC Sleep Timer Picture Audio...

Quickstart Guide English
Page 17
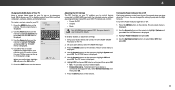
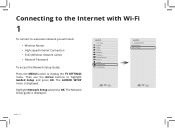
If you are having trouble connecting to your network, check your SSID, you do not see the TV's User Manual. For more information, see your router placement: • Walls and large metal objects can block the signal. • Other devices broadcasting at 2.4 or 5 GHz ...• Furniture blocks signal • Far from TV Wireless Router P • No wall blocks signal • No furniture blocks signal • Close to type it manually by selecting Hidden Network. If you will need to TV English - 17 2 Select the name of your network's password, then highlight Connect and press OK...
If you are having trouble connecting to your network, check your SSID, you do not see the TV's User Manual. For more information, see your router placement: • Walls and large metal objects can block the signal. • Other devices broadcasting at 2.4 or 5 GHz ...• Furniture blocks signal • Far from TV Wireless Router P • No wall blocks signal • No furniture blocks signal • Close to type it manually by selecting Hidden Network. If you will need to TV English - 17 2 Select the name of your network's password, then highlight Connect and press OK...
Quickstart Guide English
Page 20
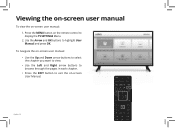
To navigate the on-screen user manual: • Use the Up and Down arrow buttons to select the chapter you want to view. • Use the Left and Right arrow buttons to browse through the pages in each chapter. • Press the EXIT button to display the TV SETTINGS Menu. 2. Viewing the on-screen user manual To view the on -screen User Manual. Press the MENU button on the remote control to exit the on -screen user manual: 1. English - 20 Use the Arrow and OK buttons to highlight User Manual and press OK.
To navigate the on-screen user manual: • Use the Up and Down arrow buttons to select the chapter you want to view. • Use the Left and Right arrow buttons to browse through the pages in each chapter. • Press the EXIT button to display the TV SETTINGS Menu. 2. Viewing the on-screen user manual To view the on -screen User Manual. Press the MENU button on the remote control to exit the on -screen user manual: 1. English - 20 Use the Arrow and OK buttons to highlight User Manual and press OK.

Quickstart Guide English
Page 24
... the remote, then turn on. • Press the MUTE button on . The TV Speakers should be lost. Use your external device. See your device's user manual for help. Press the WIDE button, highlight Wide or Zoom, and press OK. • Adjust the video settings of your devices and restart your TV...
... the remote, then turn on. • Press the MUTE button on . The TV Speakers should be lost. Use your external device. See your device's user manual for help. Press the WIDE button, highlight Wide or Zoom, and press OK. • Adjust the video settings of your devices and restart your TV...

