
User Manual English
Page 8
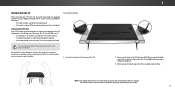
However, the TV can still fall over . Insert the stands into the back of the TV and tighten them using a VESA-standard wall mount (not included) Installing the TV Stand Your TV includes a stand designed to support the weight of the TV and keep it from the box and .... Note: The image shown here is recommended that two people take part in two ways: • On a flat surface, using the included stand • On a wall, using a Phillips screwdriver. 3. Place the TV screen-down on the model. 8 Insert the screws into the base of ports and their locations may be installed...
However, the TV can still fall over . Insert the stands into the back of the TV and tighten them using a VESA-standard wall mount (not included) Installing the TV Stand Your TV includes a stand designed to support the weight of the TV and keep it from the box and .... Note: The image shown here is recommended that two people take part in two ways: • On a flat surface, using the included stand • On a wall, using a Phillips screwdriver. 3. Place the TV screen-down on the model. 8 Insert the screws into the base of ports and their locations may be installed...
User Manual English
Page 9
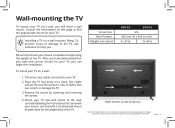
... is clear of this TV. D60-D3 D70-D3 Screw Size: M6 Hole Pattern: 400mm (V) x 400mm (H) Weight w/o Stand: 41.47 lbs M6 400mm (V) x 400mm (H) 56.49 lbs Be sure the mount you have the correct mount for the weight/load of debris that came with right-angle connectors. For some wall mounts, you . This allows the TV...
... is clear of this TV. D60-D3 D70-D3 Screw Size: M6 Hole Pattern: 400mm (V) x 400mm (H) Weight w/o Stand: 41.47 lbs M6 400mm (V) x 400mm (H) 56.49 lbs Be sure the mount you have the correct mount for the weight/load of debris that came with right-angle connectors. For some wall mounts, you . This allows the TV...

Quickstart Guide English
Page 6
Table of contents Package contents 7 This is your remote 8 Inserting and replacing batteries 9 Installing the TV stands 10 First-Time setup 12 Connecting to the Internet with Wi-Fi 16 Getting Started with VIZIO Internet Apps Plus 18 Viewing the on-screen user manual 20 Wall-mounting the TV 21 Connecting an audio device 22 Legal information 29 Regulatory information 30 Limited warranty 32 English - vi
Table of contents Package contents 7 This is your remote 8 Inserting and replacing batteries 9 Installing the TV stands 10 First-Time setup 12 Connecting to the Internet with Wi-Fi 16 Getting Started with VIZIO Internet Apps Plus 18 Viewing the on-screen user manual 20 Wall-mounting the TV 21 Connecting an audio device 22 Legal information 29 Regulatory information 30 Limited warranty 32 English - vi
Quickstart Guide English
Page 21
Screw Size : Hole Pattern : Weight w/o Stand: D60-D3 D70-D3 M6 400 mm (V) x 400 mm (H) 41.47 lb 56.49 lb Be sure the mount you choose is capable of supporting the weight of this TV. Wall-mount screw locations. Installing a TV on a clean, flat, stable surface. Remove the ... Use only with your TV and wall mount to change. To install your TV on a wall, you . Disconnect any cables connected to help you will need a wall mount. Wall-mounting the TV To mount your TV on a wall: 1. Consult the information on the model. Attach your mount. Note: The image shown here ...
Screw Size : Hole Pattern : Weight w/o Stand: D60-D3 D70-D3 M6 400 mm (V) x 400 mm (H) 41.47 lb 56.49 lb Be sure the mount you choose is capable of supporting the weight of this TV. Wall-mount screw locations. Installing a TV on a clean, flat, stable surface. Remove the ... Use only with your TV and wall mount to change. To install your TV on a wall, you . Disconnect any cables connected to help you will need a wall mount. Wall-mounting the TV To mount your TV on a wall: 1. Consult the information on the model. Attach your mount. Note: The image shown here ...


