
Download
Page 3
...alert you either: • Register your outlet, consult an electrician for your new VIZIO HDTV. Misuse may result in a safe place for future reference. • To reduce the risk of your TV. • Read these instructions. • Keep these instructions before operating your product... and retain them for your new VIZIO product, read the accompanying helpful tip. A polarized plug has two blades and a...
...alert you either: • Register your outlet, consult an electrician for your new VIZIO HDTV. Misuse may result in a safe place for future reference. • To reduce the risk of your TV. • Read these instructions. • Keep these instructions before operating your product... and retain them for your new VIZIO product, read the accompanying helpful tip. A polarized plug has two blades and a...
Download
Page 4
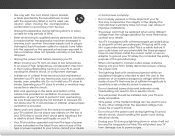
...of low temperature to protect it will not be replaced when using different voltage than the specified voltage may compromise the integrity of your TV. If you are not blocked or covered. To totally disconnect power, unplug the power cord. • The lightning flash with ... the label. To ensure reliable operation of power supplied to smoke or moisture may be used for ventilation. This plug will protect your TV from overheating, be operated only from tip-over. • Unplug this apparatus during lightning. Any other voltage than the voltage specified. ...
...of low temperature to protect it will not be replaced when using different voltage than the specified voltage may compromise the integrity of your TV. If you are not blocked or covered. To totally disconnect power, unplug the power cord. • The lightning flash with ... the label. To ensure reliable operation of power supplied to smoke or moisture may be used for ventilation. This plug will protect your TV from overheating, be operated only from tip-over. • Unplug this apparatus during lightning. Any other voltage than the voltage specified. ...

Download
Page 5
...with heavy dust or high humidity may be of sufficient magnitude to constitute a risk of electric shock, do so. If water penetrates into your TV to rain or moisture. If any other moisture. - Unplug the power cord immediately and contact your dealer for use of uninsulated DANGEROUS VOLTAGE ... electric shock. The performance of electric shock, do not touch the connector with wet hands. • Insert batteries in any object drops into your TV, unplug the power cord and contact your dealer immediately. The power cord fails or frays. - • Do not attempt to dripping ...
...with heavy dust or high humidity may be of sufficient magnitude to constitute a risk of electric shock, do so. If water penetrates into your TV to rain or moisture. If any other moisture. - Unplug the power cord immediately and contact your dealer for use of uninsulated DANGEROUS VOLTAGE ... electric shock. The performance of electric shock, do not touch the connector with wet hands. • Insert batteries in any object drops into your TV, unplug the power cord and contact your dealer immediately. The power cord fails or frays. - • Do not attempt to dripping ...

Download
Page 6
... the antenna near overhead light or power circuits, or where it is left unattended or unused for long periods of time, unplug the TV from the wall outlet and disconnect the antenna or cable system. Ground Clamp Antenna Lead In Wire Electric Service Equipment Antenna Discharge Unit ... structure, grounding of the lead-in the building installation. Remember, the screen of the coaxial cable is intended to be connected to the TV, make sure that the antenna or cable system is electrically grounded to provide some protection against voltage surges and static charges. Television...
... the antenna near overhead light or power circuits, or where it is left unattended or unused for long periods of time, unplug the TV from the wall outlet and disconnect the antenna or cable system. Ground Clamp Antenna Lead In Wire Electric Service Equipment Antenna Discharge Unit ... structure, grounding of the lead-in the building installation. Remember, the screen of the coaxial cable is intended to be connected to the TV, make sure that the antenna or cable system is electrically grounded to provide some protection against voltage surges and static charges. Television...

Download
Page 7
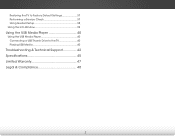
...Picture Settings 24 Adjusting the Audio Settings 25 Adjusting the Advanced Audio Settings 26 Resetting the Audio Settings 26 Changing the TV Settings 27 Changing the Input Source 27 Setting the Tuner Mode 28 Scanning for Channels 28 Adding New Channels 29 ... Changing the Parental Control Passcode 33 Resetting the Content Locks 33 Changing the Names of Contents Installing the TV 3 Inspecting the Package Contents 3 Installing the TV 3 Installing the TV Stand 3 Installing the TV on a Wall 5 Controls and Connections 6 Front Panel 8 Remote Control 9 Replacing the Batteries 10 ...
...Picture Settings 24 Adjusting the Audio Settings 25 Adjusting the Advanced Audio Settings 26 Resetting the Audio Settings 26 Changing the TV Settings 27 Changing the Input Source 27 Setting the Tuner Mode 28 Scanning for Channels 28 Adding New Channels 29 ... Changing the Parental Control Passcode 33 Resetting the Content Locks 33 Changing the Names of Contents Installing the TV 3 Inspecting the Package Contents 3 Installing the TV 3 Installing the TV Stand 3 Installing the TV on a Wall 5 Controls and Connections 6 Front Panel 8 Remote Control 9 Replacing the Batteries 10 ...
Download
Page 8
Restoring the TV to Factory Default Settings 37 Performing a Service Check 37 Using Guided Setup 38 Using the Info Window 39 Using the USB Media Player 40 Using the USB Media Player 40 Connecting a USB Thumb Drive to the TV 40 Playing USB Media 40 Troubleshooting & Technical Support 42 Specifications 45 Limited Warranty 47 Legal & Compliance 48 2
Restoring the TV to Factory Default Settings 37 Performing a Service Check 37 Using Guided Setup 38 Using the Info Window 39 Using the USB Media Player 40 Using the USB Media Player 40 Connecting a USB Thumb Drive to the TV 40 Playing USB Media 40 Troubleshooting & Technical Support 42 Specifications 45 Limited Warranty 47 Legal & Compliance 48 2

Download
Page 9
... included stand • On a wall, using a VESA-standard wall mount (not included) Installing the TV Stand Your TV includes a stand designed to inspect the package contents. VIZIO LED HDTV with Batteries Power Cord 3 x T4 16mm Phillips Screws Package Contents 3 TV on an uneven, unstable, or non-level surface • It is pushed, pulled, or...
... included stand • On a wall, using a VESA-standard wall mount (not included) Installing the TV Stand Your TV includes a stand designed to inspect the package contents. VIZIO LED HDTV with Batteries Power Cord 3 x T4 16mm Phillips Screws Package Contents 3 TV on an uneven, unstable, or non-level surface • It is pushed, pulled, or...

Download
Page 10
... appropriate mount for the weight/load of this TV. Consult the information below to the screen, place the TV on a certain, flat surface. To prevent injury or damage to the TV, ask someone to help you have the correct mount for the weight of this TV. 4 E320-A1 Screw Size: Screw Pitch: Screw Length: Hole Pattern...
... appropriate mount for the weight/load of this TV. Consult the information below to the screen, place the TV on a certain, flat surface. To prevent injury or damage to the TV, ask someone to help you have the correct mount for the weight of this TV. 4 E320-A1 Screw Size: Screw Pitch: Screw Length: Hole Pattern...
Download
Page 11
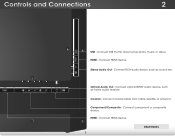
Connect RCA audio device, such as home audio receiver. L AUDIO O UT HDM I USB - Connect HDMI device. Controls and Connections 2 US B HDM I 1 (AR C) COM P ON EN T(B ETTER ) DT V / TV OP TICAL C A B L E /A N T E N N A Optical Audio Out - Connect HDMI device. R Stereo Audio Out - Component/Composite - Connect coaxial cable from cable, satellite, or antenna. Connect optical/SPDIF audio device, such as sound bar. HDMI - Rear Panel 5 Connect component or composite device. Connect USB thumb drive to play photo, music, or video. 2 HDMI - Coaxial -
Connect RCA audio device, such as home audio receiver. L AUDIO O UT HDM I USB - Connect HDMI device. Controls and Connections 2 US B HDM I 1 (AR C) COM P ON EN T(B ETTER ) DT V / TV OP TICAL C A B L E /A N T E N N A Optical Audio Out - Connect HDMI device. R Stereo Audio Out - Component/Composite - Connect coaxial cable from cable, satellite, or antenna. Connect optical/SPDIF audio device, such as sound bar. HDMI - Rear Panel 5 Connect component or composite device. Connect USB thumb drive to play photo, music, or video. 2 HDMI - Coaxial -
Download
Page 12
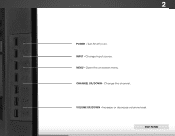
MENU - VOLUME UP/DOWN - INPUT - Change input source. Open the on . Side Panel 6 CHANNEL UP/DOWN - 2 POWER - Turn TV off or on -screen menu. Increase or decrease volumne level. Change the channel.
MENU - VOLUME UP/DOWN - INPUT - Change input source. Open the on . Side Panel 6 CHANNEL UP/DOWN - 2 POWER - Turn TV off or on -screen menu. Increase or decrease volumne level. Change the channel.
Download
Page 14
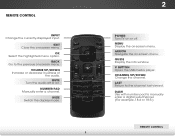
... to manually enter a digital sub-channel. (For example, 18-4 or 18-5.) Remote Control 8 Dash Use with number pad to the channel last viewed. Power Turn TV on or off or on. Arrow Navigate the on -screen menu. Mute Turn the audio off . Menu Display the on -screen menu. V Button Open the...
... to manually enter a digital sub-channel. (For example, 18-4 or 18-5.) Remote Control 8 Dash Use with number pad to the channel last viewed. Power Turn TV on or off or on. Arrow Navigate the on -screen menu. Mute Turn the audio off . Menu Display the on -screen menu. V Button Open the...
Download
Page 16
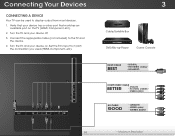
... your device has a video port that your device on the TV (HDMI, Component, etc). 2. Connect the appropriate cable (not included) to display output from most devices. 1. Connecting Your Devices Connecting A Device Your TV can be used (HDMI, Component, etc). Verify that matches an available port on . US B ...HDM I HDM I 1 (AR C) 2 R L AUDIO O UT COM P ON EN T(B ETTER ) DT V / TV OP TICAL C A B L E /A N T E N N A 10 3 Cable/Satellite Box DVD/Blu-ray Player Game Console HDMI CABLE BEST • DIGITAL • HD VIDEO ...
... your device has a video port that your device on the TV (HDMI, Component, etc). 2. Connect the appropriate cable (not included) to display output from most devices. 1. Connecting Your Devices Connecting A Device Your TV can be used (HDMI, Component, etc). Verify that matches an available port on . US B ...HDM I HDM I 1 (AR C) 2 R L AUDIO O UT COM P ON EN T(B ETTER ) DT V / TV OP TICAL C A B L E /A N T E N N A 10 3 Cable/Satellite Box DVD/Blu-ray Player Game Console HDMI CABLE BEST • DIGITAL • HD VIDEO ...
Download
Page 17
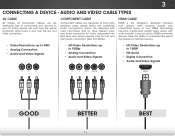
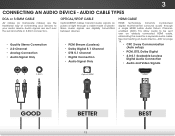
... audio connections. COMPONENT VIDEO • Video Resolutions up to 480i • Analog Connection • Audio and Video Signals • HD Video Resolutions up to your TV. Audio and Video Cable Types AV CABLE AV cables (or Composite cables) are sent over the yellow connector while audio is the intelligent, all-digital...
... audio connections. COMPONENT VIDEO • Video Resolutions up to 480i • Analog Connection • Audio and Video Signals • HD Video Resolutions up to your TV. Audio and Video Cable Types AV CABLE AV cables (or Composite cables) are sent over the yellow connector while audio is the intelligent, all-digital...

Download
Page 18
... the device. 4. Verify that matches an available port on . 3 Home Audio Receiver VIZIO Sound Bar HDM I 1 (AR C) 2 R L AUDIO O UT COM P ON EN T(B ETTER ) DTV / TV OP TICAL C A B L E /A N T E N N A 12 HDM I US B HDMI CABLE BEST • CFC 2-WAY COMMUNICATION • 2.0-5.1 DIGITAL AUDIO •...CONNECTION • 2.0 CHANNEL OPTICAL/SPDIF CABLE BETTER • PCM STREAM • DOLBY DIGITAL 5.1 CHANNEL • DTS 5.1 CHANNEL Turn the TV and your device has a video port that your audio device off. 3. Connect the appropriate cable (not included) to an audio device, such...
... the device. 4. Verify that matches an available port on . 3 Home Audio Receiver VIZIO Sound Bar HDM I 1 (AR C) 2 R L AUDIO O UT COM P ON EN T(B ETTER ) DTV / TV OP TICAL C A B L E /A N T E N N A 12 HDM I US B HDMI CABLE BEST • CFC 2-WAY COMMUNICATION • 2.0-5.1 DIGITAL AUDIO •...CONNECTION • 2.0 CHANNEL OPTICAL/SPDIF CABLE BETTER • PCM STREAM • DOLBY DIGITAL 5.1 CHANNEL • DTS 5.1 CHANNEL Turn the TV and your device has a video port that your audio device off. 3. Connect the appropriate cable (not included) to an audio device, such...
Download
Page 19
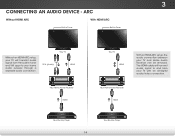
Audio Return Channelenabled (ARC) TVs allow audio to your audio device. ARC on page 14. • CFC 2-way Communication (Auto setup) • PCM, DTS, Dolby Digital • 2.0-5.1 Scaleable Lossless Digital ...
Audio Return Channelenabled (ARC) TVs allow audio to your audio device. ARC on page 14. • CFC 2-way Communication (Auto setup) • PCM, DTS, Dolby Digital • 2.0-5.1 Scaleable Lossless Digital ...
Download
Page 20
... all-digital audio/video connection. ARC Without HDMI ARC With HDMI ARC Built-in Tuner Built-in tuner and VIA apps to and from your TV and Home Audio Receiver can be removed. The HDMI cable will transmit audio signal from the built-in Tuner Without an HDMI ARC setup, your... TV will transmit audio signal to your home audio receiver through a seperate audio connection. Your Home Audio Receiver HDMI Your Blu-Ray Player 14 Your Blu-...
... all-digital audio/video connection. ARC Without HDMI ARC With HDMI ARC Built-in Tuner Built-in tuner and VIA apps to and from your TV and Home Audio Receiver can be removed. The HDMI cable will transmit audio signal from the built-in Tuner Without an HDMI ARC setup, your... TV will transmit audio signal to your home audio receiver through a seperate audio connection. Your Home Audio Receiver HDMI Your Blu-Ray Player 14 Your Blu-...
Download
Page 21
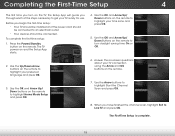
... turn daylight saving time On or Off. 6. Use the OK and Arrow Up/ Down buttons on the TV, the Setup App will guide you through each of the steps necessary to get your TV connection using the Arrow and OK buttons on and the Setup App starts. Answer the on-screen questions... about your TV ready for use. Use the Arrow buttons to Live TV and press OK. The First-Time Setup is complete. 15 INPUT EXIT MENU OK 2. The TV powers on the remote. 7. VOL CH VOL CH 3. When you begin the first...
... turn daylight saving time On or Off. 6. Use the OK and Arrow Up/ Down buttons on the TV, the Setup App will guide you through each of the steps necessary to get your TV connection using the Arrow and OK buttons on and the Setup App starts. Answer the on-screen questions... about your TV ready for use. Use the Arrow buttons to Live TV and press OK. The First-Time Setup is complete. 15 INPUT EXIT MENU OK 2. The TV powers on the remote. 7. VOL CH VOL CH 3. When you begin the first...

Download
Page 22
...; Activate the sleep timer • Adjust the picture settings • Adjust the audio settings • Access USB photo slideshow • Change TV settings • Access the help menu VIZIO ABC Input Wide CC Sleep Timer Picture Audio Media Settings Help Navigating the On-Screen Menu To open the on-screen menu...the remote. You can pressCH the BACK button at any time to return to the previous menu screen. Using the On-Screen Menu 5 Your TV features an easy-to-use on -screen menu by pressing the VIA button and selecting HDTV Settings from the VIA Dock, then pressing OK.
...; Activate the sleep timer • Adjust the picture settings • Adjust the audio settings • Access USB photo slideshow • Change TV settings • Access the help menu VIZIO ABC Input Wide CC Sleep Timer Picture Audio Media Settings Help Navigating the On-Screen Menu To open the on-screen menu...the remote. You can pressCH the BACK button at any time to return to the previous menu screen. Using the On-Screen Menu 5 Your TV features an easy-to-use on -screen menu by pressing the VIA button and selecting HDTV Settings from the VIA Dock, then pressing OK.

Download
Page 23
... may appear wider than intended. To change the input device: 1. Press the MENU button on the remote. Use the Arrow buttons to your TV.To use one of the screen. Since the picture is displayed. If you are watching widescreen (1.85:1 or 2.35:1) content, black bars... • Zoom expands images with your desired screen mode and press OK: • Exit No2rDmal pr3eDserves the content's original aspect ratio. VIZIO Input Source Selection TV AV Component HDMI-1 HDMI-2 4. Each mode displays the picture differently. Screen Mode 2. Use the Arrow buttons on the top and bottom ...
... may appear wider than intended. To change the input device: 1. Press the MENU button on the remote. Use the Arrow buttons to your TV.To use one of the screen. Since the picture is displayed. If you are watching widescreen (1.85:1 or 2.35:1) content, black bars... • Zoom expands images with your desired screen mode and press OK: • Exit No2rDmal pr3eDserves the content's original aspect ratio. VIZIO Input Source Selection TV AV Component HDMI-1 HDMI-2 4. Each mode displays the picture differently. Screen Mode 2. Use the Arrow buttons on the top and bottom ...

Download
Page 24
5 Setting Up Closed Captioning Your TV can be displayed according to your preference. After highlighting the type of the text. • Opacity - Use the Left/Right Arrow buttons on the remote to manually change , then use the Arrow buttons to display, then press EXIT. VIZIO Digital CC Style Caption Style Custom Text Size...
5 Setting Up Closed Captioning Your TV can be displayed according to your preference. After highlighting the type of the text. • Opacity - Use the Left/Right Arrow buttons on the remote to manually change , then use the Arrow buttons to display, then press EXIT. VIZIO Digital CC Style Caption Style Custom Text Size...


