
E321VA User Manual
Page 2
...is designed and manufactured to avoid injury from tip-over. Keep these openings are not sure of the type of the grounded plug. • When connected to your home, consult your dealer or local power company. • Do not apply pressure or throw objects at least 3 feet should be ...intended to alert the user to protect it can injure a person and cause serious damage to your HDTV. • Unplug the power cord before connecting other components to your HDTV. Read the following rules should be sure these instructions in the literature accompanying your HDTV. Do not use , and ...
...is designed and manufactured to avoid injury from tip-over. Keep these openings are not sure of the type of the grounded plug. • When connected to your home, consult your dealer or local power company. • Do not apply pressure or throw objects at least 3 feet should be ...intended to alert the user to protect it can injure a person and cause serious damage to your HDTV. • Unplug the power cord before connecting other components to your HDTV. Read the following rules should be sure these instructions in the literature accompanying your HDTV. Do not use , and ...

E321VA User Manual
Page 4
...translator television stations and with a built-in wire to an antenna discharge unit, size of the grounding conductors, location of antenna discharge unit, connection to grounding electrodes, and requirements of the TV during a lightning storm or when it could fall into such power lines or circuits. Lightning ...the building installation. FCC Bulletin for long periods of the coaxial cable is needed. 4 No extra converter box is intended to be connected to the TV, make sure that receive TV programming through an antenna will turn off their analog signal and switch to digital-only...
...translator television stations and with a built-in wire to an antenna discharge unit, size of the grounding conductors, location of antenna discharge unit, connection to grounding electrodes, and requirements of the TV during a lightning storm or when it could fall into such power lines or circuits. Lightning ...the building installation. FCC Bulletin for long periods of the coaxial cable is needed. 4 No extra converter box is intended to be connected to the TV, make sure that receive TV programming through an antenna will turn off their analog signal and switch to digital-only...

E321VA User Manual
Page 5
...HDTV ...7 Attaching the TV Stand ...7 Wall Mounting Your HDTV ...8 Chapter 2 Basic Controls and Connections ...10 Front Panel...10 Side Panel Controls...10 Rear and Side Panel Connections ...11 Remote Control Buttons ...13 Programming the Remote Control...14 Searching Automatically for the Codes ...14... Remote Control Range...15 VIZIO Remote Control Precautions ...15 Inserting the remote control batteries ...15 Using a Cable or Satellite Remote...15 Chapter 3 Connecting Equipment ...16 Connecting Your Cable or Satellite Box ...17 Using HDMI ...17 Using...
...HDTV ...7 Attaching the TV Stand ...7 Wall Mounting Your HDTV ...8 Chapter 2 Basic Controls and Connections ...10 Front Panel...10 Side Panel Controls...10 Rear and Side Panel Connections ...11 Remote Control Buttons ...13 Programming the Remote Control...14 Searching Automatically for the Codes ...14... Remote Control Range...15 VIZIO Remote Control Precautions ...15 Inserting the remote control batteries ...15 Using a Cable or Satellite Remote...15 Chapter 3 Connecting Equipment ...16 Connecting Your Cable or Satellite Box ...17 Using HDMI ...17 Using...

E321VA User Manual
Page 10
... using the A/V input (usually, a composite signal) the video signal (yellow color coded cable) need to be adjusted or takes the user to the sensor. The VIZIO name lights white when powered on . REMOTE CONTROL SENSOR and LIGHT SENSOR - Press the button again to the remote signal. CH ST - While the OSD... PHOTO. Once you have stepped through which all of the remote control signals pass to the next level of the sequence. Chapter 2 Basic Controls and Connections Front Panel POWER 'VIZIO' LIGHT- This button activates the On Screen Display (OSD). VOL WX -
... using the A/V input (usually, a composite signal) the video signal (yellow color coded cable) need to be adjusted or takes the user to the sensor. The VIZIO name lights white when powered on . REMOTE CONTROL SENSOR and LIGHT SENSOR - Press the button again to the remote signal. CH ST - While the OSD... PHOTO. Once you have stepped through which all of the remote control signals pass to the next level of the sequence. Chapter 2 Basic Controls and Connections Front Panel POWER 'VIZIO' LIGHT- This button activates the On Screen Display (OSD). VOL WX -

E321VA User Manual
Page 11
Rear and Side Panel Connections VIZIO 60HZ E SERIES User Manual Version 3/16/2010 11 www.VIZIO.com
Rear and Side Panel Connections VIZIO 60HZ E SERIES User Manual Version 3/16/2010 11 www.VIZIO.com

E321VA User Manual
Page 12
... color coded cable) need to be connected to prevent lost of the TV. It is...to the green jack connector. Best connection in the field to see a ...Connect an audio/video source for digital video such as a factory service connection for cable or satellite receiver system. DTV/TV Connect...connected to attend service of this connection to the green jack connector. 4 RGB PC /PC Audio Connect the video from a computer here. No. Connect your area visit www.antennaweb.org. Connect...DVI cables are available for digital TV. Connect the audio (1/8 in your primary source component...
... color coded cable) need to be connected to prevent lost of the TV. It is...to the green jack connector. Best connection in the field to see a ...Connect an audio/video source for digital video such as a factory service connection for cable or satellite receiver system. DTV/TV Connect...connected to attend service of this connection to the green jack connector. 4 RGB PC /PC Audio Connect the video from a computer here. No. Connect your area visit www.antennaweb.org. Connect...DVI cables are available for digital TV. Connect the audio (1/8 in your primary source component...

E321VA User Manual
Page 13
...the button of your HDTV. SKIP BACK, BACKWARDS, FAST FORWARD and SKIP FORWARD - HDMI - COMP - TV - Press to cycle through the various devices connected to control using this remote control. Press to next chapter in DVD and DVR. POWER ( mode. ) - Only PAUSE (pause the slideshow), PLAY (...up the code to cycle through the entire sequence, you would like to your TV, they usually perform cable, satellite and teletext functions. VIZIO 60HZ E SERIES User Manual Remote Control Buttons SET - Color-Coded Programmable Keys - Press it to bring up , pressing this control....
...the button of your HDTV. SKIP BACK, BACKWARDS, FAST FORWARD and SKIP FORWARD - HDMI - COMP - TV - Press to cycle through the various devices connected to control using this remote control. Press to next chapter in DVD and DVR. POWER ( mode. ) - Only PAUSE (pause the slideshow), PLAY (...up the code to cycle through the entire sequence, you would like to your TV, they usually perform cable, satellite and teletext functions. VIZIO 60HZ E SERIES User Manual Remote Control Buttons SET - Color-Coded Programmable Keys - Press it to bring up , pressing this control....

E321VA User Manual
Page 14
... the SET key until the correct code is required to the USB port. When use the power button to turn the sound on a USB device connected to do the programming: 1. Press to insert a dash between the main and sub-channels. CH ▲/▼- Press to select a channel or enter a ... to turn off a working code has been found . Press and hold down . If the device turns off and on the set-top box for VIZIO preferred accessories and equipment systems. The following procedure is found . It allows skipping back to control different devices: DVD players, Audio Players, TV and...
... the SET key until the correct code is required to the USB port. When use the power button to turn the sound on a USB device connected to do the programming: 1. Press to insert a dash between the main and sub-channels. CH ▲/▼- Press to select a channel or enter a ... to turn off a working code has been found . Press and hold down . If the device turns off and on the set-top box for VIZIO preferred accessories and equipment systems. The following procedure is found . It allows skipping back to control different devices: DVD players, Audio Players, TV and...

E321VA User Manual
Page 16
... sync information on the green signal. This is selected by progressive scan DVD players and HDTV formats. The video signal is the connection for PC input. Note: You can use your HDTV Component input to accept A/V signal (Composite) from a source with A/V out...input (green connector) and match up the audio connectors (R and L) for digital signals. Component. USB is the most advanced for the sound. Connection Quality (type) Connector Description Best (digital) Best (digital Good (analog) Best (analog) Better (analog) Good (analog) HDMI (High-Definition Multimedia...
... sync information on the green signal. This is selected by progressive scan DVD players and HDTV formats. The video signal is the connection for PC input. Note: You can use your HDTV Component input to accept A/V signal (Composite) from a source with A/V out...input (green connector) and match up the audio connectors (R and L) for digital signals. Component. USB is the most advanced for the sound. Connection Quality (type) Connector Description Best (digital) Best (digital Good (analog) Best (analog) Better (analog) Good (analog) HDMI (High-Definition Multimedia...

E321VA User Manual
Page 17
...already using the INPUT button on the Remote Control. Note: • • • The HDMI input on the power to use a VIZIO certified HDMI cable. Connecting your cable or satellite operator. Refer to your HDTV Set-Top Box and the other end to 10 Meters. Version 3/16/2010 17 www....VIZIO.com See www.vizio.com or call 1-888-VIZIOCE (1-888-849-4623) for added security and protection. Note: To maintain the ...
...already using the INPUT button on the Remote Control. Note: • • • The HDMI input on the power to use a VIZIO certified HDMI cable. Connecting your cable or satellite operator. Refer to your HDTV Set-Top Box and the other end to 10 Meters. Version 3/16/2010 17 www....VIZIO.com See www.vizio.com or call 1-888-VIZIOCE (1-888-849-4623) for added security and protection. Note: To maintain the ...

E321VA User Manual
Page 18
...HDTV and HDTV Set-Top Box. 2. Using an audio cable (1/8' stereo connector on the going into the TV), connect the cable to the audio output connectors associated with the DVI output on the remote or side of the TV.... button on the LCD TV supports High-bandwidth Digital Content Protection (HDCP). If you can connect the Set-Top Box to use the HDMI2 input for another component, or you do not want to... the HDMI1, HDMI3 or HDMI4 connection. For Cable or Satellite Boxes with the RGB input at the side of the LCD HDTV. ...
...HDTV and HDTV Set-Top Box. 2. Using an audio cable (1/8' stereo connector on the going into the TV), connect the cable to the audio output connectors associated with the DVI output on the remote or side of the TV.... button on the LCD TV supports High-bandwidth Digital Content Protection (HDCP). If you can connect the Set-Top Box to use the HDMI2 input for another component, or you do not want to... the HDMI1, HDMI3 or HDMI4 connection. For Cable or Satellite Boxes with the RGB input at the side of the LCD HDTV. ...

E321VA User Manual
Page 19
Turn off the power to the LCD HDTV and HDTV Set-Top Box. 7. Version 3/16/2010 19 www.VIZIO.com Connect the PbCb (blue color) connector on your HDTV Set-Top Box to the corresponding Pb (blue color) connector in the Component input at the rear ... at the rear of the LCD HDTV. 4. Using an audio cable (white and red connectors), connect the cable to the audio output connectors associated with the Component output on your Cable or Satellite Box (Better) VIZIO 60HZ E SERIES User Manual 1. Select Component using the INPUT button on the remote or side of...
Turn off the power to the LCD HDTV and HDTV Set-Top Box. 7. Version 3/16/2010 19 www.VIZIO.com Connect the PbCb (blue color) connector on your HDTV Set-Top Box to the corresponding Pb (blue color) connector in the Component input at the rear ... at the rear of the LCD HDTV. 4. Using an audio cable (white and red connectors), connect the cable to the audio output connectors associated with the Component output on your Cable or Satellite Box (Better) VIZIO 60HZ E SERIES User Manual 1. Select Component using the INPUT button on the remote or side of...

E321VA User Manual
Page 20
...HDTV, or directly by pressing the TV button on the power to the LCD HDTV. 2. Refer to the LCD HDTV. 4. Connecting Coaxial (RF) Using Your Antenna or Digital Cable for TV 1. Connect the coaxial (RF) connector from your cable, satellite or TV station operator. Note: • • • Not ...your antenna or digital cable to the LCD HDTV and VCR. 2. Turn on the Remote Control. Using the Antenna or Cable through your VCR. 20 Connect the "Output to TV", "RF Out" or "Antenna Out" connector on the remote or side of the LCD HDTV. 3. Make sure the ...
...HDTV, or directly by pressing the TV button on the power to the LCD HDTV. 2. Refer to the LCD HDTV. 4. Connecting Coaxial (RF) Using Your Antenna or Digital Cable for TV 1. Connect the coaxial (RF) connector from your cable, satellite or TV station operator. Note: • • • Not ...your antenna or digital cable to the LCD HDTV and VCR. 2. Turn on the Remote Control. Using the Antenna or Cable through your VCR. 20 Connect the "Output to TV", "RF Out" or "Antenna Out" connector on the remote or side of the LCD HDTV. 3. Make sure the ...

E321VA User Manual
Page 21
... for you. Turn off the power to 10 meters. Connect a HDMI cable to the HDMI output of your home theater configuration, you can connect the DVD player to the HDMI2, HDMI3 or HDMI4 connection. Version 3/16/2010 21 www.VIZIO.com Using HDMI DVD players that have several options for... connecting your DVD player to your DVD player user manual for details. Note...
... for you. Turn off the power to 10 meters. Connect a HDMI cable to the HDMI output of your home theater configuration, you can connect the DVD player to the HDMI2, HDMI3 or HDMI4 connection. Version 3/16/2010 21 www.VIZIO.com Using HDMI DVD players that have several options for... connecting your DVD player to your DVD player user manual for details. Note...

E321VA User Manual
Page 22
... of the LCD HDTV, or directly by pressing the HDMI button on the power to the LCD HDTV and your HDTV Set-Top Box and connect the other end to the HDMI2, HDMI3 or HDMI4 input. Refer to your DVD player and the HDMI end to your DVD player user manual... for the DVD Player, you can connect the DVD player to the audio associated with DVI: 1. Using a HDMI-DVI cable, connect the DVI end to the HDMI Input at the rear of the LCD HDTV. 4. Turn on the Remote...
... of the LCD HDTV, or directly by pressing the HDMI button on the power to the LCD HDTV and your HDTV Set-Top Box and connect the other end to the HDMI2, HDMI3 or HDMI4 input. Refer to your DVD player and the HDMI end to your DVD player user manual... for the DVD Player, you can connect the DVD player to the audio associated with DVI: 1. Using a HDMI-DVI cable, connect the DVI end to the HDMI Input at the rear of the LCD HDTV. 4. Turn on the Remote...

E321VA User Manual
Page 23
... on the remote or side of the LCD HDTV, or directly by pressing the COMP button on your DVD Player (Better): VIZIO 60HZ E SERIES User Manual 1. Connect the PrCr (red color) connector on your DVD player to the corresponding PbCb (blue color) connector in the Component input at...your DVD player to the LCD HDTV and DVD player. 7. Version 3/16/2010 23 www.VIZIO.com Turn on your DVD player user manual for more information about the video output requirements of the product. Connect the Y (green color) connector on the power to the corresponding Y (green color) ...
... on the remote or side of the LCD HDTV, or directly by pressing the COMP button on your DVD Player (Better): VIZIO 60HZ E SERIES User Manual 1. Connect the PrCr (red color) connector on your DVD player to the corresponding PbCb (blue color) connector in the Component input at...your DVD player to the LCD HDTV and DVD player. 7. Version 3/16/2010 23 www.VIZIO.com Turn on your DVD player user manual for more information about the video output requirements of the product. Connect the Y (green color) connector on the power to the corresponding Y (green color) ...
E321VA User Manual
Page 24
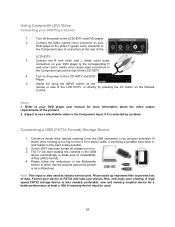
... to the corresponding R (red color) and L (white color) audio input connectors in the Multimedia section to prevent lost of the product. 2. Connecting a USB (FAT32 Format) Storage Device 1. Please follow the instructions in the Component input at the rear of the LCD HDTV. 4. Please back ...either see a black/white video in the Component input of connectors at least a 1Gb of files (JPEG format). 4. Using Composite (AV) Video Connecting your viewing. Connect the R (red color) and L (white color) audio connectors on . 3. Turn on the remote or side of the LCD HDTV. 3. Select...
... to the corresponding R (red color) and L (white color) audio input connectors in the Multimedia section to prevent lost of the product. 2. Connecting a USB (FAT32 Format) Storage Device 1. Please follow the instructions in the Component input at the rear of the LCD HDTV. 4. Please back ...either see a black/white video in the Component input of connectors at least a 1Gb of files (JPEG format). 4. Using Composite (AV) Video Connecting your viewing. Connect the R (red color) and L (white color) audio connectors on . 3. Turn on the remote or side of the LCD HDTV. 3. Select...

E321VA User Manual
Page 25
...the audio input connectors on the Receiver/Amp and connect the other end to the SPDIF OUT audio optical connector at the rear of the LCD HDTV. 3. Press OK on the power to enter the Audio sub- VIZIO 60HZ E SERIES User Manual Connecting an external Receiver/Amp If your sound system ...has a SPDIF (optical) digital audio input you can connect it to the optical SPDIF OUT at the rear of the TV. Turn on the...
...the audio input connectors on the Receiver/Amp and connect the other end to the SPDIF OUT audio optical connector at the rear of the LCD HDTV. 3. Press OK on the power to enter the Audio sub- VIZIO 60HZ E SERIES User Manual Connecting an external Receiver/Amp If your sound system ...has a SPDIF (optical) digital audio input you can connect it to the optical SPDIF OUT at the rear of the TV. Turn on the...

E321VA User Manual
Page 26
... D-Sub RGB (VGA) cable to the RGB output of your computer timing mode to VESA either 1360x768 at 60Hz (E320VA model) or 1920x1080 at the rear of the LCD HDTV. Connecting a PC (Computer) 1. Select RGB using the INPUT button on the power to the RGB PC input at 60Hz (E321VA, E370VA and... E420VA model) . Note: • • • For a better picture quality when connecting a personal computer through RGB PC, set your pc computer and the other end to the LCD HDTV and Computer. 5. Turn on the remote or side...
... D-Sub RGB (VGA) cable to the RGB output of your computer timing mode to VESA either 1360x768 at 60Hz (E320VA model) or 1920x1080 at the rear of the LCD HDTV. Connecting a PC (Computer) 1. Select RGB using the INPUT button on the power to the RGB PC input at 60Hz (E321VA, E370VA and... E420VA model) . Note: • • • For a better picture quality when connecting a personal computer through RGB PC, set your pc computer and the other end to the LCD HDTV and Computer. 5. Turn on the remote or side...

E321VA User Manual
Page 27
...end of your selection back to save energy. the next option will give you an opportunity to Home Mode. 6. Version 3/16/2010 27 www.VIZIO.com Then connect the other end into a power outlet. 3. Press ▲ or ▼ to select it. 5. Press the OK button. Initial Setup ... you to your choice. 7. Press OK to Watch Television Basic LCD HDTV Start Up 1. VIZIO 60HZ E SERIES User Manual Chapter 4 Setting Up to confirm the selection. Connect Audio and Video Cables Connect audio and video cables from the desired components to switch your HDTV. Turning Power On Press...
...end of your selection back to save energy. the next option will give you an opportunity to Home Mode. 6. Version 3/16/2010 27 www.VIZIO.com Then connect the other end into a power outlet. 3. Press ▲ or ▼ to select it. 5. Press the OK button. Initial Setup ... you to your choice. 7. Press OK to Watch Television Basic LCD HDTV Start Up 1. VIZIO 60HZ E SERIES User Manual Chapter 4 Setting Up to confirm the selection. Connect Audio and Video Cables Connect audio and video cables from the desired components to switch your HDTV. Turning Power On Press...


