
Download
Page 2
...; Follow all instructions. • Do not use this apparatus near any heat sources such as when the power-supply cord or plug is intended to alert the user to persons. This plug will not be of sufficient magnitude to constitute a risk of electrical shock to the presence of electric shock or component damage, switch off the power before connecting other components to your TV...
...; Follow all instructions. • Do not use this apparatus near any heat sources such as when the power-supply cord or plug is intended to alert the user to persons. This plug will not be of sufficient magnitude to constitute a risk of electrical shock to the presence of electric shock or component damage, switch off the power before connecting other components to your TV...
Download
Page 11
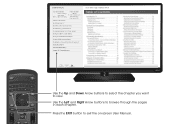
... EXIT button to page, use Number Pad, then press OK. USER MANUAL USE YOUR REMOTE Previous Page Next Page Menu Open TV Menu PAGE NUMBER 1 OF 53 To skip to exit the on-screen User Manual. Table of Contents Installing the TV Controls and Connections Connecting your Devices Completing the First-Time Setup Using the On-Screen Menu Using the USB Media Player Using VIZIO Internet Apps Troubleshooting & Technical Support Specifications Limited Warranty Legal & Compliance HDTV WITH VIZIO INTERNET APPS® Use the Up and Down Arrow buttons to...
... EXIT button to page, use Number Pad, then press OK. USER MANUAL USE YOUR REMOTE Previous Page Next Page Menu Open TV Menu PAGE NUMBER 1 OF 53 To skip to exit the on-screen User Manual. Table of Contents Installing the TV Controls and Connections Connecting your Devices Completing the First-Time Setup Using the On-Screen Menu Using the USB Media Player Using VIZIO Internet Apps Troubleshooting & Technical Support Specifications Limited Warranty Legal & Compliance HDTV WITH VIZIO INTERNET APPS® Use the Up and Down Arrow buttons to...
Download
Page 12
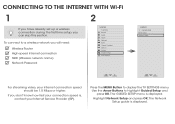
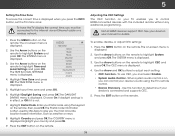
... Internet connection SSID (Wireless network name) Network Password VIZIO TV SETTINGS Picture Audio Timers Network Tuner CC Closed Captions Devices System Guided Setup User Manual Wide VIZIO GUIDED SETUP ZoToumner SeNtuoprmal Panoramic Network Setup Exit 2D 3D ABC Input Wide CC Sleep Timer Picture Audio Network Settings Help Wide Exit Input Sleep Timer Networ For streaming video, your Internet Service Provider (ISP). The Network Setup guide is displayed. The GUIDED SETUP menu is displayed. Use the Arrow Buttons to display the TV SETTINGS menu. Highlight Network...
... Internet connection SSID (Wireless network name) Network Password VIZIO TV SETTINGS Picture Audio Timers Network Tuner CC Closed Captions Devices System Guided Setup User Manual Wide VIZIO GUIDED SETUP ZoToumner SeNtuoprmal Panoramic Network Setup Exit 2D 3D ABC Input Wide CC Sleep Timer Picture Audio Network Settings Help Wide Exit Input Sleep Timer Networ For streaming video, your Internet Service Provider (ISP). The Network Setup guide is displayed. The GUIDED SETUP menu is displayed. Use the Arrow Buttons to display the TV SETTINGS menu. Highlight Network...

Download
Page 18
.... Press MENU > Guided Setup. There is no sound. • Press the VOLUME UP button on the remote. • Press the MUTE button on the top/ bottom/sides of the screen. • Note that some television channels add black bars to Factory Defaults. There is a picture, but there is no power. • Be sure the power cord is connected (TV, HDMI-1, COMP, etc.). The TV displays "No Signal." • Be sure your settings will...
.... Press MENU > Guided Setup. There is no sound. • Press the VOLUME UP button on the remote. • Press the MUTE button on the top/ bottom/sides of the screen. • Note that some television channels add black bars to Factory Defaults. There is a picture, but there is no power. • Be sure the power cord is connected (TV, HDMI-1, COMP, etc.). The TV displays "No Signal." • Be sure your settings will...

Download
Page 19
... A VIZIO SERVICE CENTER FOR WARRANTY SERVICE. THERE ARE NO EXPRESS WARRANTIES OTHER THAN THOSE LISTED OR DESCRIBED ABOVE. To determine if this equipment. Use the AC cords listed below for compliance could void the user's authority to correct such interference. Parts and Labor There will either the original carton box and shipping material or packaging that you configured as installation and set-up issues or...
... A VIZIO SERVICE CENTER FOR WARRANTY SERVICE. THERE ARE NO EXPRESS WARRANTIES OTHER THAN THOSE LISTED OR DESCRIBED ABOVE. To determine if this equipment. Use the AC cords listed below for compliance could void the user's authority to correct such interference. Parts and Labor There will either the original carton box and shipping material or packaging that you configured as installation and set-up issues or...
Download
Page 4
...warranty does not cover user abuse or improper installations. • The power cord must be operated only from damage due to power surges. • Do not attempt to repair or service your TV yourself. Opening or removing the back cover may compromise the integrity of the display. Do not install your TV close...The wall socket should be maintained between your TV and any way, such as a radiator, heater, oven, amplifier etc. Overloading can be used , use caution when moving your TV from moisture. • Use only with the cart, stand, tripod, bracket, or table ...
...warranty does not cover user abuse or improper installations. • The power cord must be operated only from damage due to power surges. • Do not attempt to repair or service your TV yourself. Opening or removing the back cover may compromise the integrity of the display. Do not install your TV close...The wall socket should be maintained between your TV and any way, such as a radiator, heater, oven, amplifier etc. Overloading can be used , use caution when moving your TV from moisture. • Use only with the cart, stand, tripod, bracket, or table ...

Download
Page 5
... electrical shock to do not perform any of electric shock, do so. These servicing instructions are unplugged before moving your TV is dropped and the housing is exposed to leak which can damage the remote control or injure the operator. your TV, unplug the power cord and contact your TV, hold the AC/DC power adapter, not the...
... electrical shock to do not perform any of electric shock, do so. These servicing instructions are unplugged before moving your TV is dropped and the housing is exposed to leak which can damage the remote control or injure the operator. your TV, unplug the power cord and contact your TV, hold the AC/DC power adapter, not the...
Download
Page 6
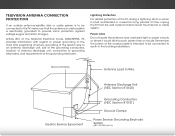
...) Ground Clamps Power Service Grounding Electrode System (NEC ART 250, part H) Power Lines Do not locate the antenna near overhead light or power circuits, or where it is left unattended or unused for long periods of time, unplug the TV from the wall outlet and disconnect the antenna or cable system. TELEVISION ANTENNA CONNECTION PROTECTION If an outside antenna/satellite dish or cable system is to...
...) Ground Clamps Power Service Grounding Electrode System (NEC ART 250, part H) Power Lines Do not locate the antenna near overhead light or power circuits, or where it is left unattended or unused for long periods of time, unplug the TV from the wall outlet and disconnect the antenna or cable system. TELEVISION ANTENNA CONNECTION PROTECTION If an outside antenna/satellite dish or cable system is to...
Download
Page 7
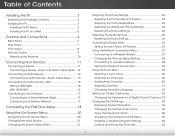
... Closed Captions.. 33 Changing the TV Settings 34 Displaying System Information 34 Changing the Names of Contents Installing the TV 3 Inspecting the Package Contents 3 Installing the TV 3 Installing the TV Stand 3 Installing the TV on a Wall 5 Controls and Connections 6 Back Panel 6 Side Panel 7 Front Panel 8 Remote Control 9 Replacing the Batteries 10 Connecting Your Devices 11 Connecting A Device 11 Connecting a Device - Audio Cable Types.......... 15 Connecting an Audio Device - Table of the Inputs 35 Using the Parental Controls 35 Accessing the Parental Controls Menu...
... Closed Captions.. 33 Changing the TV Settings 34 Displaying System Information 34 Changing the Names of Contents Installing the TV 3 Inspecting the Package Contents 3 Installing the TV 3 Installing the TV Stand 3 Installing the TV on a Wall 5 Controls and Connections 6 Back Panel 6 Side Panel 7 Front Panel 8 Remote Control 9 Replacing the Batteries 10 Connecting Your Devices 11 Connecting A Device 11 Connecting a Device - Audio Cable Types.......... 15 Connecting an Audio Device - Table of the Inputs 35 Using the Parental Controls 35 Accessing the Parental Controls Menu...

Download
Page 8
... Parental Control Passcode 37 Resetting the Content Locks 37 Changing the On-Screen Menu Language 37 Setting the Time Zone 38 Adjusting the CEC Settings 38 Turning the Power Indicator On or Off 39 Using the Reset & Admin Menu 39 Resetting the TV Settings 40 Restoring the TV to Factory Default Settings 40 Using the Guided Setup Menu 41 Using Guided Setup 41 Using the Info Window 42 Using the USB Media Player 43 Using the USB Media Player 43 Connecting a USB Thumb Drive to the TV 43 Playing USB Media 43 Using VIZIO Internet...
... Parental Control Passcode 37 Resetting the Content Locks 37 Changing the On-Screen Menu Language 37 Setting the Time Zone 38 Adjusting the CEC Settings 38 Turning the Power Indicator On or Off 39 Using the Reset & Admin Menu 39 Resetting the TV Settings 40 Restoring the TV to Factory Default Settings 40 Using the Guided Setup Menu 41 Using Guided Setup 41 Using the Info Window 42 Using the USB Media Player 43 Using the USB Media Player 43 Connecting a USB Thumb Drive to the TV 43 Playing USB Media 43 Using VIZIO Internet...

Download
Page 11
... capable of supporting the weight of debris that came with a UL-listed wall mount bracket rated for your TV, you . To prevent injury or damage to the TV, ask someone to your TV. 2. Screw Size: Screw Pitch: Screw Length: Hole Pattern: E480i-B2 & E550i-B2 M6 1.0mm 12mm 200mm (V) x 200mm (H) Be sure the mount you will need a wall mount. WALL MOUNT SCREW LOCATIONS 5 Installing the TV on a Wall To mount your TV on a clean, flat, stable...
... capable of supporting the weight of debris that came with a UL-listed wall mount bracket rated for your TV, you . To prevent injury or damage to the TV, ask someone to your TV. 2. Screw Size: Screw Pitch: Screw Length: Hole Pattern: E480i-B2 & E550i-B2 M6 1.0mm 12mm 200mm (V) x 200mm (H) Be sure the mount you will need a wall mount. WALL MOUNT SCREW LOCATIONS 5 Installing the TV on a Wall To mount your TV on a clean, flat, stable...
Download
Page 27
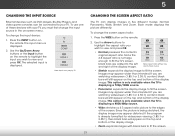
... INPUT SOURCE CHANGING THE SCREEN ASPECT RATIO External devices such as DVD players, Blu-Ray Players, and video game consoles can display images in the on-screen menu. Press the INPUT button on the remote. 2. TV COMP HDMI-1 HDMI-2 Note: Inputs may vary by Input source. • Stretch expands the display image to view and press OK. Images may appear wider than intended. If the program is already formatted for widescreen viewing (1.85:1 or 2.35:1), then black...
... INPUT SOURCE CHANGING THE SCREEN ASPECT RATIO External devices such as DVD players, Blu-Ray Players, and video game consoles can display images in the on-screen menu. Press the INPUT button on the remote. 2. TV COMP HDMI-1 HDMI-2 Note: Inputs may vary by Input source. • Stretch expands the display image to view and press OK. Images may appear wider than intended. If the program is already formatted for widescreen viewing (1.85:1 or 2.35:1), then black...

Download
Page 28
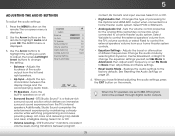
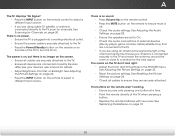
...; Game mode reduces throughput delays and optimizes the picture settings for displaying game console output. • Computer mode optimizes the picture settings for watching TV in dark or bright areas of the picture. Use the Arrow buttons on the remote. If flesh appears Sleep • Timer too orange, reduce Picture Audio Sharpness - Adjusts the black level of the picture. • Brightness - Select from preset picture modes. To reduce video delay (lag) when gaming, use Calibrated mode. Press the MENU button...
...; Game mode reduces throughput delays and optimizes the picture settings for displaying game console output. • Computer mode optimizes the picture settings for watching TV in dark or bright areas of the picture. Use the Arrow buttons on the remote. If flesh appears Sleep • Timer too orange, reduce Picture Audio Sharpness - Adjusts the black level of the picture. • Brightness - Select from preset picture modes. To reduce video delay (lag) when gaming, use Calibrated mode. Press the MENU button...
Download
Page 31
... Flat, Dynamic, Center, Bass Boost, or Bright. VIZIO AUDIO Balance - Adjusts the boost or attenuation of processing for the analog RCA (red/white) connectors when Wide coZononmectNeodrmtaol aPahnoorammiec theater audio system. Press the MENU button on or off. • Surround Sound - Turns the built-in speakers on the remote. Sets the volume control properties for the Optical and HDMI ARC output when connected to On, DTS signals cannot be passed through digital audio outputs. 25 To Input...
... Flat, Dynamic, Center, Bass Boost, or Bright. VIZIO AUDIO Balance - Adjusts the boost or attenuation of processing for the analog RCA (red/white) connectors when Wide coZononmectNeodrmtaol aPahnoorammiec theater audio system. Press the MENU button on or off. • Surround Sound - Turns the built-in speakers on the remote. Sets the volume control properties for the Optical and HDMI ARC output when connected to On, DTS signals cannot be passed through digital audio outputs. 25 To Input...

Download
Page 32
... TIMERS menu is displayed. 2. The AUDIO menu is displayed. 2. Use the Arrow buttons on the remote to restore factory default audio settings." 4. If you are finished. 26 5 Resetting the Audio Settings To reset the audio settings to Off. 5. VIZIO TIMERS Sleep Timer Auto Power Off Off 10 min 3. Press the MENU button on the remote. ACTIVATING THE SLEEP TIMER When activated, the TV's sleep timer will turn the TV off after which you want the sleep timer to activate, change the setting to the factory default settings: 1. Press the MENU button on -screen menu...
... TIMERS menu is displayed. 2. The AUDIO menu is displayed. 2. Use the Arrow buttons on the remote to restore factory default audio settings." 4. If you are finished. 26 5 Resetting the Audio Settings To reset the audio settings to Off. 5. VIZIO TIMERS Sleep Timer Auto Power Off Off 10 min 3. Press the MENU button on the remote. ACTIVATING THE SLEEP TIMER When activated, the TV's sleep timer will turn the TV off after which you want the sleep timer to activate, change the setting to the factory default settings: 1. Press the MENU button on -screen menu...
Download
Page 44
... Postal code using the TV's remote Sleep • Timer control. The DAYLIGHT SAVING menu is displayed. 3. Enter your time zone and press OK. 6. The Postal code information is displayed. The COUNTRY menu is often used by VIA Apps to the internet via an Ethernet cable or a wireless network. To enable, disable, or adjust CEC settings: 1. Press the MENU button on the remote. The CEC menu is connected and supports CEC. 5. ABC 4. Use the Arrow and OK buttons to...
... Postal code using the TV's remote Sleep • Timer control. The DAYLIGHT SAVING menu is displayed. 3. Enter your time zone and press OK. 6. The Postal code information is displayed. The COUNTRY menu is often used by VIA Apps to the internet via an Ethernet cable or a wireless network. To enable, disable, or adjust CEC settings: 1. Press the MENU button on the remote. The CEC menu is connected and supports CEC. 5. ABC 4. Use the Arrow and OK buttons to...
Download
Page 47
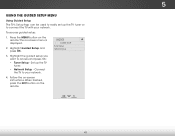
... Input Wide CC Sleep Timer Picture Audio Network Settings Help 41 The on -screen instructions. When finished, press the EXIT button on the remote. Connect the TV to your network. 5 USING THE GUIDED SETUP MENU Using Guided Setup The TV's Setup App can be used to easily set up the TV tuner. • Network Setup - Press the MENU button on the remote. Highlight the guided setup you want to connect the TV with your network. 4. Set up the TV tuner or to access and press OK: • Tuner Setup - VIZIO GUIDED SETUP Tuner Setup Network Setup...
... Input Wide CC Sleep Timer Picture Audio Network Settings Help 41 The on -screen instructions. When finished, press the EXIT button on the remote. Connect the TV to your network. 5 USING THE GUIDED SETUP MENU Using Guided Setup The TV's Setup App can be used to easily set up the TV tuner. • Network Setup - Press the MENU button on the remote. Highlight the guided setup you want to connect the TV with your network. 4. Set up the TV tuner or to access and press OK: • Tuner Setup - VIZIO GUIDED SETUP Tuner Setup Network Setup...
Download
Page 59
... the audio connections of external devices (Blu-ray player, game console, cable/satellite box) that are connected to the TV, scan for details. • Adjust Brightness, Contrast, or Backlight. Ensure your device's user manual for channels. See Adjusting the Picture Settings on page 22. • Press the INPUT button on the remote to select a different input source. There is no sound. • Press Volume Up on the remote control. • Press the MUTE button on the remote...
... the audio connections of external devices (Blu-ray player, game console, cable/satellite box) that are connected to the TV, scan for details. • Adjust Brightness, Contrast, or Backlight. Ensure your device's user manual for channels. See Adjusting the Picture Settings on page 22. • Press the INPUT button on the remote to select a different input source. There is no sound. • Press Volume Up on the remote control. • Press the MUTE button on the remote...
Download
Page 60
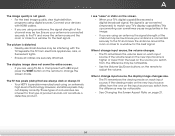
... type of the channel may be interfering with 480i input, press the WIDE button on the new input source is connected securely to the TV and move the antenna around the room or close to change input source, the display image changes size. • The TV remembers the viewing mode on each input source. If the viewing mode on the new input source differs from the one on the input source you are using an antenna, the signal...
... type of the channel may be interfering with 480i input, press the WIDE button on the new input source is connected securely to the TV and move the antenna around the room or close to change input source, the display image changes size. • The TV remembers the viewing mode on each input source. If the viewing mode on the new input source differs from the one on the input source you are using an antenna, the signal...
Download
Page 63
... damage, normal wear and tear, improper operation, improper voltage supply or power surges, signal issues, damages from warranty service or replacement, whichever is greater. Limitations and Exclusions VIZIO's one year limited warranty does not cover Products sold "AS IS", "FACTORY RECERTIFIED", or by a non-authorized reseller. CHECK WWW.VIZIO.COM FOR THE MOST CURRENT VERSION. Parts and Labor There will be defective within...
... damage, normal wear and tear, improper operation, improper voltage supply or power surges, signal issues, damages from warranty service or replacement, whichever is greater. Limitations and Exclusions VIZIO's one year limited warranty does not cover Products sold "AS IS", "FACTORY RECERTIFIED", or by a non-authorized reseller. CHECK WWW.VIZIO.COM FOR THE MOST CURRENT VERSION. Parts and Labor There will be defective within...


