Download
Page 4
... to repair or service your TV. Servicing is always flowing into Overloading can be operated only from overheating, be replaced when using different voltage than the specified voltage may cause fire or electric shock. • Slots and openings in fire or electric shock. • The wall socket should be used for long periods of the display. Operating your TV close to...
... to repair or service your TV. Servicing is always flowing into Overloading can be operated only from overheating, be replaced when using different voltage than the specified voltage may cause fire or electric shock. • Slots and openings in fire or electric shock. • The wall socket should be used for long periods of the display. Operating your TV close to...

Download
Page 5
...abnormality occurs. The power cord fails or frays. - Pulling on the apparatus. • The mains plug or appliance coupler is damaged, the internal components may be placed on the power cord may cause the batteries to leak which can damage the remote control or injure the operator. These servicing instructions are for moving... sunshine, fire or the like. • If any other cables are qualified to repair your TV is dropped and the housing is used for repair. When your TV, hold the AC/DC power adapter, not the cord. Do not expose batteries to excessive heat such as vases, ...
...abnormality occurs. The power cord fails or frays. - Pulling on the apparatus. • The mains plug or appliance coupler is damaged, the internal components may be placed on the power cord may cause the batteries to leak which can damage the remote control or injure the operator. These servicing instructions are for moving... sunshine, fire or the like. • If any other cables are qualified to repair your TV is dropped and the housing is used for repair. When your TV, hold the AC/DC power adapter, not the cord. Do not expose batteries to excessive heat such as vases, ...

Download
Page 6
... such power lines or circuits. Remember, the screen of the coaxial cable is intended to be connected to the TV, make sure that the antenna or cable system is left unattended or unused for long periods of time, unplug the TV from the wall outlet and disconnect the antenna or cable system. Power Lines Do not locate the antenna near overhead light or power circuits...
... such power lines or circuits. Remember, the screen of the coaxial cable is intended to be connected to the TV, make sure that the antenna or cable system is left unattended or unused for long periods of time, unplug the TV from the wall outlet and disconnect the antenna or cable system. Power Lines Do not locate the antenna near overhead light or power circuits...
Download
Page 7
... Audio Mode 32 Setting Timers 33 Setting the Sleep Timer 33 Setting the Auto Power Off Feature 33 Using the Network Connection Menu 34 Connecting to a Wireless Network 34 Changing the Manual Setup Settings 34 Finding MAC Addresses for Network Setup 35 Connecting to a Hidden Network 35 Setting Up the Tuner 36 Selecting a Tuner Input 36 Scanning for Channels 36 Adding New Channels 37 Skipping Channels 38 Listening to Alternate Audio 39 Changing the Analog Audio Language 39 Changing the Digital Audio Language 39 Setting Up Closed Captioning 40 1 Audio Cable Types 15 Connecting...
... Audio Mode 32 Setting Timers 33 Setting the Sleep Timer 33 Setting the Auto Power Off Feature 33 Using the Network Connection Menu 34 Connecting to a Wireless Network 34 Changing the Manual Setup Settings 34 Finding MAC Addresses for Network Setup 35 Connecting to a Hidden Network 35 Setting Up the Tuner 36 Selecting a Tuner Input 36 Scanning for Channels 36 Adding New Channels 37 Skipping Channels 38 Listening to Alternate Audio 39 Changing the Analog Audio Language 39 Changing the Digital Audio Language 39 Setting Up Closed Captioning 40 1 Audio Cable Types 15 Connecting...

Download
Page 8
... Using the Parental Controls 45 Accessing the Parental Controls Menu 45 Enabling or Disabling Program Ratings 45 Locking and Unlocking Channels 45 Blocking and Unblocking Content by Rating 46 Changing the Parental Control Passcode 46 Resetting the Content Locks 46 Adjusting the CEC Settings 47 Turning the Power Indicator On or Off 47 Using the Reset & Admin Menu 48 Restoring the TV to Factory Default Settings 48 Using the Guided Setup Menu 48 Using Guided Setup 48 Using the Info Window 49 Using the USB Media Player 50 Using the USB Media Player...
... Using the Parental Controls 45 Accessing the Parental Controls Menu 45 Enabling or Disabling Program Ratings 45 Locking and Unlocking Channels 45 Blocking and Unblocking Content by Rating 46 Changing the Parental Control Passcode 46 Resetting the Content Locks 46 Adjusting the CEC Settings 47 Turning the Power Indicator On or Off 47 Using the Reset & Admin Menu 48 Restoring the TV to Factory Default Settings 48 Using the Guided Setup Menu 48 Using Guided Setup 48 Using the Info Window 49 Using the USB Media Player 50 Using the USB Media Player...
Download
Page 11
... instructions that can begin the installation. Consult the information below to use cables with your TV. 2. E600i-B3 Screw Size: Hole Pattern: Weight w/o Stand: M6 400mm (V) x 400mm (H) 46.30 lbs Be sure the mount you will need a wall mount. To install your TV model: Installing a TV on a wall, you choose is clear of debris that came with right-angle connectors. Use only with a UL-listed wall mount bracket rated for your TV on a clean, flat...
... instructions that can begin the installation. Consult the information below to use cables with your TV. 2. E600i-B3 Screw Size: Hole Pattern: Weight w/o Stand: M6 400mm (V) x 400mm (H) 46.30 lbs Be sure the mount you will need a wall mount. To install your TV model: Installing a TV on a wall, you choose is clear of debris that came with right-angle connectors. Use only with a UL-listed wall mount bracket rated for your TV on a clean, flat...

Download
Page 15
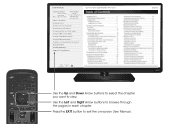
... Navigate the on -screen menu. Exit Close the on -screen menu. Number Pad Manually enter a channel. Ok Select the highlighted menu option. Wide Switch the display mode. Channel Up/Down Change the channel. Mute Turn the audio off . App launcher Quickly launch the pictured app. Closed Captions Turn closed captions on -screen menu or app. Hot Keys Perform functions within an on and off. A/V Controls Control USB media player. Dash Use with number pad to the channel last viewed. 2 Remote Control Input Change the currently-displayed input. Volume Up/Down Increase or...
... Navigate the on -screen menu. Exit Close the on -screen menu. Number Pad Manually enter a channel. Ok Select the highlighted menu option. Wide Switch the display mode. Channel Up/Down Change the channel. Mute Turn the audio off . App launcher Quickly launch the pictured app. Closed Captions Turn closed captions on -screen menu or app. Hot Keys Perform functions within an on and off. A/V Controls Control USB media player. Dash Use with number pad to the channel last viewed. 2 Remote Control Input Change the currently-displayed input. Volume Up/Down Increase or...
Download
Page 27
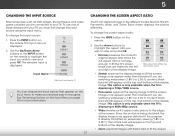
... available when the TV is displaying a 480i/480p source. • Wide stretches a 4:3 aspect ratio picture to the edges of these devices with black bars to fit the screen. Press the INPUT button on the remote. 2. 5 Changing the Input Source Changing the Screen Aspect Ratio External devices such as DVD players, Blu-ray Players, and video game consoles can change the input names that appear on the Input menu to make your devices easy...
... available when the TV is displaying a 480i/480p source. • Wide stretches a 4:3 aspect ratio picture to the edges of these devices with black bars to fit the screen. Press the INPUT button on the remote. 2. 5 Changing the Input Source Changing the Screen Aspect Ratio External devices such as DVD players, Blu-ray Players, and video game consoles can change the input names that appear on the Input menu to make your devices easy...

Download
Page 29
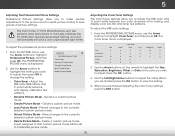
... of color before adjusting tint. Sharpness - Use the Arrow buttons on pages 28 through 30). The on-screen menu is selected are given generic names, beginning with "Custom 1." Color - picture. The Picture menu is too high, the picture may be too dark to adjust the setting: • Auto Brightness Control - 5 Adjusting the Picture Settings Your TV display can be used to affect the overall brilliance of picture elements. To manually change the picture mode: VIZIO Picture Picture Mode Auto Brightness Control...
... of color before adjusting tint. Sharpness - Use the Arrow buttons on pages 28 through 30). The on-screen menu is selected are given generic names, beginning with "Custom 1." Color - picture. The Picture menu is too high, the picture may be too dark to adjust the setting: • Auto Brightness Control - 5 Adjusting the Picture Settings Your TV display can be used to affect the overall brilliance of picture elements. To manually change the picture mode: VIZIO Picture Picture Mode Auto Brightness Control...
Download
Page 31
...PICTURE menu, use the Arrow buttons to change the setting: VIZIO Professional picture Color Tuner Rename Picture Mode Create Picture Mode Lock Picture Mode Delete Picture Mode • Color Tuner - Adjust the HSB color, RGB offsets, and 11-point white balance, and display calibration test patterns. • Rename Picture Mode - Rename a custom picture mode. • Create Picture Mode - Use the Arrow buttons on the remote to highlight the Hue, ExSitatura2tDion, Br3iDghtness, Offset, or Gain of picture settings. Press the OK button. 3. Sleep Timer Picture Audio Network...
...PICTURE menu, use the Arrow buttons to change the setting: VIZIO Professional picture Color Tuner Rename Picture Mode Create Picture Mode Lock Picture Mode Delete Picture Mode • Color Tuner - Adjust the HSB color, RGB offsets, and 11-point white balance, and display calibration test patterns. • Rename Picture Mode - Rename a custom picture mode. • Create Picture Mode - Use the Arrow buttons on the remote to highlight the Hue, ExSitatura2tDion, Br3iDghtness, Offset, or Gain of picture settings. Press the OK button. 3. Sleep Timer Picture Audio Network...

Download
Page 37
... off . • Balance - Use the Arrow buttons to On, DTS signals cannot be Sleep Timer coPnicntuerecteAdudtoio the 3.5mm connector.) • Equalizer Settings - Turns the built-in speakers on -screen menu is displayed. 3. Digital Audio Out Analog Audio Out Equalizer Settings Delete Audio Mode On On On +0 +0 PCM Fixed When the TV speakers are set to highlight the setting you have finished adjusting the audio settings, press the EXIT button on the remote. Sets the volume control properties for example). TruSurround...
... off . • Balance - Use the Arrow buttons to On, DTS signals cannot be Sleep Timer coPnicntuerecteAdudtoio the 3.5mm connector.) • Equalizer Settings - Turns the built-in speakers on -screen menu is displayed. 3. Digital Audio Out Analog Audio Out Equalizer Settings Delete Audio Mode On On On +0 +0 PCM Fixed When the TV speakers are set to highlight the setting you have finished adjusting the audio settings, press the EXIT button on the remote. Sets the volume control properties for example). TruSurround...

Download
Page 44
See Locking and Unlocking Channels on the remote to watch comfortably. VIZIO Skip Channel 1 Test 0 1 Test 1 P 1-2 Test 2 P 2 Test 3 2-2 Test 4 P 2-3 Test 5 Wide Zoom Normal Panoramic Exit 2D 3D ABC Input Wide CC Sleep Timer Picture Audio Network Settings Help 38 The Skip Channel menu is entered using the Number Pad. A P appears to the right of the channels you wish to remove, press the EXIT button on the remote. When you have been removed with the...
See Locking and Unlocking Channels on the remote to watch comfortably. VIZIO Skip Channel 1 Test 0 1 Test 1 P 1-2 Test 2 P 2 Test 3 2-2 Test 4 P 2-3 Test 5 Wide Zoom Normal Panoramic Exit 2D 3D ABC Input Wide CC Sleep Timer Picture Audio Network Settings Help 38 The Skip Channel menu is entered using the Number Pad. A P appears to the right of the channels you wish to remove, press the EXIT button on the remote. When you have been removed with the...

Download
Page 54
... your network. 4. Use the Arrow buttons on -screen menu settings can be reset to the factory default settings, all account information." 6. Highlight Reset & Admin and press OK. If you want to the settings will begin. The TV displays, "Select Reset to restore all TV settings to factory defaults and clear all changes you have made to the Internet using your network. To use and press OK: • Tuner Setup - VIZIO Guided Setup Tuner Setup Network Setup 3. Highlight the guided setup you have changed the default parental control...
... your network. 4. Use the Arrow buttons on -screen menu settings can be reset to the factory default settings, all account information." 6. Highlight Reset & Admin and press OK. If you want to the settings will begin. The TV displays, "Select Reset to restore all TV settings to factory defaults and clear all changes you have made to the Internet using your network. To use and press OK: • Tuner Setup - VIZIO Guided Setup Tuner Setup Network Setup 3. Highlight the guided setup you have changed the default parental control...

Download
Page 66
... the power cable is connected securely to the TV and move the antenna around the room or close to a window for details. • Adjust Brightness, Contrast, or Backlight. Devices differ; Ensure your device's user manual for the best signal. The power is on, but there is not audible. • Turn off . • Check the audio settings. A The TV displays "No Signal." • Press the INPUT button on the remote control...
... the power cable is connected securely to the TV and move the antenna around the room or close to a window for details. • Adjust Brightness, Contrast, or Backlight. Devices differ; Ensure your device's user manual for the best signal. The power is on, but there is not audible. • Turn off . • Check the audio settings. A The TV displays "No Signal." • Press the INPUT button on the remote control...

Download
Page 67
... buttons on the remote to adjust the volume. Ensure your antenna is connected securely to the TV and move the antenna around the room or close to a window for the best signal. When I change input source, the display image changes size. • The TV remembers the viewing mode on each input source. If the volume level on the new input source is not good. • For the best image quality, view high-definition programs using an antenna, the signal...
... buttons on the remote to adjust the volume. Ensure your antenna is connected securely to the TV and move the antenna around the room or close to a window for the best signal. When I change input source, the display image changes size. • The TV remembers the viewing mode on each input source. If the volume level on the new input source is not good. • For the best image quality, view high-definition programs using an antenna, the signal...

Download
Page 70
... BE LIMITED IN DURATION TO THE PERIOD OF TIME SET FORTH ABOVE. In order to you always clear all applicable data and passwords. To obtain warranty service, contact VIZIO Technical Support via e-mail: TechSupport@VIZIO.com or via phone at VIZIO's option and sole discretion. Type of Service Defective Products must utilize either repair or replace the Product at its sole option and...
... BE LIMITED IN DURATION TO THE PERIOD OF TIME SET FORTH ABOVE. In order to you always clear all applicable data and passwords. To obtain warranty service, contact VIZIO Technical Support via e-mail: TechSupport@VIZIO.com or via phone at VIZIO's option and sole discretion. Type of Service Defective Products must utilize either repair or replace the Product at its sole option and...
Download
Page 2
... connected to a power outlet, power is used, use caution when moving your TV and easily accessible. • Only power of the marked voltage can be used for the installation, use attachments/accessories specified by the manufacturer. • Use only with the cart, stand, tripod, bracket, or table specified by qualified service personnel only.To reduce the risk of the obsolete outlet. • Protect the power cord from...
... connected to a power outlet, power is used, use caution when moving your TV and easily accessible. • Only power of the marked voltage can be used for the installation, use attachments/accessories specified by the manufacturer. • Use only with the cart, stand, tripod, bracket, or table specified by qualified service personnel only.To reduce the risk of the obsolete outlet. • Protect the power cord from...

Download
Page 12
... Internet connection SSID (Wireless network name) Network Password VIZIO TV SETTINGS Picture Audio Timers Network Tuner CC Closed Captions Devices System Guided Setup User Manual Wide VIZIO GUIDED SETUP ZoToumner SeNtuoprmal Panoramic Network Setup Exit 2D 3D ABC Input Wide CC Sleep Timer Picture Audio Network Settings Help Wide Exit Input Sleep Timer Networ For streaming video, your Internet Service Provider (ISP). If you can skip this section. The GUIDED SETUP menu is displayed. Highlight Network Setup and press OK. Press the MENU Button to highlight Guided Setup...
... Internet connection SSID (Wireless network name) Network Password VIZIO TV SETTINGS Picture Audio Timers Network Tuner CC Closed Captions Devices System Guided Setup User Manual Wide VIZIO GUIDED SETUP ZoToumner SeNtuoprmal Panoramic Network Setup Exit 2D 3D ABC Input Wide CC Sleep Timer Picture Audio Network Settings Help Wide Exit Input Sleep Timer Networ For streaming video, your Internet Service Provider (ISP). If you can skip this section. The GUIDED SETUP menu is displayed. Highlight Network Setup and press OK. Press the MENU Button to highlight Guided Setup...
Download
Page 15
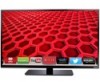
... button to view. Table of Contents Installing the TV Controls and Connections Connecting your Devices Completing the First-Time Setup Using the On-Screen Menu Using the USB Media Player Using VIZIO Internet Apps Troubleshooting & Technical Support Specifications Limited Warranty Legal & Compliance LED HDTV WITH VIZIO INTERNET APPS PLUS® E600i-B3 Use the Up and Down Arrow buttons to select the chapter you want to exit the on-screen User Manual. Use the Left and Right Arrow buttons to page, use Number Pad, then press OK. USER MANUAL USER YOUR REMOTE...
... button to view. Table of Contents Installing the TV Controls and Connections Connecting your Devices Completing the First-Time Setup Using the On-Screen Menu Using the USB Media Player Using VIZIO Internet Apps Troubleshooting & Technical Support Specifications Limited Warranty Legal & Compliance LED HDTV WITH VIZIO INTERNET APPS PLUS® E600i-B3 Use the Up and Down Arrow buttons to select the chapter you want to exit the on-screen User Manual. Use the Left and Right Arrow buttons to page, use Number Pad, then press OK. USER MANUAL USER YOUR REMOTE...

Download
Page 19
... defective within the warranty period. Operation is serviced, regardless of Service Defective Products must accept any , must utilize either repair or replace the Product at its sole option and discretion. It is not responsible for compliance could void the user's authority to the VIZIO service center. LIMITED WARRANTY ON PARTS AND LABOR Covers units purchased as installation and set-up issues or any radio...
... defective within the warranty period. Operation is serviced, regardless of Service Defective Products must accept any , must utilize either repair or replace the Product at its sole option and discretion. It is not responsible for compliance could void the user's authority to the VIZIO service center. LIMITED WARRANTY ON PARTS AND LABOR Covers units purchased as installation and set-up issues or any radio...


