
M320SL User Manua
Page 8
...Replacing the Batteries 14 Connecting Your Devices 15 Connecting A Device 15 Connecting A PC 16 Connecting an audio device (Model M320SL 17 Connecting an audio device (Model M370SL, M420SL, M470SL, M550SL 18 Connecting to your network 19 Connecting to a Wired Network (Best 19 Connecting to a Wireless Network 30 Changing... the Package Contents 3 Installing the TV 3 Installing the TV Stand 3 Installing the TV on a Wall 5 Controls and Connections 7 Rear Panel (Model M320SL 7 Rear Panel (Models M370SL, M420SL, M470SL, M550SL)..... 8 Side Panel 9 Front Panel 10 Remote Control...
...Replacing the Batteries 14 Connecting Your Devices 15 Connecting A Device 15 Connecting A PC 16 Connecting an audio device (Model M320SL 17 Connecting an audio device (Model M370SL, M420SL, M470SL, M550SL 18 Connecting to your network 19 Connecting to a Wired Network (Best 19 Connecting to a Wireless Network 30 Changing... the Package Contents 3 Installing the TV 3 Installing the TV Stand 3 Installing the TV on a Wall 5 Controls and Connections 7 Rear Panel (Model M320SL 7 Rear Panel (Models M370SL, M420SL, M470SL, M550SL)..... 8 Side Panel 9 Front Panel 10 Remote Control...

M320SL User Manua
Page 10
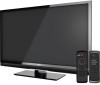
VIZIO LED LCD HDTV Installing the TV After removing the TV from the box and inspecting the package contents you can be installed in two ways: &#... TV Inspecting the Package Contents Before installing your new TV, take a moment to ensure nothing is not properly secured Quick Start Guide Power Cord (For Models M320SL, M370SL) (For Models M420SL, M470SL, M550SL) Remote Control with Batteries Package Contents 3 TV on Stand
VIZIO LED LCD HDTV Installing the TV After removing the TV from the box and inspecting the package contents you can be installed in two ways: &#... TV Inspecting the Package Contents Before installing your new TV, take a moment to ensure nothing is not properly secured Quick Start Guide Power Cord (For Models M320SL, M370SL) (For Models M420SL, M470SL, M550SL) Remote Control with Batteries Package Contents 3 TV on Stand

M320SL User Manua
Page 12
... and tighten the thumbscrew. 4. Remove the base by loosening and removing the screws. 4. Push the base onto the neck as carpet, rug, or blanket. 2. M470SL M550SL Screw Size: Screw Pitch: Hole Pattern: M6 1.0mm 400mm (V) x 400mm (H) M8 1.25mm 400mm (V) x 400mm (H) Be sure the mount you . Disconnect any... a wall mount. After you have determined that can begin the installation. Attach your TV and wall mount to find the appropriate mount for your TV model: Installing a TV on a flat, level, and stable surface. 5. To install yovur TV on a soft surface, such as shown. 3. To ...
... and tighten the thumbscrew. 4. Remove the base by loosening and removing the screws. 4. Push the base onto the neck as carpet, rug, or blanket. 2. M470SL M550SL Screw Size: Screw Pitch: Hole Pattern: M6 1.0mm 400mm (V) x 400mm (H) M8 1.25mm 400mm (V) x 400mm (H) Be sure the mount you . Disconnect any... a wall mount. After you have determined that can begin the installation. Attach your TV and wall mount to find the appropriate mount for your TV model: Installing a TV on a flat, level, and stable surface. 5. To install yovur TV on a soft surface, such as shown. 3. To ...

M320SL User Manua
Page 14
Optical Audio Out - Connect optical/SPDIF audio device, such as sound bar. Connect USB thumb drive to play photo, music, or video. PC Audio In - Rear Panel - M320SL 7 Connect 3.5mm PC audio cable RGB - HDMI - Connect component or composite device. Connect 3.5mm audio device, such as home audio receiver. Connect ethernet cable from cable, satellite, or antenna. Component/Compsite - Ethernet - Connect PC Coaxial - Connect coaxial cable from home network. Stereo Audio Out - Controls and Connections Rear Panel (Model M320SL) 2 USB - Connect HDMI device.
Optical Audio Out - Connect optical/SPDIF audio device, such as sound bar. Connect USB thumb drive to play photo, music, or video. PC Audio In - Rear Panel - M320SL 7 Connect 3.5mm PC audio cable RGB - HDMI - Connect component or composite device. Connect 3.5mm audio device, such as home audio receiver. Connect ethernet cable from cable, satellite, or antenna. Component/Compsite - Ethernet - Connect PC Coaxial - Connect coaxial cable from home network. Stereo Audio Out - Controls and Connections Rear Panel (Model M320SL) 2 USB - Connect HDMI device.

M320SL User Manua
Page 15
.... Connect 3.5mm audio device, such as home audio receiver. Connect HDMI device. (HDMI 4 on M420SL, M470SL, M550SL only) Ethernet - Stereo Audio Out - Component/Compsite - HDMI - PC Audio In - M370SL 8 2 Rear Panel (Models M370SL, M420SL, M470SL, M550SL) USB - Rear Panel - Connect PC Coaxial - Connect USB thumb drive to play photo, music, or video. Connect...
.... Connect 3.5mm audio device, such as home audio receiver. Connect HDMI device. (HDMI 4 on M420SL, M470SL, M550SL only) Ethernet - Stereo Audio Out - Component/Compsite - HDMI - PC Audio In - M370SL 8 2 Rear Panel (Models M370SL, M420SL, M470SL, M550SL) USB - Rear Panel - Connect PC Coaxial - Connect USB thumb drive to play photo, music, or video. Connect...

M320SL User Manua
Page 18
.... App launcher Quickly launch the pictured app. Last Return to manually enter a digital sub-channel. (For example, 18-4 or 18-5.) Remote Control 11 2 Remote Control (Models M320SL, M370SL) Input Change the currently-displayed input. A/V Controls Control USB media player. Volume Up/Down Increase or decrease loudness of the audio. Wide Switch...
.... App launcher Quickly launch the pictured app. Last Return to manually enter a digital sub-channel. (For example, 18-4 or 18-5.) Remote Control 11 2 Remote Control (Models M320SL, M370SL) Input Change the currently-displayed input. A/V Controls Control USB media player. Volume Up/Down Increase or decrease loudness of the audio. Wide Switch...

M320SL User Manua
Page 19
... 12 Arrow Navigate the on -screen menu. Ok Select the highlighted menu option. Mute Turn the audio off . Menu Display the on -screen menu. FRONT (Models M420SL, M470SL, M550SL) Input Change the currently-displayed input. Power Turn TV on or off or on. Info Display the info window.
... 12 Arrow Navigate the on -screen menu. Ok Select the highlighted menu option. Mute Turn the audio off . Menu Display the on -screen menu. FRONT (Models M420SL, M470SL, M550SL) Input Change the currently-displayed input. Power Turn TV on or off or on. Info Display the info window.

M320SL User Manua
Page 20
Back (Models M420SL, M470SL, M550SL) do not cover this area This is the transmitter. Alt Press and hold while pressing another key to enter a # character. V.I.A. Shortcut buttons Control VIZIO Internet Apps Remote Control - SHIFT Press and hold while pressing another key to enter a capital letter. For example, press ALT and W to enter a blue character. Back 13 ARROW Navigate the on-screen menu. 2 Remote Control -
Back (Models M420SL, M470SL, M550SL) do not cover this area This is the transmitter. Alt Press and hold while pressing another key to enter a # character. V.I.A. Shortcut buttons Control VIZIO Internet Apps Remote Control - SHIFT Press and hold while pressing another key to enter a capital letter. For example, press ALT and W to enter a blue character. Back 13 ARROW Navigate the on-screen menu. 2 Remote Control -

M320SL User Manua
Page 24
M320SL 17 Connect the appropriate cable (not included) to an audio device, such as a receiver or sound bar. 1. Connecting an audio device (Model M320SL) Your TV can output sound to the TV and the device. 4. Turn the TV and your device on the TV (Optical, 3.5mm, etc). 2. Turn the TV and your audio device off. 3. Verify that your device has a video port that matches an available port on . 3 Home Audio Receiver VIZIO Sound Bar BETTER Optical/SPDIF Cable GOOD 3.5mm Cable CONNECTING AUDIO DEVICE -
M320SL 17 Connect the appropriate cable (not included) to an audio device, such as a receiver or sound bar. 1. Connecting an audio device (Model M320SL) Your TV can output sound to the TV and the device. 4. Turn the TV and your device on the TV (Optical, 3.5mm, etc). 2. Turn the TV and your audio device off. 3. Verify that your device has a video port that matches an available port on . 3 Home Audio Receiver VIZIO Sound Bar BETTER Optical/SPDIF Cable GOOD 3.5mm Cable CONNECTING AUDIO DEVICE -

M320SL User Manua
Page 25
Turn the TV and your device on the TV (Optical, 3.5mm, etc). 2. Home Audio Receiver VIZIO Sound Bar BETTER Optical/SPDIF Cable GOOD 3.5mm Cable CONNECTING AUDIO DEVICE 18 Connect the appropriate cable (not included) to an audio device, such as a receiver or sound bar. 1. 3 Connecting an audio device (Model M370SL, M420SL, M470SL, M550SL) Your TV can output sound to the TV and the device. 4. Turn the TV and your audio device off. 3. Verify that your device has a video port that matches an available port on .
Turn the TV and your device on the TV (Optical, 3.5mm, etc). 2. Home Audio Receiver VIZIO Sound Bar BETTER Optical/SPDIF Cable GOOD 3.5mm Cable CONNECTING AUDIO DEVICE 18 Connect the appropriate cable (not included) to an audio device, such as a receiver or sound bar. 1. 3 Connecting an audio device (Model M370SL, M420SL, M470SL, M550SL) Your TV can output sound to the TV and the device. 4. Turn the TV and your audio device off. 3. Verify that your device has a video port that matches an available port on .

M320SL User Manua
Page 62
... not cover Products sold "AS IS", "FACTORY RECERTIFIED", or by this occurs, your product, refer to the "DETAILS" tab of the model's product information page (www.VIZIO.com) or look for a period of one (1) year of non-commercial usage and ninety (90) days of customer misuse, modifications or ...WILL BE DELETED IN THE COURSE OF SOME IN-HOME AND ALL SHIP-IN WARANTY SERVICE. Product returns to the service center, but VIZIO will provide instructions for restoring all personal information from warranty service or replacement, whichever is capable of storing personal data and other than ...
... not cover Products sold "AS IS", "FACTORY RECERTIFIED", or by this occurs, your product, refer to the "DETAILS" tab of the model's product information page (www.VIZIO.com) or look for a period of one (1) year of non-commercial usage and ninety (90) days of customer misuse, modifications or ...WILL BE DELETED IN THE COURSE OF SOME IN-HOME AND ALL SHIP-IN WARANTY SERVICE. Product returns to the service center, but VIZIO will provide instructions for restoring all personal information from warranty service or replacement, whichever is capable of storing personal data and other than ...


