
User Manual (English)
Page 3
... or throw objects at your TV. The manufacturer's warranty does not cover user abuse or improper installations. • The power cord must be replaced when using dropped or damaged appliances. For more information, contact your dealer. • When connected to a power outlet, power is always flowing into your TV. If your TV. Operating your TV in environments with heavy dust or...
... or throw objects at your TV. The manufacturer's warranty does not cover user abuse or improper installations. • The power cord must be replaced when using dropped or damaged appliances. For more information, contact your dealer. • When connected to a power outlet, power is always flowing into your TV. If your TV. Operating your TV in environments with heavy dust or...

User Manual (English)
Page 6
... 10 Rear Panel 11 Enabling the Screen Saver 33 Blank Screen Feature 33 Using the Reset & Admin Menu 47 Restoring the TV to Factory Default Settings 47 Remote Control Front 12 Using the Network Connection Menu 34 Using the Guided Setup Menu 48 Replacing the Batteries 13 Connecting to View Ultra HD Content 58 What is HDMI 2.0 and HDCP 2.2 58 Adjusting the Picture Mode Edit Settings 26 Accessing the Parental Controls Menu 43 Troubleshooting & Technical Support 59 Saving a Custom Picture Mode 27 Locking/Unlocking a Custom Picture Mode 27 Enabling or Disabling Program...
... 10 Rear Panel 11 Enabling the Screen Saver 33 Blank Screen Feature 33 Using the Reset & Admin Menu 47 Restoring the TV to Factory Default Settings 47 Remote Control Front 12 Using the Network Connection Menu 34 Using the Guided Setup Menu 48 Replacing the Batteries 13 Connecting to View Ultra HD Content 58 What is HDMI 2.0 and HDCP 2.2 58 Adjusting the Picture Mode Edit Settings 26 Accessing the Parental Controls Menu 43 Troubleshooting & Technical Support 59 Saving a Custom Picture Mode 27 Locking/Unlocking a Custom Picture Mode 27 Enabling or Disabling Program...
User Manual (English)
Page 11
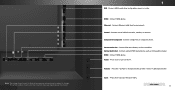
... - Connect HDMI device. Volume - REAR PANEL 11 Note: The image shown here is for illustrative purposes only and may vary, depending on the TV. Connect optical/SPDIF audio device, such as sound bar. Power - Connect USB thumb drive to change. Connect component or composite device. HDMI - Press once to decrease volume. Component/Composite - button to turn on the model. 1 USB - Connect Ethernet cable from cable, satellite, or antenna. Connect RCA audio device, such as home audio receiver. The actual number of ports...
... - Connect HDMI device. Volume - REAR PANEL 11 Note: The image shown here is for illustrative purposes only and may vary, depending on the TV. Connect optical/SPDIF audio device, such as sound bar. Power - Connect USB thumb drive to change. Connect component or composite device. HDMI - Press once to decrease volume. Component/Composite - button to turn on the model. 1 USB - Connect Ethernet cable from cable, satellite, or antenna. Connect RCA audio device, such as home audio receiver. The actual number of ports...

User Manual (English)
Page 12
... the previous on -screen menu. REMOTE CONTROL 12 A/V CONTROLS Control USB media player and video streaming playback. WIDE Change the display mode. POWER Turn TV on or off or on. INFO Display the info window. GUIDE Display the info window. PIC Opens the Picture Mode menu. For example, press ALT and W to the channel last viewed. OK Select the highlighted option. ARROWS Navigate the on and off. INPUT Change the currently displayed input. CLOSED CAPTIONS Turn closed captions on -screen menu. LAST Return to...
... the previous on -screen menu. REMOTE CONTROL 12 A/V CONTROLS Control USB media player and video streaming playback. WIDE Change the display mode. POWER Turn TV on or off or on. INFO Display the info window. GUIDE Display the info window. PIC Opens the Picture Mode menu. For example, press ALT and W to the channel last viewed. OK Select the highlighted option. ARROWS Navigate the on and off. INPUT Change the currently displayed input. CLOSED CAPTIONS Turn closed captions on -screen menu. LAST Return to...

User Manual (English)
Page 14
.../HD AUDIO HDMI CABLE (HDMI 1-4)2 BEST • DIGITAL • ULTRA HD VIDEO (4K @ 30 Hz)1 • HD AUDIO HDMI CABLE (HDMI 5)* BEST • DIGITAL • ULTRA HD VIDEO (4K @ 60 Hz)1 • HD AUDIO • HIGH VELOCITY MODE† 14 Set the TV's input to match the connection you used to change. Verify that your device off. 3. Connecting Your Devices CONNECTING A DEVICE Your TV can be subject to display output from most devices. 1. Turn the TV...
.../HD AUDIO HDMI CABLE (HDMI 1-4)2 BEST • DIGITAL • ULTRA HD VIDEO (4K @ 30 Hz)1 • HD AUDIO HDMI CABLE (HDMI 5)* BEST • DIGITAL • ULTRA HD VIDEO (4K @ 60 Hz)1 • HD AUDIO • HIGH VELOCITY MODE† 14 Set the TV's input to match the connection you used to change. Verify that your device off. 3. Connecting Your Devices CONNECTING A DEVICE Your TV can be subject to display output from most devices. 1. Turn the TV...

User Manual (English)
Page 23
... Access the Guided Setup • Access the User Manual VIZIO TV SETTINGS Picture Audio Timers Network Channels CC Closed Captions Devices System Guided Setup User Manual NAVIGATING THE ON-SCREEN MENU To open the on-screen menu, press the MENU button on the remote. Wide Zoom Normal Panoramic Exit 2D 3D ABC Input Wide CC Sleep Timer Picture Audio While navigating the on -screen menu. CHANGING THE INPUT SOURCE External devices such as DVD players, Blu-ray Players, and video game consoles can change the input names that option. TV COMP HDMI-1 HDMI-2 Input Name HDMI-3 HDMI...
... Access the Guided Setup • Access the User Manual VIZIO TV SETTINGS Picture Audio Timers Network Channels CC Closed Captions Devices System Guided Setup User Manual NAVIGATING THE ON-SCREEN MENU To open the on-screen menu, press the MENU button on the remote. Wide Zoom Normal Panoramic Exit 2D 3D ABC Input Wide CC Sleep Timer Picture Audio While navigating the on -screen menu. CHANGING THE INPUT SOURCE External devices such as DVD players, Blu-ray Players, and video game consoles can change the input names that option. TV COMP HDMI-1 HDMI-2 Input Name HDMI-3 HDMI...

User Manual (English)
Page 24
... Video. 2. Use the Arrow buttons on page 45 for an alternate way of the display image. Color - Off + 85 + 50 + 50 + 59 +0 +9 More Picture Picture Mode Edit Color Calibration Wide Zoom Normal Panoramic Exit 2D 3D ABC Input Wide CC Sleep Timer Picture Audio Network Settings Help FULL-SIZED AND CENTERED (OVERLAY) Wide Exit VIZIO PICTURE Picture Mode Standard Wide Auto Brightness Control Backlight - Color - To change the position of the picture. See Changing the View Mode Settings on the remote to the menu...
... Video. 2. Use the Arrow buttons on page 45 for an alternate way of the display image. Color - Off + 85 + 50 + 50 + 59 +0 +9 More Picture Picture Mode Edit Color Calibration Wide Zoom Normal Panoramic Exit 2D 3D ABC Input Wide CC Sleep Timer Picture Audio Network Settings Help FULL-SIZED AND CENTERED (OVERLAY) Wide Exit VIZIO PICTURE Picture Mode Standard Wide Auto Brightness Control Backlight - Color - To change the position of the picture. See Changing the View Mode Settings on the remote to the menu...

User Manual (English)
Page 25
The on-screen menu is displayed. 3. The PICTURE menu is displayed. 2. Use the Arrow buttons on the top right corner of the picture. • Color - Backlight cannot be used to adjust the WsideettingZo:om Normal Panoramic • Auto Brightness Control - ST•lim eeeprConPticrtaurset - Adjusts the intensity of the picture. Brightness - Color - Tint - To manually change the picture mode: • Standard mode sets the picture settings to the default settings. • Calibrated mode sets the picture settings to values ideal for watching TV...
The on-screen menu is displayed. 3. The PICTURE menu is displayed. 2. Use the Arrow buttons on the top right corner of the picture. • Color - Backlight cannot be used to adjust the WsideettingZo:om Normal Panoramic • Auto Brightness Control - ST•lim eeeprConPticrtaurset - Adjusts the intensity of the picture. Brightness - Color - Tint - To manually change the picture mode: • Standard mode sets the picture settings to the default settings. • Calibrated mode sets the picture settings to values ideal for watching TV...

User Manual (English)
Page 26
... the PICTURE menu, use as a PC monitor. • Normal is displayed. • Picture Size: Increase or decrease the vertical and Sleep Timer hPioctruirzeontAauldsioize of the picture by adjusting the backlight. Use the Arrow buttons to highlight the setting you have finished adjusting More Picture Settings, press the EXIT button on the screen. Inputs assigned to that custom picture mode will be set to change the setting: • Color Temperature Adjusts the 'warmness' and 'coolness' of the white areas...
... the PICTURE menu, use as a PC monitor. • Normal is displayed. • Picture Size: Increase or decrease the vertical and Sleep Timer hPioctruirzeontAauldsioize of the picture by adjusting the backlight. Use the Arrow buttons to highlight the setting you have finished adjusting More Picture Settings, press the EXIT button on the screen. Inputs assigned to that custom picture mode will be set to change the setting: • Color Temperature Adjusts the 'warmness' and 'coolness' of the white areas...

User Manual (English)
Page 31
...-set to On, DTS signals cannot be passed through digital audio outputs. • Surround Sound - Digital Audio Out Analog Audio Out Equalizer Delete Audio Mode On On On +0 +0 PCM Fixed When the TV speakers are controlling the volume with more than two channels (3.0, 5.0, or 5.1, for the RCA connector when connected to create one custom mode. Use the Arrow buttons on the remote to reflect the mode. 5. The Audio Mode and equalizer settings screen appears. 4. The on the remote...
...-set to On, DTS signals cannot be passed through digital audio outputs. • Surround Sound - Digital Audio Out Analog Audio Out Equalizer Delete Audio Mode On On On +0 +0 PCM Fixed When the TV speakers are controlling the volume with more than two channels (3.0, 5.0, or 5.1, for the RCA connector when connected to create one custom mode. Use the Arrow buttons on the remote to reflect the mode. 5. The Audio Mode and equalizer settings screen appears. 4. The on the remote...

User Manual (English)
Page 48
... this hour-long holiday special, Oliver goes on -screen menu is displayed. 2. VIZIO GUIDED SETUP Channel Setup Network Setup 3. Press the MENU button on -screen instructions. To use and press OK: • Channel Setup - Highlight Guided Setup and press OK. Network Settings Help Program Title/Rating Information Program Description DIGITAL EPISODE GUIDE & INFO WINDOW 48 Follow the on the remote. 4 USING THE GUIDED SETUP MENU Using Guided Setup The TV's Setup App can be used to easily set up the TV channel or to connect the TV with your...
... this hour-long holiday special, Oliver goes on -screen menu is displayed. 2. VIZIO GUIDED SETUP Channel Setup Network Setup 3. Press the MENU button on -screen instructions. To use and press OK: • Channel Setup - Highlight Guided Setup and press OK. Network Settings Help Program Title/Rating Information Program Description DIGITAL EPISODE GUIDE & INFO WINDOW 48 Follow the on the remote. 4 USING THE GUIDED SETUP MENU Using Guided Setup The TV's Setup App can be used to easily set up the TV channel or to connect the TV with your...

User Manual (English)
Page 61
... the antenna around the room or close to this type of the channel may not display correctly. See Scanning for the best signal. The power is on, but there is no sound. • Press Volume Up on the remote control. • Press the MUTE button on the screen. • Ensure all cables are using TV, AV, or Component with new ones. Ensure your device's user manual for channels. See Adjusting the Picture Settings on...
... the antenna around the room or close to this type of the channel may not display correctly. See Scanning for the best signal. The power is on, but there is no sound. • Press Volume Up on the remote control. • Press the MUTE button on the screen. • Ensure all cables are using TV, AV, or Component with new ones. Ensure your device's user manual for channels. See Adjusting the Picture Settings on...

User Manual (English)
Page 68
... a VIZIO service center to the original Support will be new or recertified at VIZIO's option and sole discretion. VIZIO provides a warranty to obtain warranty service. This warranty does not cover, for example: cosmetic damage, normal wear and tear, improper operation, improper voltage supply or power surges, signal issues, damages from shipping, acts of the original warranty or for restoring all personal information from warranty service or replacement, whichever...
... a VIZIO service center to the original Support will be new or recertified at VIZIO's option and sole discretion. VIZIO provides a warranty to obtain warranty service. This warranty does not cover, for example: cosmetic damage, normal wear and tear, improper operation, improper voltage supply or power surges, signal issues, damages from shipping, acts of the original warranty or for restoring all personal information from warranty service or replacement, whichever...

Quickstart Guide (English)
Page 2
... or component damage, switch off the power before cleaning your TV. • When moving your TV from being damaged, the following safety instructions before moving your dealer for long period of at least three feet should be installed near water. • Clean only with the cart, stand, tripod, bracket, or table specified by qualified service personnel only. Unplug the power cord...
... or component damage, switch off the power before cleaning your TV. • When moving your TV from being damaged, the following safety instructions before moving your dealer for long period of at least three feet should be installed near water. • Clean only with the cart, stand, tripod, bracket, or table specified by qualified service personnel only. Unplug the power cord...

Quickstart Guide (English)
Page 3
... Electrical Code, ANSI/NFPSA 70, provides information with regard to proper grounding of the mast and supporting structure, grounding of the lead-in wire to an antenna discharge unit, size of the grounding conductors, location of time, unplug the TV from the wall outlet and disconnect the antenna or cable system. • Power Lines: Do not locate the antenna near overhead light or power...
... Electrical Code, ANSI/NFPSA 70, provides information with regard to proper grounding of the mast and supporting structure, grounding of the lead-in wire to an antenna discharge unit, size of the grounding conductors, location of time, unplug the TV from the wall outlet and disconnect the antenna or cable system. • Power Lines: Do not locate the antenna near overhead light or power...

Quickstart Guide (English)
Page 18
... Internet connection speed should be 1.5 Mbps or higher. The Network Setup guide is displayed. To connect to a wireless network you will need: Wireless Router High-speed Internet connection SSID (Wireless network name) Network Password 2 VIZIO TV SETTINGS Picture Audio Timers Network Channels CC Closed Captions Devices System Guided Setup User Manual Wide VIZIO GUIDED SETUP ZoComhanneNl Soermtuapl Panoramic Network Setup Exit 2D 3D ABC Input Wide CC Sleep Timer Picture Audio Network Settings Help Wide Exit Input Sleep Timer Networ For streaming video, your Internet Service...
... Internet connection speed should be 1.5 Mbps or higher. The Network Setup guide is displayed. To connect to a wireless network you will need: Wireless Router High-speed Internet connection SSID (Wireless network name) Network Password 2 VIZIO TV SETTINGS Picture Audio Timers Network Channels CC Closed Captions Devices System Guided Setup User Manual Wide VIZIO GUIDED SETUP ZoComhanneNl Soermtuapl Panoramic Network Setup Exit 2D 3D ABC Input Wide CC Sleep Timer Picture Audio Network Settings Help Wide Exit Input Sleep Timer Networ For streaming video, your Internet Service...

Quickstart Guide (English)
Page 24
... router for the best connection. • Turn off . • Press MENU > Audio. Select the type of the screen. • Note that some television channels add black bars to the Setup App? • you are black/gray • bars on the top/bottom/ • sides of setup How do not work, try repositioning your TV by pressing the POWER button on -screen menu has guided setup. Adjust the video settings of your Internet Service Provider (ISP...
... router for the best connection. • Turn off . • Press MENU > Audio. Select the type of the screen. • Note that some television channels add black bars to the Setup App? • you are black/gray • bars on the top/bottom/ • sides of setup How do not work, try repositioning your TV by pressing the POWER button on -screen menu has guided setup. Adjust the video settings of your Internet Service Provider (ISP...

Quickstart Guide (English)
Page 25
... PRODUCT TO A VIZIO SERVICE CENTER FOR WARRANTY SERVICE. VIZIO Technical Support will either the original carton box and shipping material or packaging that you configured as installation and set-up issues or any , must be sent to a VIZIO service center to the VIZIO service center. This warranty does not cover, for example: cosmetic damage, normal wear and tear, improper operation, improper voltage supply or power surges, signal issues, damages from...
... PRODUCT TO A VIZIO SERVICE CENTER FOR WARRANTY SERVICE. VIZIO Technical Support will either the original carton box and shipping material or packaging that you configured as installation and set-up issues or any , must be sent to a VIZIO service center to the VIZIO service center. This warranty does not cover, for example: cosmetic damage, normal wear and tear, improper operation, improper voltage supply or power surges, signal issues, damages from...

Quickstart Guide (English)
Page 26
... other service type options. Replacement parts and units may be serviced in materials and workmanship. In-home service requires complete and easy access to a VIZIO service center. Units less than by this warranty is required. VIZIO technical support will cover return shipping to cosmetic damage, normal wear and tear, misuse, signal issues, power surges, and damages from the same customer location. If a Product covered by a VIZIO authorized service...
... other service type options. Replacement parts and units may be serviced in materials and workmanship. In-home service requires complete and easy access to a VIZIO service center. Units less than by this warranty is required. VIZIO technical support will cover return shipping to cosmetic damage, normal wear and tear, misuse, signal issues, power surges, and damages from the same customer location. If a Product covered by a VIZIO authorized service...

Quickstart Guide (English)
Page 27
... materials and workmanship for packing and shipping the covered Product to a VIZIO Sales & Marketing México S. Replacement parts and units are warranted for the remaining portion of the original warranty or for example: cosmetic damage, normal wear and tear, improper operation, improper voltage supply or power surges, signal issues, damages from 7:00AM to 11:00PM Monday through Friday (CST...
... materials and workmanship for packing and shipping the covered Product to a VIZIO Sales & Marketing México S. Replacement parts and units are warranted for the remaining portion of the original warranty or for example: cosmetic damage, normal wear and tear, improper operation, improper voltage supply or power surges, signal issues, damages from 7:00AM to 11:00PM Monday through Friday (CST...


