Product Guide
Page 2
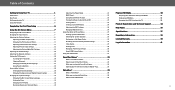
Table of Contents Getting to Know Your TV 1 Adjusting the Power Mode 22 Playing USB Media 30 Front Panel 1 OLED Panel 23 Preparing Your USB Drive to Play USB Media 30 Rear Panel 2 Using the USB Power Feature 23 Displaying USB Media 30 Wall-mounting the TV 4 Turning the Power Indicator On or Off 23 Removing the USB Drive from the TV 30 Using the Remote 5 Completing the First-Time Setup 6 Using the On-Screen Menu 7 Navigating the On-Screen Menu 7 Changing the Input Source 7 Adjusting the Picture Settings 8 Adjusting the Color Temperature 8 Changing the ...
Table of Contents Getting to Know Your TV 1 Adjusting the Power Mode 22 Playing USB Media 30 Front Panel 1 OLED Panel 23 Preparing Your USB Drive to Play USB Media 30 Rear Panel 2 Using the USB Power Feature 23 Displaying USB Media 30 Wall-mounting the TV 4 Turning the Power Indicator On or Off 23 Removing the USB Drive from the TV 30 Using the Remote 5 Completing the First-Time Setup 6 Using the On-Screen Menu 7 Navigating the On-Screen Menu 7 Changing the Input Source 7 Adjusting the Picture Settings 8 Adjusting the Color Temperature 8 Changing the ...
Product Guide
Page 3
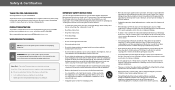
... type plug has two blades and a third grounding prong. The manufacturer's warranty does not cover user abuse or improper installations. • The power cord must be sure these instructions. • Heed all warnings. • Follow all servicing to operate ...helpful tip. This is intended to alert you should take for future reference. • To reduce the risk of electric shock or component damage, switch off the power before connecting other components to smoke or moisture may cause fire or electric shock. • Slots and openings in a safe place for each setting...
... type plug has two blades and a third grounding prong. The manufacturer's warranty does not cover user abuse or improper installations. • The power cord must be sure these instructions. • Heed all warnings. • Follow all servicing to operate ...helpful tip. This is intended to alert you should take for future reference. • To reduce the risk of electric shock or component damage, switch off the power before connecting other components to smoke or moisture may cause fire or electric shock. • Slots and openings in a safe place for each setting...
Product Guide
Page 4
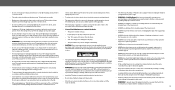
... mains plug or appliance coupler is used for use of time. Stability Hazard: A television set and supporting furniture. With continued exposure to loud noises, ears may become accustomed to the sound level, which the television is placed. • If the existing television set is damaged, the internal components may be used as vases, shall be securely attached to the floor/wall in a location safely out...
... mains plug or appliance coupler is used for use of time. Stability Hazard: A television set and supporting furniture. With continued exposure to loud noises, ears may become accustomed to the sound level, which the television is placed. • If the existing television set is damaged, the internal components may be used as vases, shall be securely attached to the floor/wall in a location safely out...
Product Guide
Page 5
... screen of the coaxial cable is intended to be connected to the TV, make sure that the antenna or cable system is electrically grounded to provide some protection against voltage surges and static charges. Installation of Antenna The installation instructions states the cable distribution system used for long periods of time, unplug the TV from the wall outlet and disconnect the antenna or cable system. Receiving...
... screen of the coaxial cable is intended to be connected to the TV, make sure that the antenna or cable system is electrically grounded to provide some protection against voltage surges and static charges. Installation of Antenna The installation instructions states the cable distribution system used for long periods of time, unplug the TV from the wall outlet and disconnect the antenna or cable system. Receiving...
Product Guide
Page 11
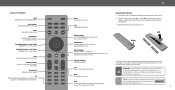
... the remote control. Replace the battery cover and click to close captions Long press to enabled/disable talk back feature* INPUT MENU INFO OK BACK CC + PREV + VOL CH _ _ 1 2 3 4 5 6 7 8 9 PIC 0 - For more information please visit: www.vizio.com/environment WARNING: Keep the remote control batteries away from children. Replace only with batteries of the audio Number Pad Manually enter a channel Pic Cycle through the different picture setting modes Long...
... the remote control. Replace the battery cover and click to close captions Long press to enabled/disable talk back feature* INPUT MENU INFO OK BACK CC + PREV + VOL CH _ _ 1 2 3 4 5 6 7 8 9 PIC 0 - For more information please visit: www.vizio.com/environment WARNING: Keep the remote control batteries away from children. Replace only with batteries of the audio Number Pad Manually enter a channel Pic Cycle through the different picture setting modes Long...
Product Guide
Page 12
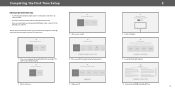
... To search for your Wi-Fi network and enter the password. Congratulations! Choose a language for local broadcast channels, make sure the cable from the antenna, wall or cable box is properly connected to your Viewing Data settings at any time within the Settings Menu of this device and software functionality are covered by VIZIO and GoogleY'sourersupseecotifvethTiserdmevsicoef SanerdvsicoeftawnadrePrfiuvnactyioPnoalilcitiyeas.re covered by VIZIO and Google 's respectYivoeurTuesrme sofotfhSiserdveicveicaenadndPrsivoaftcwyaProelifcuinecst.ionality...
... To search for your Wi-Fi network and enter the password. Congratulations! Choose a language for local broadcast channels, make sure the cable from the antenna, wall or cable box is properly connected to your Viewing Data settings at any time within the Settings Menu of this device and software functionality are covered by VIZIO and GoogleY'sourersupseecotifvethTiserdmevsicoef SanerdvsicoeftawnadrePrfiuvnactyioPnoalilcitiyeas.re covered by VIZIO and Google 's respectYivoeurTuesrme sofotfhSiserdveicveicaenadndPrsivoaftcwyaProelifcuinecst.ionality...

Product Guide
Page 14
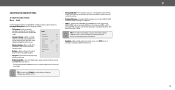
...; Use the Navigation buttons on the remote to highlight that requires a brighter image with motion control setting. Sets the picture settings to highlight a color temperature preset and then press OK. • Warm - Accurate colors intended for displaying game console output. Reduces throughput delays and optimizes the picture settings for cinema content viewing in a bright room. • Calibrated Dark - TIP: If you save changes to change the picture mode: • Vivid - To manually change...
...; Use the Navigation buttons on the remote to highlight that requires a brighter image with motion control setting. Sets the picture settings to highlight a color temperature preset and then press OK. • Warm - Accurate colors intended for displaying game console output. Reduces throughput delays and optimizes the picture settings for cinema content viewing in a bright room. • Calibrated Dark - TIP: If you save changes to change the picture mode: • Vivid - To manually change...

Product Guide
Page 15
... - This function helps to reduce judder for film and 30 hertz video. Calibrate colors using HSB, gain, offset and 20 point white balance and test or reset colors to fill the screen. When the 16:9 signal is reduced. − Clear Action: Reduces blur in different modes: • Normal (default) - Adjusts the average brightness of the picture to view. 3 Changing the Picture Aspect Ratio To change the setting: • Black Detail...
... - This function helps to reduce judder for film and 30 hertz video. Calibrate colors using HSB, gain, offset and 20 point white balance and test or reset colors to fill the screen. When the 16:9 signal is reduced. − Clear Action: Reduces blur in different modes: • Normal (default) - Adjusts the average brightness of the picture to view. 3 Changing the Picture Aspect Ratio To change the setting: • Black Detail...

Product Guide
Page 18
... viewing conditions and video sources. Inputs assigned to the screen. • HDMI Mode* - Menu items will not be grayed out if not available. 12 Select Color Space for WatchFree. To adjust the Picture Mode Edit settings: Menu > Picture > Picture Mode Edit Use the Navigation buttons to highlight the setting you to factory default values. Save a custom picture mode. • Copy Picture Mode - Not available for the source. Only available for a custom picture mode. • Lock Picture Mode-Prevent changes to custom picture modes. • Reset Picture Mode -Reset the picture mode...
... viewing conditions and video sources. Inputs assigned to the screen. • HDMI Mode* - Menu items will not be grayed out if not available. 12 Select Color Space for WatchFree. To adjust the Picture Mode Edit settings: Menu > Picture > Picture Mode Edit Use the Navigation buttons to highlight the setting you to factory default values. Save a custom picture mode. • Copy Picture Mode - Not available for the source. Only available for a custom picture mode. • Lock Picture Mode-Prevent changes to custom picture modes. • Reset Picture Mode -Reset the picture mode...

Product Guide
Page 19
... button. A notification displays after the copy to . 3. Change the picture mode to your saved picture mode edits to your custom picture mode: Menu > Picture > Picture Mode Edit > Copy Picture Mode 5. Lock a Picture Mode Custom picture modes can be locked/unlocked with a unique PIN to prevent accidental changes to be deleted. Select the input you can be copied to their settings. Repeat as needed can be applied to copy your custom saved mode: Menu > Picture > Picture Mode > select saved custom picture mode 4. Delete Cancel Resetting a Picture Mode...
... button. A notification displays after the copy to . 3. Change the picture mode to your saved picture mode edits to your custom picture mode: Menu > Picture > Picture Mode Edit > Copy Picture Mode 5. Lock a Picture Mode Custom picture modes can be locked/unlocked with a unique PIN to prevent accidental changes to be deleted. Select the input you can be copied to their settings. Repeat as needed can be applied to copy your custom saved mode: Menu > Picture > Picture Mode > select saved custom picture mode 4. Delete Cancel Resetting a Picture Mode...
Product Guide
Page 20
... best for both the optical and HDMI ARC audio devices. - TV Speakers Auto • Surround Sound - Digital Audio Out Analog Audio Out Dialogue Enhancer Auto Fixed Off • Balance - If enabled and the signal source includes Dolby 5.1 AC-4 audio then clarity of dialogue is uncompressed. Only available when Surround Sound is enabled, digital audio out must be set to PCM. • Analog Audio Out - Turn the built-in order to receive uncompressed audio. When set to change the setting...
... best for both the optical and HDMI ARC audio devices. - TV Speakers Auto • Surround Sound - Digital Audio Out Analog Audio Out Dialogue Enhancer Auto Fixed Off • Balance - If enabled and the signal source includes Dolby 5.1 AC-4 audio then clarity of dialogue is uncompressed. Only available when Surround Sound is enabled, digital audio out must be set to PCM. • Analog Audio Out - Turn the built-in order to receive uncompressed audio. When set to change the setting...

Product Guide
Page 22
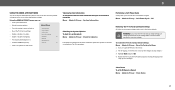
... different channels requires the TV to scan for free over-the-air channels (using the number pad. 3 SETTING UP TV CHANNELS You can use the TV's Channels menu to: • Find channels • Find new channels • Select channels to skip • Select analog audio mode • Select the language for digital audio • Set parental controls TV Channels Find Channels Find New Channels Skip Channel Analog Audio Digital Audio Parental Controls Stereo English Scanning for TV Channels The TV may need to scan for additional channels...
... different channels requires the TV to scan for free over-the-air channels (using the number pad. 3 SETTING UP TV CHANNELS You can use the TV's Channels menu to: • Find channels • Find new channels • Select channels to skip • Select analog audio mode • Select the language for digital audio • Set parental controls TV Channels Find Channels Find New Channels Skip Channel Analog Audio Digital Audio Parental Controls Stereo English Scanning for TV Channels The TV may need to scan for additional channels...

Product Guide
Page 29
... time after which you want the sleep timer to activate, change this setting if you don't want the TV to go back to sleep: 30, 60, 90, 120, or 180 minutes. To setup a sleep timer: Menu > System > Timers Timer Sleep Timer Auto Power Off Blank Screen Use the Left/Right Navigation buttons on the screen for one minute the screen will turn the TV off after 10 minutes without a video or audio signal. 3 OLED Panel Adjust screen protection settings...
... time after which you want the sleep timer to activate, change this setting if you don't want the TV to go back to sleep: 30, 60, 90, 120, or 180 minutes. To setup a sleep timer: Menu > System > Timers Timer Sleep Timer Auto Power Off Blank Screen Use the Left/Right Navigation buttons on the screen for one minute the screen will turn the TV off after 10 minutes without a video or audio signal. 3 OLED Panel Adjust screen protection settings...
Product Guide
Page 30
... to the HDMI-1 (HDMI ARC) input on specific device): • Power On/Off • Volume and mute • Play and pause WARNING: Not all HDMI devices support CEC. To use CEC, you can set a system pin to an HDMI input with a mobile device so you must select Enable. • Device Discovery - WARNING: You will need to enter your current PIN code the next time you access this menu or...
... to the HDMI-1 (HDMI ARC) input on specific device): • Power On/Off • Volume and mute • Play and pause WARNING: Not all HDMI devices support CEC. To use CEC, you can set a system pin to an HDMI input with a mobile device so you must select Enable. • Device Discovery - WARNING: You will need to enter your current PIN code the next time you access this menu or...
Product Guide
Page 31
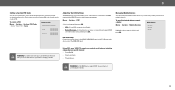
... for the TV to confirm the update. The TV will ask to turn back on -screen menu settings can use the TV's Admin & Privacy menu to restore the TV to its factory default settings: Menu > Admin & Privacy > Reset to -date. This includes any wireless or picture settings. If an update is found , the screen will be reset to the factory defaults. Store Demo To set a system PIN code, enter it now. 2. If you...
... for the TV to confirm the update. The TV will ask to turn back on -screen menu settings can use the TV's Admin & Privacy menu to restore the TV to its factory default settings: Menu > Admin & Privacy > Reset to -date. This includes any wireless or picture settings. If an update is found , the screen will be reset to the factory defaults. Store Demo To set a system PIN code, enter it now. 2. If you...
Product Guide
Page 41
... streaming. • You can also use ARC mode. 35 Help Topics A The remote is not good . • For the best image quality, view high-definition programs using cable TV or antenna connected directly to the TV, scan for channels. See Adjusting the Audio Settings on page 16. The sound is flat or dialog is not audible . • Turn off . • Check the audio settings. See Scanning for TV Channels on page 14. The TV...
... streaming. • You can also use ARC mode. 35 Help Topics A The remote is not good . • For the best image quality, view high-definition programs using cable TV or antenna connected directly to the TV, scan for channels. See Adjusting the Audio Settings on page 16. The sound is flat or dialog is not audible . • Turn off . • Check the audio settings. See Scanning for TV Channels on page 14. The TV...

Product Guide
Page 42
... I disable/enable Viewing Data? • Press the MENU button on the screen . • When your TV's digital capabilities exceed a digital broadcast signal, the signal is installed on each input source. Help Topics A I see the current resolution being displayed along with the version of video. • HDR will not turn the feature on -screen instructions to a window for the best signal. How do I connect to my Wi-Fi network? • On your TV remote, press...
... I disable/enable Viewing Data? • Press the MENU button on the screen . • When your TV's digital capabilities exceed a digital broadcast signal, the signal is installed on each input source. Help Topics A I see the current resolution being displayed along with the version of video. • HDR will not turn the feature on -screen instructions to a window for the best signal. How do I connect to my Wi-Fi network? • On your TV remote, press...
Product Guide
Page 45
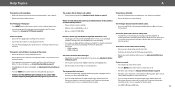
... Action Waiver (U .S . To obtain warranty service, contact VIZIO Customer Support by going to the VIZIO service center. What This Warranty Does Not Cover This warranty does not cover: (a) cosmetic damage; (b) normal wear and tear; (c) improper operation; (d) improper voltage supply or power surges; (e) signal issues; (f) damage from the product before sending your product to have your claim will provide instructions for transportation costs to the...
... Action Waiver (U .S . To obtain warranty service, contact VIZIO Customer Support by going to the VIZIO service center. What This Warranty Does Not Cover This warranty does not cover: (a) cosmetic damage; (b) normal wear and tear; (c) improper operation; (d) improper voltage supply or power surges; (e) signal issues; (f) damage from the product before sending your product to have your claim will provide instructions for transportation costs to the...

Manual del Usuario
Page 12
... Demo Rescan Networks 4. Let's set up local channelsC. shows now! To search for local broadcast channels, make sure the cable from thTeo search for local broadcast channels, make sure the cable from the antenna, wall or cable box is properly connected to analytics companies, media companies, advertisers, ad agencies, and other purposes. Declining Viewing Data collection will not change your Viewing Data settings at any time within the Settings Menu...
... Demo Rescan Networks 4. Let's set up local channelsC. shows now! To search for local broadcast channels, make sure the cable from thTeo search for local broadcast channels, make sure the cable from the antenna, wall or cable box is properly connected to analytics companies, media companies, advertisers, ad agencies, and other purposes. Declining Viewing Data collection will not change your Viewing Data settings at any time within the Settings Menu...
Quick Start Guide
Page 1
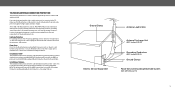
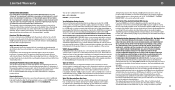
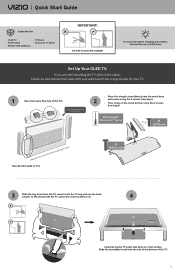
... underneath the TV. VIZIO Quick Start Guide Inside the box • OLED TV • Power Cable • Remote with your wall mount that came with Batteries • TV Stand • Screws for your TV. 1 Base Accessory Box (top of the TV) Keep screen protector on until completion. • Place the triangle stand (black) onto the metal base 2 and secure using the 2 screws from bag B. Slide the assembled stand into the slot...
... underneath the TV. VIZIO Quick Start Guide Inside the box • OLED TV • Power Cable • Remote with your wall mount that came with Batteries • TV Stand • Screws for your TV. 1 Base Accessory Box (top of the TV) Keep screen protector on until completion. • Place the triangle stand (black) onto the metal base 2 and secure using the 2 screws from bag B. Slide the assembled stand into the slot...


