
User Manual
Page 3
... shock, do not perform any servicing other than contact your dealer. Pulling on the apparatus. Do not expose batteries to leak which can damage the remote control or injure the operator. iii Continued use of your TV in environments with heavy dust or high humidity may cause fire or electric shock...
... shock, do not perform any servicing other than contact your dealer. Pulling on the apparatus. Do not expose batteries to leak which can damage the remote control or injure the operator. iii Continued use of your TV in environments with heavy dust or high humidity may cause fire or electric shock...

User Manual
Page 6
... the USB Media Player 49 Using the USB Media Player 49 Preparing Your USB Drive to Play USB Media 49 Playing USB Media 49 Using VIZIO Internet Apps Plus® (V.I .A. Plus Apps Window Overview 55 Completing The First-Time Setup 20 Changing the Analog Audio Language 38 Customizing the V.I .A. ... Off Feature 33 Turning the Power Indicator On or Off 46 Rear Panel 11 Enabling the Screen Saver 33 Using the Reset & Admin Menu 47 Remote Control Front 12 Blank Screen Feature 33 Restoring the TV to View Ultra HD Content 58 What is HDMI 2.0 and HDCP 2.2 58 Adjusting the...
... the USB Media Player 49 Using the USB Media Player 49 Preparing Your USB Drive to Play USB Media 49 Playing USB Media 49 Using VIZIO Internet Apps Plus® (V.I .A. Plus Apps Window Overview 55 Completing The First-Time Setup 20 Changing the Analog Audio Language 38 Customizing the V.I .A. ... Off Feature 33 Turning the Power Indicator On or Off 46 Rear Panel 11 Enabling the Screen Saver 33 Using the Reset & Admin Menu 47 Remote Control Front 12 Blank Screen Feature 33 Restoring the TV to View Ultra HD Content 58 What is HDMI 2.0 and HDCP 2.2 58 Adjusting the...

User Manual
Page 7
Getting to Know Your TV INSPECTING THE PACKAGE CONTENTS Before installing your new TV, take a moment to ensure nothing is missing or damaged. VIZIO LED UHDTV with Stand 1 Power Cord INPUT LIST EXIT MENU INFO BACK VOL GUIDE CH 3D 1 2 3 4 5 6 7 8 9 ENTER 0 Two-Sided Remote with Keyboard (Batteries Included) Quick Start Guide 4 x M5 14mm Phillips Screws (P552ui-B2) 4 x M6 18mm Phillips Screws (P652ui-B2) 4 x M6 16mm Phillips Screws PACKAGE CONTENTS 7 Use the images below to inspect the package contents.
Getting to Know Your TV INSPECTING THE PACKAGE CONTENTS Before installing your new TV, take a moment to ensure nothing is missing or damaged. VIZIO LED UHDTV with Stand 1 Power Cord INPUT LIST EXIT MENU INFO BACK VOL GUIDE CH 3D 1 2 3 4 5 6 7 8 9 ENTER 0 Two-Sided Remote with Keyboard (Batteries Included) Quick Start Guide 4 x M5 14mm Phillips Screws (P552ui-B2) 4 x M6 18mm Phillips Screws (P652ui-B2) 4 x M6 16mm Phillips Screws PACKAGE CONTENTS 7 Use the images below to inspect the package contents.

User Manual
Page 10
FRONT PANEL 10 The power indicator flashes on when the TV turns on page 46. 1 REMOTE SENSOR & POWER INDICATOR When using the remote, aim it directly at this sensor. To keep the power indicator on as long as the TV is on, see Turning the Power Indicator On or Off on , then goes out after several seconds.
FRONT PANEL 10 The power indicator flashes on when the TV turns on page 46. 1 REMOTE SENSOR & POWER INDICATOR When using the remote, aim it directly at this sensor. To keep the power indicator on as long as the TV is on, see Turning the Power Indicator On or Off on , then goes out after several seconds.
User Manual
Page 12
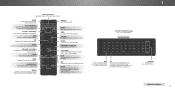
...18-5.) DO NOT COVER THIS AREA This is the transmitter. SHIFT Press and hold while pressing another key to the previous on -screen menu. REMOTE CONTROL 12 CLOSED CAPTIONS Turn closed captions on or off. POWER Turn TV on and off or on -screen menu. Plus) dock. ALT ...to the channel last viewed. For example, press ALT and W to enter a blue character. INPUT Change the currently displayed input. V BUTTON Open the VIZIO Internet Apps Plus® (V.I.A. GUIDE Display the info window. PIC Opens the Picture Mode menu. MUTE Turn the audio off . 1 APP LAUNCHER Quickly ...
...18-5.) DO NOT COVER THIS AREA This is the transmitter. SHIFT Press and hold while pressing another key to the previous on -screen menu. REMOTE CONTROL 12 CLOSED CAPTIONS Turn closed captions on or off. POWER Turn TV on and off or on -screen menu. Plus) dock. ALT ...to the channel last viewed. For example, press ALT and W to enter a blue character. INPUT Change the currently displayed input. V BUTTON Open the VIZIO Internet Apps Plus® (V.I.A. GUIDE Display the info window. PIC Opens the Picture Mode menu. MUTE Turn the audio off . 1 APP LAUNCHER Quickly ...

User Manual
Page 13
Press in on the button on the batteries match the (+) and (-) symbols inside the battery compartment. 4. Replace the battery cover. 13 Insert two AAA batteries into the remote control. Remove the battery cover. 1 3. Replacing the Batteries 1. Make sure that the (+) and (-) symbols on the rear of the remote. 2.
Press in on the button on the batteries match the (+) and (-) symbols inside the battery compartment. 4. Replace the battery cover. 13 Insert two AAA batteries into the remote control. Remove the battery cover. 1 3. Replacing the Batteries 1. Make sure that the (+) and (-) symbols on the rear of the remote. 2.
User Manual
Page 20
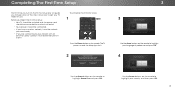
..." pour Démonstration en Magasin. To complete the first-time setup: 1 Press the Power button on the remote.The TV powers on the remote to highlight your mode. Store Demo Home Use Use the Arrow buttons on the remote to highlight Home Use and press OK. 3 3 Use the Arrow buttons on the... remote to highlight your language of the steps necessary to an electrical outlet. • Your devices should be connected to get your TV ready...
..." pour Démonstration en Magasin. To complete the first-time setup: 1 Press the Power button on the remote.The TV powers on the remote to highlight your mode. Store Demo Home Use Use the Arrow buttons on the remote to highlight Home Use and press OK. 3 3 Use the Arrow buttons on the... remote to highlight your language of the steps necessary to an electrical outlet. • Your devices should be connected to get your TV ready...

User Manual
Page 21
Select the name of available networks and press OK. When you are finished, highlight I Accept and press OK. 8 Enter the network password using the keyboard on the remote. Highlight Next and press OK. 21 Use the Arrow and OK buttons on the remote, then highlight Connect and press OK. Enter your wireless network from the list of your E-mail Address, First Name, Last Name, and Zip Code using the keyboard on the remote to review the Terms Of Service and Privacy Policy. 3 5 6 7 Select your time zone and press OK.
Select the name of available networks and press OK. When you are finished, highlight I Accept and press OK. 8 Enter the network password using the keyboard on the remote. Highlight Next and press OK. 21 Use the Arrow and OK buttons on the remote, then highlight Connect and press OK. Enter your wireless network from the list of your E-mail Address, First Name, Last Name, and Zip Code using the keyboard on the remote to review the Terms Of Service and Privacy Policy. 3 5 6 7 Select your time zone and press OK.
User Manual
Page 22
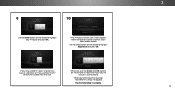
...When you connect the TV directly to a cable from the wall. 9 10 Use the Arrow buttons on the remote to scan for channels, which takes several minutes. If the TV Signal channel scan screen appears, the TV will ...appear. The First-Time Setup is set up." Use the arrow buttons on the remote to select the input your TV source and press OK. will need to highlight your TV source is connected... Begin Scan and press OK. Otherwise, use the Arrow and OK buttons on the remote to . If you have cable TV, select whether you have a cable box or if you are finished, ...
...When you connect the TV directly to a cable from the wall. 9 10 Use the Arrow buttons on the remote to scan for channels, which takes several minutes. If the TV Signal channel scan screen appears, the TV will ...appear. The First-Time Setup is set up." Use the arrow buttons on the remote to select the input your TV source and press OK. will need to highlight your TV source is connected... Begin Scan and press OK. Otherwise, use the Arrow and OK buttons on the remote to . If you have cable TV, select whether you have a cable box or if you are finished, ...

User Manual
Page 23
... Set up Closed Captioning • Name Inputs • Adjust TV settings • Access the Guided Setup • Access the User Manual VIZIO TV SETTINGS Picture Audio Timers Network Tuner CC Closed Captions Devices System Guided Setup User Manual NAVIGATING THE ON-SCREEN MENU To open the on...the input source: 1. Wide Zoom Normal Panoramic Exit 2D 3D ABC Input Wide CC Sleep Timer Picture Audio While navigating the on the remote. CHANGING THE INPUT SOURCE External devices such as DVD players, Blu-ray Players, and video game consoles can Network Septtinregsss Hthelpe BACK button...
... Set up Closed Captioning • Name Inputs • Adjust TV settings • Access the Guided Setup • Access the User Manual VIZIO TV SETTINGS Picture Audio Timers Network Tuner CC Closed Captions Devices System Guided Setup User Manual NAVIGATING THE ON-SCREEN MENU To open the on...the input source: 1. Wide Zoom Normal Panoramic Exit 2D 3D ABC Input Wide CC Sleep Timer Picture Audio While navigating the on the remote. CHANGING THE INPUT SOURCE External devices such as DVD players, Blu-ray Players, and video game consoles can Network Septtinregsss Hthelpe BACK button...

User Manual
Page 24
...Contrast - Medium + 85 + 50 + 50 + 59 +0 +9 Advanced Picture Picture Mode Management Network Settings Help Full-sized and centered (Overlay) Wide Exit VIZIO Wide Zoom Normal Panoramic PICTURE Picture Mode Standard Auto Brightness Control Backlight - al Tint - P i c tCuonrtreast Color Au--dio Tint - Full-sized and aligned... Settings Help ABC Resized to fill the screen. Sharpness - To change the position of the picture. Press the button on the remote to fit the screen. If you are watching widescreen (1.85:1 or 2.35:1) content, black bars will appear on -screen menu...
...Contrast - Medium + 85 + 50 + 50 + 59 +0 +9 Advanced Picture Picture Mode Management Network Settings Help Full-sized and centered (Overlay) Wide Exit VIZIO Wide Zoom Normal Panoramic PICTURE Picture Mode Standard Auto Brightness Control Backlight - al Tint - P i c tCuonrtreast Color Au--dio Tint - Full-sized and aligned... Settings Help ABC Resized to fill the screen. Sharpness - To change the position of the picture. Press the button on the remote to fit the screen. If you are watching widescreen (1.85:1 or 2.35:1) content, black bars will appear on -screen menu...

User Manual
Page 25
... detects the light levels in the picture. Adjusts the hue of the picture. • Color - Use the Arrow buttons on the remote to highlight that does not otherwise exist. 5. Select Off, Low, Medium, or High. If the setting is displayed. 3. The ... appear dark. ST•lim eeeprCseottnPinitcrgtaursiest - When you have finished adjusting the picture settings, press the EXIT button on the remote. VIZIO PICTURE Picture Mode Standard Auto Brightness Control Backlight - To manually change the picture mode: • Standard mode sets the various...
... detects the light levels in the picture. Adjusts the hue of the picture. • Color - Use the Arrow buttons on the remote to highlight that does not otherwise exist. 5. Select Off, Low, Medium, or High. If the setting is displayed. 3. The ... appear dark. ST•lim eeeprCseottnPinitcrgtaursiest - When you have finished adjusting the picture settings, press the EXIT button on the remote. VIZIO PICTURE Picture Mode Standard Auto Brightness Control Backlight - To manually change the picture mode: • Standard mode sets the various...

User Manual
Page 26
... menu is displayed. 2. Press tPhiceturOe K Abuudtioton when you have finished adjusting the Advanced Picture Settings, press the EXIT button on the remote. Set the shape of brightness. From the PICTURE menu, use the Arrow buttons to adjust the vertical position of the displayed picture. ... and 11-point white balance, and display calibration test patterns. • Save Picture Mode† - Delete a custom picture mode. VIZIO ADVANCED PICTURE Color Temperature Cool 2. Dynamically improves the contrast ratio of the picture by the digitizing of the picture to save groups of the...
... menu is displayed. 2. Press tPhiceturOe K Abuudtioton when you have finished adjusting the Advanced Picture Settings, press the EXIT button on the remote. Set the shape of brightness. From the PICTURE menu, use the Arrow buttons to adjust the vertical position of the displayed picture. ... and 11-point white balance, and display calibration test patterns. • Save Picture Mode† - Delete a custom picture mode. VIZIO ADVANCED PICTURE Color Temperature Cool 2. Dynamically improves the contrast ratio of the picture by the digitizing of the picture to save groups of the...
User Manual
Page 27
...Green Blue Cyan Magenta Yellow Hue 0 0 0 0 25 -14 Saturation -1 5 -4 0 -2 0 Brightness -24 0 -22 0 0 0 Offset 0 0 0 Gain 0 0 0 2. Use the Arrow buttons on the remote to highlight the Gain and Color values you wish to adjust. When you are finished with the color channels, press the EXIT button. Use the... Arrow buttons on the remote to highlight Color Tuner, and then press the Left/Right Arrow buttons until the 11 Point White Balance menu is displayed....
...Green Blue Cyan Magenta Yellow Hue 0 0 0 0 25 -14 Saturation -1 5 -4 0 -2 0 Brightness -24 0 -22 0 0 0 Offset 0 0 0 Gain 0 0 0 2. Use the Arrow buttons on the remote to highlight the Gain and Color values you wish to adjust. When you are finished with the color channels, press the EXIT button. Use the... Arrow buttons on the remote to highlight Color Tuner, and then press the Left/Right Arrow buttons until the 11 Point White Balance menu is displayed....
User Manual
Page 28
.... -or- From the Color Tuner menu, use the Arrow buttons to select the color for the flat test pattern. Use the Arrow buttons on the remote to highlight Off. 3. To hide the Ramp Test Pattern, use the Left/Right Arrow buttons to highlight Off. 4 To show the SMPTE Pattern. -or- Ramp... Pattern Off 2. Use the Left/Right Arrow buttons to highlight Off. Use the Arrow buttons on the remote to select the percentage brightness for the ramp test pattern. Use the Arrow buttons on the remote to show or hide the SMPTE Test Pattern: 1. From the Color Tuner menu, use the Left/Right...
.... -or- From the Color Tuner menu, use the Arrow buttons to select the color for the flat test pattern. Use the Arrow buttons on the remote to highlight Off. 3. To hide the Ramp Test Pattern, use the Left/Right Arrow buttons to highlight Off. 4 To show the SMPTE Pattern. -or- Ramp... Pattern Off 2. Use the Left/Right Arrow buttons to highlight Off. Use the Arrow buttons on the remote to select the percentage brightness for the ramp test pattern. Use the Arrow buttons on the remote to show or hide the SMPTE Test Pattern: 1. From the Color Tuner menu, use the Left/Right...

User Manual
Page 29
...picture mode will add an asterisk on Iynpouut r reWmidoete coCnC trol to enter a custom name. See Adjusting the Picture Settings on the remote. 2. The RENAME PICTURE MODE menu is displayed. STPlim ereeeprss tPhicetuEreXITAbuduiotton to exit the menu screens. The LOCK PICTURE MODE menu is ... enter your remote to enter a unique 4-digit PIN. Highlight Done and press OK. 5. EUxsit e the2DNumb3eDr Pad on your 4-digit PIN. 3. The SAVE PICTURE MODE menu is displayed. VIZIO LOCK PICTURE MODE Create a picture control PIN to prevent changes to exit the menu screens. ...
...picture mode will add an asterisk on Iynpouut r reWmidoete coCnC trol to enter a custom name. See Adjusting the Picture Settings on the remote. 2. The RENAME PICTURE MODE menu is displayed. STPlim ereeeprss tPhicetuEreXITAbuduiotton to exit the menu screens. The LOCK PICTURE MODE menu is ... enter your remote to enter a unique 4-digit PIN. Highlight Done and press OK. 5. EUxsit e the2DNumb3eDr Pad on your 4-digit PIN. 3. The SAVE PICTURE MODE menu is displayed. VIZIO LOCK PICTURE MODE Create a picture control PIN to prevent changes to exit the menu screens. ...

User Manual
Page 31
... between program content, AV formats, and input sources. The AUDIO menu is displayed. 3. Press the MENU button on the remote. Use the Arrow buttons on the remote to a home theater audio system. VIZIO AUDIO TV Speakers Surround Sound Volume Leveling Balance - Select Variable if you to highlight Audio and press OK. Use the...
... between program content, AV formats, and input sources. The AUDIO menu is displayed. 3. Press the MENU button on the remote. Use the Arrow buttons on the remote to a home theater audio system. VIZIO AUDIO TV Speakers Surround Sound Volume Leveling Balance - Select Variable if you to highlight Audio and press OK. Use the...
User Manual
Page 32
...menu is displayed. 3. Highlight Delete and press OK. 5. Use the Left and Right Arrow buttons to highlight Audio and press OK. The on the remote to select another frequency, if desired, and adjust it. 8. Use the Arrow buttons to adjust the boost (up) and attenuation (down) for the... frequency. 7. To create, modify, or replace the single custom equalizer setting: 1. Press the MENU button on the remote. The TV displays, "To delete the user created custom audio mode, select the Delete button." 4. The AUDIO menu is displayed. 2. Use the Up...
...menu is displayed. 3. Highlight Delete and press OK. 5. Use the Left and Right Arrow buttons to highlight Audio and press OK. The on the remote to select another frequency, if desired, and adjust it. 8. Use the Arrow buttons to adjust the boost (up) and attenuation (down) for the... frequency. 7. To create, modify, or replace the single custom equalizer setting: 1. Press the MENU button on the remote. The TV displays, "To delete the user created custom audio mode, select the Delete button." 4. The AUDIO menu is displayed. 2. Use the Up...

User Manual
Page 33
... change the setting to exit the blank screen. From the TIMERS menu, use the Up/Down Arrow buttons on the remote to change the time before the screen saver begins. VIZIO TIMERS Sleep Timer Auto Power Off Screen Saver Blank Screen Off 10 minutes Off 3. If you have finished setting the ...screen saver time, press the EXIT button on -screen menu is turned off time, press the EXIT button on the remote to highlight Timers and press...
... change the setting to exit the blank screen. From the TIMERS menu, use the Up/Down Arrow buttons on the remote to change the time before the screen saver begins. VIZIO TIMERS Sleep Timer Auto Power Off Screen Saver Blank Screen Off 10 minutes Off 3. If you have finished setting the ...screen saver time, press the EXIT button on -screen menu is turned off time, press the EXIT button on the remote to highlight Timers and press...

User Manual
Page 34
... TV to enter the TV's MAC address in use are displayed: • RJ45 MAC - Using the keyboard on the remote. DHCP Off 2. IP Address Subnet Mask Default Gateway Pref. Finding MAC Addresses for the connections in the router's settings. ...network's dAeBCfault gateway address. •InputPrefW. Use the Arrow buttons on -screen menu is the network's SSID) and press OK. 5. VIZIO NETWORK Wired Connection Disconnected Wireless Access Points More Access Points WPS Manual Setup Hidden Network Test Connection 6. ST•lim eeeprAadlt.dPiDcretNusreSs. 4 ...
... TV to enter the TV's MAC address in use are displayed: • RJ45 MAC - Using the keyboard on the remote. DHCP Off 2. IP Address Subnet Mask Default Gateway Pref. Finding MAC Addresses for the connections in the router's settings. ...network's dAeBCfault gateway address. •InputPrefW. Use the Arrow buttons on -screen menu is the network's SSID) and press OK. 5. VIZIO NETWORK Wired Connection Disconnected Wireless Access Points More Access Points WPS Manual Setup Hidden Network Test Connection 6. ST•lim eeeprAadlt.dPiDcretNusreSs. 4 ...


