
Quickstart Guide (English)
Page 3
TABLE OF CONTENTS Package Contents 4 Controls & Connections 5 First-Time Setup 7 Using the Remote 11 LED Indicators 12 Bluetooth Pairing 14 Using Bluetooth Mode 15 Advanced Setup 16 Connecting a Subwoofer 17 Using Button Combinations 18 Wall-Mounting the Sound Bar 19 Help & Troubleshooting 23 One-Year Limited Warranty 26 Legal & Compliance 27
TABLE OF CONTENTS Package Contents 4 Controls & Connections 5 First-Time Setup 7 Using the Remote 11 LED Indicators 12 Bluetooth Pairing 14 Using Bluetooth Mode 15 Advanced Setup 16 Connecting a Subwoofer 17 Using Button Combinations 18 Wall-Mounting the Sound Bar 19 Help & Troubleshooting 23 One-Year Limited Warranty 26 Legal & Compliance 27

Quickstart Guide (English)
Page 4
PACKAGE CONTENTS High Definition Sound Bar Remote Control with 2 x AAA Batteries Quick Start Guides (1 English, 1 French/Spanish) Power Adapter Coaxial Audio Cable Stereo RCA to 3.5mm Audio Cable Digital Optical Cable 2 x Sound Bar Wall Mount Brackets 2 x Wall Mount Screws (Size: M4 x 10mm) 4 Wall Mount Template
PACKAGE CONTENTS High Definition Sound Bar Remote Control with 2 x AAA Batteries Quick Start Guides (1 English, 1 French/Spanish) Power Adapter Coaxial Audio Cable Stereo RCA to 3.5mm Audio Cable Digital Optical Cable 2 x Sound Bar Wall Mount Brackets 2 x Wall Mount Screws (Size: M4 x 10mm) 4 Wall Mount Template

Quickstart Guide (English)
Page 5
CONTROLS & CONNECTIONS Back of Sound Bar SUB OUT Subwoofer Out OPTICAL (4) Digital Optical Audio In DIGITAL (3) Coaxial In * Supports .WAV file format playback only. AUX (2) Analog Audio In (Stereo 3.5mm) AUX (1) Analog Audio In (Stereo RCA) 5 USB* (6) USB In Power Port
CONTROLS & CONNECTIONS Back of Sound Bar SUB OUT Subwoofer Out OPTICAL (4) Digital Optical Audio In DIGITAL (3) Coaxial In * Supports .WAV file format playback only. AUX (2) Analog Audio In (Stereo 3.5mm) AUX (1) Analog Audio In (Stereo RCA) 5 USB* (6) USB In Power Port
Quickstart Guide (English)
Page 6
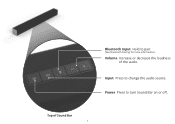
Input Press to turn Sound Bar on or off. Top of the audio. Power Press to change the audio source. Bluetooth Input Hold to pair. (See 'Bluetooth Pairing' for more information.) Volume Increase or decrease the loudness of Sound Bar 6
Input Press to turn Sound Bar on or off. Top of the audio. Power Press to change the audio source. Bluetooth Input Hold to pair. (See 'Bluetooth Pairing' for more information.) Volume Increase or decrease the loudness of Sound Bar 6
Quickstart Guide (English)
Page 7
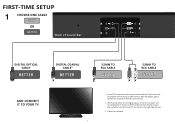
... to your device's user manual. † When using either of Sound Bar DIGITAL OPTICAL CABLE† BETTER DIGITAL COAXIAL CABLE†‡ BETTER 3.5MM TO RCA CABLE GOOD 3.5MM TO RCA CABLE GOOD AND CONNECT IT TO ...
... to your device's user manual. † When using either of Sound Bar DIGITAL OPTICAL CABLE† BETTER DIGITAL COAXIAL CABLE†‡ BETTER 3.5MM TO RCA CABLE GOOD 3.5MM TO RCA CABLE GOOD AND CONNECT IT TO ...

Quickstart Guide (English)
Page 8
Plug the power adapter into an electrical outlet. 8 2 Connect the included power adapter to the Sound Bar DC IN as shown.
Plug the power adapter into an electrical outlet. 8 2 Connect the included power adapter to the Sound Bar DC IN as shown.
Quickstart Guide (English)
Page 9
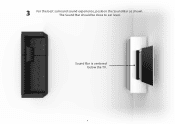
The Sound Bar should be close to ear level. Sound Bar is centered below the TV. 9 3 For the best surround sound experience, position the Sound Bar as shown.
The Sound Bar should be close to ear level. Sound Bar is centered below the TV. 9 3 For the best surround sound experience, position the Sound Bar as shown.

Quickstart Guide (English)
Page 10
... for an active input. Insert the included batteries and gently slide the battery cover back into place. 6 Turn your TV to Input 1, set the Sound Bar to switch between audio sources. The LED indicators on . To enable this feature again, you connected your TV on, the... Sound Bar will automatically turn on and begin cycling in pairs through inputs until an audio source is first powered on the front of the Sound Bar will stop the auto detect function. 4 Top 5 Top Remove the battery cover by...
... for an active input. Insert the included batteries and gently slide the battery cover back into place. 6 Turn your TV to Input 1, set the Sound Bar to switch between audio sources. The LED indicators on . To enable this feature again, you connected your TV on, the... Sound Bar will automatically turn on and begin cycling in pairs through inputs until an audio source is first powered on the front of the Sound Bar will stop the auto detect function. 4 Top 5 Top Remove the battery cover by...
Quickstart Guide (English)
Page 12
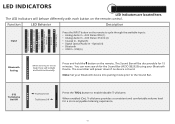
... inputs: • Analog Audio In - AUX Stereo RCA (1) • Analog Audio In - You can now search for 15 minutes. The sound bar will be discoverable for the Sound Bar (VIZIO SB2920) using your Bluetooth device into pairing mode prior to Right and back continuously. Digital (3) • Digital Optical Audio In - USB (6) Analog ...each button on the remote. When enabled (On), TruVolume provides a consistent and comfortable volume level for device) Flash from Left to the Sound Bar. AUX (1) Analog Audio In - AUX (2) Coaxial In - Note: Set your Bluetooth Device.
... inputs: • Analog Audio In - AUX Stereo RCA (1) • Analog Audio In - You can now search for 15 minutes. The sound bar will be discoverable for the Sound Bar (VIZIO SB2920) using your Bluetooth device into pairing mode prior to Right and back continuously. Digital (3) • Digital Optical Audio In - USB (6) Analog ...each button on the remote. When enabled (On), TruVolume provides a consistent and comfortable volume level for device) Flash from Left to the Sound Bar. AUX (1) Analog Audio In - AUX (2) Coaxial In - Note: Set your Bluetooth Device.

Quickstart Guide (English)
Page 14
... stop flashing. 2. Press and hold the Bluetooth button on the Sound Bar or the Bluetooth button on the remote for the Sound Bar (VIZIO SB2920) using your Bluetooth device. You can be controlled on the front of Sound Bar Volume can now search for five (5) seconds. When the Sound Bar is paired, the LED Indicators will light sequentially from your...
... stop flashing. 2. Press and hold the Bluetooth button on the Sound Bar or the Bluetooth button on the remote for the Sound Bar (VIZIO SB2920) using your Bluetooth device. You can be controlled on the front of Sound Bar Volume can now search for five (5) seconds. When the Sound Bar is paired, the LED Indicators will light sequentially from your...

Quickstart Guide (English)
Page 15
...paired, even if you hear any break-up to 30 feet. Device compatibility will vary, see your device and on the Sound Bar before pressing Play. Your Sound Bar is less than optimal: • If you change the input on your device's documentation for a smartphone. Turning off ...or moving these devices may lose some integrity when compared to the Sound Bar, as long as a hands-free device for more information. High volume levels can affect Bluetooth range, including wireless security cameras, wireless ...
...paired, even if you hear any break-up to 30 feet. Device compatibility will vary, see your device and on the Sound Bar before pressing Play. Your Sound Bar is less than optimal: • If you change the input on your device's documentation for a smartphone. Turning off ...or moving these devices may lose some integrity when compared to the Sound Bar, as long as a hands-free device for more information. High volume levels can affect Bluetooth range, including wireless security cameras, wireless ...
Quickstart Guide (English)
Page 16
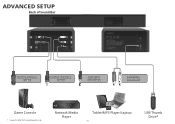
Network Media Player Tablet/MP3 Player/Laptop 16 USB Thumb Drive* ADVANCED SETUP Back of Sound Bar DIGITAL OPTICAL CABLE DIGITAL COAXIAL CABLE 3.5MM TO RCA CABLE 3.5MM TO RCA CABLE Game Console * Supports .WAV file format playback only.
Network Media Player Tablet/MP3 Player/Laptop 16 USB Thumb Drive* ADVANCED SETUP Back of Sound Bar DIGITAL OPTICAL CABLE DIGITAL COAXIAL CABLE 3.5MM TO RCA CABLE 3.5MM TO RCA CABLE Game Console * Supports .WAV file format playback only.

Quickstart Guide (English)
Page 17
...Cable* Optional Subwoofer* * RCA subwoofer cable and subwoofer not included. Connect an RCA cable from the Sound Bar to the center position. 3. See your preference. Power Off the Sound Bar and Subwoofer. Power On the Sound Bar and Subwoofer. 5. Manually adjust the SUB gain (Volume) and phase to enter bass adjustment mode. 2.... CONNECTING A SUBWOOFER Back of Sound Bar To connect a subwoofer: 1. Use the Previous/Next buttons to adjust the bass level to the Subwoofer. 4. Use the BASS ...
...Cable* Optional Subwoofer* * RCA subwoofer cable and subwoofer not included. Connect an RCA cable from the Sound Bar to the center position. 3. See your preference. Power Off the Sound Bar and Subwoofer. Power On the Sound Bar and Subwoofer. 5. Manually adjust the SUB gain (Volume) and phase to enter bass adjustment mode. 2.... CONNECTING A SUBWOOFER Back of Sound Bar To connect a subwoofer: 1. Use the Previous/Next buttons to adjust the bass level to the Subwoofer. 4. Use the BASS ...

Quickstart Guide (English)
Page 18
...All 12 LEDs will automatically power down after a period of the sound bar. VIZIO TV Remote Control Energy Star VIZIO TV Remote Enabled VIZIO TV Remote Disable Energy Star Enabled Energy Star Disabled Enable/disable the use of a VIZIO TV remote control to the factory default settings. When the Energy ...Star setting is enabled, the sound bar will flash 3 times Reset the Sound Bar to power on and adjust the volume of inactivity. To enable/disable...
...All 12 LEDs will automatically power down after a period of the sound bar. VIZIO TV Remote Control Energy Star VIZIO TV Remote Enabled VIZIO TV Remote Disable Energy Star Enabled Energy Star Disabled Enable/disable the use of a VIZIO TV remote control to the factory default settings. When the Energy ...Star setting is enabled, the sound bar will flash 3 times Reset the Sound Bar to power on and adjust the volume of inactivity. To enable/disable...

Quickstart Guide (English)
Page 19
WALL-MOUNTING THE SOUND BAR 1 Back of Sound Bar Wall-Mount Screw Holes Insert the two wall-mount screws into the wall-mount screw holes, and then tighten them with a Phillips screwdriver. 2 Place the included wall mounting template against the wall under your TV. Mark the four bracket holes using a pencil. 19
WALL-MOUNTING THE SOUND BAR 1 Back of Sound Bar Wall-Mount Screw Holes Insert the two wall-mount screws into the wall-mount screw holes, and then tighten them with a Phillips screwdriver. 2 Place the included wall mounting template against the wall under your TV. Mark the four bracket holes using a pencil. 19
Quickstart Guide (English)
Page 23
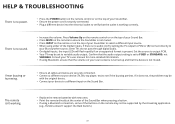
... to variable audio output. If it does not, the problem may be with new ones. • Point the remote directly at the center of your Sound Bar. • Press MUTE on the remote to verify that the outlet is working . • Replace the remote batteries with the original device. •...; Connect your device to a different input on the top of your Sound Bar to select a different input source. • When using either of the Digital Inputs, if there is set to see if the buzzing persists. Confirm...
... to variable audio output. If it does not, the problem may be with new ones. • Point the remote directly at the center of your Sound Bar. • Press MUTE on the remote to verify that the outlet is working . • Replace the remote batteries with the original device. •...; Connect your device to a different input on the top of your Sound Bar to select a different input source. • When using either of the Digital Inputs, if there is set to see if the buzzing persists. Confirm...

Quickstart Guide (English)
Page 26
... limited warranty does not cover Products sold "AS IS", "FACTORY RECERTIFIED", or by this warranty is determined to be sent to a VIZIO service center to obtain warranty service. ANY IMPLIED WARRANTIES, INCLUDING ANY IMPLIED WARRANTY OF MERCHANTABILITY AND FITNESS FOR A PARTICULAR PURPOSE, SHALL BE...replace the Product at its sole option and discretion. THERE ARE NO EXPRESS WARRANTIES OTHER THAN THOSE LISTED OR DESCRIBED ABOVE. Specifications Sound Bar: Two 2½" Full-Range Drivers Inputs: One 3.5mm Stereo Audio One RCA Stereo Audio One Optical (Toslink) One Digital Coaxial ...
... limited warranty does not cover Products sold "AS IS", "FACTORY RECERTIFIED", or by this warranty is determined to be sent to a VIZIO service center to obtain warranty service. ANY IMPLIED WARRANTIES, INCLUDING ANY IMPLIED WARRANTY OF MERCHANTABILITY AND FITNESS FOR A PARTICULAR PURPOSE, SHALL BE...replace the Product at its sole option and discretion. THERE ARE NO EXPRESS WARRANTIES OTHER THAN THOSE LISTED OR DESCRIBED ABOVE. Specifications Sound Bar: Two 2½" Full-Range Drivers Inputs: One 3.5mm Stereo Audio One RCA Stereo Audio One Optical (Toslink) One Digital Coaxial ...


