
User Manual
Page 1
Go to www.vtechphones.com to register your product for enhanced warranty support and the latest VTech product news. CM18045/ AM18047 4-Line Small Business System Cordless Handset BC User's manual
Go to www.vtechphones.com to register your product for enhanced warranty support and the latest VTech product news. CM18045/ AM18047 4-Line Small Business System Cordless Handset BC User's manual

User Manual
Page 2
... Important safety information. In Canada, please dial 1 (800) 267-7377. The TIA-1083 Compliant Logo is necessary to mark this VTech product. T TIA-1083 The ENERGY STAR® program (www.energystar.gov) recognizes and encourages the use of the charger. Before using...the Telecommunications Industry Association. Used under license. Model number: Type: CM18045/AM18047 4-Line Small Business System Cordless Handset Serial number: Purchase date: Place of purchase: Both the model and serial numbers of your VTech product can be found on your sales receipt and original packaging ...
... Important safety information. In Canada, please dial 1 (800) 267-7377. The TIA-1083 Compliant Logo is necessary to mark this VTech product. T TIA-1083 The ENERGY STAR® program (www.energystar.gov) recognizes and encourages the use of the charger. Before using...the Telecommunications Industry Association. Used under license. Model number: Type: CM18045/AM18047 4-Line Small Business System Cordless Handset Serial number: Purchase date: Place of purchase: Both the model and serial numbers of your VTech product can be found on your sales receipt and original packaging ...

User Manual
Page 3
... circuit. For example, do not use the telephone to be created when the adapter is plugged into the power outlet, or when the handset is replaced in place if it is plugged into the cradle, if the phone is damaged, refer to hazardous voltages or other electrical devices...if the product is located in the user's manual. The user should not plug the phone into a power outlet, and should not put a charged handset into a ceiling, an under-the-table or cabinet outlet. etc.); Opening the product or reassembling it has dried thoroughly. • Avoid placing the telephone...
... circuit. For example, do not use the telephone to be created when the adapter is plugged into the power outlet, or when the handset is replaced in place if it is plugged into the cradle, if the phone is damaged, refer to hazardous voltages or other electrical devices...if the product is located in the user's manual. The user should not plug the phone into a power outlet, and should not put a charged handset into a ceiling, an under-the-table or cabinet outlet. etc.); Opening the product or reassembling it has dried thoroughly. • Avoid placing the telephone...

User Manual
Page 4
...risk of fire or battery explosion, replace with this product. If interference is experienced, moving the cordless telephone farther away from the handset if the console is unplugged, switched off or if the electrical power is voluntarily participating in an industry program to collect and recycle... nickelmetal hydride rechargeable batteries when taken out of service within range of the cordless handset. The battery or conductor may be easily accessible. You may cause interference to TVs and VCRs. These batteries may overheat and...
...risk of fire or battery explosion, replace with this product. If interference is experienced, moving the cordless telephone farther away from the handset if the console is unplugged, switched off or if the electrical power is voluntarily participating in an industry program to collect and recycle... nickelmetal hydride rechargeable batteries when taken out of service within range of the cordless handset. The battery or conductor may be easily accessible. You may cause interference to TVs and VCRs. These batteries may overheat and...
User Manual
Page 6
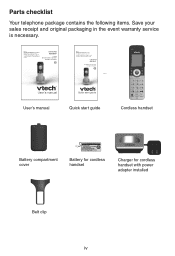
... clip iv Parts checklist Your telephone package contains the following items. Save your product for enhanced warranty support and the latest VTech product news. CM18045/ AM18047 4-Line Small Business System Cordless Handset BC Go to www.vtechphones.com to register your sales receipt and original packaging in the event warranty service is necessary.
... clip iv Parts checklist Your telephone package contains the following items. Save your product for enhanced warranty support and the latest VTech product news. CM18045/ AM18047 4-Line Small Business System Cordless Handset BC Go to www.vtechphones.com to register your sales receipt and original packaging in the event warranty service is necessary.
User Manual
Page 7
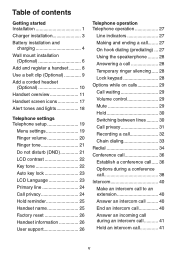
...Charger installation 3 Battery installation and charging 4 Wall mount installation (Optional 6 Add and register a handset.......... 8 Use a belt clip (Optional 9 Add a corded headset (Optional 10 Handset overview 11 Handset screen icons 17 Alert tones and lights 18 Telephone settings Telephone setup 19 Menu settings 19 Ringer... tone 22 Auto key lock 23 LCD Language 23 Primary line 24 Call privacy 24 Hold reminder 25 Handset name 25 Factory reset 26 Handset information 26 User support 26 Telephone operation Telephone operation 27 Line indicators 27 Making and ending a call...
...Charger installation 3 Battery installation and charging 4 Wall mount installation (Optional 6 Add and register a handset.......... 8 Use a belt clip (Optional 9 Add a corded headset (Optional 10 Handset overview 11 Handset screen icons 17 Alert tones and lights 18 Telephone settings Telephone setup 19 Menu settings 19 Ringer... tone 22 Auto key lock 23 LCD Language 23 Primary line 24 Call privacy 24 Hold reminder 25 Handset name 25 Factory reset 26 Handset information 26 User support 26 Telephone operation Telephone operation 27 Line indicators 27 Making and ending a call...

User Manual
Page 9
Table of contents Answering system operation...... 67 New message indication......... 67 Call screening 67 Call intercept 67 Message playback 68 Options during playback.......... 69 Transfer messages 69 Delete all mailbox messages... 70 Record memo 71 Remote access 72 Appendix Deregister a handset 74 Handset display screen messages 75 Troubleshooting 78 Maintenance 87 FCC Part 68 and ACTA 88 FCC Part 15 90 California Energy Commission battery charging testing instructions 91 For C-UL compliance only.......... 92 Limited warranty 96 Technical specifications 99 Index 100 vii
Table of contents Answering system operation...... 67 New message indication......... 67 Call screening 67 Call intercept 67 Message playback 68 Options during playback.......... 69 Transfer messages 69 Delete all mailbox messages... 70 Record memo 71 Remote access 72 Appendix Deregister a handset 74 Handset display screen messages 75 Troubleshooting 78 Maintenance 87 FCC Part 68 and ACTA 88 FCC Part 15 90 California Energy Commission battery charging testing instructions 91 For C-UL compliance only.......... 92 Limited warranty 96 Technical specifications 99 Index 100 vii

User Manual
Page 10
...and set up CM18445/AM18447 console first before expanding your system with a protective sticker covering the handset display, remove it before use . The handset can be shipped with this handset to a power outlet not controlled by a wall switch. In Canada, dial 1 (800) ...800) 595-9511. Getting started Installation This CM18045/AM18047 handset is an accessary of CM18445/ AM18447 concole. Phone lines DECT Optional 2.5mm corded headset (purchased separately) CM18045 handset (Ext. 1, 2, 3...) CM18445 console (Ext. 0) Install the handset close to the console before use . You ...
...and set up CM18445/AM18447 console first before expanding your system with a protective sticker covering the handset display, remove it before use . The handset can be shipped with this handset to a power outlet not controlled by a wall switch. In Canada, dial 1 (800) ...800) 595-9511. Getting started Installation This CM18045/AM18047 handset is an accessary of CM18445/ AM18447 concole. Phone lines DECT Optional 2.5mm corded headset (purchased separately) CM18045 handset (Ext. 1, 2, 3...) CM18445 console (Ext. 0) Install the handset close to the console before use . You ...
User Manual
Page 11
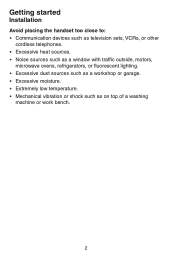
Getting started Installation Avoid placing the handset too close to: • Communication devices such as television sets, VCRs, or other cordless telephones. • Excessive heat sources. • Noise sources such as a window with traffic outside, motors, microwave ovens, refrigerators, or fluorescent lighting. • Excessive dust sources such as a workshop or garage. • Excessive moisture. • Extremely low temperature. • Mechanical vibration or shock such as on top of a washing machine or work bench. 2
Getting started Installation Avoid placing the handset too close to: • Communication devices such as television sets, VCRs, or other cordless telephones. • Excessive heat sources. • Noise sources such as a window with traffic outside, motors, microwave ovens, refrigerators, or fluorescent lighting. • Excessive dust sources such as a workshop or garage. • Excessive moisture. • Extremely low temperature. • Mechanical vibration or shock such as on top of a washing machine or work bench. 2
User Manual
Page 13
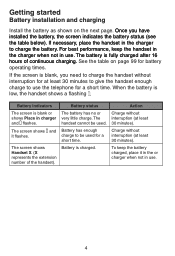
..., you have installed the battery, the screen indicates the battery status (see the table below). The screen shows Handset X. (X represents the extension number of continuous charging. The handset cannot be used . Battery status The battery has no or very little charge. See the table on the next... page. The screen shows and it in the or charger when not in charger and flashes. Battery has enough charge to charge the handset without interruption (at least 30 minutes). Charge without interruption for at least 30 minutes). Once you need to be used for a short...
..., you have installed the battery, the screen indicates the battery status (see the table below). The screen shows Handset X. (X represents the extension number of continuous charging. The handset cannot be used . Battery status The battery has no or very little charge. See the table on the next... page. The screen shows and it in the or charger when not in charger and flashes. Battery has enough charge to charge the handset without interruption (at least 30 minutes). Charge without interruption for at least 30 minutes). Once you need to be used for a short...
User Manual
Page 14
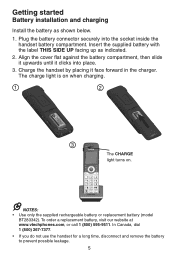
.... In Canada, dial 1 (800) 267-7377. • If you do not use the handset for a long time, disconnect and remove the battery to prevent possible leakage. 5 Charge the handset by placing it clicks into the socket inside the handset battery compartment. NOTES: • Use only the supplied rechargeable battery or replacement battery (model...
.... In Canada, dial 1 (800) 267-7377. • If you do not use the handset for a long time, disconnect and remove the battery to prevent possible leakage. 5 Charge the handset by placing it clicks into the socket inside the handset battery compartment. NOTES: • Use only the supplied rechargeable battery or replacement battery (model...

User Manual
Page 17
... Ext. 2) Press # on this extension to register. To reset the handset, remove the handset from the charger. Handset X registered. 6. Press MENU/SELECT or /SKIP to Registration, then press MENU/SELECT or /SKIP. It takes up to 60 seconds to 9). You can add CM18045/AM18047 handsets to the CM18445/ AM18447 console at any time, each new...
... Ext. 2) Press # on this extension to register. To reset the handset, remove the handset from the charger. Handset X registered. 6. Press MENU/SELECT or /SKIP to Registration, then press MENU/SELECT or /SKIP. It takes up to 60 seconds to 9). You can add CM18045/AM18047 handsets to the CM18445/ AM18447 console at any time, each new...
User Manual
Page 18
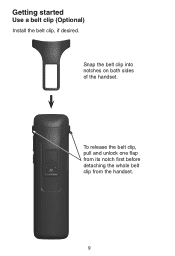
Getting started Use a belt clip (Optional) Install the belt clip, if desired. To release the belt clip, pull and unlock one flap from its notch first before detaching the whole belt clip from the handset. 9 Snap the belt clip into notches on both sides of the handset.
Getting started Use a belt clip (Optional) Install the belt clip, if desired. To release the belt clip, pull and unlock one flap from its notch first before detaching the whole belt clip from the handset. 9 Snap the belt clip into notches on both sides of the handset.
User Manual
Page 19
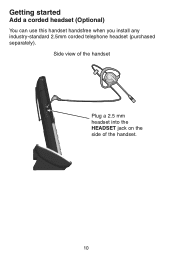
Getting started Add a corded headset (Optional) You can use this handset handsfree when you install any industry-standard 2.5mm corded telephone headset (purchased separately). Side view of the handset Plug a 2.5 mm headset into the HEADSET jack on the side of the handset. 10
Getting started Add a corded headset (Optional) You can use this handset handsfree when you install any industry-standard 2.5mm corded telephone headset (purchased separately). Side view of the handset Plug a 2.5 mm headset into the HEADSET jack on the side of the handset. 10
User Manual
Page 20
REDIAL/PAUSE • Press to view the last 10 numbers dialed. /SPEAKER • Press to select a menu item displayed above the key. Getting started Handset overview Charge light • On when the handset is charging in idle. Softkeys (2) • Press to turn on the desired line. • Press to answer a call. Press again to make an intercom call on the handset speakerphone. INT • Press to make a call when in the charger. LINE 1/LINE 2/LINE 3/LINE 4 • Press to resume normal handset use. 11
REDIAL/PAUSE • Press to view the last 10 numbers dialed. /SPEAKER • Press to select a menu item displayed above the key. Getting started Handset overview Charge light • On when the handset is charging in idle. Softkeys (2) • Press to turn on the desired line. • Press to answer a call. Press again to make an intercom call on the handset speakerphone. INT • Press to make a call when in the charger. LINE 1/LINE 2/LINE 3/LINE 4 • Press to resume normal handset use. 11

User Manual
Page 21
.... • While in a menu, press to -group broadcast. Press and hold to turn off. Press and hold again to turn the feature on. Getting started Handset overview DIR • Press to scroll up . DND (Do not disturb) • In idle mode, press and hold to adjust the ringer volume when in...
.... • While in a menu, press to -group broadcast. Press and hold to turn off. Press and hold again to turn the feature on. Getting started Handset overview DIR • Press to scroll up . DND (Do not disturb) • In idle mode, press and hold to adjust the ringer volume when in...
User Manual
Page 22
... MB • Settings • Remaining time • Delete all old Main menu • Directory • Call history • Ringer setting • Handset setup • Speed dial • User support • Handset info Using menus • Factory reset • Press MENU/SELECT to the idle screen. 13 or press M.Box to show the...
... MB • Settings • Remaining time • Delete all old Main menu • Directory • Call history • Ringer setting • Handset setup • Speed dial • User support • Handset info Using menus • Factory reset • Press MENU/SELECT to the idle screen. 13 or press M.Box to show the...

User Manual
Page 23
...Press MENU/SELECT in to join a call . Page 26 Display ring group status, and the extension number of the handset to Page 26 the factory default. 14 Getting started Handset overview The following tables provides you to get extra support. Pages 46-47 Display a website for Pages 20-21 an ... you with more details on the main menu and the answering system menu of the handset. Pages 22-25 *Primary line defines which line is automatically selected each time you pick up the corded handset or press the speakerphone. **Call privacy defines whether other extensions can barge in idle ...
...Press MENU/SELECT in to join a call . Page 26 Display ring group status, and the extension number of the handset to Page 26 the factory default. 14 Getting started Handset overview The following tables provides you to get extra support. Pages 46-47 Display a website for Pages 20-21 an ... you with more details on the main menu and the answering system menu of the handset. Pages 22-25 *Primary line defines which line is automatically selected each time you pick up the corded handset or press the speakerphone. **Call privacy defines whether other extensions can barge in idle ...

User Manual
Page 24
Pages 68-69 Set up the call. Getting started Handset overview Table 2 - Modify the passcode for any voice messages. 15 Set the maximum duration allowed for users to access private mailbox remotely by making a call ... in the private mailbox. Pages 68-69 Turn on or off the private mailbox, or set to play an announcement only to pick up the handset's private mailbox. Remote access -
Pages 68-69 Set up the call. Getting started Handset overview Table 2 - Modify the passcode for any voice messages. 15 Set the maximum duration allowed for users to access private mailbox remotely by making a call ... in the private mailbox. Pages 68-69 Turn on or off the private mailbox, or set to play an announcement only to pick up the handset's private mailbox. Remote access -
User Manual
Page 25
Reference Pages 61-66 Page 66 Page 70 16 Set whether the handset user hear the caller whenever a voice recording is played in idle mode when there are unattended messages in private mailbox and talk to the caller. ... and number of other system extensions can intercept and stop a recording in the private mailbox. Call intercept - Delete all old Description Call screening - Getting started Handset overview Table 2 - Set whether users of messages available in the private mailbox. Answering system menu (Press left softkey in idle screen) (Continued) Menu Settings (Continued...
Reference Pages 61-66 Page 66 Page 70 16 Set whether the handset user hear the caller whenever a voice recording is played in idle mode when there are unattended messages in private mailbox and talk to the caller. ... and number of other system extensions can intercept and stop a recording in the private mailbox. Call intercept - Delete all old Description Call screening - Getting started Handset overview Table 2 - Set whether users of messages available in the private mailbox. Answering system menu (Press left softkey in idle screen) (Continued) Menu Settings (Continued...
