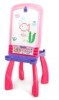
Vtech DigiArt Creative Easel Pink Support and Manuals
Get Help and Manuals for this Vtech item
View All Support Options Below
Free Vtech DigiArt Creative Easel Pink manuals!
Problems with Vtech DigiArt Creative Easel Pink?
Ask a Question
Free Vtech DigiArt Creative Easel Pink manuals!
Problems with Vtech DigiArt Creative Easel Pink?
Ask a Question
Popular Vtech DigiArt Creative Easel Pink Manual Pages
User Manual - Page 1
User's Manual
© 2016 VTech All rights reserved
Printed in China 91-003216-006 US
User Manual - Page 2
... preschoolers for your child learn to maintain a child's interest. We thank you for trusting VTech® with the important job helping your child. Sincerely, Your iends at 's why all...child's a ention and teach important preschool skills like spelling, counting and the alphabet. At VTech®, we know that use technology to do great things. ese vital skills are uniquely designed...
User Manual - Page 3
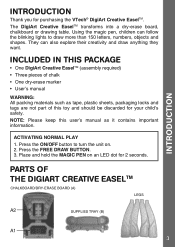
...tape, plastic sheets, packaging locks and tags are not part of the DigiArt Creative Easeltm
CHALKBOARD/DRY-ERASE BOARD (A) LEGS
SUPPLIES TRAY (B)
3 Parts of this user's manual as it contains important information. INTRODUCTION
INTRODUCTION
Thank you for...this toy and should be discarded for purchasing the VTech® DigiArt Creative EaselTM. Place and hold the MAGIC PEN on . 2.
User Manual - Page 4
1
2
7
3
4
5
8
6
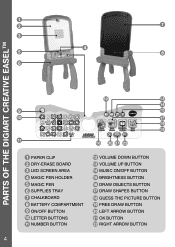
PARTS OF THE DIGIART CREATIVE EASELtm
12
13
14
9
15
10
17
19
18
11
16 20 21 22
1 PAPER CLIP 2 DRY-ERASE BOARD 3 LED SCREEN ...
User Manual - Page 5
... TRAY (B).
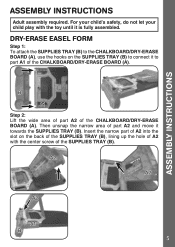
5 Then unsnap the narrow area of part A2 and move it to part A1 of the CHALKBOARD/DRY-ERASE BOARD (A). DRY-ERASE EASEL FORM
Step 1: To attach the SUPPLIES TRAY (B) ...connect it towards the SUPPLIES TRAY (B).
Insert the narrow part of A2 with the toy until it is fully assembled.
ASSEMBLY INSTRUCTIONS
Assembly Instructions
Adult assembly required. For your child's safety, do...
User Manual - Page 6
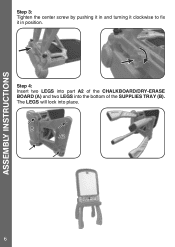
Step 4: Insert two LEGS into part A2 of the CHALKBOARD/DRY-ERASE BOARD (A) and two LEGS into place.
6
ASSEMBLY INSTRUCTIONS
Step 3: Tighten the center screw by pushing it in and turning it clockwise to fix it in position. The LEGS will lock into the bottom of the SUPPLIES TRAY (B).
User Manual - Page 7

To change the chalkboard back into the stand again. TRANSFORMATION INSTRUCTIONS
TRANSFORM FROM DRY-ERASE BOARD TO CHALKBOARD
Step 1: Make sure the MAGIC PEN is placed in the MAGIC PEN HOLDER. Step 2: Detach the CHALKBOARD/DRY-ERASE BOARD (A) from the stand by pulling up, turning it over to the chalkboard side and putting it into a dry-erase board, reverse the order of the steps above.
7
User Manual - Page 8
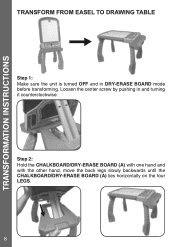
... and with the other hand, move the back legs slowly backwards until the CHALKBOARD/DRY-ERASE BOARD (A) lies horizontally on the four LEGS.
8
TRANSFORMATION INSTRUCTIONS
TRANSFORM FROM EASEL TO DRAWING TABLE
Step 1: Make sure the unit is turned OFF and in and turning it counterclockwise. Loosen the center screw by pushing in...
User Manual - Page 9
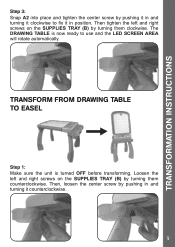
... in position. TRANSFORM FROM DRAWING TABLE TO EASEL
Step 1: Make sure the unit is now ready to fix it in and turning it clockwise to use and the LED SCREEN AREA will rotate automatically.
Then, loosen the center screw by turning them clockwise. TRANSFORMATION INSTRUCTIONS
Step 3: Snap A2 into place and tighten...
User Manual - Page 11
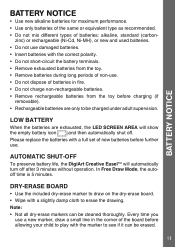
...batteries. • Remove rechargeable batteries from the toy before allowing your child to play with a full set of new batteries before further use . • Do not dispose of batteries in the corner of...non-use .
Note:
• Not all dry-erase markers can be cleaned thoroughly. Please replace the batteries with the marker to be charged under adult supervision. DRY-ERASE BOARD
• ...
User Manual - Page 13

... the NUMBER BUTTON to draw
the shape. Follow the voice instructions
and use the MAGIC PEN to undo one step (maximum
13 Follow the voice
instructions and use the MAGIC PEN to trace the blinking lights to... learn how to see the number-selection menu. Follow the voice instructions
and use the MAGIC PEN to trace the blinking lights to learn how to clear it.
...
User Manual - Page 14

... sprays or cleaners on the unit and press the FREE DRAW BUTTON.
Remove the batteries when the unit is not in dry areas.
2. CARE & MAINTENANCE/TROUBLESHOOTING
• Press the RIGHT ARROW BUTTON to excess moisture or water.
14 If you would like to listen to adjust the brightness. DO NOT use...
User Manual - Page 15
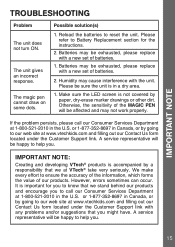
... exhausted, please replace with any problems and/or suggestions that you might have.
A service representative will be happy to help you to our web site at www.vtechkids.com and filling out our Contact Us form located under the Customer Support link with a new set of our products. IMPORTANT NOTE:
Creating and developing VTech® products...
User Manual - Page 16
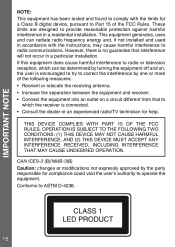
...installation.
If this equipment does cause harmful interference to radio or television reception, which the receiver is encouraged to try to correct the interference by the party responsible for a Class B digital device, pursuant to ASTM D-4236.
16 THIS DEVICE COMPLIES WITH PART...been tested and found to comply with the instructions, may cause harmful interference to radio communications. ...
User Manual - Page 17
... in the owner's manual; (f) a product or part that there may be responsible for any VTech serial number has been removed or defaced.
Register your product online at our discretion replace the product with nonVTech products; (d) damage caused by accident, misuse, unreasonable use, immersion in water, neglect, abuse, battery leakage, or improper installation, improper service, or other...
Vtech DigiArt Creative Easel Pink Reviews
We have not received any reviews for Vtech yet.