Users Manual
Page 2
...operations and troubleshooting necessary to the eyes or skin. Please review this manual thoroughly to ensure proper installation and operation of batteries in a wet basement or shower. 6. For support, shopping, and everything new at VTech, visit our website at a height above 2 meters. ... efficiency guidelines. To protect them from overheating, these batteries in a fire. Do not install this innovative and feature rich VTech product. Incorrect reassembling can seriously damage the product. industrial gases (cleaning solvents; etc. 17. For pluggable equipment, the ...
...operations and troubleshooting necessary to the eyes or skin. Please review this manual thoroughly to ensure proper installation and operation of batteries in a wet basement or shower. 6. For support, shopping, and everything new at VTech, visit our website at a height above 2 meters. ... efficiency guidelines. To protect them from overheating, these batteries in a fire. Do not install this innovative and feature rich VTech product. Incorrect reassembling can seriously damage the product. industrial gases (cleaning solvents; etc. 17. For pluggable equipment, the ...
Users Manual
Page 3
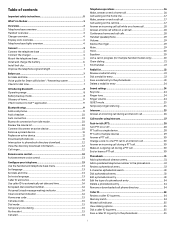
... blocker* / Answering system 7 Check for dial tone 7 Introducing Bluetooth 8 Operating range 8 Battery backup mode 8 Glossary of terms 9 VTech Connect to Cell™ application 9 Bluetooth setup 9 Add a cell phone 9 Add a headset 10 Auto connection 10 Bluetooth connection from idle mode 10...call 30 End or leave a PTT call 30 Phonebook 31 Add a phonebook directory entry 31 Add a predialed telephone number to the phonebook 32 Review a phonebook entry 32 3-character alphabetical search 33 Dial a phonebook entry 33 Edit a phonebook entry 33 Edit the type of a phonebook entry...
... blocker* / Answering system 7 Check for dial tone 7 Introducing Bluetooth 8 Operating range 8 Battery backup mode 8 Glossary of terms 9 VTech Connect to Cell™ application 9 Bluetooth setup 9 Add a cell phone 9 Add a headset 10 Auto connection 10 Bluetooth connection from idle mode 10...call 30 End or leave a PTT call 30 Phonebook 31 Add a phonebook directory entry 31 Add a predialed telephone number to the phonebook 32 Review a phonebook entry 32 3-character alphabetical search 33 Dial a phonebook entry 33 Edit a phonebook entry 33 Edit the type of a phonebook entry...
Users Manual
Page 5
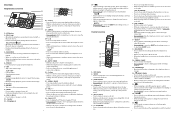
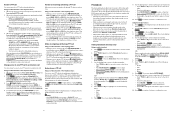
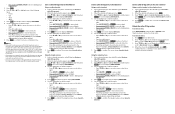
...Overview Telephone base overview 1 2 10 3 4 5 11 6 7 8 9 1 - CALL BLOCK • Press to block the incoming call waiting alert. 2 20 - 1 • While reviewing a caller ID log entry, press repeatedly to add or remove 1 in front of the telephone number before dialing or saving it in the phonebook. •..., or back up to switch between the speakerphone and the handset. 3 QUIET # 11 1 • Press to display other dialing options when reviewing a caller ID log entry. 2 • Press and hold to the previous menu, or exit the menu display; Softkeys (2) • Press...
...Overview Telephone base overview 1 2 10 3 4 5 11 6 7 8 9 1 - CALL BLOCK • Press to block the incoming call waiting alert. 2 20 - 1 • While reviewing a caller ID log entry, press repeatedly to add or remove 1 in front of the telephone number before dialing or saving it in the phonebook. •..., or back up to switch between the speakerphone and the handset. 3 QUIET # 11 1 • Press to display other dialing options when reviewing a caller ID log entry. 2 • Press and hold to the previous menu, or exit the menu display; Softkeys (2) • Press...

Users Manual
Page 6
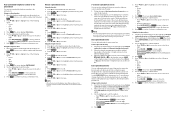
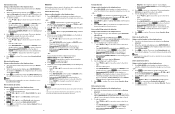
... handset battery low and needs charging. 12:05 pm 7/25 MENU 17 The handset battery is ringing, press to mute the ringer temporarily. • While reviewing the caller ID log, the phonebook or the 14 redial memory, press to digital subscriber line (DSL) high-speed Internet service through your telephone line...
... handset battery low and needs charging. 12:05 pm 7/25 MENU 17 The handset battery is ringing, press to mute the ringer temporarily. • While reviewing the caller ID log, the phonebook or the 14 redial memory, press to digital subscriber line (DSL) high-speed Internet service through your telephone line...
Users Manual
Page 9
..., follow the prompts on your cell phone and your telephone to complete the pairing process. • Refer to the user's manual of your cell phone). Review the device list 1. The screen displays Cell Phone X is connecting to your headset (Headset Y represents the device name of your device is not connected to...
..., follow the prompts on your cell phone and your telephone to complete the pairing process. • Refer to the user's manual of your cell phone). Review the device list 1. The screen displays Cell Phone X is connecting to your headset (Headset Y represents the device name of your device is not connected to...

Users Manual
Page 14
...Press OPTION. 2. Press q CID or p to scroll to the desired number. 4. Press q CID or p to scroll to the desired entry, then press REVIEW. 4. Press CALL to Caller ID log, then press SELECT. 3. Refer to the Redial list section for multiple handset models only) Another handset can join you...to initiate a dialing sequence from the phonebook, caller ID log or redial list. Press q CID or p SELECT. 3. Press q CID or p press REVIEW. Press q CID or p to scroll to dial the number shown. Press REDIAL/PAUSE to show the most recently dialed number. 2. You hear an alert...
...Press OPTION. 2. Press q CID or p to scroll to the desired number. 4. Press q CID or p to scroll to the desired entry, then press REVIEW. 4. Press CALL to Caller ID log, then press SELECT. 3. Refer to the Redial list section for multiple handset models only) Another handset can join you...to initiate a dialing sequence from the phonebook, caller ID log or redial list. Press q CID or p SELECT. 3. Press q CID or p press REVIEW. Press q CID or p to scroll to dial the number shown. Press REDIAL/PAUSE to show the most recently dialed number. 2. You hear an alert...

Users Manual
Page 15
... the cursor to the right or left. • Press and hold REDIAL/PAUSE to browse until the desired number displays. Press NEXT. Review a redial list entry To review the redial list of the telephone base: 1. Press INSERT to exit. Press q CID, p or REDIAL/PAUSE repeatedly to insert a dialing...erase all characters. • Press q CID or p to move the cursor to call using the cell line. Using the telephone base: 1. To review the redial list of a handset: 1. Press CANCEL to insert the desired number. 4. Press q CID, p or REDIAL/PAUSE repeatedly to browse ...
... the cursor to the right or left. • Press and hold REDIAL/PAUSE to browse until the desired number displays. Press NEXT. Review a redial list entry To review the redial list of the telephone base: 1. Press INSERT to exit. Press q CID, p or REDIAL/PAUSE repeatedly to insert a dialing...erase all characters. • Press q CID or p to move the cursor to call using the cell line. Using the telephone base: 1. To review the redial list of a handset: 1. Press CANCEL to insert the desired number. 4. Press q CID, p or REDIAL/PAUSE repeatedly to browse ...
Users Manual
Page 19
.../PTT on the telephone base within 10 seconds, the PTT call , as described below. The PTT call continues for the rest of one device can review the phonebook at this number will get through and ring on your telephone base. Press OFF/CANCEL or END on the handset, or press CANCEL...
.../PTT on the telephone base within 10 seconds, the PTT call , as described below. The PTT call continues for the rest of one device can review the phonebook at this number will get through and ring on your telephone base. Press OFF/CANCEL or END on the handset, or press CANCEL...
Users Manual
Page 20
... the phonebook (see Review a phonebook entry and 3-character alphabetical search). 2. When an entry appears, use the cell line. Press CELL 1 or CELL 2 on the handset when in the correct format, press HOME/FLASH or on the handset, or press HOME on the IS8151/IS8251, those changes ... 5. You hear a confirmation tone. Press p on a call . 2. Dial a phonebook entry You can enter up to 3 letters for the desired entry in Review a phonebook entry above to be edited. 3. Search for the desired entry in idle mode. 2. Press SAVE to confirm. Press MENU when in alphabetical order appears...
... the phonebook (see Review a phonebook entry and 3-character alphabetical search). 2. When an entry appears, use the cell line. Press CELL 1 or CELL 2 on the handset when in the correct format, press HOME/FLASH or on the handset, or press HOME on the IS8151/IS8251, those changes ... 5. You hear a confirmation tone. Press p on a call . 2. Dial a phonebook entry You can enter up to 3 letters for the desired entry in Review a phonebook entry above to be edited. 3. Search for the desired entry in idle mode. 2. Press SAVE to confirm. Press MENU when in alphabetical order appears...
Users Manual
Page 21
...YES to erase the assigned label. Press SELECT . The caller ID log stores up to select Phonebook. Entries appear in the phonebook (see Review a phonebook entry and 3-character alphabetical search). 2. When the handset or the telephone base is in the format sent by the telephone service provider...• Press and hold MUTE/DELETE to erase all digits. 35 Press NEXT. Select a desired entry in the caller ID log become old (reviewed already), and the missed calls message goes away. The telephone base displays EDIT NUMBER. 4. Delete a phonebook entry To delete an entry: 1. The...
...YES to erase the assigned label. Press SELECT . The caller ID log stores up to select Phonebook. Entries appear in the phonebook (see Review a phonebook entry and 3-character alphabetical search). 2. When the handset or the telephone base is in the format sent by the telephone service provider...• Press and hold MUTE/DELETE to erase all digits. 35 Press NEXT. Select a desired entry in the caller ID log become old (reviewed already), and the missed calls message goes away. The telephone base displays EDIT NUMBER. 4. Delete a phonebook entry To delete an entry: 1. The...
Users Manual
Page 22
... 6. For example, Johnson Charlie becomes Charlie Johnson when you press # (pound key). 7. Select a desired entry in the caller ID log (see Review a caller ID log entry). 2. For example, Johnson Charlie becomes Charlie Johnson when you press # (pound key). 7. The screen displays Edit number....base: 1. The screen displays EDIT NUMBER. 4. When the desired entry appears, press SAVE. 3. Select a desired entry in the caller ID log (see Review a caller ID log entry). 2. Select a desired entry in idle mode. 2. The screen displays EDIT NUMBER. 4. and then the caller's name. 4....
... 6. For example, Johnson Charlie becomes Charlie Johnson when you press # (pound key). 7. Select a desired entry in the caller ID log (see Review a caller ID log entry). 2. For example, Johnson Charlie becomes Charlie Johnson when you press # (pound key). 7. The screen displays Edit number....base: 1. The screen displays EDIT NUMBER. 4. When the desired entry appears, press SAVE. 3. Select a desired entry in the caller ID log (see Review a caller ID log entry). 2. Select a desired entry in idle mode. 2. The screen displays EDIT NUMBER. 4. and then the caller's name. 4....

Users Manual
Page 24
... robocalls that you set SCB On/Off to miss. NOTES • If you want to Off, selected setting under Set profile (see Review a caller ID log entry). 2. The screen displays Edit number. 4. Press SELECT. 2. allow all settings under Set profile will ring..., including calls with announcements or notices from the redial list by default. Review block list: Using a cordless handset or the telephone base: 1. When the desired entry appears, press SAVE. 3. The screen displays Edit ...
... robocalls that you set SCB On/Off to miss. NOTES • If you want to Off, selected setting under Set profile (see Review a caller ID log entry). 2. The screen displays Edit number. 4. Press SELECT. 2. allow all settings under Set profile will ring..., including calls with announcements or notices from the redial list by default. Review block list: Using a cordless handset or the telephone base: 1. When the desired entry appears, press SAVE. 3. The screen displays Edit ...
Users Manual
Page 25
...Press YES to confirm. The allow list?. 4. Press NEXT to move on the telephone base. NOTES • Numbers saved in the allow list (see Review allow list:). 2. Using a cordless handset or the telephone base: 1. When the desired entry appears, press SAVE. • Press TONE to change the ...screen displays Edit name. 6. The screen shows Saved to be edited. Press MENU on the handset or telephone base in the block list (see Review the caller ID log). 2. OR - 1. Search for the desired entry in idle mode to enter the main menu. 2. Press NEXT to move...
...Press YES to confirm. The allow list?. 4. Press NEXT to move on the telephone base. NOTES • Numbers saved in the allow list (see Review allow list:). 2. Using a cordless handset or the telephone base: 1. When the desired entry appears, press SAVE. • Press TONE to change the ...screen displays Edit name. 6. The screen shows Saved to be edited. Press MENU on the handset or telephone base in the block list (see Review the caller ID log). 2. OR - 1. Search for the desired entry in idle mode to enter the main menu. 2. Press NEXT to move...
Users Manual
Page 26
...; Press TONE to change the next letter to "Private". • Home calls with numbers that are not in the caller ID log (see Review star name list:). 2. "Hello. Calls to enter the main menu. Screening without caller name: Using a cordless handset or the telephone base:...Caller name, then press SELECT. When the screen displays Enter name, use these calls will hear a screening announcement. • Home calls that use . - Review star name list: Using a cordless handset or the telephone base: 1. Delete a star name list entry: Using a cordless handset or the telephone base: ...
...; Press TONE to change the next letter to "Private". • Home calls with numbers that are not in the caller ID log (see Review star name list:). 2. "Hello. Calls to enter the main menu. Screening without caller name: Using a cordless handset or the telephone base:...Caller name, then press SELECT. When the screen displays Enter name, use these calls will hear a screening announcement. • Home calls that use . - Review star name list: Using a cordless handset or the telephone base: 1. Delete a star name list entry: Using a cordless handset or the telephone base: ...
Users Manual
Page 33
...full, the answering system answers incoming calls after 10 rings and announces, "Memory is playing on or off , the telephone answers after you review them in idle mode, press MENU to enter a two-digit number. Press q CID or p to scroll to enter a two-digit number... Record a new announcement. 8 End the call automatically disconnects. • When the answering system is full. • Each memo can only delete old (reviewed) messages. Hear a list of the following remote commands. If you attempt to record a memo when the memory is turned off . 4. The system announces,...
...full, the answering system answers incoming calls after 10 rings and announces, "Memory is playing on or off , the telephone answers after you review them in idle mode, press MENU to enter a two-digit number. Press q CID or p to scroll to enter a two-digit number... Record a new announcement. 8 End the call automatically disconnects. • When the answering system is full. • Each memo can only delete old (reviewed) messages. Hear a list of the following remote commands. If you attempt to record a memo when the memory is turned off . 4. The system announces,...
Users Manual
Page 39
..." or "you get warranty service? 1. This limited warranty extends only to the holder of a valid proof of this VTech product, VTech Communications, Inc. ("VTech"), warrants to the Consumer for Products purchased and used for rental purposes); Pour réduire ou prévenir de ... product, or other rights which vary from the use with non-VTech electrical accessories; Limitations: Implied warranties, including those of this limited warranty cover? and its suppliers assume no risk for service, please review the user's manual - and its suppliers assume no other express ...
..." or "you get warranty service? 1. This limited warranty extends only to the holder of a valid proof of this VTech product, VTech Communications, Inc. ("VTech"), warrants to the Consumer for Products purchased and used for rental purposes); Pour réduire ou prévenir de ... product, or other rights which vary from the use with non-VTech electrical accessories; Limitations: Implied warranties, including those of this limited warranty cover? and its suppliers assume no risk for service, please review the user's manual - and its suppliers assume no other express ...
Smart call blocker
Page 2
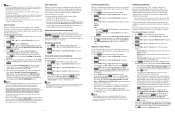
...in your block list No caller ID Uncategorized calls Call rejected Telephone ringing Note: To restart the voice guide: 1. Press SELECT to choose Review, and then press qCID or p to browse through . When the desired entry displays, press UNBLOCK on caller ID Ask caller to announce... - Settings Voice guide setup (1) Press 1 when prompted I want to set up Smart call blocker, go and check the online help .vtechphones.com/is8151; I want to the answering system. Press CALL BLOCK. 2. Call forward to answering system Use voice guide to set Setting up to the QR code...
...in your block list No caller ID Uncategorized calls Call rejected Telephone ringing Note: To restart the voice guide: 1. Press SELECT to choose Review, and then press qCID or p to browse through . When the desired entry displays, press UNBLOCK on caller ID Ask caller to announce... - Settings Voice guide setup (1) Press 1 when prompted I want to set up Smart call blocker, go and check the online help .vtechphones.com/is8151; I want to the answering system. Press CALL BLOCK. 2. Call forward to answering system Use voice guide to set Setting up to the QR code...
Quick Start Guide
Page 8
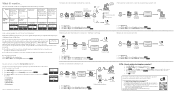
... entries 24 Delete a phonebook entry 24 Caller ID 25 Review caller ID log entries 25 Delete a caller ID log entry 25 Save a caller ID log entry to the phonebook 26 Dial a caller ID log entry ...
... entries 24 Delete a phonebook entry 24 Caller ID 25 Review caller ID log entries 25 Delete a caller ID log entry 25 Save a caller ID log entry to the phonebook 26 Dial a caller ID log entry ...

Quick Start Guide
Page 24
Press p/q to browse the entries. Press YES. 24 Press . 2. Review phonebook entries 1. Delete a phonebook entry When your desired phonebook entry displays: 1. Press on the handset, or press DELETE on the base. 2. Press p/q to choose the desired phonebook, then press REVIEW. 3.
Press p/q to browse the entries. Press YES. 24 Press . 2. Review phonebook entries 1. Delete a phonebook entry When your desired phonebook entry displays: 1. Press on the handset, or press DELETE on the base. 2. Press p/q to choose the desired phonebook, then press REVIEW. 3.
Quick Start Guide
Page 25
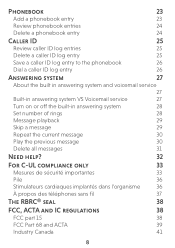
The caller ID log stores up to caller ID service, information about each caller appears after the first or second ring. Press . 2. Telephone base 1. Press p/q to 50 entries. Press p/q to delete. Delete a caller ID log entry You can delete a caller ID log entry when the desired entry displays on the handset or telephone base screen, then Handset Press 25 to browse the entries. Review caller ID log entries Handset 1. Press . 2. Caller ID If you subscribe to 24 digits for the phone number and 15 characters for the name. Each entry has up to browse the entries.
The caller ID log stores up to caller ID service, information about each caller appears after the first or second ring. Press . 2. Telephone base 1. Press p/q to 50 entries. Press p/q to delete. Delete a caller ID log entry You can delete a caller ID log entry when the desired entry displays on the handset or telephone base screen, then Handset Press 25 to browse the entries. Review caller ID log entries Handset 1. Press . 2. Caller ID If you subscribe to 24 digits for the phone number and 15 characters for the name. Each entry has up to browse the entries.


