
User Manual
Page 3
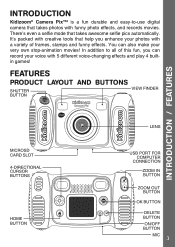
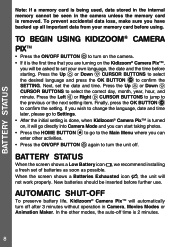
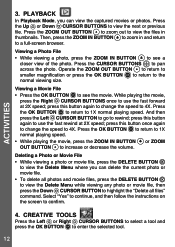
... with 5 different voice-changing effects and play 4 builtin games! FEATURES PRODUCT LAYOUT AND BUTTONS Shutter View Finder Button Introduction / Features microSD Card Slot 4-Directional Cursor Buttons Home Button Lens USB Port for Computer Connection Zoom In Button Zoom Out Button OK Button Delete Button ON/OFF Button MIC 3 There's even a selfie mode that help you can also make your very own stop-animation movies! INTRODUCTION Kidizoom® Camera Pix™ is a fun durable and easy-to...
... with 5 different voice-changing effects and play 4 builtin games! FEATURES PRODUCT LAYOUT AND BUTTONS Shutter View Finder Button Introduction / Features microSD Card Slot 4-Directional Cursor Buttons Home Button Lens USB Port for Computer Connection Zoom In Button Zoom Out Button OK Button Delete Button ON/OFF Button MIC 3 There's even a selfie mode that help you can also make your very own stop-animation movies! INTRODUCTION Kidizoom® Camera Pix™ is a fun durable and easy-to...
User Manual
Page 4
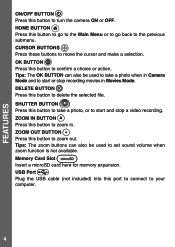
... used to set sound volume when zoom function is not available. Tips: The zoom buttons can also be used to take a photo, or to start or stop a video recording. Shutter Button Press this button to zoom in Movies Mode. Delete Button Press this port to connect to your computer. 4 Memory Card Slot Insert a microSD card here for memory expansion. USB Port Plug the USB cable (not included) into this button to delete...
... used to set sound volume when zoom function is not available. Tips: The zoom buttons can also be used to take a photo, or to start or stop a video recording. Shutter Button Press this button to zoom in Movies Mode. Delete Button Press this port to connect to your computer. 4 Memory Card Slot Insert a microSD card here for memory expansion. USB Port Plug the USB cable (not included) into this button to delete...
User Manual
Page 5
... not part of this user's manual as tape, plastic sheets and tags are recommended Batteries 4 X "AA" (LR6) alkaline batteries (not included) Operating Temperature 0 - 40°C 5 NOTE: Please keep this toy, and should be discarded for your child's safety. Included In This Package INCLUDED IN THIS PACKAGE • One VTech® Kidizoom® Camera Pix™ • One wrist strap • User's manual WARNING...
... not part of this user's manual as tape, plastic sheets and tags are recommended Batteries 4 X "AA" (LR6) alkaline batteries (not included) Operating Temperature 0 - 40°C 5 NOTE: Please keep this toy, and should be discarded for your child's safety. Included In This Package INCLUDED IN THIS PACKAGE • One VTech® Kidizoom® Camera Pix™ • One wrist strap • User's manual WARNING...
User Manual
Page 6
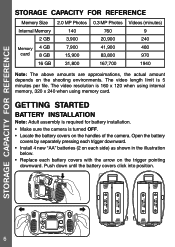
... the arrow on the shooting environments. GETTING STARTED BATTERY INSTALLATION Note: Adult assembly is required for battery installation. • Make sure the camera is 5 minutes per file. Push down until the battery covers click into position. 6 The video length limit is turned OFF. • Locate the battery covers on the handles of the camera. The video resolution is 160 x 120 when using internal memory, 320 x 240 when using memory card.
... the arrow on the shooting environments. GETTING STARTED BATTERY INSTALLATION Note: Adult assembly is required for battery installation. • Make sure the camera is 5 minutes per file. Push down until the battery covers click into position. 6 The video length limit is turned OFF. • Locate the battery covers on the handles of the camera. The video resolution is 160 x 120 when using internal memory, 320 x 240 when using memory card.

User Manual
Page 7
.... MEMORY Card INSTALLATION • Kidizoom® Camera Pix™ supports the below memory cards for maximum performance. • Use only batteries of the same or equivalent type as recommended. • Do not mix different types of SD-3C,LCC. • Make sure the camera is turned OFF and push the card once and it will be charged under adult supervision. Getting Started BATTERY NOTICE • Use new alkaline batteries for...
.... MEMORY Card INSTALLATION • Kidizoom® Camera Pix™ supports the below memory cards for maximum performance. • Use only batteries of the same or equivalent type as recommended. • Do not mix different types of SD-3C,LCC. • Make sure the camera is turned OFF and push the card once and it will be charged under adult supervision. Getting Started BATTERY NOTICE • Use new alkaline batteries for...
User Manual
Page 8
... preserve battery life, Kidizoom® Camera PixTM will not work properly. Press the Up or Down CURSOR BUTTONS to select the desired language and press the OK BUTTON to the previous or the next setting item. In the other activities. • Press the ON/OFF Button again to turn on the Kidizoom® Camera Pix™, you will go directly into Camera Mode and you can start taking...
... preserve battery life, Kidizoom® Camera PixTM will not work properly. Press the Up or Down CURSOR BUTTONS to select the desired language and press the OK BUTTON to the previous or the next setting item. In the other activities. • Press the ON/OFF Button again to turn on the Kidizoom® Camera Pix™, you will go directly into Camera Mode and you can start taking...
User Manual
Page 9
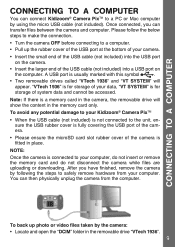
... using the micro USB cable (not included). "VTech 1936" is for storage of system data and cannot be accessed. Please follow the below steps to make the connection. • Turn the camera OFF before connecting to a computer. • Pull up photo or video files taken by following the steps to your computer, do not insert or remove the memory card and do not disconnect the camera...
... using the micro USB cable (not included). "VTech 1936" is for storage of system data and cannot be accessed. Please follow the below steps to make the connection. • Turn the camera OFF before connecting to a computer. • Pull up photo or video files taken by following the steps to your computer, do not insert or remove the memory card and do not disconnect the camera...
User Manual
Page 10
... Button different activities. Drag and drop the files to a location in your computer for backup. To back up voice files recorded by other cameras to Kidizoom® Camera Pix™, as "100VTECH". CAMERA In Camera mode, you can take normal photos, selfies or pictures with Mac OS X version 10.6, 10.7, 10.8, 10.9, 10.10, or 10.11. SYSTEM REQUIREMENTS FOR COMPUTER CONNECTION...
... Button different activities. Drag and drop the files to a location in your computer for backup. To back up voice files recorded by other cameras to Kidizoom® Camera Pix™, as "100VTECH". CAMERA In Camera mode, you can take normal photos, selfies or pictures with Mac OS X version 10.6, 10.7, 10.8, 10.9, 10.10, or 10.11. SYSTEM REQUIREMENTS FOR COMPUTER CONNECTION...
User Manual
Page 11
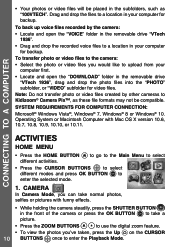
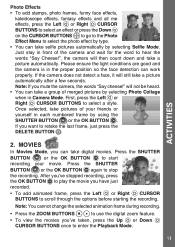
... press the DELETE BUTTON . After you've stopped recording, press the OK BUTTON to play the movie you can take selfie pictures automatically by selecting Selfie Mode. Note: If you want to scroll through the options before starting the recording. If you mute the camera, the words "Say cheese!" Activities 2. Press the SHUTTER BUTTON or the OK BUTTON again to hear the words...
... press the DELETE BUTTON . After you've stopped recording, press the OK BUTTON to play the movie you can take selfie pictures automatically by selecting Selfie Mode. Note: If you want to scroll through the options before starting the recording. If you mute the camera, the words "Say cheese!" Activities 2. Press the SHUTTER BUTTON or the OK BUTTON again to hear the words...
User Manual
Page 12
.... Press the OK BUTTON to return to 1X normal playing speed. • While playing the movie, press the ZOOM IN BUTTON OUT BUTTON to enter the selected tool. 12 Creative Tools Press the Left or Right Cursor Buttons to select a tool and press the OK BUTTON to increase or decrease the volume. Activities 3. Operate the ZOOM OUT BUTTON to return to...
.... Press the OK BUTTON to return to 1X normal playing speed. • While playing the movie, press the ZOOM IN BUTTON OUT BUTTON to enter the selected tool. 12 Creative Tools Press the Left or Right Cursor Buttons to select a tool and press the OK BUTTON to increase or decrease the volume. Activities 3. Operate the ZOOM OUT BUTTON to return to...
User Manual
Page 14
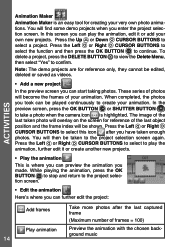
... very own photo animations. While playing the animation, press the OK Button to stop and return to select this screen you can preview the animation you enter the project selection screen. Animation Maker Animation Maker is highlighted. The image of the last taken photo will then be played continuously to create your own new projects. To delete a project, press the Delete Button to view the...
... very own photo animations. While playing the animation, press the OK Button to stop and return to select this screen you can preview the animation you enter the project selection screen. Animation Maker Animation Maker is highlighted. The image of the last taken photo will then be played continuously to create your own new projects. To delete a project, press the Delete Button to view the...

User Manual
Page 15
... Button to start recording a new file when the "Record" icon is highlighted. Save as video Save the animation as video) Advanced options Change the setting: • Animation Speed • Background Music • Frame Overlay On/Off Return Return to project selection screen Note: To delete the selected frame, press the Delete Button to view the Delete Menu, then select "Yes" to confirm and continue. First, make...
... Button to start recording a new file when the "Record" icon is highlighted. Save as video Save the animation as video) Advanced options Change the setting: • Animation Speed • Background Music • Frame Overlay On/Off Return Return to project selection screen Note: To delete the selected frame, press the Delete Button to view the Delete Menu, then select "Yes" to confirm and continue. First, make...
User Manual
Page 16
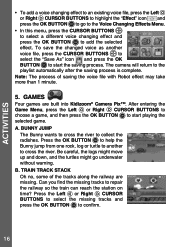
... the OK button to start playing the selected game. Can you find the missing tracks to confirm. 16 The camera will return to collect the radishes. GAMES Four games are missing. After entering the Game Menu, press the Left or Right Cursor Buttons to choose a game, and then press the OK Button to start the saving process. Activities • To add a voice changing effect...
... the OK button to start playing the selected game. Can you find the missing tracks to confirm. 16 The camera will return to collect the radishes. GAMES Four games are missing. After entering the Game Menu, press the Left or Right Cursor Buttons to choose a game, and then press the OK Button to start the saving process. Activities • To add a voice changing effect...
User Manual
Page 17
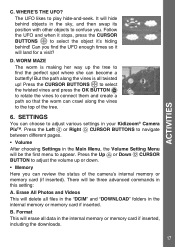
...Volume After choosing Settings in the Main Menu, the Volume Setting Menu will hide behind ! It will be three advanced commands in your Kidizoom® Camera PixTM. Follow the UFO and when it stops, press the CURSOR Buttons to select the object it will erase all files in the "DCIM" and "DOWNLOAD...delete all data in the internal memory or memory card if inserted. Activities C. Where's the UFO? Press the Left or Right Cursor Buttons to play hide-and-seek. Erase All Photos and Videos This will be the first menu to connect them and create a path so that the worm can review...
...Volume After choosing Settings in the Main Menu, the Volume Setting Menu will hide behind ! It will be three advanced commands in your Kidizoom® Camera PixTM. Follow the UFO and when it stops, press the CURSOR Buttons to select the object it will erase all files in the "DCIM" and "DOWNLOAD...delete all data in the internal memory or memory card if inserted. Activities C. Where's the UFO? Press the Left or Right Cursor Buttons to play hide-and-seek. Erase All Photos and Videos This will be the first menu to connect them and create a path so that the worm can review...

User Manual
Page 18
Follow the instructions on the screen to free up space. • Photo Resolution For the best picture quality, please select 2.0 megapixel. Then, delete the files in the camera unless the microSD card is removed. If you want to change the setting, press the OK Button . Factory Reset Factory Reset will be seen in the camera's internal memory to confirm the action. This option will allow...
Follow the instructions on the screen to free up space. • Photo Resolution For the best picture quality, please select 2.0 megapixel. Then, delete the files in the camera unless the microSD card is removed. If you want to change the setting, press the OK Button . Factory Reset Factory Reset will be seen in the camera's internal memory to confirm the action. This option will allow...
User Manual
Page 19
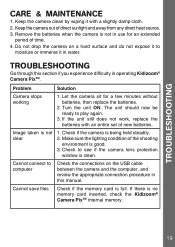
.... 2. Make sure the lighting condition of direct sunlight and away from any direct heat source. 3. Keep the camera clean by wiping it in use for a few minutes without batteries, then replace the batteries. 2. Check if the camera is good. 3. Do not drop the camera on the USB cable between the camera and the computer, and review the appropriate connection procedure in operating Kidizoom® Camera PixTM. Problem Solution Camera stops working 1. The unit should...
.... 2. Make sure the lighting condition of direct sunlight and away from any direct heat source. 3. Keep the camera clean by wiping it in use for a few minutes without batteries, then replace the batteries. 2. Check if the camera is good. 3. Do not drop the camera on the USB cable between the camera and the computer, and review the appropriate connection procedure in operating Kidizoom® Camera PixTM. Problem Solution Camera stops working 1. The unit should...
User Manual
Page 20
... DOWNLOAD/PHOTO folder, videos should be put in the DOWNLOAD/ VIDEO folder in the Kidizoom® Camera PixTM. If the unit still does not work, replace the batteries with any problems and/or suggestions that you might have a problem that cannot be solved by using in Canada. Check to see if the memory card is correctly inserted. 2. Troubleshooting & TECHNICAL SUPPORT Can't view the downloaded video or photo files Screen...
... DOWNLOAD/PHOTO folder, videos should be put in the DOWNLOAD/ VIDEO folder in the Kidizoom® Camera PixTM. If the unit still does not work, replace the batteries with any problems and/or suggestions that you might have a problem that cannot be solved by using in Canada. Check to see if the memory card is correctly inserted. 2. Troubleshooting & TECHNICAL SUPPORT Can't view the downloaded video or photo files Screen...
User Manual
Page 21
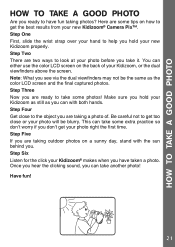
...via the dual viewfinders may not be blurry. Step Three Now you are two ways to look at your new Kidizoom® Camera Pix™. This can with the sun behind you. Once you hear the clicking sound, you can either use the color LCD screen on how to get too close to the ...hand to help you hold your Kidizoom, or the dual viewfinders above the screen. Step Four Get close or your Kidizoom® makes when you have fun taking photos? Have fun! 21 Make sure you hold your photo right the first time. Step Five If you are taking outdoor photos on a sunny day, stand with both ...
...via the dual viewfinders may not be blurry. Step Three Now you are two ways to look at your new Kidizoom® Camera Pix™. This can with the sun behind you. Once you hear the clicking sound, you can either use the color LCD screen on how to get too close to the ...hand to help you hold your Kidizoom, or the dual viewfinders above the screen. Step Four Get close or your Kidizoom® makes when you have fun taking photos? Have fun! 21 Make sure you hold your photo right the first time. Step Five If you are taking outdoor photos on a sunny day, stand with both ...
User Manual
Page 22
... in a residential installation. We make every effort to call our Consumer Services Department at VTech® take very seriously. It is accompanied by deletion of data as a result of the information which can occur. Disclaimer And Limitation Of Liability DISCLAIMER AND LIMITATION OF LIABILITY VTech® Electronics North America, L.L.C. However, errors sometimes can be happy to help you might...
... in a residential installation. We make every effort to call our Consumer Services Department at VTech® take very seriously. It is accompanied by deletion of data as a result of the information which can occur. Disclaimer And Limitation Of Liability DISCLAIMER AND LIMITATION OF LIABILITY VTech® Electronics North America, L.L.C. However, errors sometimes can be happy to help you might...

User Manual
Page 25
... use with a new unit or product of the product; Return of the product under normal use , immersion in the owner's manual; (f) a product or part that there may be responsible for direct, special, incidental or consequential damages resulting from this Warranty shall be provided instructions on how to returning a product for any VTech serial number has been removed or defaced. This Warranty is covered...
... use with a new unit or product of the product; Return of the product under normal use , immersion in the owner's manual; (f) a product or part that there may be responsible for direct, special, incidental or consequential damages resulting from this Warranty shall be provided instructions on how to returning a product for any VTech serial number has been removed or defaced. This Warranty is covered...

