

User Manual
Page 3
Table of Contents INTRODUCTION 1 SETUP 2 POWER SOURCE 2-4 MAIN UNIT BATTERY INSTALLATION 2 MAIN UNIT AC ADAPTOR CONNECTION 2 BACKUP BATTERY INSTALLATION 3 KEYBOARD BATTERY INSTALLATION 3 BATTERY NOTICE 3 IF YOUR UNIT DOESN'T TURN ON OR STOPS RESPONDING ...... 3 STILL HAVING PROBLEMS 4 MAIN UNIT BUTTONS 4-5 INFRARED KEYBOARD 5-8 MODE DESCRIPTION 9 DESCRIPTION OF ACTIVITIES 9-14 ALARM CLOCK 14-15 CARE AND MAINTENANCE 16
Table of Contents INTRODUCTION 1 SETUP 2 POWER SOURCE 2-4 MAIN UNIT BATTERY INSTALLATION 2 MAIN UNIT AC ADAPTOR CONNECTION 2 BACKUP BATTERY INSTALLATION 3 KEYBOARD BATTERY INSTALLATION 3 BATTERY NOTICE 3 IF YOUR UNIT DOESN'T TURN ON OR STOPS RESPONDING ...... 3 STILL HAVING PROBLEMS 4 MAIN UNIT BUTTONS 4-5 INFRARED KEYBOARD 5-8 MODE DESCRIPTION 9 DESCRIPTION OF ACTIVITIES 9-14 ALARM CLOCK 14-15 CARE AND MAINTENANCE 16

User Manual
Page 4
... meet a good friend like you through the questions in Me-Mo-Mo™ Mode (that I really want to play with me !). I am VTECH®'s Me-Mo-Mo™. LIGHT-UP, SHAKING ANTENNAE BACKLIGHT BUTTON LCD SCREEN POWER BUTTON POSEABLE LEGS WITH SUCTION CUP FEET INFRARED KEYBOARD 1 will guide you ! That will learn about your world, language...
... meet a good friend like you through the questions in Me-Mo-Mo™ Mode (that I really want to play with me !). I am VTECH®'s Me-Mo-Mo™. LIGHT-UP, SHAKING ANTENNAE BACKLIGHT BUTTON LCD SCREEN POWER BUTTON POSEABLE LEGS WITH SUCTION CUP FEET INFRARED KEYBOARD 1 will guide you ! That will learn about your world, language...

User Manual
Page 5
...instead of this manual. Press the Power button again and the clock mode will appear. POWER SOURCE Me-Mo-Mo™ operates on the keyboard to life! Locate the battery cover on the back of Me-Mo-Mo™, please insert 2 AA batteries in the main unit. The power adaptor is OFF or in ...the unit.) 1. NOTE: Do not leave the adaptor plugged in use of Me-Mo-Mo™. 3. For first time setup of Me-Mo-Mo™...
...instead of this manual. Press the Power button again and the clock mode will appear. POWER SOURCE Me-Mo-Mo™ operates on the keyboard to life! Locate the battery cover on the back of Me-Mo-Mo™, please insert 2 AA batteries in the main unit. The power adaptor is OFF or in ...the unit.) 1. NOTE: Do not leave the adaptor plugged in use of Me-Mo-Mo™. 3. For first time setup of Me-Mo-Mo™...
User Manual
Page 6
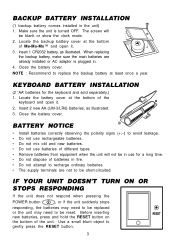
... avoid leakage. • Do not use rechargeable batteries. • Do not mix old and new batteries. • Do not use batteries of the keyboard and open it . 2. When replacing the backup battery, make sure the main batteries are not to replace the backup battery at the bottom of different... the backup battery cover at the bottom of the unit. Before inserting new batteries, press and hold the RESET button on the bottom of Me-Mo-Mo™ and open it . 3. Use a small blunt object to be reset. Close the battery cover. Locate the battery cover at least once a year. ...
... avoid leakage. • Do not use rechargeable batteries. • Do not mix old and new batteries. • Do not use batteries of the keyboard and open it . 2. When replacing the backup battery, make sure the main batteries are not to replace the backup battery at the bottom of different... the backup battery cover at the bottom of the unit. Before inserting new batteries, press and hold the RESET button on the bottom of Me-Mo-Mo™ and open it . 3. Use a small blunt object to be reset. Close the battery cover. Locate the battery cover at least once a year. ...
User Manual
Page 8
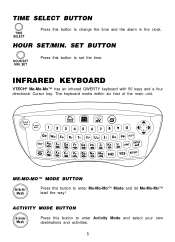
... this button to enter Activity Mode and select your own destinations and activities. 5 The keyboard works within six feet of the main unit. INFRARED KEYBOARD VTECH® Me-Mo-Mo™ has an infrared QWERTY keyboard with 50 keys and a four directional Cursor key. HOUR SET/MIN. ACTIVITY MODE BUTTON... Press this button to enter Me-Mo-Mo™ Mode and let Me-Mo-Mo™ lead the way! SET ...
... this button to enter Activity Mode and select your own destinations and activities. 5 The keyboard works within six feet of the main unit. INFRARED KEYBOARD VTECH® Me-Mo-Mo™ has an infrared QWERTY keyboard with 50 keys and a four directional Cursor key. HOUR SET/MIN. ACTIVITY MODE BUTTON... Press this button to enter Me-Mo-Mo™ Mode and let Me-Mo-Mo™ lead the way! SET ...
User Manual
Page 14
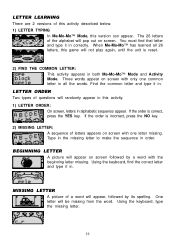
...MISSING LETTER: A sequence of letters appears on screen with only one letter missing. MISSING LETTER A picture of questions will randomly appear in both Me-Mo-Mo™ Mode and Activity Mode. LETTER ORDER Two types of a word will appear, followed by a word with the beginning letter missing. BEGINNING LETTER...common letter and type it in order. The 26 letters of this activity described below. 1) LETTER TYPING In Me-Mo-Mo™ Mode, this version can appear. Using the keyboard, type the missing letter. 11 LETTER LEARNING There are 2 versions of the alphabet will pop out on screen....
...MISSING LETTER: A sequence of letters appears on screen with only one letter missing. MISSING LETTER A picture of questions will randomly appear in both Me-Mo-Mo™ Mode and Activity Mode. LETTER ORDER Two types of a word will appear, followed by a word with the beginning letter missing. BEGINNING LETTER...common letter and type it in order. The 26 letters of this activity described below. 1) LETTER TYPING In Me-Mo-Mo™ Mode, this version can appear. Using the keyboard, type the missing letter. 11 LETTER LEARNING There are 2 versions of the alphabet will pop out on screen....
User Manual
Page 18
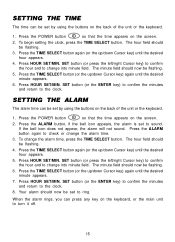
...again until the desired hour appears. 5. When the alarm rings, you can press any key on the keyboard, or the main unit to the clock. SETTING THE ALARM The alarm time can be set by using ...the buttons on the back of the unit or the keyboard. 1. The hour field should be flashing. 3. To begin setting the clock, press the TIME SELECT button... THE TIME The time can be set by using the buttons on the back of the unit or the keyboard. 1. Press the POWER button so that the time appears on the screen. 2. To change into minute ...
...again until the desired hour appears. 5. When the alarm rings, you can press any key on the keyboard, or the main unit to the clock. SETTING THE ALARM The alarm time can be set by using ...the buttons on the back of the unit or the keyboard. 1. The hour field should be flashing. 3. To begin setting the clock, press the TIME SELECT button... THE TIME The time can be set by using the buttons on the back of the unit or the keyboard. 1. Press the POWER button so that the time appears on the screen. 2. To change into minute ...


