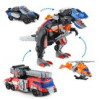
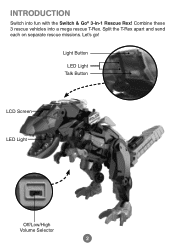
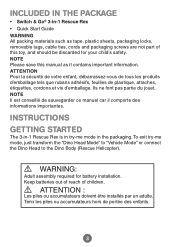
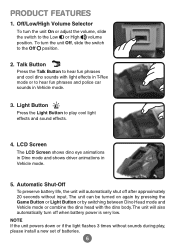
User Manual
Page 1
Instruction Manual ® 3-IN-1 RESCUE REX 3-IN-1 Scan for Assembly Video Scan For Animation
User Manual
Page 2
Let's go! Split the T-Rex apart and send each on separate rescue missions. INTRODUCTION Switch into a mega rescue T-Rex. Light Button LED Light Talk Button LCD Screen LED Light Off/Low/High Volume Selector 2 Combine these 3 rescue vehicles into fun with the Switch & Go® 3-in-1 Rescue Rex!
User Manual
Page 3
... of reach of this toy, and should be discarded for battery installation. Ils ne font pas partie du jouet. To exit try -me mode, just transform the "Dino Head Mode" to "Vehicle Mode" or connect the Dino Head to the Dino Body (Rescue Helicopter). INSTRUCTIONS GETTING STARTED The 3-in-1 Rescue Rex is in try -me mode in -1 Rescue Rex • Quick Start Guide WARNING All packing materials...
User Manual
Page 4
... non-rechargeable batteries. 4 IMPORTANT: BATTERY INFORMATION • Insert batteries with the correct polarity (+ and -). • Do not mix old and new batteries. • Do not mix alkaline, standard (carbon-zinc) or rechargeable batteries. • Only batteries of non-use a screwdriver to secure. Find the battery cover located on one end of batteries in fire. Battery Removal and Installation 1. Make sure the unit is turned Off. 2. Replace the battery cover and tighten...
User Manual
Page 6
... unit powers down or if the light flashes 3 times without input. To turn the unit On or adjust the volume, slide the switch to play , please install a new set of batteries. 6 Off/Low/High Volume Selector To turn the unit Off, slide the switch to hear fun phrases and police car sounds in Vehicle mode. 5. LCD Screen The LCD Screen shows dino eye animations in Dino mode and shows driver animations in Vehicle mode. 3. Light Button Press the Light Button to the Low or High volume...
User Manual
Page 7
TRANSFORMATION Transforming from Dino Head Mode to Police Car Mode 1. Begin in Dino Head Mode. 1 Scan for Assembly Video 2. Flip the windshield forward. 2 7
User Manual
Page 8
Swing the side panels out. 4 5 8 2. Flip up the Dino's mouth and flip the jaw cover backward. 3 4.
User Manual
Page 9
5. Fold the side panels forward. 6 6. The Dino Head is now in Police Car Mode. 7 9
User Manual
Page 10
To combine the Rescue Rex, follow the below steps to switch the Police Car back to the Dino Head. 1 2 3 10
User Manual
Page 12
Flip both landing skids out. 2 12 Begin in Helicopter Mode. 1 2. Transforming from Helicopter Mode to Dino Body Mode 1.
User Manual
Page 13
3. Flip the claws out. 4 5.Rotate both arms up. 5 13 Rotate 2 of the propeller blades toward the center . 3 4.
User Manual
Page 14
Begin in Fire Engine Mode. 1 2. Flip the base cover to Dino Legs Mode 1. Transforming from Fire Engine Mode to the front. 2 14
User Manual
Page 17
Flip the cab of the fire engine up and fold the engine grill backward. 10 17 7. Spread the toes and adjust the legs and feet for stability. 9 8.
User Manual
Page 18
9. The Fire Engine is now in Dino Legs Mode. 11 NOTE To switch the Dino Head, Dino Body and Dino Legs back into the Police Car, Helicopter and Fire Engine, follow the above steps in reverse order. 18
User Manual
Page 21
NOTE To separate the T-Rex into the Dino Head, Dino Body and Dino Legs, follow the above steps in Rescue Rex Mode. 3.The combined unit is now in reverse order. 21
User Manual
Page 22
... the Customer Support link. Turn the unit Off. 2. If the unit still does not work, install a new set of our products. Keep the unit out of time. 4. Do not drop the unit on hard surfaces and do not expose the unit to help you might have. Let the unit stand for you to use for some reason the unit stops working or malfunctions, please follow these steps: 1. It is accompanied by going...
User Manual
Page 23
... installation. Address: 1156 W. NOTE This equipment has been tested and found to comply with the instructions, may cause harmful interference to radio communications. Caution: Changes or modifications not expressly approved by one or more of Conformity 47 CFR § 2.1077 Compliance Information Trade Name: VTech® Model: 5495 Product Name: Switch & Go® 3-IN-1 Rescue Rex Responsible Party: VTech Electronics North...
User Manual
Page 24
Printed in China. 91-004424-000 US CAN AUS All rights reserved. Visit our website for more information about our products, downloads, resources and more. vtechkids.com vtechkids.ca Read our complete warranty policy online at vtechkids.com/warranty vtechkids.ca/warranty TM & © 2023 VTech Holdings Limited.