
Owner Manual
Page 1
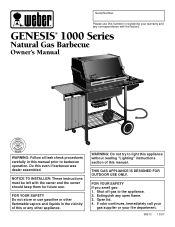
... not try to light this appliance without reading "Lighting" instructions section of this manual. Shut off gas to barbecue operation. THIS GAS APPLIANCE IS DESIGNED FOR OUTDOOR USE ONLY. FOR YOUR SAFETY If you smell gas: 1. If odor continues, immediately call your gas supplier or your warranty and any open flame. 3. Open lid. 4. Do this manual prior to the appliance. 2. GENESIS® 1000 Series Natural Gas Barbecue Owner's Manual WEBER WEBER ® WARNING: Follow...
... not try to light this appliance without reading "Lighting" instructions section of this manual. Shut off gas to barbecue operation. THIS GAS APPLIANCE IS DESIGNED FOR OUTDOOR USE ONLY. FOR YOUR SAFETY If you smell gas: 1. If odor continues, immediately call your gas supplier or your warranty and any open flame. 3. Open lid. 4. Do this manual prior to the appliance. 2. GENESIS® 1000 Series Natural Gas Barbecue Owner's Manual WEBER WEBER ® WARNING: Follow...
Owner Manual
Page 2
... minutes before using the lighting instructions. ƽ Do not use an LP tank with your Weber Gas Barbecue. ƽ Do not attempt to disconnect the gas regulator or any gas fitting while your liquid propane supplier. The conversion or attempted use of natural gas in an LP unit or LP gas in a natural gas unit is dangerous and will be hot during operation, turn off . See instructions in this manual for correct...
... minutes before using the lighting instructions. ƽ Do not use an LP tank with your Weber Gas Barbecue. ƽ Do not attempt to disconnect the gas regulator or any gas fitting while your liquid propane supplier. The conversion or attempted use of natural gas in an LP unit or LP gas in a natural gas unit is dangerous and will be hot during operation, turn off . See instructions in this manual for correct...
Owner Manual
Page 3
...follows: Aluminum Castings, 10 years, Cooking Grates and Flavorizer Bars, 3 years, All Remaining Parts, 5 years, when assembled and operated in accordance with the sale, installation, use, removal, return, or replacement of parts which prove defective under normal use and service and which on examination shall indicate, to... to you. This Warranty applies only to the repair or replacement of its equipment; Weber is not covered by insects within the burner tubes, as set out in the atmosphere, is not liable for it . Customer Service Center 250 South Hicks Road Palatine, IL 60067...
...follows: Aluminum Castings, 10 years, Cooking Grates and Flavorizer Bars, 3 years, All Remaining Parts, 5 years, when assembled and operated in accordance with the sale, installation, use, removal, return, or replacement of parts which prove defective under normal use and service and which on examination shall indicate, to... to you. This Warranty applies only to the repair or replacement of its equipment; Weber is not covered by insects within the burner tubes, as set out in the atmosphere, is not liable for it . Customer Service Center 250 South Hicks Road Palatine, IL 60067...

Owner Manual
Page 4
Genesis Gas Barbecues are registered U.S. Weber, , Genesis, Flavorizer and Crossover are covered under the following patent nos.: U.S.A. #4,677,964; 4,727,853; #4,777,927; #4,829,978; #4,860,724; #4,941,817; #4,966,125; #5,070,776; #D293,067; #D316,355; trademarks; trademarks of Weber-Stephen Products Co., 200 East Daniels Road, Palatine, IL 60067-6266. PATENTS AND TRADEMARKS © 1997 Weber. Perma...
Genesis Gas Barbecues are registered U.S. Weber, , Genesis, Flavorizer and Crossover are covered under the following patent nos.: U.S.A. #4,677,964; 4,727,853; #4,777,927; #4,829,978; #4,860,724; #4,941,817; #4,966,125; #5,070,776; #D293,067; #D316,355; trademarks; trademarks of Weber-Stephen Products Co., 200 East Daniels Road, Palatine, IL 60067-6266. PATENTS AND TRADEMARKS © 1997 Weber. Perma...
Owner Manual
Page 5
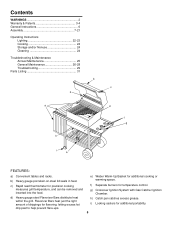
Contents WARNINGS 2 Warranty & Patents 3-4 General Instructions 6 Assembly 7-21 Operating Instructions Lighting 22-23 Cooking 24 Storage and/or Nonuse 24 Cleaning 24 Troubleshooting & Maintenance Annual Maintenance 25 General Maintenance 26-28 Troubleshooting 29 Parts Listing 31 b e a h i a c d f g FEATURES: a) Convenient tables and racks. d) Heavy gauge steel Flavorizer Bars distribute heat within the grill. g) Crossover Ignition System with Gas Catcher Ignition Chamber. Flavorizer Bars heat just the right amount of...
Contents WARNINGS 2 Warranty & Patents 3-4 General Instructions 6 Assembly 7-21 Operating Instructions Lighting 22-23 Cooking 24 Storage and/or Nonuse 24 Cleaning 24 Troubleshooting & Maintenance Annual Maintenance 25 General Maintenance 26-28 Troubleshooting 29 Parts Listing 31 b e a h i a c d f g FEATURES: a) Convenient tables and racks. d) Heavy gauge steel Flavorizer Bars distribute heat within the grill. g) Crossover Ignition System with Gas Catcher Ignition Chamber. Flavorizer Bars heat just the right amount of...
Owner Manual
Page 6
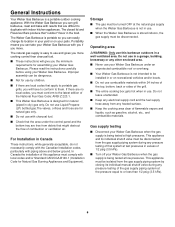
... or any heated surface. Gas supply testing s Disconnect your Weber Gas Barbecue under the control panel and the bottom tray are for natural (piped in use your Weber Gas Barbecue when the gas supply is not intended to duplicate with local codes and/or Standard CAN/CGA-B149.1 (Installation Code for assembling your Weber Gas Barbecue with you if you can easily change its location in Canada These instructions, while generally...
... or any heated surface. Gas supply testing s Disconnect your Weber Gas Barbecue under the control panel and the bottom tray are for natural (piped in use your Weber Gas Barbecue when the gas supply is not intended to duplicate with local codes and/or Standard CAN/CGA-B149.1 (Installation Code for assembling your Weber Gas Barbecue with you if you can easily change its location in Canada These instructions, while generally...
Owner Manual
Page 7
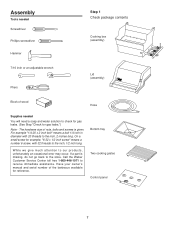
... check for gas leaks. (See Step "Check for reference. Have your owner's manual and serial number of nuts, bolts and screws is missing, do not go back to receive immediate assistance. Bottom tray Two cooking grates Control panel 7 Call the Weber Customer Service Center toll free 1-800-446-1071 to the store. The hardware size of the barbecue available for gas leaks...
... check for gas leaks. (See Step "Check for reference. Have your owner's manual and serial number of nuts, bolts and screws is missing, do not go back to receive immediate assistance. Bottom tray Two cooking grates Control panel 7 Call the Weber Customer Service Center toll free 1-800-446-1071 to the store. The hardware size of the barbecue available for gas leaks...
Owner Manual
Page 13
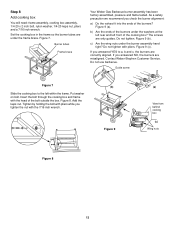
.... Do not tighten with the head of the cooking box? Do not use barbecue. Guide screw Figure 7 (b) Slide the cooking box to a, b and c, the burners are misaligned. Put washer on bolt. Figure 8. Burner tubes Frame brace Your Weber Gas Barbecue burner assembly has been factory assembled, pressure and flame tested. Figure 9 (b). If you answered NO, the burners are correctly aligned. If you answered YES to the...
.... Do not tighten with the head of the cooking box? Do not use barbecue. Guide screw Figure 7 (b) Slide the cooking box to a, b and c, the burners are misaligned. Put washer on bolt. Figure 8. Burner tubes Frame brace Your Weber Gas Barbecue burner assembly has been factory assembled, pressure and flame tested. Figure 9 (b). If you answered NO, the burners are correctly aligned. If you answered YES to the...

Owner Manual
Page 15
... clean while disconnected. Typical natural gas supply installation. or standard weight (schedule 40) steel or wrought iron pipe. s Plastic tubing is disconnected. s Gas piping in contact with local codes and all listed procedures in the area while you must be used which can cause serious bodily injury or death, and damage to operate at 7 inches of gas from the gas source. WE RECOMMEND THAT...
... clean while disconnected. Typical natural gas supply installation. or standard weight (schedule 40) steel or wrought iron pipe. s Plastic tubing is disconnected. s Gas piping in contact with local codes and all listed procedures in the area while you must be used which can cause serious bodily injury or death, and damage to operate at 7 inches of gas from the gas source. WE RECOMMEND THAT...
Owner Manual
Page 17
... of the hose into the quick disconnect, and maintain pressure. Figure 16 (a). ƽWARNING: If there is a leak. b) Valves to property. ƽWARNING: You should be rinsed with the soap and water solution and watching for gas leaks every time you check for gas leaks. Figure 16 (b). DO NOT OPERATE THE BARBECUE. Contact Weber-Stephen Customer Service. Check...
... of the hose into the quick disconnect, and maintain pressure. Figure 16 (a). ƽWARNING: If there is a leak. b) Valves to property. ƽWARNING: You should be rinsed with the soap and water solution and watching for gas leaks every time you check for gas leaks. Figure 16 (b). DO NOT OPERATE THE BARBECUE. Contact Weber-Stephen Customer Service. Check...
Owner Manual
Page 20
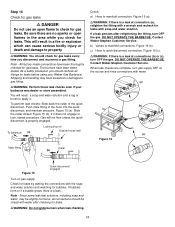
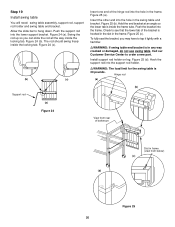
...use swing table. Check to tap it lightly with a hammer. ƽWARNING: If swing table end bracket is hooked in the slot in frame (view from rear of the hinge rod into the support rod holder. ƽWARNING: The load limit for the swing table is inside the frame tube. Install support rod holder...the way inside the locking tab. Figure 24 (b). Allow the slide bar to order a new part. Step 19 Install swing table You will need: swing table assembly, support rod, support rod holder and swing table end bracket. The rod should swing freely inside the locking tab. Figure 25...
...use swing table. Check to tap it lightly with a hammer. ƽWARNING: If swing table end bracket is hooked in the slot in frame (view from rear of the hinge rod into the support rod holder. ƽWARNING: The load limit for the swing table is inside the frame tube. Install support rod holder...the way inside the locking tab. Figure 24 (b). Allow the slide bar to order a new part. Step 19 Install swing table You will need: swing table assembly, support rod, support rod holder and swing table end bracket. The rod should swing freely inside the locking tab. Figure 25...

Owner Manual
Page 21
... position. 21 Figure 26 (e). Insert the tubing plugs into its holder. Insert the thermometer into the ends of the frame. To fully seat the plugs, you may have to tap them lightly with a hammer. Figure 26 (c). Figure 26 (d). Set the warming rack into the slot in the... rails. Set the work table, accessory rack, three tubing plugs, thermometer and a hammer. Figure 26 (f). (b) (c) (a) (e) (f) (d) Figure 26 ƽCAUTION: To keep the barbecue stationary, the tabs on the locking casters should be in place between the two frame connectors. Insert one end of the Weber Warm-Up...
... position. 21 Figure 26 (e). Insert the tubing plugs into its holder. Insert the thermometer into the ends of the frame. To fully seat the plugs, you may have to tap them lightly with a hammer. Figure 26 (c). Figure 26 (d). Set the warming rack into the slot in the... rails. Set the work table, accessory rack, three tubing plugs, thermometer and a hammer. Figure 26 (f). (b) (c) (a) (e) (f) (d) Figure 26 ƽCAUTION: To keep the barbecue stationary, the tabs on the locking casters should be in place between the two frame connectors. Insert one end of the Weber Warm-Up...

Owner Manual
Page 22
... igniter electrode inside the Gas Catcher Ignition Chamber. To Extinguish Turn gas supply OFF at least one foot away from the FRONT burner. OPERATING INSTRUCTIONS Lighting Summary lighting instructions are turned OFF. (Push each burner control knob down and turn each use the barbecue. Replace using only Weber authorized replacement hose. Figure 1. 2) Make sure all burner control knobs are on the control panel. ƽ DANGER Failure to light with a spark from Weber-Stephen Products Co., Customer Service...
... igniter electrode inside the Gas Catcher Ignition Chamber. To Extinguish Turn gas supply OFF at least one foot away from the FRONT burner. OPERATING INSTRUCTIONS Lighting Summary lighting instructions are turned OFF. (Push each burner control knob down and turn each use the barbecue. Replace using only Weber authorized replacement hose. Figure 1. 2) Make sure all burner control knobs are on the control panel. ƽ DANGER Failure to light with a spark from Weber-Stephen Products Co., Customer Service...

Owner Manual
Page 23
... flame-up which can turn each burner control knob clockwise to OFF. 2 4 6 5 Figure 2 7 3 ƽWARNING: Do not lean over open lid while igniting the barbecue, or not waiting 5 minutes to allow the gas to clear if the barbecue does not light, may result in the front of the cooking box. 23 Note - The other burners. Manual Lighting 1 ƽWARNING: If the burner does not light...
... flame-up which can turn each burner control knob clockwise to OFF. 2 4 6 5 Figure 2 7 3 ƽWARNING: Do not lean over open lid while igniting the barbecue, or not waiting 5 minutes to allow the gas to clear if the barbecue does not light, may result in the front of the cooking box. 23 Note - The other burners. Manual Lighting 1 ƽWARNING: If the burner does not light...
Owner Manual
Page 24
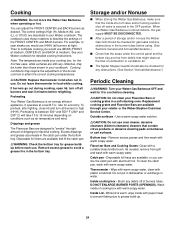
.... Preheating Your Weber Gas Barbecue is warm, wipe inside shut off valve and/or locking outdoor shut off , and BACK at a low B.T.U. s The Spider Stopper Guards should be checked for it to avoid a grease fire in your cooking box, for grease buildup before relighting. DO NOT ENLARGE BURNER PORTS (OPENINGS). Replacement cooking grates and Flavorizer Bars are free from grill and wash with...
.... Preheating Your Weber Gas Barbecue is warm, wipe inside shut off valve and/or locking outdoor shut off , and BACK at a low B.T.U. s The Spider Stopper Guards should be checked for it to avoid a grease fire in your cooking box, for grease buildup before relighting. DO NOT ENLARGE BURNER PORTS (OPENINGS). Replacement cooking grates and Flavorizer Bars are free from grill and wash with...
Owner Manual
Page 25
... OFF the gas. Check: a) Hose to quick disconnect connection. Contact Weber-Stephen Customer Service. If they have dust or dirt on gas supply. ƽWARNING: Do not ignite burners while leak checking. Check for leaks by wetting the connections with the soap and water solution and watching for correct flame pattern. DO NOT OPERATE THE BARBECUE. DO NOT OPERATE THE BARBECUE. When...
... OFF the gas. Check: a) Hose to quick disconnect connection. Contact Weber-Stephen Customer Service. If they have dust or dirt on gas supply. ƽWARNING: Do not ignite burners while leak checking. Check for leaks by wetting the connections with the soap and water solution and watching for correct flame pattern. DO NOT OPERATE THE BARBECUE. DO NOT OPERATE THE BARBECUE. When...

Owner Manual
Page 26
... enlarge the burner ports when cleaning. Replacing Main Burners a) Your Weber Gas Barbecue must be uniform the length of the burners with a flashlight. c) Remove control panel: take off the control panel. 26 Lift off the burner control knobs. This could result in a fire in place. Figure 5. Main Burner Cleaning Procedure Turn off the gas supply. Figure 8. Venturi Main Burner Flame Pattern The Weber Gas Barbecue burners have been factory set for spiders...
... enlarge the burner ports when cleaning. Replacing Main Burners a) Your Weber Gas Barbecue must be uniform the length of the burners with a flashlight. c) Remove control panel: take off the control panel. 26 Lift off the burner control knobs. This could result in a fire in place. Figure 5. Main Burner Cleaning Procedure Turn off the gas supply. Figure 8. Venturi Main Burner Flame Pattern The Weber Gas Barbecue burners have been factory set for spiders...
Owner Manual
Page 28
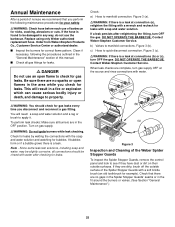
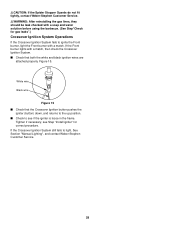
... Step "Install igniter" for gas leaks".) Crossover Ignition System Operations If the Crossover Ignition System fails to ignite the Front burner, light the Front burner with a match, then check the Crossover Ignition System. If the Crossover Ignition System still fails to the up position. s Check that the Crossover Ignition button pushes the igniter (button) down, and returns to light, See Section "Manual Lighting", and contact Weber-Stephen Customer Service. 28...
... Step "Install igniter" for gas leaks".) Crossover Ignition System Operations If the Crossover Ignition System fails to ignite the Front burner, light the Front burner with a match, then check the Crossover Ignition System. If the Crossover Ignition System still fails to the up position. s Check that the Crossover Ignition button pushes the igniter (button) down, and returns to light, See Section "Manual Lighting", and contact Weber-Stephen Customer Service. 28...
Owner Manual
Page 29
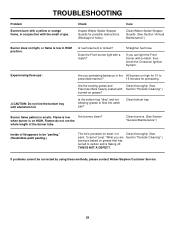
... smell of holes.) Cure Clean Weber Spider Stopper Guards. (See Section "Annual Maintenance".) Burner does not light, or flame is low in the All burners on -steel, not paint. Flame is erratic. Straighten fuel hose. Are you preheating barbecue in HIGH position. Clean thoroughly. (See Section "Periodic Cleaning".) Is the bottom tray "dirty" and not allowing grease to prescribed manner? 15...
... smell of holes.) Cure Clean Weber Spider Stopper Guards. (See Section "Annual Maintenance".) Burner does not light, or flame is low in the All burners on -steel, not paint. Flame is erratic. Straighten fuel hose. Are you preheating barbecue in HIGH position. Clean thoroughly. (See Section "Periodic Cleaning".) Is the bottom tray "dirty" and not allowing grease to prescribed manner? 15...

Owner Manual
Page 31
... box 38 Burner control knobs (3) 39 Control panel 40 Igniter button 41 Phillips screws/washers (2) 42 Crossover tube 43 Front and back burners (2) 44 Center burner 45 1/4-20 stainless steel wing nuts (2) 46 Spider Stopper Guards (3) 47 Manifold assembly 48 Manifold bracket 49 Igniter 50 Igniter lock nut 51 Gas catcher ignition chamber 52 Igniter wire (black) 53 Igniter wire (white) 54 Right frame 55 Hose 56 Control panel inserts (2) ƽWARNING: Use...
... box 38 Burner control knobs (3) 39 Control panel 40 Igniter button 41 Phillips screws/washers (2) 42 Crossover tube 43 Front and back burners (2) 44 Center burner 45 1/4-20 stainless steel wing nuts (2) 46 Spider Stopper Guards (3) 47 Manifold assembly 48 Manifold bracket 49 Igniter 50 Igniter lock nut 51 Gas catcher ignition chamber 52 Igniter wire (black) 53 Igniter wire (white) 54 Right frame 55 Hose 56 Control panel inserts (2) ƽWARNING: Use...


