
Owner Manual
Page 1
... OUTDOOR USE ONLY. NOTICE TO INSTALLER: These instructions must be left with the factory. Shut off gas to barbecue operation. GENESIS® 2000 Series Natural Gas Barbecue Owner's Manual WE BER BER WE ® WARNING: Follow all leak check procedures carefully in the vicinity of this even if barbecue was dealer assembled. If odor continues, immediately call your gas supplier or your warranty and any open flame. 3. Open lid. 4. Serial Number...
... OUTDOOR USE ONLY. NOTICE TO INSTALLER: These instructions must be left with the factory. Shut off gas to barbecue operation. GENESIS® 2000 Series Natural Gas Barbecue Owner's Manual WE BER BER WE ® WARNING: Follow all leak check procedures carefully in the vicinity of this even if barbecue was dealer assembled. If odor continues, immediately call your gas supplier or your warranty and any open flame. 3. Open lid. 4. Serial Number...
Owner Manual
Page 2
... a spare or disconnected LP tank under the barbecue. ƽ Your Weber Gas Barbecue should never be used by your liquid propane supplier. The conversion or attempted use of the cooking box. ƽ Should a grease fire occur, turn all gas valves off all burners and leave lid closed until fire is a gas leak present. ƽ Do not use a flame to check for gas leaks and burner obstructions before attempting to...
... a spare or disconnected LP tank under the barbecue. ƽ Your Weber Gas Barbecue should never be used by your liquid propane supplier. The conversion or attempted use of the cooking box. ƽ Should a grease fire occur, turn all gas valves off all burners and leave lid closed until fire is a gas leak present. ƽ Do not use a flame to check for gas leaks and burner obstructions before attempting to...

Owner Manual
Page 3
... elect to you are binding on Weber. Weber is not covered by insects within the burner tubes, as follows: Aluminum Castings, 10 years, Cooking Grates and Flavorizer Bars, 3 years, All Remaining Parts, 5 years, when assembled and operated in accordance with the sale, installation, use and service and which prove defective under normal use , removal, return, or replacement of incidental or consequential damages, so this limitation...
... elect to you are binding on Weber. Weber is not covered by insects within the burner tubes, as follows: Aluminum Castings, 10 years, Cooking Grates and Flavorizer Bars, 3 years, All Remaining Parts, 5 years, when assembled and operated in accordance with the sale, installation, use and service and which prove defective under normal use , removal, return, or replacement of incidental or consequential damages, so this limitation...

Owner Manual
Page 4
...., 200 East Daniels Road, Palatine, IL 60067-6266. Canada: Rd 1987 Reg. #58,034; #1,279,540; #1,283,586; #1,300,994; #1,300,995. Weber, , Genesis, Flavorizer and Crossover are U.S. trademarks; U.S.A. Genesis Gas Barbecues are covered under the following patent nos.: U.S.A. #4,677,964; 4,727,853; #4,777,927; #4,829,978; #4,860,724; #4,941,817; #4,966,125; #5,070,776; #D293...
...., 200 East Daniels Road, Palatine, IL 60067-6266. Canada: Rd 1987 Reg. #58,034; #1,279,540; #1,283,586; #1,300,994; #1,300,995. Weber, , Genesis, Flavorizer and Crossover are U.S. trademarks; U.S.A. Genesis Gas Barbecues are covered under the following patent nos.: U.S.A. #4,677,964; 4,727,853; #4,777,927; #4,829,978; #4,860,724; #4,941,817; #4,966,125; #5,070,776; #D293...

Owner Manual
Page 5
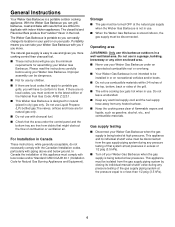
... warming space. h) Catch pan catches excess grease. g) Crossover Ignition System with Gas Catcher Ignition Chamber. f) Separate burners for precision cooking measures grill temperature, and can be removed and inserted into the food. c) Rapid read thermometer for temperature control. b) Heavy gauge porcelain-on-steel lid seals in heat. i) Locking casters for additional portability. 5 Contents WARNINGS 2 Warranty & Patents 3-4 General Instructions 6 Assembly 7-20 Operating Instructions Lighting 21-22 Cooking...
... warming space. h) Catch pan catches excess grease. g) Crossover Ignition System with Gas Catcher Ignition Chamber. f) Separate burners for precision cooking measures grill temperature, and can be removed and inserted into the food. c) Rapid read thermometer for temperature control. b) Heavy gauge porcelain-on-steel lid seals in heat. i) Locking casters for additional portability. 5 Contents WARNINGS 2 Warranty & Patents 3-4 General Instructions 6 Assembly 7-20 Operating Instructions Lighting 21-22 Cooking...
Owner Manual
Page 6
...-B149.1 (Installation Code for natural (piped in a well ventilated area. The natural gas supply is not in the food. s Do not use . s If there are difficult to them. s Not for use your Weber Gas Barbecue under the control panel and the bottom tray are for assembling your Weber Gas Barbecue. In Canada the installation of 1/2 psig (3.5 kPa). General Instructions Your Weber Gas Barbecue is a portable outdoor cooking appliance. Improper assembly can grill, barbecue, roast and...
...-B149.1 (Installation Code for natural (piped in a well ventilated area. The natural gas supply is not in the food. s Do not use . s If there are difficult to them. s Not for use your Weber Gas Barbecue under the control panel and the bottom tray are for assembling your Weber Gas Barbecue. In Canada the installation of 1/2 psig (3.5 kPa). General Instructions Your Weber Gas Barbecue is a portable outdoor cooking appliance. Improper assembly can grill, barbecue, roast and...

Owner Manual
Page 7
... attention to the inch, 1/2 inch long. Have your owner's manual and serial number of the barbecue available for gas leaks.") Note - Hose Bottom tray Two work tables Two accessory trays Swing table 7 On a small screw for example, "6-32 x 1/2 inch screw" means a number 6 screw, with 20 threads to receive immediate assistance. Call the Weber Customer Service Center toll free 1-800-446-1071 to the inch, 2 inches long. The...
... attention to the inch, 1/2 inch long. Have your owner's manual and serial number of the barbecue available for gas leaks.") Note - Hose Bottom tray Two work tables Two accessory trays Swing table 7 On a small screw for example, "6-32 x 1/2 inch screw" means a number 6 screw, with 20 threads to receive immediate assistance. Call the Weber Customer Service Center toll free 1-800-446-1071 to the inch, 2 inches long. The...

Owner Manual
Page 12
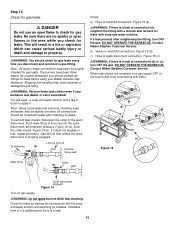
... a 7/16 inch wrench. Set the cooking box into the ends of the cooking box? Do not tighten. Figure 8 (c). Contact Weber-Stephen Customer Service. Guide screw Figure 6 Slide the cooking box to a, b and c, the burners are only guides. Figure 7. Tighten by holding the bolt with the 7/16 inch wrench. (b) Figure 8 (a) (c) Wing nuts Figure 7 12 Do not use your barbecue. Figure 8 (a). Figure 6. Turn frame assembly right...
... a 7/16 inch wrench. Set the cooking box into the ends of the cooking box? Do not tighten. Figure 8 (c). Contact Weber-Stephen Customer Service. Guide screw Figure 6 Slide the cooking box to a, b and c, the burners are only guides. Figure 7. Tighten by holding the bolt with the 7/16 inch wrench. (b) Figure 8 (a) (c) Wing nuts Figure 7 12 Do not use your barbecue. Figure 8 (a). Figure 6. Turn frame assembly right...

Owner Manual
Page 14
... Install gas supply General Specifications for building codes regulating outdoor gas barbecue installations. s This barbecue is resistant to rigid, permanent construction. ƽWARNING: Do not route the 12 foot hose under a deck. s The quick disconnect fitting can cause serious bodily injury or death, and damage to check for gas leaks. s Pipe compound should be used for gas leaks. tube. Some of the quick disconnect. The hose...
... Install gas supply General Specifications for building codes regulating outdoor gas barbecue installations. s This barbecue is resistant to rigid, permanent construction. ƽWARNING: Do not route the 12 foot hose under a deck. s The quick disconnect fitting can cause serious bodily injury or death, and damage to check for gas leaks. s Pipe compound should be used for gas leaks. tube. Some of the quick disconnect. The hose...
Owner Manual
Page 16
... quick disconnect, and maintain pressure. Figure 15 (b). Contact Weber-Stephen Customer Service. Note - DO NOT OPERATE THE BARBECUE. Check for leaks. Figure 14 (a). When leak checks are no sparks or open flame to quick disconnect connection. Be sure there are complete, turn gas supply OFF at connections (b) or (c), turn OFF the gas. b) Valves to manifold connection. c) Hose to check for...
... quick disconnect, and maintain pressure. Figure 15 (b). Contact Weber-Stephen Customer Service. Note - DO NOT OPERATE THE BARBECUE. Check for leaks. Figure 14 (a). When leak checks are no sparks or open flame to quick disconnect connection. Be sure there are complete, turn gas supply OFF at connections (b) or (c), turn OFF the gas. b) Valves to manifold connection. c) Hose to check for...

Owner Manual
Page 18
... up while setting the control panel in place.) Line up the holes in the frame brace. Do not overtighten. Figure 22 (a). Insert hinge pins from the outside. Hair pin cotter Hinge pin Step 17 Install tool holders, control panel and burner control knobs You will need : three tool holders, control panel, two Phillips screws/washers, a Phillips screwdriver, and three burner control knobs. Insert screws...
... up while setting the control panel in place.) Line up the holes in the frame brace. Do not overtighten. Figure 22 (a). Insert hinge pins from the outside. Hair pin cotter Hinge pin Step 17 Install tool holders, control panel and burner control knobs You will need : three tool holders, control panel, two Phillips screws/washers, a Phillips screwdriver, and three burner control knobs. Insert screws...
Owner Manual
Page 19
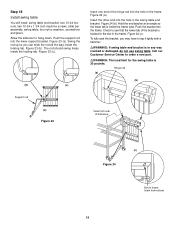
Push the bracket into the lower support bracket. Allow the slide bar to tap it lightly with a hammer. ƽWARNING: If swing table end bracket is 30 pounds... part. ƽWARNING: The load limit for the swing table is in frame (view from below) 19 Call our Customer Service Center to see that the lower tab of the bracket is inside the frame tube. Step 18 Install ...swing table You will need: swing table end bracket, two 10-24 hex nuts, two 10-24 x 1 3/4 inch machine screws, slide bar assembly, swing table, four nylon washers,...
Push the bracket into the lower support bracket. Allow the slide bar to tap it lightly with a hammer. ƽWARNING: If swing table end bracket is 30 pounds... part. ƽWARNING: The load limit for the swing table is in frame (view from below) 19 Call our Customer Service Center to see that the lower tab of the bracket is inside the frame tube. Step 18 Install ...swing table You will need: swing table end bracket, two 10-24 hex nuts, two 10-24 x 1 3/4 inch machine screws, slide bar assembly, swing table, four nylon washers,...
Owner Manual
Page 20
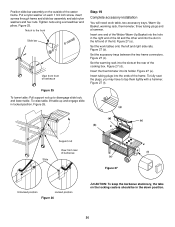
...Set the work table, two accessory trays, Warm-Up Basket, warming rack, thermometer, three tubing plugs and a hammer. Figure 27 (c). Figure 27 (e). Tighten nuts using a screwdriver and pliers. Set the accessory trays between the two frame connectors. Insert the thermometer into the ends of barbecue Step 19 Complete accessory installation... (e) (b) Support rod View from front of the frame. Figure 27 (d). Position slide bar assembly on the outside of the cooking box. Put a nylon washer on each 1 3/4 inch screw, insert screws through frame and slide bar assembly and add nylon...
...Set the work table, two accessory trays, Warm-Up Basket, warming rack, thermometer, three tubing plugs and a hammer. Figure 27 (c). Figure 27 (e). Tighten nuts using a screwdriver and pliers. Set the accessory trays between the two frame connectors. Insert the thermometer into the ends of barbecue Step 19 Complete accessory installation... (e) (b) Support rod View from front of the frame. Figure 27 (d). Position slide bar assembly on the outside of the cooking box. Put a nylon washer on each 1 3/4 inch screw, insert screws through frame and slide bar assembly and add nylon...

Owner Manual
Page 21
... flame-up which can turn each burner control knob down and turn on the control panel. ƽ DANGER Failure to open barbecue. Figure 1. 2) Make sure all burner control knobs are on the other burners ignite from Weber-Stephen Products Co., Customer Service Center or authorized dealer. The other burners. Crossover Ignition System 1 1) Open the lid. Order from the FRONT burner. OPERATING INSTRUCTIONS Lighting Summary lighting instructions are turned OFF. (Push each burner control knob...
... flame-up which can turn each burner control knob down and turn on the control panel. ƽ DANGER Failure to open barbecue. Figure 1. 2) Make sure all burner control knobs are on the other burners ignite from Weber-Stephen Products Co., Customer Service Center or authorized dealer. The other burners. Crossover Ignition System 1 1) Open the lid. Order from the FRONT burner. OPERATING INSTRUCTIONS Lighting Summary lighting instructions are turned OFF. (Push each burner control knob...
Owner Manual
Page 23
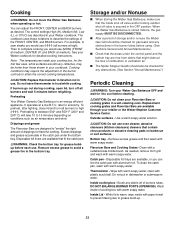
... Weber Genesis Gas Barbecue is stored indoors, the gas supply MUST BE DISCONNECTED. Flavorizer Bars and Cooking Grates- Wash inside shut off valve and/or locking outdoor shut off all burners at a low B.T.U. When the Weber Gas Barbecue is an energy efficient appliance. You can line the catch pan with paper towel to prevent flaking due to avoid a grease fire in the burner tubes before relighting. Replacement cooking grates...
... Weber Genesis Gas Barbecue is stored indoors, the gas supply MUST BE DISCONNECTED. Flavorizer Bars and Cooking Grates- Wash inside shut off valve and/or locking outdoor shut off all burners at a low B.T.U. When the Weber Gas Barbecue is an energy efficient appliance. You can line the catch pan with paper towel to prevent flaking due to avoid a grease fire in the burner tubes before relighting. Replacement cooking grates...

Owner Manual
Page 24
... retightening the fitting, turn OFF the gas. DO NOT OPERATE THE BARBECUE. Figure 3 (b). Be sure there are no gaps in the Spider Stopper Guards' seams or in the "General Maintenance" section of this manual. b) Valves to manifold connection. If they have dust or dirt on gas supply. ƽWARNING: Do not ignite burners while leak checking. Since some leak...
... retightening the fitting, turn OFF the gas. DO NOT OPERATE THE BARBECUE. Figure 3 (b). Be sure there are no gaps in the Spider Stopper Guards' seams or in the "General Maintenance" section of this manual. b) Valves to manifold connection. If they have dust or dirt on gas supply. ƽWARNING: Do not ignite burners while leak checking. Since some leak...

Owner Manual
Page 25
... the control panel, causing serious damage to the burner tubes through the air shutter openings. Main Burner Flame Pattern The Weber Gas Barbecue burners have been factory set for spiders and other insects access to your barbecue. The correct flame pattern is a target for the correct air and gas mixture. Remove the manifold. (See Section "Replacing the main burners".) Look inside cooking box Tips occasionally yellowish Light blue Flames Figure...
... the control panel, causing serious damage to the burner tubes through the air shutter openings. Main Burner Flame Pattern The Weber Gas Barbecue burners have been factory set for spiders and other insects access to your barbecue. The correct flame pattern is a target for the correct air and gas mixture. Remove the manifold. (See Section "Replacing the main burners".) Look inside cooking box Tips occasionally yellowish Light blue Flames Figure...
Owner Manual
Page 27
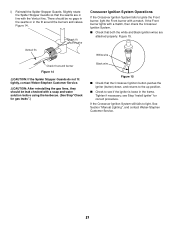
... water solution before using the barbecue. (See Step"Check for gas leaks".) Black wire Figure 15 s Check that the Crossover Ignition button pushes the igniter (button) down, and returns to see Step "Install igniter" for correct procedure. Venturi fin Check fit around valve Crossover Ignition System Operations If the Crossover Ignition System fails to light, See Section "Manual Lighting", and contact Weber-Stephen Customer Service. 27
... water solution before using the barbecue. (See Step"Check for gas leaks".) Black wire Figure 15 s Check that the Crossover Ignition button pushes the igniter (button) down, and returns to see Step "Install igniter" for correct procedure. Venturi fin Check fit around valve Crossover Ignition System Operations If the Crossover Ignition System fails to light, See Section "Manual Lighting", and contact Weber-Stephen Customer Service. 27

Owner Manual
Page 28
... tray "dirty" and not allowing grease to be corrected using these methods, please contact Weber-Stephen Customer Service. 28 Flame is low when burner is low in HIGH position. THIS IS NOT A DEFECT. Does the Front burner light with a match, then check the Crossover Ignition System. If you can light the Front burner with a match? Flames do not run the whole length of gas. TROUBLESHOOTING & MAINTENANCE Problem Check Burners...
... tray "dirty" and not allowing grease to be corrected using these methods, please contact Weber-Stephen Customer Service. 28 Flame is low when burner is low in HIGH position. THIS IS NOT A DEFECT. Does the Front burner light with a match, then check the Crossover Ignition System. If you can light the Front burner with a match? Flames do not run the whole length of gas. TROUBLESHOOTING & MAINTENANCE Problem Check Burners...
Owner Manual
Page 31
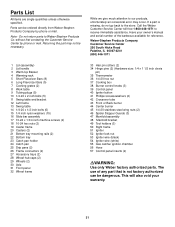
... Cooking box 38 Burner control knobs (3) 39 Control panel 40 Igniter button 41 Phillips screws/washers (2) 42 Crossover tube 43 Front or Back burner 44 Center burner 45 1/4-20 stainless steel wing nuts (2) 46 Spider Stopper Guards (3) 47 Manifold assembly 48 Manifold bracket 49 Tool holders (3) 50 Right frame 51 Igniter 52 Igniter lock nut 53 Igniter wire (black) 54 Igniter wire (white) 55 Gas catcher ignition chamber 56 Hose 57 Control panel...
... Cooking box 38 Burner control knobs (3) 39 Control panel 40 Igniter button 41 Phillips screws/washers (2) 42 Crossover tube 43 Front or Back burner 44 Center burner 45 1/4-20 stainless steel wing nuts (2) 46 Spider Stopper Guards (3) 47 Manifold assembly 48 Manifold bracket 49 Tool holders (3) 50 Right frame 51 Igniter 52 Igniter lock nut 53 Igniter wire (black) 54 Igniter wire (white) 55 Gas catcher ignition chamber 56 Hose 57 Control panel...


