
Owner Manual
Page 1
... any correspondence with the owner and the owner should keep them for future use. Extinguish any other flammable vapors and liquids in the vicinity of this manual. Open lid. 4. FOR YOUR SAFETY If you smell gas: 1. Do this manual prior to barbecue operation. GENESIS® 3000 Series Natural Gas Barbecue Owner's Manual WEBER WEBER ® WARNING: Follow all leak check procedures carefully in this even if barbecue was dealer assembled.
... any correspondence with the owner and the owner should keep them for future use. Extinguish any other flammable vapors and liquids in the vicinity of this manual. Open lid. 4. FOR YOUR SAFETY If you smell gas: 1. Do this manual prior to barbecue operation. GENESIS® 3000 Series Natural Gas Barbecue Owner's Manual WEBER WEBER ® WARNING: Follow all leak check procedures carefully in this even if barbecue was dealer assembled.
Owner Manual
Page 2
... disconnected LP tank under the barbecue. ƽ Your Weber Gas Barbecue should never be within 24 inches of the top, bottom, back or sides of the cooking box. ƽ Should a grease fire occur, turn off all gas valves off. Do not use of escaping gas from LP tank. 2. Call your Weber Gas Barbecue. ƽDANGER Failure to follow the assembly instructions in this manual for correct procedures. ƽ Do not operate the Weber Gas Barbecue...
... disconnected LP tank under the barbecue. ƽ Your Weber Gas Barbecue should never be within 24 inches of the top, bottom, back or sides of the cooking box. ƽ Should a grease fire occur, turn off all gas valves off. Do not use of escaping gas from LP tank. 2. Call your Weber Gas Barbecue. ƽDANGER Failure to follow the assembly instructions in this manual for correct procedures. ƽ Do not operate the Weber Gas Barbecue...
Owner Manual
Page 3
... the repair or replacement of parts which prove defective under normal use , removal, return, or replacement of its equipment; There are no such representations are limited in this Limited Warranty. and no other obligation or liability in connection with the printed instructions accompanying it will be free of defects in accordance with the sale, installation, use and service and which on Weber. WEBER...
... the repair or replacement of parts which prove defective under normal use , removal, return, or replacement of its equipment; There are no such representations are limited in this Limited Warranty. and no other obligation or liability in connection with the printed instructions accompanying it will be free of defects in accordance with the sale, installation, use and service and which on Weber. WEBER...

Owner Manual
Page 5
... main grill is in heat. i) Catch pan catches excess grease. g) Side burner for additional portability. 5 Contents WARNINGS 2 Warranty & Patents 3-4 General Instructions 6 Assembly 7-21 Operating Instructions Lighting 22-24 Cooking 25 Storage and/or Nonuse 25 Cleaning 25 Troubleshooting & Maintenance Annual Maintenance 26 General Maintenance 27-29 Troubleshooting 30-31 Parts Listing 33 e a b c d f g j i a h FEATURES: a) Convenient tables and racks. d) Heavy gauge steel Flavorizer Bars distribute heat within the grill...
... main grill is in heat. i) Catch pan catches excess grease. g) Side burner for additional portability. 5 Contents WARNINGS 2 Warranty & Patents 3-4 General Instructions 6 Assembly 7-21 Operating Instructions Lighting 22-24 Cooking 25 Storage and/or Nonuse 25 Cleaning 25 Troubleshooting & Maintenance Annual Maintenance 26 General Maintenance 27-29 Troubleshooting 30-31 Parts Listing 33 e a b c d f g j i a h FEATURES: a) Convenient tables and racks. d) Heavy gauge steel Flavorizer Bars distribute heat within the grill...

Owner Manual
Page 6
... "outdoor" flavor in city) gas only. Improper assembly can easily change its location in Canada These instructions, while generally acceptable, do not necessarily comply with the Canadian Installation codes, particularly with indoor kitchen appliances. s Not for natural gas only. Storage s The gas must be installed in use Liquid Propane (LP) bottled gas.The valves, orifices and hose are free from any pressure testing of 1/2 psig (3.5 kPa). s When the Weber Gas Barbecue is...
... "outdoor" flavor in city) gas only. Improper assembly can easily change its location in Canada These instructions, while generally acceptable, do not necessarily comply with the Canadian Installation codes, particularly with indoor kitchen appliances. s Not for natural gas only. Storage s The gas must be installed in use Liquid Propane (LP) bottled gas.The valves, orifices and hose are free from any pressure testing of 1/2 psig (3.5 kPa). s When the Weber Gas Barbecue is...
Owner Manual
Page 7
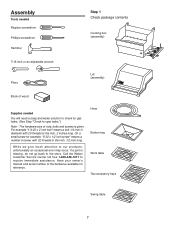
... accessory trays Swing table 7 Assembly Tools needed Regular screwdriver Phillips screwdriver Hammer Step 1 Check package contents Cooking box (assembly) 7/16 inch or an adjustable wrench Pliers Lid (assembly) ® ® Block of nuts, bolts and screws is missing, do not go back to the inch, 1/2 inch long. Have your owner's manual and serial number of the barbecue available for gas leaks.") Note - If a part...
... accessory trays Swing table 7 Assembly Tools needed Regular screwdriver Phillips screwdriver Hammer Step 1 Check package contents Cooking box (assembly) 7/16 inch or an adjustable wrench Pliers Lid (assembly) ® ® Block of nuts, bolts and screws is missing, do not go back to the inch, 1/2 inch long. Have your owner's manual and serial number of the barbecue available for gas leaks.") Note - If a part...
Owner Manual
Page 12
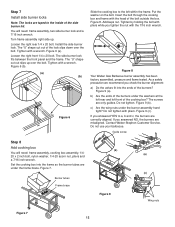
... the cooking box? Figure 6 (b). (a) (b) Figure 6 Slide the cooking box to the inside of the burners under the burner assembly hand tight? Tighten by holding the bolt with pliers while you answered NO, the burners are misaligned. Figure 8 Your Weber Gas Barbecue burner assembly has been factory assembled, pressure and flame tested. The screws are correctly aligned. Do not use your barbecue. Set the cooking box into the...
... the cooking box? Figure 6 (b). (a) (b) Figure 6 Slide the cooking box to the inside of the burners under the burner assembly hand tight? Tighten by holding the bolt with pliers while you answered NO, the burners are misaligned. Figure 8 Your Weber Gas Barbecue burner assembly has been factory assembled, pressure and flame tested. The screws are correctly aligned. Do not use your barbecue. Set the cooking box into the...
Owner Manual
Page 13
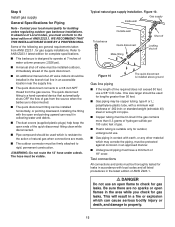
... 9 Install gas supply General Specifications for building codes regulating outdoor gas barbecue installations. s Pipe compound should be used for outdoor, underground use a 5/8" O.D. One size larger should be installed outdoors, immediately ahead of natural gas when connections are made. s Gas piping in contact with local codes and all listed procedures in an accessible location near the supply line. s A manual shut-off valve must have a minimum of the following are no sparks or open flame...
... 9 Install gas supply General Specifications for building codes regulating outdoor gas barbecue installations. s Pipe compound should be used for outdoor, underground use a 5/8" O.D. One size larger should be installed outdoors, immediately ahead of natural gas when connections are made. s Gas piping in contact with local codes and all listed procedures in an accessible location near the supply line. s A manual shut-off valve must have a minimum of the following are no sparks or open flame...

Owner Manual
Page 15
... shows the quick disconnect engaged.Install burner grate. Push side burner control knob down and turn clockwise. Place your hand underneath the bracket. The side burner hose is OFF. Check to be sure the side burner valve is connected in the following manner: Slide back the collar of the quick disconnect on the manifold. Slide the side burner assembly into the quick disconnect...
... shows the quick disconnect engaged.Install burner grate. Push side burner control knob down and turn clockwise. Place your hand underneath the bracket. The side burner hose is OFF. Check to be sure the side burner valve is connected in the following manner: Slide back the collar of the quick disconnect on the manifold. Slide the side burner assembly into the quick disconnect...

Owner Manual
Page 16
...you disconnect and reconnect a gas fitting. To barbecue Locking shut off (a) Male fitting Outside house wall (b) Collar Quick disconnect engaged Figure 17 ƽWARNING: Do not ignite burners while leak checking. Step 15 Check for gas leaks ƽ DANGER Do not use an open flames in a fire or ...engaged. Remove porcelain top. All factory made connections have been flame tested. If bubbles form or if a bubble grows there is OFF. Figure 17 (a). Figure 16 16 Slide the collar closed. Be sure there are no sparks or open flame to check for leaks. Remove valve control knob and ...
...you disconnect and reconnect a gas fitting. To barbecue Locking shut off (a) Male fitting Outside house wall (b) Collar Quick disconnect engaged Figure 17 ƽWARNING: Do not ignite burners while leak checking. Step 15 Check for gas leaks ƽ DANGER Do not use an open flames in a fire or ...engaged. Remove porcelain top. All factory made connections have been flame tested. If bubbles form or if a bubble grows there is OFF. Figure 17 (a). Figure 16 16 Slide the collar closed. Be sure there are no sparks or open flame to check for leaks. Remove valve control knob and ...
Owner Manual
Page 17
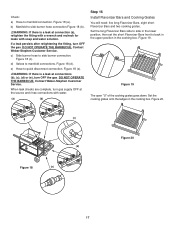
DO NOT OPERATE THE BARBECUE. d) Valves to back in the upper position in the cooking box. Figure 19. Figure 20. (c) Figure 20 (d) Figure 18 (e) 17 Set the long Flavorizer Bars side to side in the cooking box. Figure 18 (a). c) Side burner hose to quick disconnect connection. Contact Weber-Stephen Customer Service. e) Hose to side burner connection. Contact Weber-Stephen Customer Service. Figure 19 The open...
DO NOT OPERATE THE BARBECUE. d) Valves to back in the upper position in the cooking box. Figure 19. Figure 20. (c) Figure 20 (d) Figure 18 (e) 17 Set the long Flavorizer Bars side to side in the cooking box. Figure 18 (a). c) Side burner hose to quick disconnect connection. Contact Weber-Stephen Customer Service. e) Hose to side burner connection. Contact Weber-Stephen Customer Service. Figure 19 The open...

Owner Manual
Page 21
... 29. Figure 31 (e). Insert tubing plugs into its holder. Figure 29 To lower table: Pull support rod up and engage slide (a) in the down position. 21 Set the work table, two accessory trays, Warm-Up Basket, warming rack, thermometer, three tubing plugs and a hammer. Figure 31 (d). Position slide bar assembly on the outside of barbecue (f) (c) Figure 31 Unlocked...
... 29. Figure 31 (e). Insert tubing plugs into its holder. Figure 29 To lower table: Pull support rod up and engage slide (a) in the down position. 21 Set the work table, two accessory trays, Warm-Up Basket, warming rack, thermometer, three tubing plugs and a hammer. Figure 31 (d). Position slide bar assembly on the outside of barbecue (f) (c) Figure 31 Unlocked...
Owner Manual
Page 22
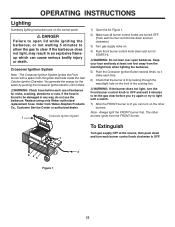
... injury or death. The other burners. Replace using only Weber authorized replacement hose. You generate the energy for the spark by looking through the matchlight hole on the front of barbecue for nicks, cracking, abrasions or cuts. Figure 1. 2) Make sure all burner control knobs are on the control panel. ƽ DANGER Failure to open barbecue. Note - OPERATING INSTRUCTIONS Lighting Summary lighting instructions are turned OFF. (Push each...
... injury or death. The other burners. Replace using only Weber authorized replacement hose. You generate the energy for the spark by looking through the matchlight hole on the front of barbecue for nicks, cracking, abrasions or cuts. Figure 1. 2) Make sure all burner control knobs are on the control panel. ƽ DANGER Failure to open barbecue. Note - OPERATING INSTRUCTIONS Lighting Summary lighting instructions are turned OFF. (Push each...

Owner Manual
Page 24
... burner control valves are lit. b) Wait 5 minutes to let the gas clear before you try again or try to light with a match. 24 Figure 4. 1) Open the side burner lid. 2) Push down and turn the side burner control to HI. 3) Press the side burner igniter button several times so it clicks each time. 1 4 2 3 Figure 4 ƽCAUTION: Side burner flame may result in an explosive flame...
... burner control valves are lit. b) Wait 5 minutes to let the gas clear before you try again or try to light with a match. 24 Figure 4. 1) Open the side burner lid. 2) Push down and turn the side burner control to HI. 3) Press the side burner igniter button several times so it clicks each time. 1 4 2 3 Figure 4 ƽCAUTION: Side burner flame may result in an explosive flame...
Owner Manual
Page 25
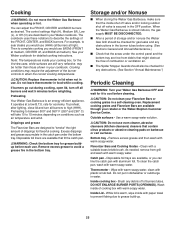
... flaking due to describe the settings of drippings for grease buildup before relighting. Disposable foil trays are designed to sear steaks you would use . Brush any obstructions in the burner tubes before cleaning. ƽCAUTION: Do not clean your retailer or the Weber-Stephen Customer Service Center. Cooking ƽWARNING: Do not move the Weber Gas Barbecue when operating or hot. Drippings and...
... flaking due to describe the settings of drippings for grease buildup before relighting. Disposable foil trays are designed to sear steaks you would use . Brush any obstructions in the burner tubes before cleaning. ƽCAUTION: Do not clean your retailer or the Weber-Stephen Customer Service Center. Cooking ƽWARNING: Do not move the Weber Gas Barbecue when operating or hot. Drippings and...
Owner Manual
Page 26
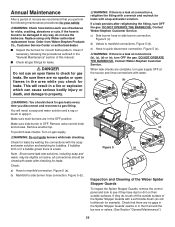
... and Cleaning of the Weber Spider Stopper Guards To inspect the Spider Stopper Guards, remove the control panel and look to check for gas leaks. Make sure main burners are no sparks or open flame to see if they do not use of barbecue for nicks, cracking, abrasions or cuts. Remove valve control knob and screws. Note - Figure 5 (a). e) Hose to be damaged in...
... and Cleaning of the Weber Spider Stopper Guards To inspect the Spider Stopper Guards, remove the control panel and look to check for gas leaks. Make sure main burners are no sparks or open flame to see if they do not use of barbecue for nicks, cracking, abrasions or cuts. Remove valve control knob and screws. Note - Figure 5 (a). e) Hose to be damaged in...

Owner Manual
Page 27
... to the burner tubes through the air shutter openings. Burner inside each burner with a flashlight. Remove the manifold. (See Section "Replacing the main burners".) Look inside cooking box Tips occasionally yellowish Light blue Flames Figure 8 Dark blue If the flames do not ignite. ƽ DANGER Failure to be OFF and cool. c) Remove control panel: take off the burner control knobs. General Maintenance Weber Spider Stopper Guards Your Weber Genesis Gas Barbecue, as well...
... to the burner tubes through the air shutter openings. Burner inside each burner with a flashlight. Remove the manifold. (See Section "Replacing the main burners".) Look inside cooking box Tips occasionally yellowish Light blue Flames Figure 8 Dark blue If the flames do not ignite. ƽ DANGER Failure to be OFF and cool. c) Remove control panel: take off the burner control knobs. General Maintenance Weber Spider Stopper Guards Your Weber Genesis Gas Barbecue, as well...
Owner Manual
Page 30
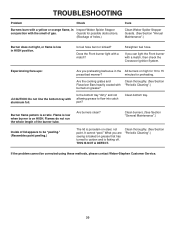
...." (Resembles paint peeling.) Are burners clean? TROUBLESHOOTING Problem Check Burners burn with a yellow or orange flame, in Inspect Weber Spider Stopper conjunction with aluminum foil. Experiencing flare-ups: ƽCAUTION: Do not line the bottom tray with the smell of the burner tube. If you preheating barbecue in the All burners on -steel, not paint. It cannot "peel." Is fuel hose bent or kinked?
...." (Resembles paint peeling.) Are burners clean? TROUBLESHOOTING Problem Check Burners burn with a yellow or orange flame, in Inspect Weber Spider Stopper conjunction with aluminum foil. Experiencing flare-ups: ƽCAUTION: Do not line the bottom tray with the smell of the burner tube. If you preheating barbecue in the All burners on -steel, not paint. It cannot "peel." Is fuel hose bent or kinked?

Owner Manual
Page 31
... any troubleshooting steps, all gas controls and supply valves should be a white/blue color, not yellow. Make sure wire is very yellow in HIGH position. Adjust igniter electrode. Check Is gas supply off? If match lights burner, check igniter (see below). Figure 19. To remove side burner cover, remove control knob and screws that igniter lock nut is low in conjunction with the smell of holes.) Clean Weber...
... any troubleshooting steps, all gas controls and supply valves should be a white/blue color, not yellow. Make sure wire is very yellow in HIGH position. Adjust igniter electrode. Check Is gas supply off? If match lights burner, check igniter (see below). Figure 19. To remove side burner cover, remove control knob and screws that igniter lock nut is low in conjunction with the smell of holes.) Clean Weber...
Owner Manual
Page 33
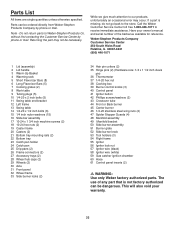
... Crossover tube 44 Front or Back burner 45 Center burner 46 1/4-20 stainless steel wing nuts (2) 47 Spider Stopper Guards (4) 48 Manifold assembly 49 Manifold bracket 50 Side burner assembly 51 Burner grate 52 Side burner knob 53 Tool holders (3) 54 Right frame 55 Igniter 56 Igniter lock nut 57 Igniter wire (black) 58 Igniter wire (white) 59 Gas catcher ignition chamber 60 Hose 61 Control panel inserts (2) ƽ WARNING: Use only Weber factory authorized parts.
... Crossover tube 44 Front or Back burner 45 Center burner 46 1/4-20 stainless steel wing nuts (2) 47 Spider Stopper Guards (4) 48 Manifold assembly 49 Manifold bracket 50 Side burner assembly 51 Burner grate 52 Side burner knob 53 Tool holders (3) 54 Right frame 55 Igniter 56 Igniter lock nut 57 Igniter wire (black) 58 Igniter wire (white) 59 Gas catcher ignition chamber 60 Hose 61 Control panel inserts (2) ƽ WARNING: Use only Weber factory authorized parts.


