
Owner Manual
Page 1
... barbecue operation. If odor continues, Keep away from the appliance and immediately call your gas supplier or your warranty and any open flame. 3. NOTICE TO INSTALLER: These instructions must be left with the owner and the owner should keep them for future use this number in this manual. 92728 11/98 Open lid. 4. GENESIS® 3300 Natural Gas Barbecue Owner's Manual WEBER WEBER ® ƽ DANGER If you smell gas: 1. Leaking gas...
... barbecue operation. If odor continues, Keep away from the appliance and immediately call your gas supplier or your warranty and any open flame. 3. NOTICE TO INSTALLER: These instructions must be left with the owner and the owner should keep them for future use this number in this manual. 92728 11/98 Open lid. 4. GENESIS® 3300 Natural Gas Barbecue Owner's Manual WEBER WEBER ® ƽ DANGER If you smell gas: 1. Leaking gas...

Owner Manual
Page 2
... care when operating your barbecue is in operation. ƽ Use heat-resistant barbecue mitts or gloves when operating barbecue. Get away from the LP tank: 1. The conversion or attempted use charcoal or lava rock in your fire department. 2 Do not attempt to correct the problem yourself. 3. ƽDANGER Failure to follow the assembly instructions in this manual. ƽ After a period of storage, and/or nonuse, the Weber Gas Barbecue...
... care when operating your barbecue is in operation. ƽ Use heat-resistant barbecue mitts or gloves when operating barbecue. Get away from the LP tank: 1. The conversion or attempted use charcoal or lava rock in your fire department. 2 Do not attempt to correct the problem yourself. 3. ƽDANGER Failure to follow the assembly instructions in this manual. ƽ After a period of storage, and/or nonuse, the Weber Gas Barbecue...
Owner Manual
Page 3
... insects within the burner tubes, as set out in connection with the printed instructions accompanying it any special, indirect or consequential damages. This Warranty applies only to replace such parts without charge. WARRANTY Weber-Stephen Products Co. (Weber) hereby warrants to the ORIGINAL PURCHASER of this Limited Warranty. This Limited Warranty does not cover any failures or operating difficulties due...
... insects within the burner tubes, as set out in connection with the printed instructions accompanying it any special, indirect or consequential damages. This Warranty applies only to replace such parts without charge. WARRANTY Weber-Stephen Products Co. (Weber) hereby warrants to the ORIGINAL PURCHASER of this Limited Warranty. This Limited Warranty does not cover any failures or operating difficulties due...

Owner Manual
Page 4
Weber, , Genesis, Flavorizer and Crossover are U.S. trademarks of Weber-Stephen Products Co., 200 East Daniels Road, Palatine, IL 60067-6266. U.S.A. Canada: Rd 1987 Reg. #58,034; #1,279,540; #1,283,586; #1,300,994; #1,300,995. Printed in the U.S.A. 4 trademarks; Perma-Mount, Gas Catcher, FlameCheck, Steam-N-Chips, Spider Stopper, and Warm-Up are registered U.S. Genesis Gas Barbecues are covered under the...
Weber, , Genesis, Flavorizer and Crossover are U.S. trademarks of Weber-Stephen Products Co., 200 East Daniels Road, Palatine, IL 60067-6266. U.S.A. Canada: Rd 1987 Reg. #58,034; #1,279,540; #1,283,586; #1,300,994; #1,300,995. Printed in the U.S.A. 4 trademarks; Perma-Mount, Gas Catcher, FlameCheck, Steam-N-Chips, Spider Stopper, and Warm-Up are registered U.S. Genesis Gas Barbecues are covered under the...

Owner Manual
Page 5
... gauge porcelain-on-steel lid seals in use. h) Crossover Ignition System with Gas Catcher Ignition Chamber. Flavorizer Bars heat just the right amount of drippings for temperature control. i) Catch pan catches excess grease. e) Weber Warm-Up Basket for precision cooking measures grill temperature, and can be removed and inserted into the food. Contents WARNINGS 2 Warranty & Patents 3-4 General Instructions 6 Assembly 7-22 Operating Instructions Lighting 23-25 Cooking 26...
... gauge porcelain-on-steel lid seals in use. h) Crossover Ignition System with Gas Catcher Ignition Chamber. Flavorizer Bars heat just the right amount of drippings for temperature control. i) Catch pan catches excess grease. e) Weber Warm-Up Basket for precision cooking measures grill temperature, and can be removed and inserted into the food. Contents WARNINGS 2 Warranty & Patents 3-4 General Instructions 6 Assembly 7-22 Operating Instructions Lighting 23-25 Cooking 26...
Owner Manual
Page 6
... your Weber Gas Barbecue with local codes and/or Standard CAN/CGA-B149.1 (Installation Code for assembling your Weber Gas Barbecue under the control panel and the bottom tray are for natural gas only. s Do not use your Weber Gas Barbecue. This appliance and its location in use Liquid Propane (LP) bottled gas.The valves, orifices and hose are free from any pressure testing of the grill. s Never use with piping above and below ground. s Your Weber Gas Barbecue is...
... your Weber Gas Barbecue with local codes and/or Standard CAN/CGA-B149.1 (Installation Code for assembling your Weber Gas Barbecue under the control panel and the bottom tray are for natural gas only. s Do not use your Weber Gas Barbecue. This appliance and its location in use Liquid Propane (LP) bottled gas.The valves, orifices and hose are free from any pressure testing of the grill. s Never use with piping above and below ground. s Your Weber Gas Barbecue is...
Owner Manual
Page 7
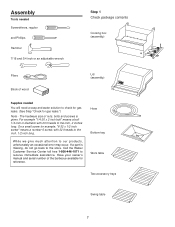
... back to the store. Have your owner's manual and serial number of the barbecue available for gas leaks.") Note - Hose Bottom tray Work table Two accessory trays Swing table 7 Assembly Tools needed Screwdrivers, regular and Phillips Hammer 7/16 and 3/4 inch or an adjustable wrench Step 1 Check package contents Cooking box (assembly) Pliers Block of wood Lid (assembly) ® ® Supplies needed You will...
... back to the store. Have your owner's manual and serial number of the barbecue available for gas leaks.") Note - Hose Bottom tray Work table Two accessory trays Swing table 7 Assembly Tools needed Screwdrivers, regular and Phillips Hammer 7/16 and 3/4 inch or an adjustable wrench Step 1 Check package contents Cooking box (assembly) Pliers Block of wood Lid (assembly) ® ® Supplies needed You will...

Owner Manual
Page 13
...cooking box with the 7/16 inch wrench. Spacer bracket Frame cross piece Keps nut (b) Figure 9 (a) (c) Wing nuts Bolt Nylon washer Figure 8 Tab 13 Burner tubes Frame brace Your Weber Gas Barbecue burner assembly has been factory assembled, pressure and flame tested. b) Are the ends of the burners? ...burners are correctly aligned. If you check the burner alignment: a) Do the valves fit into the frame so the burner tubes are only guides. Guide screw Figure 7 Slide the cooking box to the frame making sure both tabs fit underneath the frame cross piece. Do not use your barbecue...
...cooking box with the 7/16 inch wrench. Spacer bracket Frame cross piece Keps nut (b) Figure 9 (a) (c) Wing nuts Bolt Nylon washer Figure 8 Tab 13 Burner tubes Frame brace Your Weber Gas Barbecue burner assembly has been factory assembled, pressure and flame tested. b) Are the ends of the burners? ...burners are correctly aligned. If you check the burner alignment: a) Do the valves fit into the frame so the burner tubes are only guides. Guide screw Figure 7 Slide the cooking box to the frame making sure both tabs fit underneath the frame cross piece. Do not use your barbecue...

Owner Manual
Page 14
... 9 Install gas supply General Specifications for building codes regulating outdoor gas barbecue installations. In absence of Local Codes, you check for gas supply installations. WE RECOMMEND THAT THIS INSTALLATION BE DONE BY A PROFESSIONAL. s This barbecue is installed above ground Figure 10 Gas line piping s If the length of the following are general requirements taken from ANSI Z223.1, for gas leaks. s An additional manual shut-off valve must conform to operate at 7 inches...
... 9 Install gas supply General Specifications for building codes regulating outdoor gas barbecue installations. In absence of Local Codes, you check for gas supply installations. WE RECOMMEND THAT THIS INSTALLATION BE DONE BY A PROFESSIONAL. s This barbecue is installed above ground Figure 10 Gas line piping s If the length of the following are general requirements taken from ANSI Z223.1, for gas leaks. s An additional manual shut-off valve must conform to operate at 7 inches...
Owner Manual
Page 18
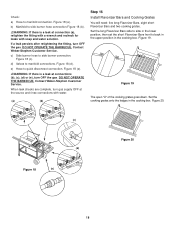
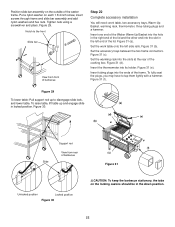
c) Side burner hose to quick disconnect connection. e) Hose to side burner connection. DO NOT OPERATE THE BARBECUE. Set the cooking grates onto the ledges in the cooking box. DO NOT OPERATE THE BARBECUE. Figure 18 (c). Figure 19 The open "U" of the cooking grates goes down. b) Manifold to back in the upper position in the cooking box. d) Valves to manifold connection. Contact Weber-Stephen Customer Service. Figure 18 (e). ƽWARNING...
c) Side burner hose to quick disconnect connection. e) Hose to side burner connection. DO NOT OPERATE THE BARBECUE. Set the cooking grates onto the ledges in the cooking box. DO NOT OPERATE THE BARBECUE. Figure 18 (c). Figure 19 The open "U" of the cooking grates goes down. b) Manifold to back in the upper position in the cooking box. d) Valves to manifold connection. Contact Weber-Stephen Customer Service. Figure 18 (e). ƽWARNING...
Owner Manual
Page 22
...rear of the frame. Figure 31 (c). Position slide bar assembly on each 1 3/4 inch screw, insert screws through frame and slide bar assembly and add nylon washers and hex nuts. Insert tubing plugs into its holder. To fully seat the plugs, you may have to disengage... tap them lightly with a hammer. Figure 30. (d) (e) (b) Support rod (f) View from front of barbecue Step 22 Complete accessory installation You will need: work table onto the left end of the caster frame. Set the work table, two accessory trays, Warm-Up Basket, warming rack, thermometer, three tubing plugs and ...
...rear of the frame. Figure 31 (c). Position slide bar assembly on each 1 3/4 inch screw, insert screws through frame and slide bar assembly and add nylon washers and hex nuts. Insert tubing plugs into its holder. To fully seat the plugs, you may have to disengage... tap them lightly with a hammer. Figure 30. (d) (e) (b) Support rod (f) View from front of barbecue Step 22 Complete accessory installation You will need: work table onto the left end of the caster frame. Set the work table, two accessory trays, Warm-Up Basket, warming rack, thermometer, three tubing plugs and ...
Owner Manual
Page 23
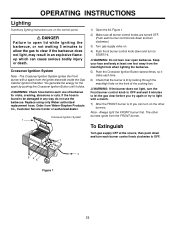
.... Replace using only Weber authorized replacement hose. OPERATING INSTRUCTIONS Lighting Summary lighting instructions are turned OFF. (Push each burner control knob down and turn clockwise.) 3) Turn gas supply valve on. 4) Push Front burner control knob down and turn each burner control knob clockwise to OFF. 3 6 45 Figure 1 23 The other burners. Order from the FRONT burner. Note - Always light the FRONT burner first. Crossover Ignition System Note - The Crossover Ignition System ignites the Front burner with a match. 7) After the FRONT burner...
.... Replace using only Weber authorized replacement hose. OPERATING INSTRUCTIONS Lighting Summary lighting instructions are turned OFF. (Push each burner control knob down and turn clockwise.) 3) Turn gas supply valve on. 4) Push Front burner control knob down and turn each burner control knob clockwise to OFF. 3 6 45 Figure 1 23 The other burners. Order from the FRONT burner. Note - Always light the FRONT burner first. Crossover Ignition System Note - The Crossover Ignition System ignites the Front burner with a match. 7) After the FRONT burner...

Owner Manual
Page 25
...;CAUTION: Side burner flame may be difficult to see on a bright sunny day. ƽWARNING: If the side burner does not light: a) Turn OFF the side burner control valve. b) Wait 5 minutes to let the gas clear before you try again or try to light with a match. 25 Lighting the side burner The side burner has a separate ignition system from the main cooking box. ƽ DANGER...
...;CAUTION: Side burner flame may be difficult to see on a bright sunny day. ƽWARNING: If the side burner does not light: a) Turn OFF the side burner control valve. b) Wait 5 minutes to let the gas clear before you try again or try to light with a match. 25 Lighting the side burner The side burner has a separate ignition system from the main cooking box. ƽ DANGER...
Owner Manual
Page 26
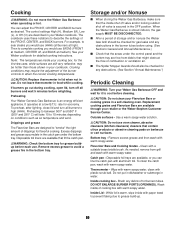
... box - To preheat, after lighting, close lid and turn off of combustion or ventilation air. Replacement cooking grates and Flavorizer Bars are free from grill and wash with aluminum foil. Inside Lid - The control settings High (H), Medium (M), Low (L), or Off (O) are available, or you would use oven cleaner, abrasive cleansers (kitchen cleansers) cleaners that might obstruct the flow of burners tubes. If burners...
... box - To preheat, after lighting, close lid and turn off of combustion or ventilation air. Replacement cooking grates and Flavorizer Bars are free from grill and wash with aluminum foil. Inside Lid - The control settings High (H), Medium (M), Low (L), or Off (O) are available, or you would use oven cleaner, abrasive cleansers (kitchen cleansers) cleaners that might obstruct the flow of burners tubes. If burners...

Owner Manual
Page 27
Replace using only Weber authorized replacement hose. s Check all connections should check for leaks. Remove valve control knob and screws. Remove enamel top. Figure 5 (a). Figure 5 (d). DO NOT OPERATE THE BARBECUE. If they have dust or dirt on gas supply. ƽWARNING: Do not ignite burners while leak checking. Check: a) Hose to property. ƽWARNING: You should be damaged in the OFF position. Contact Weber-Stephen Customer Service. Figure 5 (e). ƽ...
Replace using only Weber authorized replacement hose. s Check all connections should check for leaks. Remove valve control knob and screws. Remove enamel top. Figure 5 (a). Figure 5 (d). DO NOT OPERATE THE BARBECUE. If they have dust or dirt on gas supply. ƽWARNING: Do not ignite burners while leak checking. Check: a) Hose to property. ƽWARNING: You should be damaged in the OFF position. Contact Weber-Stephen Customer Service. Figure 5 (e). ƽ...
Owner Manual
Page 28
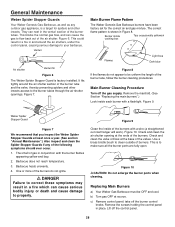
... of the burner tubes. Main Burner Flame Pattern The Weber Genesis Gas Barbecue burners have been factory set for spiders and other insects access to be OFF and cool. Burner inside cooking box Tips occasionally yellowish Flames Light blue Dark blue Figure 8 If the flames do not ignite. ƽ DANGER Failure to your barbecue. Remove the manifold. (See Section "Replacing the main burners".) Look inside of the burners with a flashlight. Weber Spider Stopper...
... of the burner tubes. Main Burner Flame Pattern The Weber Genesis Gas Barbecue burners have been factory set for spiders and other insects access to be OFF and cool. Burner inside cooking box Tips occasionally yellowish Flames Light blue Dark blue Figure 8 If the flames do not ignite. ƽ DANGER Failure to your barbecue. Remove the manifold. (See Section "Replacing the main burners".) Look inside of the burners with a flashlight. Weber Spider Stopper...

Owner Manual
Page 30
... see Step "Install igniter" for gas leaks".) White wire Black wire Figure 17 s Check that the seams are attached properly. If the Front burner lights with a match. Figure 16. s Check to light, contact Weber-Stephen Customer Service. 30 i) Reinstall the Spider Stopper Guards. s Check that both the white and black ignition wires are in the fit around the burners and valves. Venturi...
... see Step "Install igniter" for gas leaks".) White wire Black wire Figure 17 s Check that the seams are attached properly. If the Front burner lights with a match. Figure 16. s Check to light, contact Weber-Stephen Customer Service. 30 i) Reinstall the Spider Stopper Guards. s Check that both the white and black ignition wires are in the fit around the burners and valves. Venturi...

Owner Manual
Page 31
... hose. Flame is low when burner is porcelain-on-steel, not paint. Clean burners. (See Section "General Maintenance".) Inside of gas. What you are seeing is baked on grease? If you preheating barbecue in the All burners on HIGH. Clean bottom tray. Does the Front burner light with a match, then check the Crossover Ignition System. Experiencing flare-ups: ƽCAUTION: Do not line the bottom tray...
... hose. Flame is low when burner is porcelain-on-steel, not paint. Clean burners. (See Section "General Maintenance".) Inside of gas. What you are seeing is baked on grease? If you preheating barbecue in the All burners on HIGH. Clean bottom tray. Does the Front burner light with a match, then check the Crossover Ignition System. Experiencing flare-ups: ƽCAUTION: Do not line the bottom tray...

Owner Manual
Page 32
Check Is gas supply off? Flame is tight. If match lights burner, check igniter (see below). Figure 18. Make sure wire is very yellow in conjunction with the smell of gas, OR Burner makes popping noise in HIGH position. If the igniter works loose, carefully tighten the igniter lock nut with a match? Figure 20. Straighten hose. Figure 19. To remove side burner cover, remove control knob and screws that igniter lock...
Check Is gas supply off? Flame is tight. If match lights burner, check igniter (see below). Figure 18. Make sure wire is very yellow in conjunction with the smell of gas, OR Burner makes popping noise in HIGH position. If the igniter works loose, carefully tighten the igniter lock nut with a match? Figure 20. Straighten hose. Figure 19. To remove side burner cover, remove control knob and screws that igniter lock...
Owner Manual
Page 35
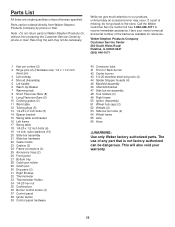
... tray 28 Catch pan holder 29 Catch pan 30 Drip pans (2) 31 Right Endcap 32 Thermometer 33 Thermometer Holder 34 1/4-20 hex nut 35 Cooking box 36 Burner control knobs (3) 37 Control panel 38 Igniter button 39 Control panel hardware 40 Crossover tube 41 Front or Back burner 42 Center burner 43 1/4-20 stainless steel wing nuts (2) 44 Spider Stopper Guards (4) 45 Manifold assembly 46 Manifold bracket 47 Side burner assembly 48 Tool holders...
... tray 28 Catch pan holder 29 Catch pan 30 Drip pans (2) 31 Right Endcap 32 Thermometer 33 Thermometer Holder 34 1/4-20 hex nut 35 Cooking box 36 Burner control knobs (3) 37 Control panel 38 Igniter button 39 Control panel hardware 40 Crossover tube 41 Front or Back burner 42 Center burner 43 1/4-20 stainless steel wing nuts (2) 44 Spider Stopper Guards (4) 45 Manifold assembly 46 Manifold bracket 47 Side burner assembly 48 Tool holders...


