
Owner Manual
Page 1
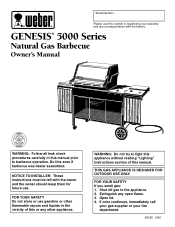
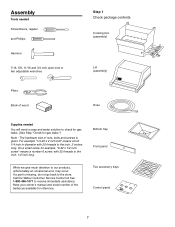
... of this number in this even if barbecue was dealer assembled. If odor continues, immediately call your gas supplier or your warranty and any open flame. 3. GENESIS® 5000 Series Natural Gas Barbecue Owner's Manual ® WARNING: Follow all leak check procedures carefully in registering your fire department. 86020 6/96 Do this manual prior to barbecue operation. Open lid. 4. Serial Number Please use this manual. NOTICE TO INSTALLER: These instructions must be...
... of this number in this even if barbecue was dealer assembled. If odor continues, immediately call your gas supplier or your warranty and any open flame. 3. GENESIS® 5000 Series Natural Gas Barbecue Owner's Manual ® WARNING: Follow all leak check procedures carefully in registering your fire department. 86020 6/96 Do this manual prior to barbecue operation. Open lid. 4. Serial Number Please use this manual. NOTICE TO INSTALLER: These instructions must be...
Owner Manual
Page 2
... operation. s Use heat-resistant barbecue mitts or gloves when operating barbecue. s Do not attempt to disconnect the gas regulator or any gas fitting while your barbecue is in operation. Do not attempt to correct the problem yourself. 3. Call your Weber Gas Barbecue. s After a period of storage, and/or nonuse, the Weber Gas Barbecue should be checked by children. s Do not enlarge valve orifices or burner ports when cleaning the valves or burners. The conversion...
... operation. s Use heat-resistant barbecue mitts or gloves when operating barbecue. s Do not attempt to disconnect the gas regulator or any gas fitting while your barbecue is in operation. Do not attempt to correct the problem yourself. 3. Call your Weber Gas Barbecue. s After a period of storage, and/or nonuse, the Weber Gas Barbecue should be checked by children. s Do not enlarge valve orifices or burner ports when cleaning the valves or burners. The conversion...
Owner Manual
Page 3
... you . Weber is not covered by insects within the burner tubes, as follows: Aluminum Castings, 10 years, Cooking Grates, 3 years, Stainless Steel Flavorizer Bars, 5 years, All Remaining Parts, 5 years, when assembled and operated in material and workmanship from the date of purchase as set forth herein and any failures or operating difficulties due to accident, abuse, misuse, alteration, misapplication, vandalism, improper installation or...
... you . Weber is not covered by insects within the burner tubes, as follows: Aluminum Castings, 10 years, Cooking Grates, 3 years, Stainless Steel Flavorizer Bars, 5 years, All Remaining Parts, 5 years, when assembled and operated in material and workmanship from the date of purchase as set forth herein and any failures or operating difficulties due to accident, abuse, misuse, alteration, misapplication, vandalism, improper installation or...

Owner Manual
Page 4
... Stopper, and Warm-Up are covered under the following patent nos.: U.S.A. #4,677,964; 4,727,853; #4,777,927; #4,829,978; #4,860,724; #4,941,817; #4,966,125; #5,070,776; #D293,067; #D316,355; Genesis Gas Barbecues are U.S. Canada: Rd 1987 Reg. #58,034; #1,279,540; #1,283,586; #1,300,994; #1,300,995. U.S.A. Weber, , Genesis, Flavorizer and Crossover are registered...
... Stopper, and Warm-Up are covered under the following patent nos.: U.S.A. #4,677,964; 4,727,853; #4,777,927; #4,829,978; #4,860,724; #4,941,817; #4,966,125; #5,070,776; #D293,067; #D316,355; Genesis Gas Barbecues are U.S. Canada: Rd 1987 Reg. #58,034; #1,279,540; #1,283,586; #1,300,994; #1,300,995. U.S.A. Weber, , Genesis, Flavorizer and Crossover are registered...

Owner Manual
Page 5
... control. f) Crossover Ignition System with Gas Catcher Ignition Chamber. g) Weber Warm-Up Basket for flavoring. j) Steam-N-Chips Smoker lets you add genuine smoke flavor to the burners if the flame goes out. l) Enclosed storage area. d) Heavy gauge steel Flavorizer Bars vaporize just the right amount of drippings for additional cooking or warming space. 5 Contents WARNINGS 2 Warranty & Patents 3-4 General Instructions 6 Assembly 7-27 Operating Instructions Lighting...
... control. f) Crossover Ignition System with Gas Catcher Ignition Chamber. g) Weber Warm-Up Basket for flavoring. j) Steam-N-Chips Smoker lets you add genuine smoke flavor to the burners if the flame goes out. l) Enclosed storage area. d) Heavy gauge steel Flavorizer Bars vaporize just the right amount of drippings for additional cooking or warming space. 5 Contents WARNINGS 2 Warranty & Patents 3-4 General Instructions 6 Assembly 7-27 Operating Instructions Lighting...
Owner Manual
Page 6
... fuel. s Keep any heated surface. s Do not use Liquid Propane (LP) bottled gas.The valves, orifices and hose are for Natural Gas Burning Appliances and Equipment). Do not use with results that are local codes that apply to portable gas grills, you must be turned OFF at low pressures. Please read the instructions carefully before using your Weber Gas Barbecue under the control panel and the bottom tray are no local...
... fuel. s Keep any heated surface. s Do not use Liquid Propane (LP) bottled gas.The valves, orifices and hose are for Natural Gas Burning Appliances and Equipment). Do not use with results that are local codes that apply to portable gas grills, you must be turned OFF at low pressures. Please read the instructions carefully before using your Weber Gas Barbecue under the control panel and the bottom tray are no local...
Owner Manual
Page 7
... inch, 1/2 inch long. Have your owner's manual and serial number of nuts, bolts and screws is missing, do not go back to our products, unfortunately an occasional error may occur. While we give much attention to the store. Call the Weber Customer Service Center toll free 1-800-446-1071 to receive immediate assistance. On a small screw for gas leaks.") Note - Assembly...
... inch, 1/2 inch long. Have your owner's manual and serial number of nuts, bolts and screws is missing, do not go back to our products, unfortunately an occasional error may occur. While we give much attention to the store. Call the Weber Customer Service Center toll free 1-800-446-1071 to receive immediate assistance. On a small screw for gas leaks.") Note - Assembly...
Owner Manual
Page 15
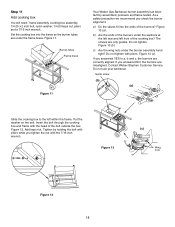
... the 7/16 inch wrench. Burner tubes Frame brace Figure 11 Your Weber Gas Barbecue burner assembly has been factory assembled, pressure and flame tested. As a safety precaution we recommend you tighten the nut with pliers while you check the burner alignment: a) Do the valves fit into the frame so the burner tubes are correctly aligned. If you answered NO, the burners are only guides. Add keps...
... the 7/16 inch wrench. Burner tubes Frame brace Figure 11 Your Weber Gas Barbecue burner assembly has been factory assembled, pressure and flame tested. As a safety precaution we recommend you tighten the nut with pliers while you check the burner alignment: a) Do the valves fit into the frame so the burner tubes are correctly aligned. If you answered NO, the burners are only guides. Add keps...

Owner Manual
Page 16
... must be copper tubing, type K or L; s The quick disconnect connects to rigid, permanent construction. ƽWARNING: Do not route the 12' hose under a deck. s Underground piping must be installed horizontally, or pointing downward. Refer to operate at 7 inches of 18" cover. s This barbecue is suitable only for complete specifications. s Gas piping in contact with the open flames in a fire or...
... must be copper tubing, type K or L; s The quick disconnect connects to rigid, permanent construction. ƽWARNING: Do not route the 12' hose under a deck. s Underground piping must be installed horizontally, or pointing downward. Refer to operate at 7 inches of 18" cover. s This barbecue is suitable only for complete specifications. s Gas piping in contact with the open flames in a fire or...

Owner Manual
Page 17
..., but you should loosen, tighten before attaching side burner hose. Figure 15 Step 15 Install side burner You will need : one burner control knob. (Valves are off You will need : the 12 foot natural gas supply hose and a 3/4 inch wrench. Side burner fitting Step 14 Connect flexible hose to manifold You will need: side burner assembly, burner grate, 3/4 inch, 5/8 inch and an 11/16 inch or two adjustable wrenches. ƽCAUTION: No...
..., but you should loosen, tighten before attaching side burner hose. Figure 15 Step 15 Install side burner You will need : one burner control knob. (Valves are off You will need : the 12 foot natural gas supply hose and a 3/4 inch wrench. Side burner fitting Step 14 Connect flexible hose to manifold You will need: side burner assembly, burner grate, 3/4 inch, 5/8 inch and an 11/16 inch or two adjustable wrenches. ƽCAUTION: No...
Owner Manual
Page 20
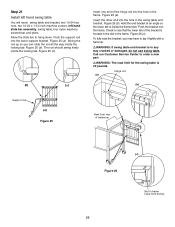
... x 1 3/4 inch machine screws, left hand slide bar assembly, swing table, four nylon washers, screwdriver and pliers. Allow the slide bar to tap it lightly with a hammer. ƽWARNING: If swing table end bracket is inside the locking tab. Figure 25 (c). (b) (c) Insert one end of barbecue (c) Figure 26 ... hang down. Call our Customer Service Center to see that the lower tab of the bracket is 30 pounds. Hinge rod (a) (b) Support rod (a) Figure 25 View from below) 20 Push the support rod into the frame. Figure 25 (b). Check to order a new part. ƽWARNING: The load...
... x 1 3/4 inch machine screws, left hand slide bar assembly, swing table, four nylon washers, screwdriver and pliers. Allow the slide bar to tap it lightly with a hammer. ƽWARNING: If swing table end bracket is inside the locking tab. Figure 25 (c). (b) (c) Insert one end of barbecue (c) Figure 26 ... hang down. Call our Customer Service Center to see that the lower tab of the bracket is 30 pounds. Hinge rod (a) (b) Support rod (a) Figure 25 View from below) 20 Push the support rod into the frame. Figure 25 (b). Check to order a new part. ƽWARNING: The load...

Owner Manual
Page 23
...gas leaks ƽ DANGER ƽ Do not use an open flames in a fire or explosion which can cause serious bodily injury or death and damage to property. ƽWARNING: You should recheck all connections should be rinsed with the soap and water solution and watching for gas leaks. Remove valve control knob...even if your Weber Genesis Gas Barbecue. Figure 33. Figure 34 (a). You will allow gas to check for leaks. Be sure there are no sparks or open flame to fill the hoses and manifold. Make sure side burner is complete. Turn on the FlameCheck valve. Figure 35....
...gas leaks ƽ DANGER ƽ Do not use an open flames in a fire or explosion which can cause serious bodily injury or death and damage to property. ƽWARNING: You should recheck all connections should be rinsed with the soap and water solution and watching for gas leaks. Remove valve control knob...even if your Weber Genesis Gas Barbecue. Figure 33. Figure 34 (a). You will allow gas to check for leaks. Be sure there are no sparks or open flame to fill the hoses and manifold. Make sure side burner is complete. Turn on the FlameCheck valve. Figure 35....

Owner Manual
Page 29
... Ignition System 1 2 6 745 8 3 3) Turn gas supply valve on. 4) Push Front burner control knob down and turn each burner control knob clockwise to OFF. Note - The FRONT burner must be damaged in an explosive flameup which can turn the Front burner control knob to OFF and wait 5 minutes to clear if the barbecue does not light, may result in any way, do not use of the cooking box...
... Ignition System 1 2 6 745 8 3 3) Turn gas supply valve on. 4) Push Front burner control knob down and turn each burner control knob clockwise to OFF. Note - The FRONT burner must be damaged in an explosive flameup which can turn the Front burner control knob to OFF and wait 5 minutes to clear if the barbecue does not light, may result in any way, do not use of the cooking box...
Owner Manual
Page 31
... shown in your retailer or the Weber-Stephen Customer Service Center. Drippings and grease The Flavorizer Bars are designed to "smoke" the right amount of the burner controls to cool before relighting. Storage and/or Nonuse s When storing the Weber Gas Barbecue, make sure that the inside your cooking box, for detailed cooking instructions. Replacement cooking grates and Flavorizer Bars are still...
... shown in your retailer or the Weber-Stephen Customer Service Center. Drippings and grease The Flavorizer Bars are designed to "smoke" the right amount of the burner controls to cool before relighting. Storage and/or Nonuse s When storing the Weber Gas Barbecue, make sure that the inside your cooking box, for detailed cooking instructions. Replacement cooking grates and Flavorizer Bars are still...

Owner Manual
Page 33
... every time you disconnect and reconnect a gas fitting. Be sure there are no gaps in the Spider Stopper Guards' seams or in the OFF position. DO NOT OPERATE THE BARBECUE. DO NOT OPERATE THE BARBECUE. Remove enamel top. Check for example). Note - b) Manifold to quick disconnect connection. Replace using only Weber authorized replacement hose. e) Hose to side burner hose connection. Figure 5 (e). ƽWARNING: If there...
... every time you disconnect and reconnect a gas fitting. Be sure there are no gaps in the Spider Stopper Guards' seams or in the OFF position. DO NOT OPERATE THE BARBECUE. DO NOT OPERATE THE BARBECUE. Remove enamel top. Check for example). Note - b) Manifold to quick disconnect connection. Replace using only Weber authorized replacement hose. e) Hose to side burner hose connection. Figure 5 (e). ƽWARNING: If there...
Owner Manual
Page 34
... not appear to property. c) Remove control panel: take off the burner control knobs. This is to your fingers under the control panel, causing serious damage to make sure all the burner ports are fully open. 1. Replacing Main Burners a) Your Weber Gas Barbecue must be uniform the length of the control panel at source. The correct flame pattern is factory installed. Figure 7. This could result in...
... not appear to property. c) Remove control panel: take off the burner control knobs. This is to your fingers under the control panel, causing serious damage to make sure all the burner ports are fully open. 1. Replacing Main Burners a) Your Weber Gas Barbecue must be uniform the length of the control panel at source. The correct flame pattern is factory installed. Figure 7. This could result in...

Owner Manual
Page 37
... gas flow to the burners. The valve allows the gas to operate, contact Weber-Stephen Customer Service. Center line Thermocouple nuts 1/8 inch Ignition holes Figure 18 Wall of cooking box 37 If the Front burner should fail to flow into the Front burner. The tip of the probe is shown in the flame. The probe senses the heat from the Front burner, and activates the FlameCheck valve...
... gas flow to the burners. The valve allows the gas to operate, contact Weber-Stephen Customer Service. Center line Thermocouple nuts 1/8 inch Ignition holes Figure 18 Wall of cooking box 37 If the Front burner should fail to flow into the Front burner. The tip of the probe is shown in the flame. The probe senses the heat from the Front burner, and activates the FlameCheck valve...
Owner Manual
Page 38
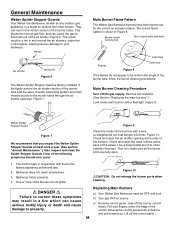
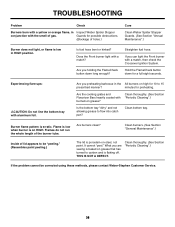
... button down for preheating. Straighten fuel hose. Experiencing flare-ups: ƽCAUTION: Do not line the bottom tray with the smell of the burner tube. Burner flame pattern is flaking off. TROUBLESHOOTING Problem Check Burners burn with a yellow or orange flame, in Inspect Weber Spider Stopper conjunction with aluminum foil. Is fuel hose bent or kinked? If you preheating barbecue in HIGH position. Are...
... button down for preheating. Straighten fuel hose. Experiencing flare-ups: ƽCAUTION: Do not line the bottom tray with the smell of the burner tube. Burner flame pattern is flaking off. TROUBLESHOOTING Problem Check Burners burn with a yellow or orange flame, in Inspect Weber Spider Stopper conjunction with aluminum foil. Is fuel hose bent or kinked? If you preheating barbecue in HIGH position. Are...

Owner Manual
Page 39
... of electrode to bottom. If the igniter works loose, carefully tighten the igniter lock nut with a match? Gap should be 1/8 to 3/16 inch gap Figure 19 Figure 21 39 Side Burner Troubleshooting ƽWARNING: Before attempting any troubleshooting steps, all gas controls and supply valves should be in the OFF position. Check Is gas supply off? Light front burner. Straighten hose. Check igniter: Remove side burner cover. Figure 20.
... of electrode to bottom. If the igniter works loose, carefully tighten the igniter lock nut with a match? Gap should be 1/8 to 3/16 inch gap Figure 19 Figure 21 39 Side Burner Troubleshooting ƽWARNING: Before attempting any troubleshooting steps, all gas controls and supply valves should be in the OFF position. Check Is gas supply off? Light front burner. Straighten hose. Check igniter: Remove side burner cover. Figure 20.
Owner Manual
Page 43
... box 53 Burner control knobs (3) 54 FlameCheck button 55 Control panel 56 Igniter button 57 Control panel push-in buttons (2) 58 Crossover tube 59 Front or Back burner 60 Center burner 61 1/4-20 stainless steel wing nuts (2) 62 Manifold assembly 63 Manifold bracket 64 Side burner assembly 65 Thermocouple 66 Tool holders (3) 67 Right frame 68 Igniter 69 Igniter lock nut 70 Igniter wire (white) 71 Igniter wire (black) 72 Hose ƽWARNING: Use...
... box 53 Burner control knobs (3) 54 FlameCheck button 55 Control panel 56 Igniter button 57 Control panel push-in buttons (2) 58 Crossover tube 59 Front or Back burner 60 Center burner 61 1/4-20 stainless steel wing nuts (2) 62 Manifold assembly 63 Manifold bracket 64 Side burner assembly 65 Thermocouple 66 Tool holders (3) 67 Right frame 68 Igniter 69 Igniter lock nut 70 Igniter wire (white) 71 Igniter wire (black) 72 Hose ƽWARNING: Use...


