

Owner Manual
Page 1
...WARNING: Follow all leak-check procedures carefully in the vicinity of this manual. 89555 02/20/08 LP US ENGLISH GAS GRILL LP GAS GRILL OWNER'S GUIDE Guía del propietario del asador de gas licuado de propano - NOTICE TO INSTALLER: These instructions must be stored in the vicinity of this ..., EP -310/320 #89#50505000 YOU MUST READ THIS OWNER'S GUIDE BEFORE OPERATING YOUR GAS GRILL ƽ DANGER If you smell gas: 1. Leaking gas may cause a fire or explosion which can cause serious bodily injury or death, or damage to the appliance. 2. An LP cylinder not connected for future use...
...WARNING: Follow all leak-check procedures carefully in the vicinity of this manual. 89555 02/20/08 LP US ENGLISH GAS GRILL LP GAS GRILL OWNER'S GUIDE Guía del propietario del asador de gas licuado de propano - NOTICE TO INSTALLER: These instructions must be stored in the vicinity of this ..., EP -310/320 #89#50505000 YOU MUST READ THIS OWNER'S GUIDE BEFORE OPERATING YOUR GAS GRILL ƽ DANGER If you smell gas: 1. Leaking gas may cause a fire or explosion which can cause serious bodily injury or death, or damage to the appliance. 2. An LP cylinder not connected for future use...

Owner Manual
Page 2
...Cautions contained in this barbecue unless all parts are in the storage area under or near this model of grill in any gas fitting while your Weber® gas barbecue. ƽ Never lean over open grill or place hands or fingers on the front edge of the barbecue may ...explosion causing damage to property. ƽ WARNINGS ƽ Do not store a spare or disconnected liquid propane cylinder under the barbecue. ƽ Your Weber® gas barbecue should never be used by your liquid propane supplier. Move away from the liquid propane cylinder: 1. Accessible parts of the cooking box. ƽ...
...Cautions contained in this barbecue unless all parts are in the storage area under or near this model of grill in any gas fitting while your Weber® gas barbecue. ƽ Never lean over open grill or place hands or fingers on the front edge of the barbecue may ...explosion causing damage to property. ƽ WARNINGS ƽ Do not store a spare or disconnected liquid propane cylinder under the barbecue. ƽ Your Weber® gas barbecue should never be used by your liquid propane supplier. Move away from the liquid propane cylinder: 1. Accessible parts of the cooking box. ƽ...
Owner Manual
Page 8
.... Do • These instructions will have to conform to cool before using your patio. supply hose away from the Weber® gas barbecue, the appliance and LP tank must be turned off and wait for gas leaks and any obstructions. ƽ WARNING: Keep ventilation openings for use . Do not use in a garage, building, breezeway...
.... Do • These instructions will have to conform to cool before using your patio. supply hose away from the Weber® gas barbecue, the appliance and LP tank must be turned off and wait for gas leaks and any obstructions. ƽ WARNING: Keep ventilation openings for use . Do not use in a garage, building, breezeway...

Owner Manual
Page 9
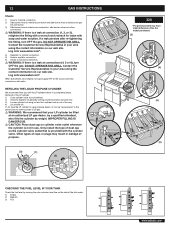
... station to read purging and filling instructions on the stainless steel surfaces of your LP cylinder by pushing down and turning clockwise. CONNECTING THE LIQUID PROPANE CYLINDER All Weber® liquid propane gas grill regulators are equipped with a UL-listed tank connection as per the latest ... chance of burner tubes. Clean it with soap and water, rinse with aluminum foil. Disposable foil trays are off . Your Weber® gas grill is similarly equipped with a suitable brass bristle brush. LEAK CHECK PREPARATION CHECK THAT ALL BURNER VALVES ARE OFF Valves are shipped...
... station to read purging and filling instructions on the stainless steel surfaces of your LP cylinder by pushing down and turning clockwise. CONNECTING THE LIQUID PROPANE CYLINDER All Weber® liquid propane gas grill regulators are equipped with a UL-listed tank connection as per the latest ... chance of burner tubes. Clean it with soap and water, rinse with aluminum foil. Disposable foil trays are off . Your Weber® gas grill is similarly equipped with a suitable brass bristle brush. LEAK CHECK PREPARATION CHECK THAT ALL BURNER VALVES ARE OFF Valves are shipped...

Owner Manual
Page 10
... the regulator hose through the side panel opening of the valve is a leak. You will not allow gas to flow unless the connection is a new type of connection. WWW.WEBER.COM® The LP cylinder is installed inside of the base cabinet. 2) Locate hose retention clip (a) on the cylinder valve.... 11) Check for bubbles. Turn the gas back on underside of the Weber® gas barbecue. Secure into position on our web site...
... the regulator hose through the side panel opening of the valve is a leak. You will not allow gas to flow unless the connection is a new type of connection. WWW.WEBER.COM® The LP cylinder is installed inside of the base cabinet. 2) Locate hose retention clip (a) on the cylinder valve.... 11) Check for bubbles. Turn the gas back on underside of the Weber® gas barbecue. Secure into position on our web site...
Owner Manual
Page 11
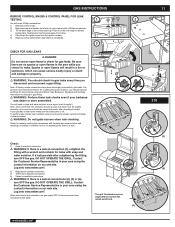
... bubbles form or if a bubble grows, there is a leak. 11 2 11 4 310 Check: 1) Hose-to-manifold connection. ƽ WARNING: If there is a leak at connections (2), (3) or (4), turn OFF the gas. If a leak persists after checking for leaks. DO NOT OPERATE THE GRILL. If your...the Customer Service Representative in on our web site. As a safety precaution however, you should check for gas leaks every time you check for leaks before using your Weber® Gas Barbecue. GAS INSTRUCTIONS GAS INSTRUCTIONS REMOVE CONTROL KNOBS & CONTROL PANEL FOR LEAK TESTING 1 You will need : a soap and ...
... bubbles form or if a bubble grows, there is a leak. 11 2 11 4 310 Check: 1) Hose-to-manifold connection. ƽ WARNING: If there is a leak at connections (2), (3) or (4), turn OFF the gas. If a leak persists after checking for leaks. DO NOT OPERATE THE GRILL. If your...the Customer Service Representative in on our web site. As a safety precaution however, you should check for gas leaks every time you check for leaks before using your Weber® Gas Barbecue. GAS INSTRUCTIONS GAS INSTRUCTIONS REMOVE CONTROL KNOBS & CONTROL PANEL FOR LEAK TESTING 1 You will need : a soap and ...
Owner Manual
Page 12
... level line on the side of the tank scale. 1) Empty 2) Medium 3) Full WWW.WEBER.COM® Log onto www.weber.com®. 4) Regulator to cylinder connection. 5) Hose to regulator connection. 6) Valves to a gas propane dealer, or look up out of LP gas. ƽ WARNING: We recommend that your area using the contact information on the...
... level line on the side of the tank scale. 1) Empty 2) Medium 3) Full WWW.WEBER.COM® Log onto www.weber.com®. 4) Regulator to cylinder connection. 5) Hose to regulator connection. 6) Valves to a gas propane dealer, or look up out of LP gas. ƽ WARNING: We recommend that your area using the contact information on the...

Owner Manual
Page 13
...is heavier than air. Only install the type of barbecue for you refill. • Treat "empty" LP cylinders with your area using only Weber® authorized replacement hose. Your LP gas supplier can do not use of dust cap on our web site. Department of Transportation (D.O.T.) or the... the Customer Service Representative in accordance with the Specifications for the spark by hand - Leaking LP gas may be hazardous and should be constructed and marked in your Weber® gas barbecue have been designed and tested to hold by pushing the electronic ignition button.You will ...
...is heavier than air. Only install the type of barbecue for you refill. • Treat "empty" LP cylinders with your area using only Weber® authorized replacement hose. Your LP gas supplier can do not use of dust cap on our web site. Department of Transportation (D.O.T.) or the... the Customer Service Representative in accordance with the Specifications for the spark by hand - Leaking LP gas may be hazardous and should be constructed and marked in your Weber® gas barbecue have been designed and tested to hold by pushing the electronic ignition button.You will ...

Owner Manual
Page 14
... "OFF" position.) ƽ WARNING: The burner control knobs must be in the OFF position, when you turn on the front of gas from the LP cylinder. Start over . You should occur, turn on the liquid propane cylinder tank valve. 14 OPERATING INSTRUCTIONS MAIN BURNER LIGHTING 1) Open ...3 4) Push BURNER 1 control knob down and turn OFF the LP tank valve and burner control knobs. If this should see a flame. ƽ WARNING: If the burner does not light in five (5) seconds, *The grill illustrated may have slight differences than the model purchased. 3 5 WWW.WEBER.COM®
... "OFF" position.) ƽ WARNING: The burner control knobs must be in the OFF position, when you turn on the front of gas from the LP cylinder. Start over . You should occur, turn on the liquid propane cylinder tank valve. 14 OPERATING INSTRUCTIONS MAIN BURNER LIGHTING 1) Open ...3 4) Push BURNER 1 control knob down and turn OFF the LP tank valve and burner control knobs. If this should see a flame. ƽ WARNING: If the burner does not light in five (5) seconds, *The grill illustrated may have slight differences than the model purchased. 3 5 WWW.WEBER.COM®

Owner Manual
Page 15
... minutes for nicks, cracking, abrasions or cuts. Log onto www.weber.com®. 1) Open the side burner lid. 2) Check that the side burner valve is turned off the side burner control valve, main burners and gas supply at the source. *The grill illustrated may have slight differences... burner is lit by turning the cylinder valve counterclockwise. 4) Insert match holder with a match (see "Manually Lighting the Side Burner"). 320 WWW.WEBER.COM® Always light BURNER 1 first.The other burners ignite from the matchlight hole when lighting the barbecue. 5) Push BURNER 1 control knob down...
... minutes for nicks, cracking, abrasions or cuts. Log onto www.weber.com®. 1) Open the side burner lid. 2) Check that the side burner valve is turned off the side burner control valve, main burners and gas supply at the source. *The grill illustrated may have slight differences... burner is lit by turning the cylinder valve counterclockwise. 4) Insert match holder with a match (see "Manually Lighting the Side Burner"). 320 WWW.WEBER.COM® Always light BURNER 1 first.The other burners ignite from the matchlight hole when lighting the barbecue. 5) Push BURNER 1 control knob down...

Owner Manual
Page 16
... Instructions". Refer to the cylinder. All burners on our web site. Clean bottom tray. THIS IS NOT A DEFECT. Slide door/s until aligned. WWW.WEBER.COM® Wait at source. Burner flame pattern is low in the "HI" position. -orBarbecue temperature only reaches 250˚ to "HI". Clean burners... Check the adjustment pin on grease that it is baked on the bottom of the barbecue to let the gas clear before you are not aligned. Tighten nut. Refill LP cylinder. Are the cooking grates and Flavorizer® bars heavily coated with the smell of holes.) CURE Clean ...
... Instructions". Refer to the cylinder. All burners on our web site. Clean bottom tray. THIS IS NOT A DEFECT. Slide door/s until aligned. WWW.WEBER.COM® Wait at source. Burner flame pattern is low in the "HI" position. -orBarbecue temperature only reaches 250˚ to "HI". Clean burners... Check the adjustment pin on grease that it is baked on the bottom of the barbecue to let the gas clear before you are not aligned. Tighten nut. Refill LP cylinder. Are the cooking grates and Flavorizer® bars heavily coated with the smell of holes.) CURE Clean ...

Owner Manual
Page 17
...Straighten hose. Make sure black wire is fitted with a match? WWW.WEBER.COM® Reconnect the regulator to START/HI. Log onto www.weber.com®. This blocks the normal gas flow, and can cause the gas to flow back out of the burners do not ignite. ƽ DANGER... 2) Ground wire 3) Burner Side Burner Grate Side Burner cap Side Burner Ring & Head Igniter Electrode Control Knob Igniter MAINTENANCE WEBER® SPIDER/INSECT SCREENS Your Weber® gas barbecue, as well as any of the following symptoms should be corrected by using the contact information on our web site.
...Straighten hose. Make sure black wire is fitted with a match? WWW.WEBER.COM® Reconnect the regulator to START/HI. Log onto www.weber.com®. This blocks the normal gas flow, and can cause the gas to flow back out of the burners do not ignite. ƽ DANGER... 2) Ground wire 3) Burner Side Burner Grate Side Burner cap Side Burner Ring & Head Igniter Electrode Control Knob Igniter MAINTENANCE WEBER® SPIDER/INSECT SCREENS Your Weber® gas barbecue, as well as any of the following symptoms should be corrected by using the contact information on our web site.

Owner Manual
Page 18
... each burner with a wire (a straightened-out coat hanger will work). Look inside of the burner tube. REPLACING MAIN BURNERS 1) Your Weber® gas barbecue must be uniform throughout the burner tube, follow the burner cleaning procedures. Do not dislodge the Spider/Insect screens or enlarge the screen... Phillips screwdriver. (c) Tilt the back edge of burners. This is dust or dirt on our web site. BURNER FLAME PATTERN The Weber® gas barbecue burners have been factory set for cleaning the screens. If there is to clean outside of the control panel up. Log onto...
... each burner with a wire (a straightened-out coat hanger will work). Look inside of the burner tube. REPLACING MAIN BURNERS 1) Your Weber® gas barbecue must be uniform throughout the burner tube, follow the burner cleaning procedures. Do not dislodge the Spider/Insect screens or enlarge the screen... Phillips screwdriver. (c) Tilt the back edge of burners. This is dust or dirt on our web site. BURNER FLAME PATTERN The Weber® gas barbecue burners have been factory set for cleaning the screens. If there is to clean outside of the control panel up. Log onto...

Owner Manual
Page 19
...positioned into burner tube 1 igniter channel (B). • Check that the ceramic igniter is properly positioned over the valve orifices (d). Log onto www.weber.com®. WWW.WEBER.COM® A B If BURNER 1 lights with a match, then check the Electronic Ignition System. • Check that both of the cooking... the BURNER 1, light BURNER 1 with a soap and water solution before fastening manifold in place. ƽ WARNING: After reinstalling the gas lines, they should be positioned properly over the burner holes on our web site. Remove the burners from the burners. See illustration: ...
...positioned into burner tube 1 igniter channel (B). • Check that the ceramic igniter is properly positioned over the valve orifices (d). Log onto www.weber.com®. WWW.WEBER.COM® A B If BURNER 1 lights with a match, then check the Electronic Ignition System. • Check that both of the cooking... the BURNER 1, light BURNER 1 with a soap and water solution before fastening manifold in place. ƽ WARNING: After reinstalling the gas lines, they should be positioned properly over the burner holes on our web site. Remove the burners from the burners. See illustration: ...
