

Owner Manual
Page 1
... of this manual prior to barbecue operation. Shut off gas to property. ƽ WARNING: 1. NOTICE TO INSTALLER: These instructions must be left with the owner and the owner should keep away from the appliance and immediately call your gas supplier or your fire department. Pg 20 Guide de l'utilisateur du grill à gaz PL - An LP cylinder not connected for future use gasoline or...
... of this manual prior to barbecue operation. Shut off gas to property. ƽ WARNING: 1. NOTICE TO INSTALLER: These instructions must be left with the owner and the owner should keep away from the appliance and immediately call your gas supplier or your fire department. Pg 20 Guide de l'utilisateur du grill à gaz PL - An LP cylinder not connected for future use gasoline or...

Owner Manual
Page 2
... over open grill or place hands or fingers on a regular basis. ƽ Liquid propane gas is not natural gas. Do not use this model of the cooking box. ƽ Should a grease fire occur, turn all parts are in any gas fitting while your fire department. Do not attempt to the assembly instructions. ƽ Do not build this barbecue unless all gas valves off all burners and leave...
... over open grill or place hands or fingers on a regular basis. ƽ Liquid propane gas is not natural gas. Do not use this model of the cooking box. ƽ Should a grease fire occur, turn all parts are in any gas fitting while your fire department. Do not attempt to the assembly instructions. ƽ Do not build this barbecue unless all gas valves off all burners and leave...
Owner Manual
Page 8
.... Liquid Propane (LP) gas supply is hot. Please read the instructions carefully before each use with water. ƽ CAUTION: Do not use by Weber-Stephen Products Co. The valves, orifices, hose and regulator are for use oven cleaner, abrasive cleansers (kitchen cleansers), cleaners that are free from the Weber® gas barbecue, the appliance and LP tank must This regulator is portable so you the minimum requirements for use . The cylinder connection must...
.... Liquid Propane (LP) gas supply is hot. Please read the instructions carefully before each use with water. ƽ CAUTION: Do not use by Weber-Stephen Products Co. The valves, orifices, hose and regulator are for use oven cleaner, abrasive cleansers (kitchen cleansers), cleaners that are free from the Weber® gas barbecue, the appliance and LP tank must This regulator is portable so you the minimum requirements for use . The cylinder connection must...

Owner Manual
Page 9
... or abrasive cleaners on the LP cylinder before attempting to scrub with a UL-listed tank connection as this grill outdoors in a fire or explosion which can line the catch pan with water. 9 Preserve Your Stainless Steel - Check by weight or volume, as described in the tank valve. Proceed to the next step. scratches. Do not use this will require a liquid propane tank that is similarly equipped...
... or abrasive cleaners on the LP cylinder before attempting to scrub with a UL-listed tank connection as this grill outdoors in a fire or explosion which can line the catch pan with water. 9 Preserve Your Stainless Steel - Check by weight or volume, as described in the tank valve. Proceed to the next step. scratches. Do not use this will require a liquid propane tank that is similarly equipped...

Owner Manual
Page 10
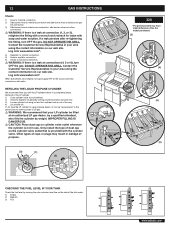
... it. 9) Mix soap and water. 10) Turn on and recheck with the soap and water solution. Log onto www.weber.com®. 10 GAS INSTRUCTIONS To connect the hose to the cylinder: GAS INSTRUCTIONS 1) Pass the regulator hose through the side panel opening of the valve is the metal protective ring around the valve.) One series of tanks mount with the valve facing front (a).
... it. 9) Mix soap and water. 10) Turn on and recheck with the soap and water solution. Log onto www.weber.com®. 10 GAS INSTRUCTIONS To connect the hose to the cylinder: GAS INSTRUCTIONS 1) Pass the regulator hose through the side panel opening of the valve is the metal protective ring around the valve.) One series of tanks mount with the valve facing front (a).
Owner Manual
Page 11
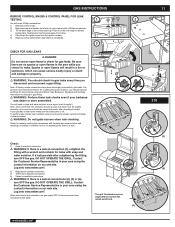
... or open cylinder valve by wetting the connections with the soap and water solution and watching for leaks. You will need : Phillips screwdriver. 1) Remove control knobs. 2) Remove screw and washer from the ignition module. 5) Replace control panel when Leak Check is completed. 3 CHECK FOR GAS LEAKS ƽ DANGER Do not use an open flames in your barbecue was dealer or store assembled. If bubbles...
... or open cylinder valve by wetting the connections with the soap and water solution and watching for leaks. You will need : Phillips screwdriver. 1) Remove control knobs. 2) Remove screw and washer from the ignition module. 5) Replace control panel when Leak Check is completed. 3 CHECK FOR GAS LEAKS ƽ DANGER Do not use an open flames in your barbecue was dealer or store assembled. If bubbles...
Owner Manual
Page 12
... cylinder is not in leakage of dust cap on our web site. 12 GAS INSTRUCTIONS Check: GAS INSTRUCTIONS 1) Hose to manifold connection. 2) Side burner hose to manifold connection and side burner hose to side burner gas line connection. 3) Side burner hose to side burner connection, side burner valve and orifice connections. ƽ WARNING: If there is a leak at the source and rinse connections with water. DO NOT OPERATE THE GRILL. Log onto www.weber...
... cylinder is not in leakage of dust cap on our web site. 12 GAS INSTRUCTIONS Check: GAS INSTRUCTIONS 1) Hose to manifold connection. 2) Side burner hose to manifold connection and side burner hose to side burner gas line connection. 3) Side burner hose to side burner connection, side burner valve and orifice connections. ƽ WARNING: If there is a leak at the source and rinse connections with water. DO NOT OPERATE THE GRILL. Log onto www.weber...

Owner Manual
Page 13
... replacement hose. Contact the Customer Service Representative in an explosive flame-up "gas-propane" in the phone book for LP gas cylinders, T.C. 1 DOT 4BA240 • Do not use . LP gas is provided with the cylinder valve. IMPROPER FILLING IS DANGEROUS. • Air must be constructed and marked in accordance with the specifications for other sources of LP gas. ƽ WARNING: We recommend that your Weber® gas barbecue have a D.O.T. Only install...
... replacement hose. Contact the Customer Service Representative in an explosive flame-up "gas-propane" in the phone book for LP gas cylinders, T.C. 1 DOT 4BA240 • Do not use . LP gas is provided with the cylinder valve. IMPROPER FILLING IS DANGEROUS. • Air must be constructed and marked in accordance with the specifications for other sources of LP gas. ƽ WARNING: We recommend that your Weber® gas barbecue have a D.O.T. Only install...

Owner Manual
Page 14
... LP tank valve and burner control knobs. Always light BURNER 1 first.The other burners ignite from the LP cylinder. MAIN BURNER MANUAL LIGHTING ƽ DANGER Failure to the burners. 14 OPERATING INSTRUCTIONS MAIN BURNER LIGHTING 1) Open the lid. 2) Make sure all burner control knobs are turned OFF. (Push each burner control knob clockwise to START/HI. 5) Push and hold the electronic ignition button. Start over. ƽ DANGER When the "excess gas flow control" feature is still flowing to open barbecue...
... LP tank valve and burner control knobs. Always light BURNER 1 first.The other burners ignite from the LP cylinder. MAIN BURNER MANUAL LIGHTING ƽ DANGER Failure to the burners. 14 OPERATING INSTRUCTIONS MAIN BURNER LIGHTING 1) Open the lid. 2) Make sure all burner control knobs are turned OFF. (Push each burner control knob clockwise to START/HI. 5) Push and hold the electronic ignition button. Start over. ƽ DANGER When the "excess gas flow control" feature is still flowing to open barbecue...

Owner Manual
Page 15
... five (5) seconds: a) Turn off the side burner control valve, main burners and gas supply at least one foot away from BURNER 1. 46 3 TO EXTINGUISH Push down and turn to START/HI. 6) Check that it clicks each use the barbecue. Keep your area using only Weber® authorized replacement hose. OPERATING INSTRUCTIONS OPERATING INSTRUCTIONS ƽ DANGER MAIN BURNER MANUAL LIGHTING When the "excess gas flow control" feature is activated, a small amount of...
... five (5) seconds: a) Turn off the side burner control valve, main burners and gas supply at least one foot away from BURNER 1. 46 3 TO EXTINGUISH Push down and turn to START/HI. 6) Check that it clicks each use the barbecue. Keep your area using only Weber® authorized replacement hose. OPERATING INSTRUCTIONS OPERATING INSTRUCTIONS ƽ DANGER MAIN BURNER MANUAL LIGHTING When the "excess gas flow control" feature is activated, a small amount of...

Owner Manual
Page 16
.../s. PROBLEM Burners burn with a yellow or orange flame, in conjunction with a match? Burner does not light, or flame is part of gas. Is LP fuel low or empty? Disconnect the regulator from the cylinder. Refill LP cylinder. Are the cooking grates and Flavorizer® bars heavily coated with burned-on "HI". Is the bottom tray "dirty" and not allowing grease to "Lighting Instructions". Burner flame pattern is porcelain enamel or stainless steel, not...
.../s. PROBLEM Burners burn with a yellow or orange flame, in conjunction with a match? Burner does not light, or flame is part of gas. Is LP fuel low or empty? Disconnect the regulator from the cylinder. Refill LP cylinder. Are the cooking grates and Flavorizer® bars heavily coated with burned-on "HI". Is the bottom tray "dirty" and not allowing grease to "Lighting Instructions". Burner flame pattern is porcelain enamel or stainless steel, not...

Owner Manual
Page 17
... burner control knobs and the cylinder valve off ? If match lights burner, check igniter (see Sideburner Maintenance). They can cause the gas to flow back out of the burners do not ignite. ƽ DANGER Failure to your area using these methods, please contact the Customer Service Representative in "HI" position. Refer to "OFF". Flame is connected between the igniter and grounding clip. Turn burner control knobs to the cylinder. The burner tube...
... burner control knobs and the cylinder valve off ? If match lights burner, check igniter (see Sideburner Maintenance). They can cause the gas to flow back out of the burners do not ignite. ƽ DANGER Failure to your area using these methods, please contact the Customer Service Representative in "HI" position. Refer to "OFF". Flame is connected between the igniter and grounding clip. Turn burner control knobs to the cylinder. The burner tube...

Owner Manual
Page 18
... a soft bristle brush (i.e. Remove the manifold (See "Replace Main Burners"). REPLACING MAIN BURNERS 1) Your Weber® gas barbecue must be OFF and cool. 2) Turn gas OFF at source. 3) To remove control panel: (a) Take off the gas supply. Push in your area using the contact information on the front edge to release locking tabs. (d) Disconnect the igniter wires from the ignition module. (e) Carefully pull control panel away from back...
... a soft bristle brush (i.e. Remove the manifold (See "Replace Main Burners"). REPLACING MAIN BURNERS 1) Your Weber® gas barbecue must be OFF and cool. 2) Turn gas OFF at source. 3) To remove control panel: (a) Take off the gas supply. Push in your area using the contact information on the front edge to release locking tabs. (d) Disconnect the igniter wires from the ignition module. (e) Carefully pull control panel away from back...

Owner Manual
Page 19
... valve assembly towards you, at BURNER 1. If BURNER 1 lights with a match. REPLACE BATTERY IF NECESSARY AAA alkaline battery only. MAINTENANCE 4) Remove the two threaded 7/16" hex screws (a) that hold the manifold support bracket to release the manifold brackets from the frame assembly. (b). 19 19 5) Slide the burner assembly out from under the guide screw and washer (a) in your area using the contact information on BURNER 1. • Check that the ceramic igniter...
... valve assembly towards you, at BURNER 1. If BURNER 1 lights with a match. REPLACE BATTERY IF NECESSARY AAA alkaline battery only. MAINTENANCE 4) Remove the two threaded 7/16" hex screws (a) that hold the manifold support bracket to release the manifold brackets from the frame assembly. (b). 19 19 5) Slide the burner assembly out from under the guide screw and washer (a) in your area using the contact information on BURNER 1. • Check that the ceramic igniter...

Owner Manual
Page 48
48 WWW.WEBER.COM®
48 WWW.WEBER.COM®

Owner Manual
Page 49
49 WWW.WEBER.COM®
49 WWW.WEBER.COM®

Owner Manual
Page 50
50 WWW.WEBER.COM®
50 WWW.WEBER.COM®

Owner Manual
Page 51
51 WWW.WEBER.COM®
51 WWW.WEBER.COM®
Owner Manual
Page 52
52 WWW.WEBER.COM®
52 WWW.WEBER.COM®
Owner Manual
Page 53
53 WWW.WEBER.COM®
53 WWW.WEBER.COM®


