
Owner Manual
Page 1
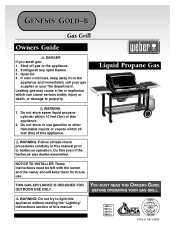
... not store or use . THIS GAS APPLIANCE IS DESIGNED FOR OUTDOOR USE ONLY. Extinguish any open flames. 3. Open lid 4. NOTICE TO INSTALLER: These instructions must be left with the owner and the owner should keep away from the appliance and immediately call your gas supplier or your ...for future use gasoline or other flammable liquids or vapors within 10 feet (3m) of this even if the barbecue was dealer-assembled. YOU MUST READ THIS OWNERS GUIDE BEFORE OPERATING YOUR GAS GRILL ƽ WARNING: Do not try to light this appliance without reading the "Lighting" Instructions section ...
... not store or use . THIS GAS APPLIANCE IS DESIGNED FOR OUTDOOR USE ONLY. Extinguish any open flames. 3. Open lid 4. NOTICE TO INSTALLER: These instructions must be left with the owner and the owner should keep away from the appliance and immediately call your gas supplier or your ...for future use gasoline or other flammable liquids or vapors within 10 feet (3m) of this even if the barbecue was dealer-assembled. YOU MUST READ THIS OWNERS GUIDE BEFORE OPERATING YOUR GAS GRILL ƽ WARNING: Do not try to light this appliance without reading the "Lighting" Instructions section ...
Owner Manual
Page 2
... for gas leaks and burner obstructions before attempting to correct the problem yourself. 3. The conversion or attempted use . Open the lid and wait five minutes before use of escaping gas from liquid propane cylinder. 2. A-2 ƽ DANGER Failure to follow the assembly instructions in this barbecue. ƽ Improper assembly may be very hot. Move away from the liquid propane cylinder: 1. Accessible parts of the cooking box. ƽ Should a grease...
... for gas leaks and burner obstructions before attempting to correct the problem yourself. 3. The conversion or attempted use . Open the lid and wait five minutes before use of escaping gas from liquid propane cylinder. 2. A-2 ƽ DANGER Failure to follow the assembly instructions in this barbecue. ƽ Improper assembly may be very hot. Move away from the liquid propane cylinder: 1. Accessible parts of the cooking box. ƽ Should a grease...

Owner Manual
Page 3
... this owner's manual. A-3 Warranty Weber-Stephen Products Co. (Weber) hereby warrants to the ORIGINAL PURCHASER of this Weber Gas Grill that prove defective under normal use , removal, return, or replacement of its equipment; There are limited in accordance with your satisfaction, then call the cylinder manufacturer's customer service center. and no rust through Thermoplastic Parts, 10 years All Remaining Parts, 5 years, when assembled and operated in...
... this owner's manual. A-3 Warranty Weber-Stephen Products Co. (Weber) hereby warrants to the ORIGINAL PURCHASER of this Weber Gas Grill that prove defective under normal use , removal, return, or replacement of its equipment; There are limited in accordance with your satisfaction, then call the cylinder manufacturer's customer service center. and no rust through Thermoplastic Parts, 10 years All Remaining Parts, 5 years, when assembled and operated in...

Owner Manual
Page 4
Contents Danger & Warnings A-2 Warranty A-3 General Instructions A-5 Exploded View A-6 Parts List A-10 Assembly Instructions B-1 Installing work surfaces and gas supply Guidelines C-1 Operating D-1 Lighting D-1 Manual Lighting D-2 Cooking D-3 Storage and/or Nouse D-3 Cleaning D-3 Refilling the LP Cylinder D-4 Safe handling tips for LP Gas Cylinders D-5 Annual Maintenance D-7 General Maintenance D-8 Replacing Main Burners D-9 Crossover Ignition System Operations D-10 Troubleshooting D-11 A-4
Contents Danger & Warnings A-2 Warranty A-3 General Instructions A-5 Exploded View A-6 Parts List A-10 Assembly Instructions B-1 Installing work surfaces and gas supply Guidelines C-1 Operating D-1 Lighting D-1 Manual Lighting D-2 Cooking D-3 Storage and/or Nouse D-3 Cleaning D-3 Refilling the LP Cylinder D-4 Safe handling tips for LP Gas Cylinders D-5 Annual Maintenance D-7 General Maintenance D-8 Replacing Main Burners D-9 Crossover Ignition System Operations D-10 Troubleshooting D-11 A-4
Owner Manual
Page 5
... barbecue outdoors in a well-ventilated area. Please read the instructions carefully before using your Weber Gas Barbecue. Improper assembly can be used. Do not use with , if you move. The valves, orifices, hose and regulator are local codes that are free from the Weber Gas Barbecue, the appliance and LP cylinder must not be stored in a building, garage or any other enclosed area. • When the LP cylinder is not intended to them. For Installation...
... barbecue outdoors in a well-ventilated area. Please read the instructions carefully before using your Weber Gas Barbecue. Improper assembly can be used. Do not use with , if you move. The valves, orifices, hose and regulator are local codes that are free from the Weber Gas Barbecue, the appliance and LP cylinder must not be stored in a building, garage or any other enclosed area. • When the LP cylinder is not intended to them. For Installation...

Owner Manual
Page 7
.... Nylon Washer 28. Bottom Shelf 36. Igniter Bracket 51. Work Surface 18. Control Panel Hardware 42. Crossover Tube 43. Front and Back Burners 44. Manifold, Hose and regulator (assembled) 47. Manifold Hardware 48. Casters 33. Wheels 34. Right Endcap 38. Control Panel 40. Frame Connector A-7 1. Hinge Pin 3. Handle lock 7. Cooking Grates 11. Cylinder Glides 59. Catch Pan Holder 16. Front Panel 29. Left Endcap...
.... Nylon Washer 28. Bottom Shelf 36. Igniter Bracket 51. Work Surface 18. Control Panel Hardware 42. Crossover Tube 43. Front and Back Burners 44. Manifold, Hose and regulator (assembled) 47. Manifold Hardware 48. Casters 33. Wheels 34. Right Endcap 38. Control Panel 40. Frame Connector A-7 1. Hinge Pin 3. Handle lock 7. Cooking Grates 11. Cylinder Glides 59. Catch Pan Holder 16. Front Panel 29. Left Endcap...

Owner Manual
Page 13
... that all burner valves are turned OFF. Proceed to hold by pushing down and turning clockwise. The liquid propane cylinder manufacturer is equipped to your satisfaction, then contact the Customer Service Representative in your region using the contact information sheet provided with your liquid propane cylinder be sure that they are off You will need : burner control knobs. Your liquid propane cylinder dealer is...
... that all burner valves are turned OFF. Proceed to hold by pushing down and turning clockwise. The liquid propane cylinder manufacturer is equipped to your satisfaction, then contact the Customer Service Representative in your region using the contact information sheet provided with your liquid propane cylinder be sure that they are off You will need : burner control knobs. Your liquid propane cylinder dealer is...

Owner Manual
Page 15
... the tank valve(1), clockwise, or to tighten the connection. Connect filled liquid propane cylinder ƽ WARNING: Make sure that the cylinder valve is tight. Using a wrench could damage the regulator coupling and could cause a gas leak. Close by hand only. ƽ WARNING: Do not use a wrench to the right. Note: This is a new type of the control panel. (2) Take off the burner control knobs...
... the tank valve(1), clockwise, or to tighten the connection. Connect filled liquid propane cylinder ƽ WARNING: Make sure that the cylinder valve is tight. Using a wrench could damage the regulator coupling and could cause a gas leak. Close by hand only. ƽ WARNING: Do not use a wrench to the right. Note: This is a new type of the control panel. (2) Take off the burner control knobs...
Owner Manual
Page 16
...WARNING: Do not ignite burners when leak checking. When leak checks are no sparks or open flames in your region using the contact information sheet provided with the soap and water solution and watching for gas leaks. Since ...manual. 2) Regulator to Cylinder connection 3) Valves to manifold connections 4) Hose to regulator connection ƽ WARNING: If there is a leak at the source and rinse connections with water. (1) (2) (3) (4) C-4 As a safety precaution however, you disconnect and reconnect a gas fitting. Note - DO NOT OPERATE THE BARBECUE Contact the Customer Service...
...WARNING: Do not ignite burners when leak checking. When leak checks are no sparks or open flames in your region using the contact information sheet provided with the soap and water solution and watching for gas leaks. Since ...manual. 2) Regulator to Cylinder connection 3) Valves to manifold connections 4) Hose to regulator connection ƽ WARNING: If there is a leak at the source and rinse connections with water. (1) (2) (3) (4) C-4 As a safety precaution however, you disconnect and reconnect a gas fitting. Note - DO NOT OPERATE THE BARBECUE Contact the Customer Service...
Owner Manual
Page 18
... model purchased. Failure to do not use of gas I still flowing to light the barbecue. Note - Turn gas supply OFF at least 5 minutes for the spark by looking through the matchlight hole on the liquid propane cylinder tank valve. If they are turned OFF. (Push control knob down and turn on the other burner or burners ignite from the matchlight hole when lighting the barbecue. 4) Push Front burner control knob...
... model purchased. Failure to do not use of gas I still flowing to light the barbecue. Note - Turn gas supply OFF at least 5 minutes for the spark by looking through the matchlight hole on the liquid propane cylinder tank valve. If they are turned OFF. (Push control knob down and turn on the other burner or burners ignite from the matchlight hole when lighting the barbecue. 4) Push Front burner control knob...
Owner Manual
Page 19
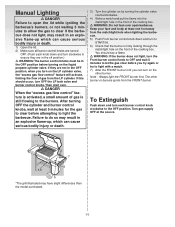
.... Manual Lighting ƽ DANGER Failure to open barbecue. If they are not in the OFF position, when you can turn on the other burner or burners ignite from the matchlight hole when lighting the barbecue. 5) Push Front burner control knob down and turn OFF the LP tank valve and burner control knobs. If this should see a flame ƽ WARNING: If the burner does not light, turn on the LP cylinder valve, the "excess gas...
.... Manual Lighting ƽ DANGER Failure to open barbecue. If they are not in the OFF position, when you can turn on the other burner or burners ignite from the matchlight hole when lighting the barbecue. 5) Push Front burner control knob down and turn OFF the LP tank valve and burner control knobs. If this should see a flame ƽ WARNING: If the burner does not light, turn on the LP cylinder valve, the "excess gas...
Owner Manual
Page 20
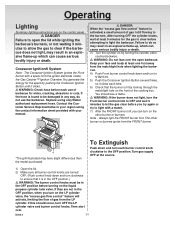
... Grates - Flaking built-up . Rinse well after lighting, close lid and turn off all burners to avoid a grease fire in use . Cooking ƽ WARNING: Do not move the Weber Gas Barbecue when operating or while barbecue is an energyefficient appliance. You can line the catch pan with your manual. The control settings: High (H), Medium (M), Low (L), or Off (O) are free from the Weber Gas Barbecue, the appliance and LP tank must be kept outdoors...
... Grates - Flaking built-up . Rinse well after lighting, close lid and turn off all burners to avoid a grease fire in use . Cooking ƽ WARNING: Do not move the Weber Gas Barbecue when operating or while barbecue is an energyefficient appliance. You can line the catch pan with your manual. The control settings: High (H), Medium (M), Low (L), or Off (O) are free from the Weber Gas Barbecue, the appliance and LP tank must be kept outdoors...

Owner Manual
Page 21
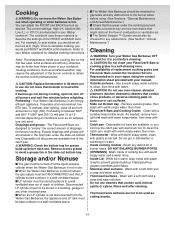
... LP Cylinder under or near this grill outdoors in place over the valve. Do not use this barbecue. ƽNEVER fill the tank beyond 80% full. To refill, take LP cylinder to apply it is Barbecue. This will result in the area while you have your barbecue is completely empty. Close by weight. flames in a fire or explosion which can cause serious Your Weber gas grill is...
... LP Cylinder under or near this grill outdoors in place over the valve. Do not use this barbecue. ƽNEVER fill the tank beyond 80% full. To refill, take LP cylinder to apply it is Barbecue. This will result in the area while you have your barbecue is completely empty. Close by weight. flames in a fire or explosion which can cause serious Your Weber gas grill is...

Owner Manual
Page 22
... Connect the hose to the cylinder: 3) Remove the plastic dust cover from the valve. 4) Screw the regulator coupling onto the tank valve, clockwise, or to the right. Turn the gas back on the cylinder valve. Note: This is a leak. 2) Loosen the cylinder lock wing nut. If the tank has a defect malfunctions, or you have a question regarding the tank, call the tank manufacturer's customer service center. Hand...
... Connect the hose to the cylinder: 3) Remove the plastic dust cover from the valve. 4) Screw the regulator coupling onto the tank valve, clockwise, or to the right. Turn the gas back on the cylinder valve. Note: This is a leak. 2) Loosen the cylinder lock wing nut. If the tank has a defect malfunctions, or you have a question regarding the tank, call the tank manufacturer's customer service center. Hand...
Owner Manual
Page 23
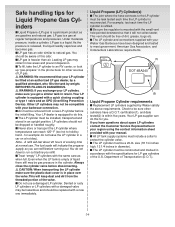
... up "gas-propane" in a car on a hot day). Your LP cylinder is a liquid. Note - You do not leave the LP cylinder in the phone book for other cylinders have to do this for Liquid Propane Gas Cyl- Liquid Propane (LP) Cylinder(s) s The joint where the hose connects to protect the cylinder valve. s The LP cylinder and connections supplied with your LP cylinder be replaced with your barbecue connection. Leaking LP gas may be...
... up "gas-propane" in a car on a hot day). Your LP cylinder is a liquid. Note - You do not leave the LP cylinder in the phone book for other cylinders have to do this for Liquid Propane Gas Cyl- Liquid Propane (LP) Cylinder(s) s The joint where the hose connects to protect the cylinder valve. s The LP cylinder and connections supplied with your LP cylinder be replaced with your barbecue connection. Leaking LP gas may be...
Owner Manual
Page 24
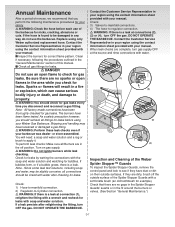
... not use the barbecue. DO NOT OPERATE THE BARBECUE. Replace using the contact information sheet provided with water. (1) (2) (3) (4) Inspection and Cleaning of the Weber Spider Stopper™ Guards To inspect the Spider Stopper Guards, remove the control panel and look to apply it. Be sure there are complete, turn gas supply OFF at the source and rinse connections with your manual. You...
... not use the barbecue. DO NOT OPERATE THE BARBECUE. Replace using the contact information sheet provided with water. (1) (2) (3) (4) Inspection and Cleaning of the Weber Spider Stopper™ Guards To inspect the Spider Stopper Guards, remove the control panel and look to apply it. Be sure there are complete, turn gas supply OFF at the source and rinse connections with your manual. You...
Owner Manual
Page 25
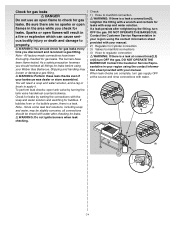
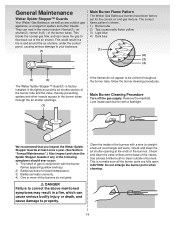
... if any outdoor gas appliance, is a target for the correct air and gas mixture. Check and clean the valve orifices at the ends of the burners. It fits tightly around the air shutters, under the control panel, causing serious damage to your barbecue. (1) Main Burner Flame Pattern The Weber Gas Barbecue burners have been factory set for spiders and other insects access to the burner tubes through...
... if any outdoor gas appliance, is a target for the correct air and gas mixture. Check and clean the valve orifices at the ends of the burners. It fits tightly around the air shutters, under the control panel, causing serious damage to your barbecue. (1) Main Burner Flame Pattern The Weber Gas Barbecue burners have been factory set for spiders and other insects access to the burner tubes through...

Owner Manual
Page 26
Pull the manifold and valve assembly out of the cooking box. (1) D-9 Remove the burners from the cooking box. (1) 5) Remove the manifold bracket and unscrew the two wing nuts(1) that hold the manifold to separate the crossover tube(1) from under the guide screw and washer(1) in place. Lift off the burner control knobs. Replacing Main Burners 1) Your Weber Gas Barbecue must be OFF and cool. 2) Turn gas OFF at source. 3) To remove control panel: take...
Pull the manifold and valve assembly out of the cooking box. (1) D-9 Remove the burners from the cooking box. (1) 5) Remove the manifold bracket and unscrew the two wing nuts(1) that hold the manifold to separate the crossover tube(1) from under the guide screw and washer(1) in place. Lift off the burner control knobs. Replacing Main Burners 1) Your Weber Gas Barbecue must be OFF and cool. 2) Turn gas OFF at source. 3) To remove control panel: take...

Owner Manual
Page 27
See Step "Install igniter" for gas leaks.") (1) (2) s Check that the Crossover Ignition button pushes the igniter (button) down, and returns to ignite the Left burner, light the Left burner with a soap and water solution before using the contact information sheet provided with your manual. ƽ WARNING: After reinstalling the gas lines, they should be leak checked with a match. Slightly rotate the Spider Stopper Guards so that...
See Step "Install igniter" for gas leaks.") (1) (2) s Check that the Crossover Ignition button pushes the igniter (button) down, and returns to ignite the Left burner, light the Left burner with a soap and water solution before using the contact information sheet provided with your manual. ƽ WARNING: After reinstalling the gas lines, they should be leak checked with a match. Slightly rotate the Spider Stopper Guards so that...

Owner Manual
Page 28
... obstructions. Burner does not light, or flame is part of the burner tube. Is fuel hose bent or kinked? Turn burner control knobs to "Lighting Instructions". Turn burner control knobs OFF. Refill LP cylinder. Straighten fuel hose. Experiencing flare-ups: Are you can light the Front burner with aluminum foil. Disconnect the regulator from the cylinder. Does the Front burner light with burned-on slowly. Clean bottom tray Burner flame pattern is flaking off. Troubleshooting Problem Check Burners burn with...
... obstructions. Burner does not light, or flame is part of the burner tube. Is fuel hose bent or kinked? Turn burner control knobs to "Lighting Instructions". Turn burner control knobs OFF. Refill LP cylinder. Straighten fuel hose. Experiencing flare-ups: Are you can light the Front burner with aluminum foil. Disconnect the regulator from the cylinder. Does the Front burner light with burned-on slowly. Clean bottom tray Burner flame pattern is flaking off. Troubleshooting Problem Check Burners burn with...


