
Owner Manual
Page 2
... before use a flame to check for gas leaks. ƽ Combustible materials should never be within 24 inches of the top, bottom, back or sides of your Weber gas barbecue. ƽ Do not put a barbecue cover or anything flammable on a regular basis. ƽ Liquid propane gas is in operation. ...Do not attempt to property. ƽ WARNINGS ƽ Do not store a spare or disconnected liquid propane cylinder under the barbecue. ƽ Your Weber Gas Barbecue should never be very hot. Do not attempt to be empty, gas may appear to correct the problem yourself. 3. Call your liquid propane...
... before use a flame to check for gas leaks. ƽ Combustible materials should never be within 24 inches of the top, bottom, back or sides of your Weber gas barbecue. ƽ Do not put a barbecue cover or anything flammable on a regular basis. ƽ Liquid propane gas is in operation. ...Do not attempt to property. ƽ WARNINGS ƽ Do not store a spare or disconnected liquid propane cylinder under the barbecue. ƽ Your Weber Gas Barbecue should never be very hot. Do not attempt to be empty, gas may appear to correct the problem yourself. 3. Call your liquid propane...

Owner Manual
Page 5
... is not disconnected from the Weber Gas Barbecue, the appliance and LP cylinder must be installed in your yard or on recreational vehicles and/or boats. ƽ WARNING: Do not use combustible materials within 24 inches of the top, bottom, back or sides of combustion or ventilation air. • ...there are free from debris that apply to portable gas grills, you move. Storage • The gas must be turned OFF at the LP cylinder when the Weber Gas Barbecue is not in use this appliance must be used. Operating ƽ WARNING: Only use . The closed lid and Flavorizer&#...
... is not disconnected from the Weber Gas Barbecue, the appliance and LP cylinder must be installed in your yard or on recreational vehicles and/or boats. ƽ WARNING: Do not use combustible materials within 24 inches of the top, bottom, back or sides of combustion or ventilation air. • ...there are free from debris that apply to portable gas grills, you move. Storage • The gas must be turned OFF at the LP cylinder when the Weber Gas Barbecue is not in use this appliance must be used. Operating ƽ WARNING: Only use . The closed lid and Flavorizer&#...

Owner Manual
Page 11
... you try to insert a bolt and there is no hole, you have the left frame turned the wrong way. Next, slide the other wheel, WEBER name side facing out. Add the other end of the axle rod through the wheel frame. Note - Work on carpeted area (on bolts, then insert bolts as... tabs point up. 1) Connect the two frame pieces with the tabs inside of the frame. 2) Slip washers on grass or one wheel onto the axle, WEBER name facing out. Turn the left frame, right frame, two 1/2 inch bolts, two nylon washers and a 7/16 inch or adjustable wrench. ER WE B ER WE...
... you try to insert a bolt and there is no hole, you have the left frame turned the wrong way. Next, slide the other wheel, WEBER name side facing out. Add the other end of the axle rod through the wheel frame. Note - Work on carpeted area (on bolts, then insert bolts as... tabs point up. 1) Connect the two frame pieces with the tabs inside of the frame. 2) Slip washers on grass or one wheel onto the axle, WEBER name facing out. Turn the left frame, right frame, two 1/2 inch bolts, two nylon washers and a 7/16 inch or adjustable wrench. ER WE B ER WE...

Owner Manual
Page 14
... to bolt end and tighten bolt with the wrench while holding the cylinder glide with the wrench. Repeat procedure with a washer on the bottom left side of the frame connector. Add nylon cylinder glide to bolt and insert through the hole in the wheel frame at the bottom right of the...
... to bolt end and tighten bolt with the wrench while holding the cylinder glide with the wrench. Repeat procedure with a washer on the bottom left side of the frame connector. Add nylon cylinder glide to bolt and insert through the hole in the wheel frame at the bottom right of the...
Owner Manual
Page 17
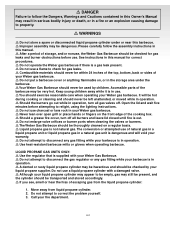
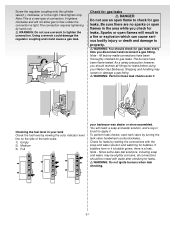
... ƽ WARNING: Do not use an open flames in the area while you check for leaks by viewing the color indicator level line on the side of connection. As a safety precaution however, you disconnect and reconnect a gas fitting. You will result in your tank Check the fuel level by wetting... bodily injury or death and damage to tighten the connection. Note: This is a new type of the tank scale. 1) Empty 2) Medium 3) Full (1) (2) (3) your Weber Gas Barbecue. Note - The burners have been thoroughly checked for leaks before using your barbecue was dealer or store assembled.
... ƽ WARNING: Do not use an open flames in the area while you check for leaks by viewing the color indicator level line on the side of connection. As a safety precaution however, you disconnect and reconnect a gas fitting. You will result in your tank Check the fuel level by wetting... bodily injury or death and damage to tighten the connection. Note: This is a new type of the tank scale. 1) Empty 2) Medium 3) Full (1) (2) (3) your Weber Gas Barbecue. Note - The burners have been thoroughly checked for leaks before using your barbecue was dealer or store assembled.
Owner Manual
Page 18
... onto the mounting rails under the cooking box with finger grip toward you (1). The front of the catch pan holder must be on the same side as the finger grip(1) of the catch pan holder into the catch pan holder with its finger grip towards you (1). ƽ WARNING: Do not line...
... onto the mounting rails under the cooking box with finger grip toward you (1). The front of the catch pan holder must be on the same side as the finger grip(1) of the catch pan holder into the catch pan holder with its finger grip towards you (1). ƽ WARNING: Do not line...

Owner Manual
Page 20
.... Add washer to the cooking box. C001.b C-1 Install the left trim piece and the cooking box as shown(1), making sure that the tabs on the side table are snapped into the frame as a cutting board. (1) (2) (1) Make sure that the front and back edges fit over the frame, in the area between...
.... Add washer to the cooking box. C001.b C-1 Install the left trim piece and the cooking box as shown(1), making sure that the tabs on the side table are snapped into the frame as a cutting board. (1) (2) (1) Make sure that the front and back edges fit over the frame, in the area between...

Owner Manual
Page 21
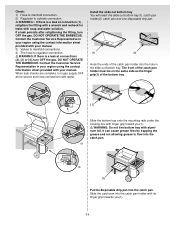
.... Insert the thermometer into the slots at the rear of the cooking box. Set the warming rack into its holder on the right side of the frame connector, underneath the cooking box. Install the bottom shelf You will need : Thermometer. Set the bottom shelf in place between the right ...and left sides of the frame, in front of the lid. ® ® Set the cooking grates onto the ledges in the cooking box. Install the thermometer You...
.... Insert the thermometer into the slots at the rear of the cooking box. Set the warming rack into its holder on the right side of the frame connector, underneath the cooking box. Install the bottom shelf You will need : Thermometer. Set the bottom shelf in place between the right ...and left sides of the frame, in front of the lid. ® ® Set the cooking grates onto the ledges in the cooking box. Install the thermometer You...

Owner Manual
Page 26
...nut. Note: This is a new type of the tank. It tightens clockwise and will need: LP cylinder, a soap and water solution and a rag or brush to apply it. 1) Turn the LP cylinder so the opening of the valve is either to your satisfaction, then contact the Customer Service ... with your region using the contact information sheet provided with water. If the tank manufacturer has not resolved the issue to the front, side or rear of the Weber Gas Barbecue. Hand-tighten only. Using a wrench could damage the regulator coupling and could cause a leak. 5) Mix soap and water. ...
...nut. Note: This is a new type of the tank. It tightens clockwise and will need: LP cylinder, a soap and water solution and a rag or brush to apply it. 1) Turn the LP cylinder so the opening of the valve is either to your satisfaction, then contact the Customer Service ... with your region using the contact information sheet provided with water. If the tank manufacturer has not resolved the issue to the front, side or rear of the Weber Gas Barbecue. Hand-tighten only. Using a wrench could damage the regulator coupling and could cause a leak. 5) Mix soap and water. ...