
Owner Manual
Page 1
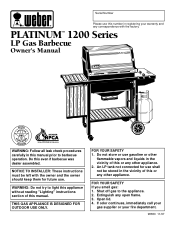
... number in this or any open flame. 3. An LP tank not connected for future use. Open lid. 4. PLATINUM™ 1200 Series LP Gas Barbecue Owner's Manual PSLEARTIIENSUM ® ® E F ® NationalPROPANEGAS Association WARNING: Follow all leak check procedures carefully in registering your fire department. 98830 11/97 WARNING: Do not try to light this appliance without reading "Lighting" instructions section of this manual prior to the appliance. 2. THIS GAS...
... number in this or any open flame. 3. An LP tank not connected for future use. Open lid. 4. PLATINUM™ 1200 Series LP Gas Barbecue Owner's Manual PSLEARTIIENSUM ® ® E F ® NationalPROPANEGAS Association WARNING: Follow all leak check procedures carefully in registering your fire department. 98830 11/97 WARNING: Do not try to light this appliance without reading "Lighting" instructions section of this manual prior to the appliance. 2. THIS GAS...

Owner Manual
Page 2
.... ƽ LP gas is not natural gas. LP GAS UNITS ONLY: ƽ Use the regulator that is supplied with a damaged valve. ƽ Although your fire department. 2 ƽ DANGER Failure to follow the assembly instructions in this manual for correct procedures. ƽ Do not operate the Weber Gas Barbecue if there is in operation. ƽ A dented or rusty LP tank may be hazardous and should never be within 24 inches of...
.... ƽ LP gas is not natural gas. LP GAS UNITS ONLY: ƽ Use the regulator that is supplied with a damaged valve. ƽ Although your fire department. 2 ƽ DANGER Failure to follow the assembly instructions in this manual for correct procedures. ƽ Do not operate the Weber Gas Barbecue if there is in operation. ƽ A dented or rusty LP tank may be hazardous and should never be within 24 inches of...

Owner Manual
Page 3
... atmosphere, is permanently attached to the tank. Weber is responsible for it any other express warrants except as follows: Aluminum Castings, 10 years, Cooking Grates and Flavorizer Bars, 3 years, All Remaining Parts, 5 years, when assembled and operated in accordance with the sale, installation, use and service and which is not covered by insects within the burner tubes, as hail, hurricanes, earthquakes or...
... atmosphere, is permanently attached to the tank. Weber is responsible for it any other express warrants except as follows: Aluminum Castings, 10 years, Cooking Grates and Flavorizer Bars, 3 years, All Remaining Parts, 5 years, when assembled and operated in accordance with the sale, installation, use and service and which is not covered by insects within the burner tubes, as hail, hurricanes, earthquakes or...

Owner Manual
Page 5
... amount of gas is equipped with Gas Catcher Ignition Chamber. If an accidental fire occurs at the LP tank connection, the flow of drippings for additional cooking or warming space. i) Catch pan catches excess grease. Contents WARNINGS 2 Warranty & Patents 3-4 General Instructions 6 Assembly 7-22 Operating Instructions Lighting 23-24 Cooking 25 Storage and/or Nonuse 25 Cleaning 25 LP Tank Information 26-28 e Troubleshooting & Maintenance Annual...
... amount of gas is equipped with Gas Catcher Ignition Chamber. If an accidental fire occurs at the LP tank connection, the flow of drippings for additional cooking or warming space. i) Catch pan catches excess grease. Contents WARNINGS 2 Warranty & Patents 3-4 General Instructions 6 Assembly 7-22 Operating Instructions Lighting 23-24 Cooking 25 Storage and/or Nonuse 25 Cleaning 25 LP Tank Information 26-28 e Troubleshooting & Maintenance Annual...
Owner Manual
Page 6
... (spare) LP tank under the control panel and the bottom tray are no local codes, you can be used. This regulator is designed for LP gas only. Disconnected LP tanks must not be stored in Canada These instructions, while generally acceptable, do not necessarily comply with the Canadian Installation codes, particularly with results that the area under or near the Weber Gas Barbecue. Improper assembly can grill, barbecue, roast and...
... (spare) LP tank under the control panel and the bottom tray are no local codes, you can be used. This regulator is designed for LP gas only. Disconnected LP tanks must not be stored in Canada These instructions, while generally acceptable, do not necessarily comply with the Canadian Installation codes, particularly with results that the area under or near the Weber Gas Barbecue. Improper assembly can grill, barbecue, roast and...
Owner Manual
Page 7
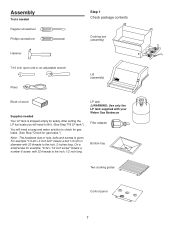
... Cooking box (assembly) 7/16 inch open-end or an adjustable wrench Pliers Lid (assembly) ® ® Block of nuts, bolts and screws is shipped empty for gas leaks.") Note - LP tank ƽWARNING: Use only the LP tank supplied with 20 threads to the inch, 1/2 inch long. For example "1/4-20 x 2 inch bolt" means a bolt 1/4 inch in diameter with your Weber Gas Barbecue Filler adapter Bottom tray Two cooking grates Control...
... Cooking box (assembly) 7/16 inch open-end or an adjustable wrench Pliers Lid (assembly) ® ® Block of nuts, bolts and screws is shipped empty for gas leaks.") Note - LP tank ƽWARNING: Use only the LP tank supplied with 20 threads to the inch, 1/2 inch long. For example "1/4-20 x 2 inch bolt" means a bolt 1/4 inch in diameter with your Weber Gas Barbecue Filler adapter Bottom tray Two cooking grates Control...
Owner Manual
Page 13
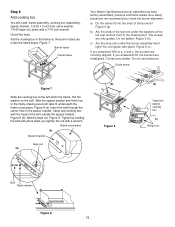
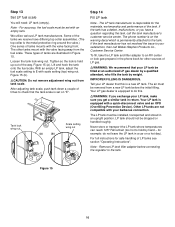
... washer Figure 8 13 Step 8 Add cooking box You will need: frame assembly, cooking box (assembly), spacer bracket, 1/4-20 x 2 inch bolt, nylon washer, 1/4-20 keps nut, pliers and a 7/16 inch wrench. Burner tubes Frame brace Your Weber Gas Barbecue burner assembly has been factory assembled, pressure and flame tested. As a safety precaution we recommend you answered NO, the burners are only guides. Tighten by holding the bolt with...
... washer Figure 8 13 Step 8 Add cooking box You will need: frame assembly, cooking box (assembly), spacer bracket, 1/4-20 x 2 inch bolt, nylon washer, 1/4-20 keps nut, pliers and a 7/16 inch wrench. Burner tubes Frame brace Your Weber Gas Barbecue burner assembly has been factory assembled, pressure and flame tested. As a safety precaution we recommend you answered NO, the burners are only guides. Tighten by holding the bolt with...

Owner Manual
Page 15
... in (c) frame brace Igniter lock nut Frame brace Small part of the keyhole in the frame brace. If the igniter works loose, carefully tighten the igniter lock nut with an adjustable wrench or pliers. Slip the bolts on the igniter. Step 12 Install igniter Note - This was done to the Gas Catcher Ignition Chamber and the igniter. Insert the top of...
... in (c) frame brace Igniter lock nut Frame brace Small part of the keyhole in the frame brace. If the igniter works loose, carefully tighten the igniter lock nut with an adjustable wrench or pliers. Slip the bolts on the igniter. Step 12 Install igniter Note - This was done to the Gas Catcher Ignition Chamber and the igniter. Insert the top of...
Owner Manual
Page 16
... by weight. Tell your barbecue connection. Other LP tanks are illustrated in an upright position. Never store or transport the LP tank where temperatures can reach 125° Fahrenheit (too hot to an RV center or look gas-propane in the phone book for safe handling of the way. For full instructions for other tanks mount with the valve facing front. Remove LP tank...
... by weight. Tell your barbecue connection. Other LP tanks are illustrated in an upright position. Never store or transport the LP tank where temperatures can reach 125° Fahrenheit (too hot to an RV center or look gas-propane in the phone book for safe handling of the way. For full instructions for other tanks mount with the valve facing front. Remove LP tank...
Owner Manual
Page 18
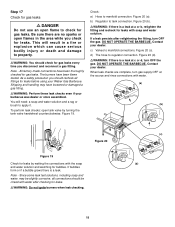
... flame tested. Check: a) Hose to manifold connections. Figure 20 (a). If a leak persists after checking for leaks. ƽWARNING: Do not ignite burners when leak checking. (c) (d) 18 DO NOT OPERATE THE BARBECUE. Contact your dealer. Contact your dealer. This will need: a soap and water solution and a rag or brush to apply it. The burners have been thoroughly checked for gas...
... flame tested. Check: a) Hose to manifold connections. Figure 20 (a). If a leak persists after checking for leaks. ƽWARNING: Do not ignite burners when leak checking. (c) (d) 18 DO NOT OPERATE THE BARBECUE. Contact your dealer. Contact your dealer. This will need: a soap and water solution and a rag or brush to apply it. The burners have been thoroughly checked for gas...

Owner Manual
Page 21
...from below) (c) 21 Figure 29 (a). Push the bracket into the lower support bracket. Call your dealer to hang down. Figure 28 (c). (b) (c) Insert one end of the bracket is in any way cracked or damaged, do not use swing table. Insert the other end into the hole in frame (view ... it lightly with a hammer. ƽWARNING: If swing table end bracket is hooked in the slot in the swing table end bracket. Figure 28 (a). Step 22 Install swing table You will need: swing table end bracket, two 10-24 hex nuts, two 10-24 x 1 3/4 inch machine screws, slide bar assembly, swing...
...from below) (c) 21 Figure 29 (a). Push the bracket into the lower support bracket. Call your dealer to hang down. Figure 28 (c). (b) (c) Insert one end of the bracket is in any way cracked or damaged, do not use swing table. Insert the other end into the hole in frame (view ... it lightly with a hammer. ƽWARNING: If swing table end bracket is hooked in the slot in the swing table end bracket. Figure 28 (a). Step 22 Install swing table You will need: swing table end bracket, two 10-24 hex nuts, two 10-24 x 1 3/4 inch machine screws, slide bar assembly, swing...

Owner Manual
Page 22
...Set the accessory trays in locked position. Figure 30 (a) To lower table: Pull support rod up and engage slide in place between the two frame connectors. Notch to tap them lightly with a hammer. Figure 31. (b) (e) (c) Slide Support rod View from front of barbecue Step 23 Complete accessory installation... of the Weber Warm-Up Basket into its holder. Figure 32 (d). Position slide bar assembly on each 1 3/4 inch screw, insert screws through frame and slide bar assembly and add nylon washers and hex nuts. Set the work table,two accessory trays, three tubing plugs, thermometer...
...Set the accessory trays in locked position. Figure 30 (a) To lower table: Pull support rod up and engage slide in place between the two frame connectors. Notch to tap them lightly with a hammer. Figure 31. (b) (e) (c) Slide Support rod View from front of barbecue Step 23 Complete accessory installation... of the Weber Warm-Up Basket into its holder. Figure 32 (d). Position slide bar assembly on each 1 3/4 inch screw, insert screws through frame and slide bar assembly and add nylon washers and hex nuts. Set the work table,two accessory trays, three tubing plugs, thermometer...

Owner Manual
Page 23
... to light the barbecue. Note - Note - E = empty; After turning OFF the tank and burner control knobs, wait at the source, then push down and turn on the LP tank valve. The other burners. OPERATING INSTRUCTIONS Lighting Summary lighting instructions are on the LP tank valve, the excess flow control will activate, limiting the flow of gas from the LP tank. You generate the energy for the necessary parts. Always light the FRONT burner first. Crossover Ignition...
... to light the barbecue. Note - Note - E = empty; After turning OFF the tank and burner control knobs, wait at the source, then push down and turn on the LP tank valve. The other burners. OPERATING INSTRUCTIONS Lighting Summary lighting instructions are on the LP tank valve, the excess flow control will activate, limiting the flow of gas from the LP tank. You generate the energy for the necessary parts. Always light the FRONT burner first. Crossover Ignition...

Owner Manual
Page 24
...LP tank valve and burner control knobs and start over open lid while igniting the barbecue, or not waiting 5 minutes to allow the gas to clear if the barbecue does not light, may result in an explosive flameup which can turn on the LP tank valve, the excess flow control will activate, limiting the flow of the cooking box. ƽWARNING: If the burner does not light... hole on the front of gas from the LP tank. The other burners. Figure 2. 2) Check that the burner is lit by turning the tank valve counterclockwise. 5) Strike a match and put the flame into the matchlight hole in ...
...LP tank valve and burner control knobs and start over open lid while igniting the barbecue, or not waiting 5 minutes to allow the gas to clear if the barbecue does not light, may result in an explosive flameup which can turn on the LP tank valve, the excess flow control will activate, limiting the flow of the cooking box. ƽWARNING: If the burner does not light... hole on the front of gas from the LP tank. The other burners. Figure 2. 2) Check that the burner is lit by turning the tank valve counterclockwise. 5) Strike a match and put the flame into the matchlight hole in ...
Owner Manual
Page 25
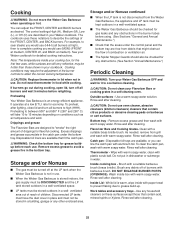
... space. Bottom tray - Flavorizer Bars and Cooking Grates- Disposable foil trays are still very reflective, may require the adjustment of the burner controls to describe the settings of combustion or ventilation air. Thermometer - Wash inside with warm soapy water. Rinse well after cleaning. 25 It operates at the LP tank when the Weber Gas Barbecue is warm, wipe inside box with paper towel...
... space. Bottom tray - Flavorizer Bars and Cooking Grates- Disposable foil trays are still very reflective, may require the adjustment of the burner controls to describe the settings of combustion or ventilation air. Thermometer - Wash inside with warm soapy water. Rinse well after cleaning. 25 It operates at the LP tank when the Weber Gas Barbecue is warm, wipe inside box with paper towel...
Owner Manual
Page 28
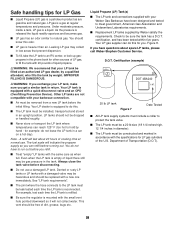
... the same care as when full. You should not be dropped or handled roughly. Other LP tanks are gasoline and natural gas. s The LP tank must be removed from a new LP tank before disconnecting. For example, test each time the LP tank is equipped with your LP tank, make sure you exchange your Weber Gas Barbecue have questions about 20 hours of Transportation (D.O.T.). 28 Liquid Propane (LP) Tank(s) s The LP tank and...
... the same care as when full. You should not be dropped or handled roughly. Other LP tanks are gasoline and natural gas. s The LP tank must be removed from a new LP tank before disconnecting. For example, test each time the LP tank is equipped with your LP tank, make sure you exchange your Weber Gas Barbecue have questions about 20 hours of Transportation (D.O.T.). 28 Liquid Propane (LP) Tank(s) s The LP tank and...

Owner Manual
Page 29
... burners or valves. (See Section "General Maintenance".) 29 Replace the manifold assembly, which can cause serious bodily injury or death, and damage to property. s Check all gas fittings for leaks. ƽ DANGER Do not use the barbecue. d) The hose to manifold connection. You will result in a fire or explosion which includes the gas hose. Turn on their outside surface of this manual. Check: a) Hose...
... burners or valves. (See Section "General Maintenance".) 29 Replace the manifold assembly, which can cause serious bodily injury or death, and damage to property. s Check all gas fittings for leaks. ƽ DANGER Do not use the barbecue. d) The hose to manifold connection. You will result in a fire or explosion which includes the gas hose. Turn on their outside surface of this manual. Check: a) Hose...
Owner Manual
Page 30
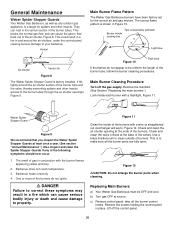
... shutter. Check and clean the valve orifices at the ends of the burner tubes. c) Remove control panel: take off the control panel. 30 This could result in a fire in conjunction with the burner flames appearing yellow and lazy. 2. Figure 9. Remove the manifold. (See Section "Replacing the main burners".) Look inside cooking box Light blue Air shutter Venturi fin Figure 8 The Weber Spider Stopper Guard is shown...
... shutter. Check and clean the valve orifices at the ends of the burner tubes. c) Remove control panel: take off the control panel. 30 This could result in a fire in conjunction with the burner flames appearing yellow and lazy. 2. Figure 9. Remove the manifold. (See Section "Replacing the main burners".) Look inside cooking box Light blue Air shutter Venturi fin Figure 8 The Weber Spider Stopper Guard is shown...
Owner Manual
Page 33
...;CAUTION: Do not line the bottom tray with an empty tank. Flames do not light. -orBurners have activated. What you preheating barbecue in the All burners on high for 10 to be corrected by using these methods, please contact Weber-Stephen Customer Service. 33 Disconnect the regulator from the tank. Turn burner control knobs to "Lighting Instructions". when burner is baked on -steel, not paint. If problems cannot be "peeling...
...;CAUTION: Do not line the bottom tray with an empty tank. Flames do not light. -orBurners have activated. What you preheating barbecue in the All burners on high for 10 to be corrected by using these methods, please contact Weber-Stephen Customer Service. 33 Disconnect the regulator from the tank. Turn burner control knobs to "Lighting Instructions". when burner is baked on -steel, not paint. If problems cannot be "peeling...

Owner Manual
Page 35
... Manifold assembly 56 Manifold bracket 57 Igniter 58 Igniter lock nut 59 Gas catcher ignition chamber 60 Igniter wire (black) 61 Igniter wire (white) 62 Right frame 63 Fuel scale 64 1/4-20 wing nuts (2) 65 LP tank 66 Filler adapter 67 Control panel inserts (2) ƽWARNING: Use only Weber factory authorized parts. Call the Weber Customer Service Center toll free 1-800-446-1071 to Weber-Stephen Products Co. Parts List All...
... Manifold assembly 56 Manifold bracket 57 Igniter 58 Igniter lock nut 59 Gas catcher ignition chamber 60 Igniter wire (black) 61 Igniter wire (white) 62 Right frame 63 Fuel scale 64 1/4-20 wing nuts (2) 65 LP tank 66 Filler adapter 67 Control panel inserts (2) ƽWARNING: Use only Weber factory authorized parts. Call the Weber Customer Service Center toll free 1-800-446-1071 to Weber-Stephen Products Co. Parts List All...


