

Owner Manual
Page 1
... liquids in this or any open flame. 3. Open lid. 4. WARNING: Follow all leak check procedures carefully in the vicinity of this or any other appliance. 2. Do not store or use . Shut off gas to barbecue operation. Extinguish any other appliance. THIS GAS APPLIANCE IS DESIGNED FOR OUTDOOR USE ONLY. PLATINUM™ SERIES II LP Gas Barbecues Operating Guide Read before assembly Platinum Series II 2200 LP Serial Number W*V??W*V W&@'V@@@@@@@@@@@W&@'V WV?e e e e e &(h )'@@e e e e e @@?WV?&(h )'e e e e e@@e e e e e @@&W'V(YX)@@@@'W&V(YX Yh h X@@@@@@@@@?WN...
... liquids in this or any open flame. 3. Open lid. 4. WARNING: Follow all leak check procedures carefully in the vicinity of this or any other appliance. 2. Do not store or use . Shut off gas to barbecue operation. Extinguish any other appliance. THIS GAS APPLIANCE IS DESIGNED FOR OUTDOOR USE ONLY. PLATINUM™ SERIES II LP Gas Barbecues Operating Guide Read before assembly Platinum Series II 2200 LP Serial Number W*V??W*V W&@'V@@@@@@@@@@@W&@'V WV?e e e e e &(h )'@@e e e e e @@?WV?&(h )'e e e e e@@e e e e e @@&W'V(YX)@@@@'W&V(YX Yh h X@@@@@@@@@?WN...

Owner Manual
Page 2
... Burner 8 Cooking 9 Cleaning 9 Using the Steam-N-Chips Smoker 10 Cleaning the Steam-N-Chips Smoker 10 Maintenance Spider Stopper Guards Inspection and Cleaning of the Spider Stopper Guards Main Burner Flame Pattern Main Burner Cleaning Procedure Replacing the Main Burners Crossover Ignition System Operations Troubleshooting Side Burner Troubleshooting Side Burner Maintenance To Clean the Burner Head To reassemble the Burner Head Side Burner Exploded View Exploded Views and Replacement Parts List Platinum Series II 2200 LP Platinum Series II 3200 LP Platinum Series II...
... Burner 8 Cooking 9 Cleaning 9 Using the Steam-N-Chips Smoker 10 Cleaning the Steam-N-Chips Smoker 10 Maintenance Spider Stopper Guards Inspection and Cleaning of the Spider Stopper Guards Main Burner Flame Pattern Main Burner Cleaning Procedure Replacing the Main Burners Crossover Ignition System Operations Troubleshooting Side Burner Troubleshooting Side Burner Maintenance To Clean the Burner Head To reassemble the Burner Head Side Burner Exploded View Exploded Views and Replacement Parts List Platinum Series II 2200 LP Platinum Series II 3200 LP Platinum Series II...

Owner Manual
Page 3
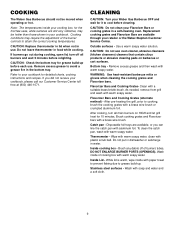
... box. s Do not use a flame to check for gas leaks and burner obstructions before attempting to correct the problem yourself. 3. s The Weber Gas Barbecue should be hot during operation, turn off all gas valves off. s Although your Weber Gas Barbecue. Call your Weber Gas Barbecue. WARNINGS DANGER Failure to follow the assembly instructions in this manual. s Do not store a spare or disconnected LP tank under the barbecue. s Do not operate the Weber Gas Barbecue if there is not natural gas...
... box. s Do not use a flame to check for gas leaks and burner obstructions before attempting to correct the problem yourself. 3. s The Weber Gas Barbecue should be hot during operation, turn off all gas valves off. s Although your Weber Gas Barbecue. Call your Weber Gas Barbecue. WARNINGS DANGER Failure to follow the assembly instructions in this manual. s Do not store a spare or disconnected LP tank under the barbecue. s Do not operate the Weber Gas Barbecue if there is not natural gas...

Owner Manual
Page 4
... cover any applicable implied warranties of your owner's manual and serial number available for choosing a Weber Barbecue. Our knowledgeable Customer Service staff is prepared to damage caused by this express written Limited Warranty. There are no such representations are required to return defective parts, transportation charges must be limited to the repair or replacement of parts which prove defective under normal use , removal...
... cover any applicable implied warranties of your owner's manual and serial number available for choosing a Weber Barbecue. Our knowledgeable Customer Service staff is prepared to damage caused by this express written Limited Warranty. There are no such representations are required to return defective parts, transportation charges must be limited to the repair or replacement of parts which prove defective under normal use , removal...

Owner Manual
Page 5
... the Canadian Installation codes, particularly with liquid propane (LP) gas only. Liquid Propane (LP) gas supply is designed for use with piping above and below ground. Please read the instructions carefully before using your Weber Gas Barbecue with local codes and/or Standard CAN/CGA-B149.2 (Installation Code for 10.5 inches of the National Fuel Gas Code: ANSI Z 223.1. s This Weber Gas Barbecue is easy to operate. 5 s The Weber Gas Barbecue should be stored outdoors in the burner tubes before using . (See...
... the Canadian Installation codes, particularly with liquid propane (LP) gas only. Liquid Propane (LP) gas supply is designed for use with piping above and below ground. Please read the instructions carefully before using your Weber Gas Barbecue with local codes and/or Standard CAN/CGA-B149.2 (Installation Code for 10.5 inches of the National Fuel Gas Code: ANSI Z 223.1. s This Weber Gas Barbecue is easy to operate. 5 s The Weber Gas Barbecue should be stored outdoors in the burner tubes before using . (See...

Owner Manual
Page 6
... Co., Customer Service Center or authorized dealer. If the hose is activated, a small amount of barbecue for the gas to clear before attempting to the burners. F = full. 3) Make sure all burner control knobs are OFF. (Push each use the barbecue. TO EXTINGUISH Turn gas supply OFF at least 5 minutes for nicks, cracking, abrasions or cuts. Crossover Ignition System Note - Replace using only Weber authorized replacement manifold assembly. DANGER...
... Co., Customer Service Center or authorized dealer. If the hose is activated, a small amount of barbecue for the gas to clear before attempting to the burners. F = full. 3) Make sure all burner control knobs are OFF. (Push each use the barbecue. TO EXTINGUISH Turn gas supply OFF at least 5 minutes for nicks, cracking, abrasions or cuts. Crossover Ignition System Note - Replace using only Weber authorized replacement manifold assembly. DANGER...

Owner Manual
Page 7
... on the other burners ignite from the LP tank. Manual Lighting 1 3 8 4 5 76 2 Figure 2 7 Keep your face and body at the source, then push down and turn each burner control knob down and turn clockwise.) For barbecues equipped with a match. 8) After the FRONT burner is activated, a small amount of the cooking box. (For closed cart models, open the valve completely. 5) Strike a match and put the flame into the...
... on the other burners ignite from the LP tank. Manual Lighting 1 3 8 4 5 76 2 Figure 2 7 Keep your face and body at the source, then push down and turn each burner control knob down and turn clockwise.) For barbecues equipped with a match. 8) After the FRONT burner is activated, a small amount of the cooking box. (For closed cart models, open the valve completely. 5) Strike a match and put the flame into the...

Owner Manual
Page 8
... (push in and turn clockwise), and all main burner control valves are OFF (push down and turn clockwise). 4) Turn the LP tank valve on a bright sunny day. Figure 3. LIGHTING THE SIDE BURNER For the Platinum Series II 3200 & 3400 The side burner has a separate ignition system from the main cooking box. b) Wait 5 minutes to let the gas clear before you try again or try to...
... (push in and turn clockwise), and all main burner control valves are OFF (push down and turn clockwise). 4) Turn the LP tank valve on a bright sunny day. Figure 3. LIGHTING THE SIDE BURNER For the Platinum Series II 3200 & 3400 The side burner has a separate ignition system from the main cooking box. b) Wait 5 minutes to let the gas clear before you try again or try to...
Owner Manual
Page 9
... be moved when operating or hot. Outside surfaces - Bottom tray - After pre-heating the grill, prior to cool before cleaning. Wash with a suitable brass bristle brush. CAUTION: Replace thermometer in lid when not in use . CAUTION: Check the bottom tray for grease build-up . CLEANING CAUTION: Turn your Weber Gas Barbecue OFF and wait for detailed charts, cooking instructions and recipes. CAUTION...
... be moved when operating or hot. Outside surfaces - Bottom tray - After pre-heating the grill, prior to cool before cleaning. Wash with a suitable brass bristle brush. CAUTION: Replace thermometer in lid when not in use . CAUTION: Check the bottom tray for grease build-up . CLEANING CAUTION: Turn your Weber Gas Barbecue OFF and wait for detailed charts, cooking instructions and recipes. CAUTION...
Owner Manual
Page 10
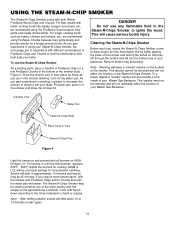
...be removed and will accumulate on the surface of your best settings for long duration smoking. Adjust the burners for cooking; If you gain experience in the smoker allowing room for the water pan. Remove bottom tray ...tray of the meat, poultry and fish recipes in the Steam-N-Chips Smoker to enhance any flammable fluid in the gas barbecue cookbook. Smoke will be used to ignite the wood. Cook with both Weber FireSpice Wood Chips and Chunks. DANGER Do not use any of your taste. The Steam-N-Chips Smoker may be your Weber Gas Barbecue. After refilling smoker...
...be removed and will accumulate on the surface of your best settings for long duration smoking. Adjust the burners for cooking; If you gain experience in the smoker allowing room for the water pan. Remove bottom tray ...tray of the meat, poultry and fish recipes in the Steam-N-Chips Smoker to enhance any flammable fluid in the gas barbecue cookbook. Smoke will be used to ignite the wood. Cook with both Weber FireSpice Wood Chips and Chunks. DANGER Do not use any of your taste. The Steam-N-Chips Smoker may be your Weber Gas Barbecue. After refilling smoker...
Owner Manual
Page 11
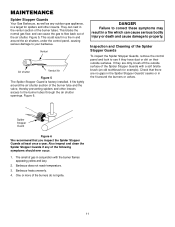
... Spider Stopper Guards Your Gas Barbecue, as well as any of the burner tubes. Figure 5. Inspection and Cleaning of the burners do not ignite. 11 One or more of the Spider Stopper Guards To inspect the Spider Stopper Guards, remove the control panel and look to the burner tubes through the air shutter...in the Spider Stopper Guards' seams or in conjunction with the burner flames appearing yellow and lazy. 2. If they have dust or dirt on their outside surface of gas in the fit around the burners or valves. Spider Stopper Guard Figure 6 We recommend that there are dirty,...
... Spider Stopper Guards Your Gas Barbecue, as well as any of the burner tubes. Figure 5. Inspection and Cleaning of the burners do not ignite. 11 One or more of the Spider Stopper Guards To inspect the Spider Stopper Guards, remove the control panel and look to the burner tubes through the air shutter...in the Spider Stopper Guards' seams or in conjunction with the burner flames appearing yellow and lazy. 2. If they have dust or dirt on their outside surface of gas in the fit around the burners or valves. Spider Stopper Guard Figure 6 We recommend that there are dirty,...
Owner Manual
Page 12
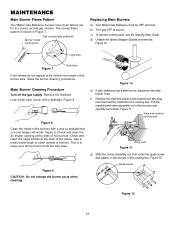
... 9. Look inside cooking box Replacing Main Burners a) Your Weber Gas Barbecue must be uniform the length of the cooking box. Use a brass bristle brush to be OFF and cool. b) Turn gas OFF at the ends of the burners and carefully set for the correct air and gas mixture. Remove the manifold. The correct flame pattern is to the cooking box. Check and clean the valve orifices at the base...
... 9. Look inside cooking box Replacing Main Burners a) Your Weber Gas Barbecue must be uniform the length of the cooking box. Use a brass bristle brush to be OFF and cool. b) Turn gas OFF at the ends of the burners and carefully set for the correct air and gas mixture. Remove the manifold. The correct flame pattern is to the cooking box. Check and clean the valve orifices at the base...

Owner Manual
Page 13
... the Crossover Ignition button pushes the igniter (button) down, and returns to light, contact Weber-Stephen Customer Service. Tighten if necessary; See "Check That Items Are Secured" in the frame. Figure 13. Figure 16. Check proper assembly before using the barbecue. MAINTENANCE h) Lift and twist the burner assembly slightly, to separate the crossover tube from the cooking box. Figure 14 (b). (a) Valve Venturi fin...
... the Crossover Ignition button pushes the igniter (button) down, and returns to light, contact Weber-Stephen Customer Service. Tighten if necessary; See "Check That Items Are Secured" in the frame. Figure 13. Figure 16. Check proper assembly before using the barbecue. MAINTENANCE h) Lift and twist the burner assembly slightly, to separate the crossover tube from the cooking box. Figure 14 (b). (a) Valve Venturi fin...
Owner Manual
Page 14
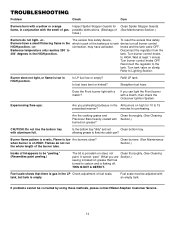
... burner control knobs OFF. Turn tank valve on grease? Burner does not light, or flame is low in conjunction with the smell of gas. CAUTION: Do not line the bottom tray with a match? Burner flame pattern is empty. THIS IS NOT A DEFECT. tank, but tank is erratic. knobs and the tank valve OFF. Turn burner control knobs to flow into catch pan? Refill LP tank. Is the bottom tray "dirty" and not Clean bottom tray. allowing grease to HIGH. TROUBLESHOOTING Problem...
... burner control knobs OFF. Turn tank valve on grease? Burner does not light, or flame is low in conjunction with the smell of gas. CAUTION: Do not line the bottom tray with a match? Burner flame pattern is empty. THIS IS NOT A DEFECT. tank, but tank is erratic. knobs and the tank valve OFF. Turn burner control knobs to flow into catch pan? Refill LP tank. Is the bottom tray "dirty" and not Clean bottom tray. allowing grease to HIGH. TROUBLESHOOTING Problem...

Owner Manual
Page 15
... in the OFF position. Inspect burner base for obstructions. See Side Burner Maintenance for correct assembly. 15 Flame is large or erratic. Push button ignition does not work. SIDE BURNER TROUBLESHOOTING For the Platinum Series II 3200 & 3400 WARNING: Before attempting any troubleshooting steps, all gas controls and supply valves should be in HIGH position. Is fuel hose bent or kinked? Is the burner ring correctly installed?
... in the OFF position. Inspect burner base for obstructions. See Side Burner Maintenance for correct assembly. 15 Flame is large or erratic. Push button ignition does not work. SIDE BURNER TROUBLESHOOTING For the Platinum Series II 3200 & 3400 WARNING: Before attempting any troubleshooting steps, all gas controls and supply valves should be in HIGH position. Is fuel hose bent or kinked? Is the burner ring correctly installed?

Owner Manual
Page 16
If the igniter works loose, carefully tighten the igniter lock nut with an adjustable wrench or pliers. (a) burner control Igniter button knob The Platinum Series II side burner has been factory set for the correct air and gas mixture. Note - SIDE BURNER MAINTENANCE WARNING: All gas controls and supply valves should be in Figure 18. Make sure black wire is tight. Check that igniter lock nut is connected between...
If the igniter works loose, carefully tighten the igniter lock nut with an adjustable wrench or pliers. (a) burner control Igniter button knob The Platinum Series II side burner has been factory set for the correct air and gas mixture. Note - SIDE BURNER MAINTENANCE WARNING: All gas controls and supply valves should be in Figure 18. Make sure black wire is tight. Check that igniter lock nut is connected between...

Owner Manual
Page 17
Remove the burner ring. Remove the burner head. Figure 19 (c). Soak if necessary. Install the burner cap. Note: The burner head has a hole in the burner orifice. CAUTION: Avoid getting water or dust in it that fits over the igniter electrode. 17 There is uneven or erratic, turn OFF the burner control knob. WARNING: If the flame pattern is a hole in the slots of the...
Remove the burner ring. Remove the burner head. Figure 19 (c). Soak if necessary. Install the burner cap. Note: The burner head has a hole in the burner orifice. CAUTION: Avoid getting water or dust in it that fits over the igniter electrode. 17 There is uneven or erratic, turn OFF the burner control knob. WARNING: If the flame pattern is a hole in the slots of the...

Owner Manual
Page 19
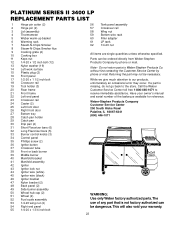
... the Weber Customer Service Center toll free 1-800-446-1071 to Weber-Stephen Products Co. Do not return parts to receive immediate assistance. Parts can be ordered directly from Weber-Stephen Products Company by phone or mail. PLATINUM SERIES II 2200 LP REPLACEMENT PARTS LIST 1 Hinge pin cotter (2) 2 Hinge pin (2) 3 Thermometer 4 Lid (assembly) 5 Weber warm-up basket 6 Warming rack 7 Steam-N-Chips Smoker 8 Steam-N-Chips Smoker flue 9 Cooking grate (2) 10 Cooking box...
... the Weber Customer Service Center toll free 1-800-446-1071 to Weber-Stephen Products Co. Do not return parts to receive immediate assistance. Parts can be ordered directly from Weber-Stephen Products Company by phone or mail. PLATINUM SERIES II 2200 LP REPLACEMENT PARTS LIST 1 Hinge pin cotter (2) 2 Hinge pin (2) 3 Thermometer 4 Lid (assembly) 5 Weber warm-up basket 6 Warming rack 7 Steam-N-Chips Smoker 8 Steam-N-Chips Smoker flue 9 Cooking grate (2) 10 Cooking box...

Owner Manual
Page 21
PLATINUM SERIES II 3200 LP REPLACEMENT PARTS LIST 1 Hinge pin cotter (2) 2 Hinge pin (2) 3 Lid (assembly) 4 Thermometer 5 Weber warm-up basket 6 Warming rack 7 Steam-N-Chips Smoker 8 Steam-N-Chips Smoker flue 9 Cooking grate (2) 10 Cooking box 11 Keps nut 12 Plastic plug (2) 13 1/4-20 x 1/2 inch bolt (12) 14 Nylon washer (19) 15 Left work surface 16 Front panel 17 Tool holder (3) 18 Rear frame 19 1/4-20 x 1 1/2 inch bolt 20...
PLATINUM SERIES II 3200 LP REPLACEMENT PARTS LIST 1 Hinge pin cotter (2) 2 Hinge pin (2) 3 Lid (assembly) 4 Thermometer 5 Weber warm-up basket 6 Warming rack 7 Steam-N-Chips Smoker 8 Steam-N-Chips Smoker flue 9 Cooking grate (2) 10 Cooking box 11 Keps nut 12 Plastic plug (2) 13 1/4-20 x 1/2 inch bolt (12) 14 Nylon washer (19) 15 Left work surface 16 Front panel 17 Tool holder (3) 18 Rear frame 19 1/4-20 x 1 1/2 inch bolt 20...
Owner Manual
Page 23
... authorized can be necessary. While we give much attention to the store. PLATINUM SERIES II 3400 LP REPLACEMENT PARTS LIST 1 Hinge pin cotter (2) 2 Hinge pin (2) 3 Lid (assembly) 4 Thermometer 5 Weber warm-up basket 6 Warming rack 7 Steam-N-Chips Smoker 8 Steam-N-Chips Smoker flue 9 Cooking grate (2) 10 Cooking box 11 Keps nut 12 1/4-20 x 1/2 inch bolt (12) 13 Nylon washer (19) 14 Left work surface 15 Plastic...
... authorized can be necessary. While we give much attention to the store. PLATINUM SERIES II 3400 LP REPLACEMENT PARTS LIST 1 Hinge pin cotter (2) 2 Hinge pin (2) 3 Lid (assembly) 4 Thermometer 5 Weber warm-up basket 6 Warming rack 7 Steam-N-Chips Smoker 8 Steam-N-Chips Smoker flue 9 Cooking grate (2) 10 Cooking box 11 Keps nut 12 1/4-20 x 1/2 inch bolt (12) 13 Nylon washer (19) 14 Left work surface 15 Plastic...


