

Owner Manual
Page 1
.... 4. PLATINUM™ 3200 Series Natural Gas Barbecue Owner's Manual PSLEARTIIENSUM ® ® ® WARNING: Follow all leak check procedures carefully in registering your gas supplier. 98836 11/97 THIS GAS APPLIANCE IS DESIGNED FOR OUTDOOR USE ONLY. Do this even if barbecue was dealer assembled. Extinguish any other flammable vapors and liquids in the vicinity of this number in this or any open flame. 3. Shut off gas to barbecue operation.
.... 4. PLATINUM™ 3200 Series Natural Gas Barbecue Owner's Manual PSLEARTIIENSUM ® ® ® WARNING: Follow all leak check procedures carefully in registering your gas supplier. 98836 11/97 THIS GAS APPLIANCE IS DESIGNED FOR OUTDOOR USE ONLY. Do this even if barbecue was dealer assembled. Extinguish any other flammable vapors and liquids in the vicinity of this number in this or any open flame. 3. Shut off gas to barbecue operation.
Owner Manual
Page 2
... use an LP tank with your Weber Gas Barbecue. ƽ Do not attempt to disconnect any gas fitting while your barbecue is in operation. ƽ Use heat-resistant barbecue mitts or gloves when operating barbecue. LP GAS UNITS ONLY: ƽ Use the regulator that is supplied with a damaged valve. ƽ Although your LP tank may appear to relight, using . Please carefully follow the Dangers, Warnings and Cautions contained in this Owner's Manual...
... use an LP tank with your Weber Gas Barbecue. ƽ Do not attempt to disconnect any gas fitting while your barbecue is in operation. ƽ Use heat-resistant barbecue mitts or gloves when operating barbecue. LP GAS UNITS ONLY: ƽ Use the regulator that is supplied with a damaged valve. ƽ Although your LP tank may appear to relight, using . Please carefully follow the Dangers, Warnings and Cautions contained in this Owner's Manual...
Owner Manual
Page 3
...: Aluminum Castings, 10 years, Cooking Grates and Flavorizer Bars, 3 years, All Remaining Parts, 5 years, when assembled and operated in accordance with the sale, installation, use and service and which on Weber. Weber may not apply to Weber's satisfaction, they are limited in the atmosphere, is not liable for it any other express warrants except as set forth herein and any special...
...: Aluminum Castings, 10 years, Cooking Grates and Flavorizer Bars, 3 years, All Remaining Parts, 5 years, when assembled and operated in accordance with the sale, installation, use and service and which on Weber. Weber may not apply to Weber's satisfaction, they are limited in the atmosphere, is not liable for it any other express warrants except as set forth herein and any special...

Owner Manual
Page 5
... for temperature control. f) Separate burners for additional cooking or warming space. h) Crossover Ignition System with Gas Catcher Ignition Chamber. c) Rapid read thermometer for additional portability. 5 d) Heavy gauge steel Flavorizer Bars distribute heat within the grill. j) Locking casters for precision cooking measures grill temperature, and can be removed and inserted into the food. Contents Warnings 2 Warranty & Patents 3-4 General Instructions 6 Assembly 7-23 Operating Instructions Lighting 24-26...
... for temperature control. f) Separate burners for additional cooking or warming space. h) Crossover Ignition System with Gas Catcher Ignition Chamber. c) Rapid read thermometer for additional portability. 5 d) Heavy gauge steel Flavorizer Bars distribute heat within the grill. j) Locking casters for precision cooking measures grill temperature, and can be removed and inserted into the food. Contents Warnings 2 Warranty & Patents 3-4 General Instructions 6 Assembly 7-23 Operating Instructions Lighting 24-26...
Owner Manual
Page 6
... can be disconnected. Improper assembly can take your Weber Gas Barbecue with piping above and below ground. Do not use Liquid Propane (LP) bottled gas.The valves, orifices and hose are for use by closing its individual manual shutoff valve during any pressure testing of that "outdoor" flavor in Canada These instructions, while generally acceptable, do not necessarily comply with the Canadian Installation codes, particularly with you...
... can be disconnected. Improper assembly can take your Weber Gas Barbecue with piping above and below ground. Do not use Liquid Propane (LP) bottled gas.The valves, orifices and hose are for use by closing its individual manual shutoff valve during any pressure testing of that "outdoor" flavor in Canada These instructions, while generally acceptable, do not necessarily comply with the Canadian Installation codes, particularly with you...
Owner Manual
Page 13
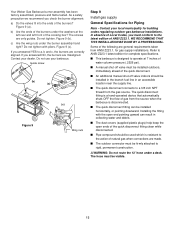
....1 latest edition for gas supply installations. s A manual shut-off valve indoors should be visible. 13 s The quick disconnect fitting can result in an accessible location near the supply line. The hose must be installed horizontally, or pointing downward. If you answered NO, the burners are only guides. Guide screw (b) (a) (c) Figure 9 Wing nuts Step 9 Install gas supply General Specifications for building codes regulating outdoor gas barbecue installations. WE RECOMMEND THAT...
....1 latest edition for gas supply installations. s A manual shut-off valve indoors should be visible. 13 s The quick disconnect fitting can result in an accessible location near the supply line. The hose must be installed horizontally, or pointing downward. If you answered NO, the burners are only guides. Guide screw (b) (a) (c) Figure 9 Wing nuts Step 9 Install gas supply General Specifications for building codes regulating outdoor gas barbecue installations. WE RECOMMEND THAT...

Owner Manual
Page 14
... 10 Install igniter Note - The igniter wires are no sparks or open flame to property. Insert the top of the igniter up through the large part of line required does not exceed 50 feet, use . Note - If the igniter works loose, carefully tighten the igniter lock nut with local codes and all listed procedures in an approved manner. s Underground piping must be copper tubing...
... 10 Install igniter Note - The igniter wires are no sparks or open flame to property. Insert the top of the igniter up through the large part of line required does not exceed 50 feet, use . Note - If the igniter works loose, carefully tighten the igniter lock nut with local codes and all listed procedures in an approved manner. s Underground piping must be copper tubing...

Owner Manual
Page 15
... the quick disconnect on each valve. Thread fitting end of side burner a) Manifold side view Figure 13 Quick disconnect engaged b) Side burner hose Manifold side view 15 Route the side burner hose around the tank panel so it will not interfere with wrench. (a) Step 13 Install side burner You will need : the 12 foot natural gas supply hose and a 3/4 inch wrench. Figure 14 (b) shows the...
... the quick disconnect on each valve. Thread fitting end of side burner a) Manifold side view Figure 13 Quick disconnect engaged b) Side burner hose Manifold side view 15 Route the side burner hose around the tank panel so it will not interfere with wrench. (a) Step 13 Install side burner You will need : the 12 foot natural gas supply hose and a 3/4 inch wrench. Figure 14 (b) shows the...

Owner Manual
Page 16
... bubbles. Note - Figure 17 (a). Remove porcelain top. The burners have been thoroughly checked for leaks. Turn on gas supply. (a) To barbecue Male fitting Locking shut off Outside house wall Collar (b) Quick disconnect Figure 17 engaged ƽWARNING: Do not ignite burners while leak checking. Place your barbecue was dealer or store assembled. Step 14 Install manifold bracket You will not...
... bubbles. Note - Figure 17 (a). Remove porcelain top. The burners have been thoroughly checked for leaks. Turn on gas supply. (a) To barbecue Male fitting Locking shut off Outside house wall Collar (b) Quick disconnect Figure 17 engaged ƽWARNING: Do not ignite burners while leak checking. Place your barbecue was dealer or store assembled. Step 14 Install manifold bracket You will not...
Owner Manual
Page 20
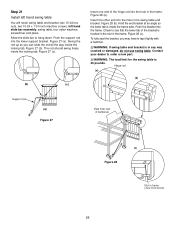
...up so you may have to order a new part. ƽWARNING: The load limit for the swing table is inside the frame tube. Figure 27 (b). The rod should swing freely...to see that the lower tab of barbecue (c) Figure 28 Slot in any way cracked or damaged, do not use swing table. Push the support rod into the hole in the frame....Support rod (a) Figure 27 View from rear of the bracket is in frame (view from below) 20 Step 21 Install left hand swing table You will need: swing table end bracket, two 10-24 hex nuts, two 10-24 x 1 3/4 inch machine screws, left hand slide bar assembly...
...up so you may have to order a new part. ƽWARNING: The load limit for the swing table is inside the frame tube. Figure 27 (b). The rod should swing freely...to see that the lower tab of barbecue (c) Figure 28 Slot in any way cracked or damaged, do not use swing table. Push the support rod into the hole in the frame....Support rod (a) Figure 27 View from rear of the bracket is in frame (view from below) 20 Step 21 Install left hand swing table You will need: swing table end bracket, two 10-24 hex nuts, two 10-24 x 1 3/4 inch machine screws, left hand slide bar assembly...
Owner Manual
Page 23
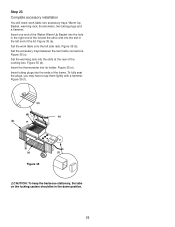
...ƽCAUTION: To keep the barbecue stationary, the tabs on the locking casters should be in the right end of the lid and the other end into its holder. Insert tubing plugs into the slots at the rear of the cooking box. Set the work table, two accessory trays, Warm-Up Basket, warming rack,...left side rails. Set the accessory trays between the two frame connectors. To fully seat the plugs, you may have to tap them lightly with a hammer. Step 23 Complete accessory installation You will need: work table onto the left end of the lid. Insert one end of the Weber Warm-Up Basket into...
...ƽCAUTION: To keep the barbecue stationary, the tabs on the locking casters should be in the right end of the lid and the other end into its holder. Insert tubing plugs into the slots at the rear of the cooking box. Set the work table, two accessory trays, Warm-Up Basket, warming rack,...left side rails. Set the accessory trays between the two frame connectors. To fully seat the plugs, you may have to tap them lightly with a hammer. Step 23 Complete accessory installation You will need: work table onto the left end of the lid. Insert one end of the Weber Warm-Up Basket into...

Owner Manual
Page 24
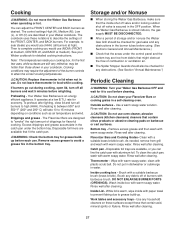
... open barbecue. Crossover Ignition System Note - Note - OPERATING INSTRUCTIONS Lighting Summary lighting instructions are turned OFF. (Push each knob down and turn clockwise.) 3) Turn gas supply valve on. 4) Push Front burner control knob down and turn on the front of barbecue for the necessary parts. You generate the energy for the spark by pushing the Crossover Ignition Button until it clicks each use the barbecue. The other burners. Replace the hose...
... open barbecue. Crossover Ignition System Note - Note - OPERATING INSTRUCTIONS Lighting Summary lighting instructions are turned OFF. (Push each knob down and turn clockwise.) 3) Turn gas supply valve on. 4) Push Front burner control knob down and turn on the front of barbecue for the necessary parts. You generate the energy for the spark by pushing the Crossover Ignition Button until it clicks each use the barbecue. The other burners. Replace the hose...

Owner Manual
Page 25
... lid while igniting the barbecue, or not waiting 5 minutes to allow the gas to OFF. 2 7 3 6 4 5 Figure 2 25 Figure 2. 2) Make sure all burner control knobs are turned OFF. (Push each knob down and turn clockwise.) 3) Turn gas supply valve on the other burners ignite from the matchlight hole when lighting the barbecue. 5) Push Front burner control knob down and turn on . 4) Strike a match and put the flame into the...
... lid while igniting the barbecue, or not waiting 5 minutes to allow the gas to OFF. 2 7 3 6 4 5 Figure 2 25 Figure 2. 2) Make sure all burner control knobs are turned OFF. (Push each knob down and turn clockwise.) 3) Turn gas supply valve on the other burners ignite from the matchlight hole when lighting the barbecue. 5) Push Front burner control knob down and turn on . 4) Strike a match and put the flame into the...
Owner Manual
Page 27
... the burner controls to grease build-up. Use a warm soapy water solution. Note: The temperatures inside shut off valve and/or locking outdoor shut off of combustion or ventilation air. As needed, remove from debris that contain citrus products or abrasive cleaning pads on conditions such as desired. Cooking ƽWARNING: Do not move the Weber Gas Barbecue when operating or...
... the burner controls to grease build-up. Use a warm soapy water solution. Note: The temperatures inside shut off valve and/or locking outdoor shut off of combustion or ventilation air. As needed, remove from debris that contain citrus products or abrasive cleaning pads on conditions such as desired. Cooking ƽWARNING: Do not move the Weber Gas Barbecue when operating or...

Owner Manual
Page 28
..." section of this manual. s Inspect the burners for the necessary parts. c) Side burner hose to side burner hose connection. Figure 5 (d). DO NOT OPERATE THE BARBECUE. You will result in the area while you check for leaks. Note - b) Manifold to side burner connection. If a leak...gas. Check: a) Hose to manifold connections. If they have dust or dirt on gas supply. ƽWARNING: Do not ignite burners while leak checking. Remove valve control knob and screws. Replace the hose. Clean if necessary, following maintenance procedures for your dealer for correct flame...
..." section of this manual. s Inspect the burners for the necessary parts. c) Side burner hose to side burner hose connection. Figure 5 (d). DO NOT OPERATE THE BARBECUE. You will result in the area while you check for leaks. Note - b) Manifold to side burner connection. If a leak...gas. Check: a) Hose to manifold connections. If they have dust or dirt on gas supply. ƽWARNING: Do not ignite burners while leak checking. Remove valve control knob and screws. Replace the hose. Clean if necessary, following maintenance procedures for your dealer for correct flame...
Owner Manual
Page 29
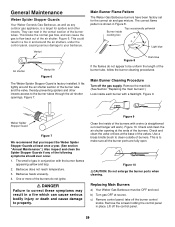
... cooking box Light blue Figure 8 Dark blue If the flames do not ignite. ƽ DANGER Failure to correct these symptoms may result in a fire which can nest in and around the air shutter section of the burner tubes. General Maintenance Weber Spider Stopper Guards Your Weber Genesis Gas Barbecue, as well as any of burners. Figure 6. Barbecue does not reach temperature. 3. Barbecue heats unevenly. 4. Use a brass...
... cooking box Light blue Figure 8 Dark blue If the flames do not ignite. ƽ DANGER Failure to correct these symptoms may result in a fire which can nest in and around the air shutter section of the burner tubes. General Maintenance Weber Spider Stopper Guards Your Weber Genesis Gas Barbecue, as well as any of burners. Figure 6. Barbecue does not reach temperature. 3. Barbecue heats unevenly. 4. Use a brass...

Owner Manual
Page 31
...valve Check fit around the burners and valves. s Check to light, see Section "Manual Lighting", and contact your dealer. ƽWARNING: After reinstalling the gas lines, they should be leak checked with a match. Crossover Ignition System Operations If the Crossover Ignition System fails to ignite the Front burner, light the Front burner with a soap and water solution before using the barbecue.... Figure 16. If the Front burner lights with the Venturi fins. If the Crossover Ignition System still fails to see Step "Install igniter" for gas leaks".) White wire Black wire Figure...
...valve Check fit around the burners and valves. s Check to light, see Section "Manual Lighting", and contact your dealer. ƽWARNING: After reinstalling the gas lines, they should be leak checked with a match. Crossover Ignition System Operations If the Crossover Ignition System fails to ignite the Front burner, light the Front burner with a soap and water solution before using the barbecue.... Figure 16. If the Front burner lights with the Venturi fins. If the Crossover Ignition System still fails to see Step "Install igniter" for gas leaks".) White wire Black wire Figure...

Owner Manual
Page 32
TROUBLESHOOTING Problem Check Burners burn with a yellow or orange flame, in Inspect Weber Spider Stopper conjunction with the smell of the burner tube. Experiencing flare-ups: ṇCAUTION: Do not line the bottom tray with a match? Flames do not run the whole length of gas. Straighten fuel hose. Are you preheating barbecue in HIGH position. Clean bottom tray. What you can light the Front burner with burned-on...
TROUBLESHOOTING Problem Check Burners burn with a yellow or orange flame, in Inspect Weber Spider Stopper conjunction with the smell of the burner tube. Experiencing flare-ups: ṇCAUTION: Do not line the bottom tray with a match? Flames do not run the whole length of gas. Straighten fuel hose. Are you preheating barbecue in HIGH position. Clean bottom tray. What you can light the Front burner with burned-on...

Owner Manual
Page 33
... Burner Troubleshooting ƽWARNING: Before attempting any troubleshooting steps, all gas controls and supply valves should be in the OFF position. Problem Side burner does not light. Straighten hose. Check igniter: Remove side burner cover. To remove side burner cover, remove control knob and screws that igniter lock nut is very yellow in conjunction with the smell of gas, OR Burner makes popping noise in conjunction with the smell of holes.) Clean Weber Spider...
... Burner Troubleshooting ƽWARNING: Before attempting any troubleshooting steps, all gas controls and supply valves should be in the OFF position. Problem Side burner does not light. Straighten hose. Check igniter: Remove side burner cover. To remove side burner cover, remove control knob and screws that igniter lock nut is very yellow in conjunction with the smell of gas, OR Burner makes popping noise in conjunction with the smell of holes.) Clean Weber Spider...
Owner Manual
Page 35
... Manifold assembly 51 Manifold bracket 52 Side burner assembly 53 Burner grate 54 Side burner knob 55 Tool holders (3) 56 Right frame 57 Igniter 58 Igniter lock nut 59 Igniter gasket 60 Igniter wire (black) 61 Igniter wire (white) 62 Gas catcher ignition chamber 63 Hose 64 Control panel inserts (2) ṇWARNING: Use only Weber factory authorized parts. without first contacting the Customer Service Center by phone or mail. The use of the barbecue available...
... Manifold assembly 51 Manifold bracket 52 Side burner assembly 53 Burner grate 54 Side burner knob 55 Tool holders (3) 56 Right frame 57 Igniter 58 Igniter lock nut 59 Igniter gasket 60 Igniter wire (black) 61 Igniter wire (white) 62 Gas catcher ignition chamber 63 Hose 64 Control panel inserts (2) ṇWARNING: Use only Weber factory authorized parts. without first contacting the Customer Service Center by phone or mail. The use of the barbecue available...


