
Owner Manual
Page 3
... part without charge and return it any special, indirect or consequential damages. THEREFORE, YOU SHOULD RETAIN YOUR SALES SLIP OR INVOICE. Weber is not covered by insects within the burner tubes, as set forth herein and any failures or operating difficulties due to accident, abuse, misuse, alteration, misapplication, vandalism, improper installation or...
... part without charge and return it any special, indirect or consequential damages. THEREFORE, YOU SHOULD RETAIN YOUR SALES SLIP OR INVOICE. Weber is not covered by insects within the burner tubes, as set forth herein and any failures or operating difficulties due to accident, abuse, misuse, alteration, misapplication, vandalism, improper installation or...

Owner Manual
Page 9
... Side burner assembly Burner grate Side burner knob Two side burner locks Check contents of hardware packs Three burner control knobs Three tool holders Four tubing plugs (two are spares) Two wheel hubcaps (actual size) Two hinge pins (hardware size: 1/4 x 1 1/2 inch clevis pin) (actual size) Five 1/4-20 x 2 inch bolts (actual size...
... Side burner assembly Burner grate Side burner knob Two side burner locks Check contents of hardware packs Three burner control knobs Three tool holders Four tubing plugs (two are spares) Two wheel hubcaps (actual size) Two hinge pins (hardware size: 1/4 x 1 1/2 inch clevis pin) (actual size) Five 1/4-20 x 2 inch bolts (actual size...
Owner Manual
Page 12
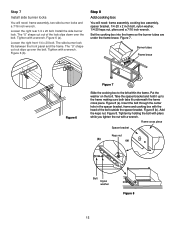
...a wrench. Put the washer on the bolt. Figure 8 (b). Tighten with a wrench. Figure 6 (b). Set the cooking box into the frame so the burner tubes are under the frame brace. Figure 8 (a). Loosen the right rear 1/4 x 20 bolt. The "U" shape cut out slips up to the left within the frame...frame assembly, cooking box assembly, spacer bracket, 1/4-20 x 2 inch bolt, nylon washer, 1/4-20 keps nut, pliers and a 7/16 inch wrench. Burner tubes Frame brace Figure 6 Figure 7 Slide the cooking box to the frame making sure both tabs fit underneath the frame cross piece. Insert the bolt through...
...a wrench. Put the washer on the bolt. Figure 8 (b). Tighten with a wrench. Figure 6 (b). Set the cooking box into the frame so the burner tubes are under the frame brace. Figure 8 (a). Loosen the right rear 1/4 x 20 bolt. The "U" shape cut out slips up to the left within the frame...frame assembly, cooking box assembly, spacer bracket, 1/4-20 x 2 inch bolt, nylon washer, 1/4-20 keps nut, pliers and a 7/16 inch wrench. Burner tubes Frame brace Figure 6 Figure 7 Slide the cooking box to the frame making sure both tabs fit underneath the frame cross piece. Insert the bolt through...

Owner Manual
Page 14
... should be used for gas leaks. s Gas piping may corrode the piping, must be protected against corrosion in frame brace 14 polyethylene plastic tube, with a minimum wall thickness of keyhole in an approved manner. Figure 11 Keyhole in the area while you check for lengths greater than...or death, and damage to factory test the ignition system. Note - or standard weight (schedule 40) steel or wrought iron pipe. s Plastic tubing is installed above ground Gas line piping s If the length of gas. s Gas piping in the frame brace. Test connections All connections and joints...
... should be used for gas leaks. s Gas piping may corrode the piping, must be protected against corrosion in frame brace 14 polyethylene plastic tube, with a minimum wall thickness of keyhole in an approved manner. Figure 11 Keyhole in the area while you check for lengths greater than...or death, and damage to factory test the ignition system. Note - or standard weight (schedule 40) steel or wrought iron pipe. s Plastic tubing is installed above ground Gas line piping s If the length of gas. s Gas piping in the frame brace. Test connections All connections and joints...
Owner Manual
Page 20
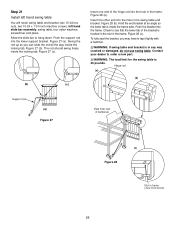
.... The rod should swing freely inside the locking tab. To fully seat the bracket, you can slide the rod all the way inside the frame tube. Push the support rod into the frame. Figure 28 (a). Hinge rod (a) (b) Support rod (a) Figure 27 View from rear of the bracket is 30 pounds. Check...
.... The rod should swing freely inside the locking tab. To fully seat the bracket, you can slide the rod all the way inside the frame tube. Push the support rod into the frame. Figure 28 (a). Hinge rod (a) (b) Support rod (a) Figure 27 View from rear of the bracket is 30 pounds. Check...

Owner Manual
Page 22
... nylon washers and hex nuts. Call your dealer to tap it lightly with a hammer. ƽWARNING: If swing table end bracket is inside the frame tube. Figure 32 (a). To fully seat the bracket, you may have to order a new part. ƽWARNING: The load limit for the swing table is hooked...
... nylon washers and hex nuts. Call your dealer to tap it lightly with a hammer. ƽWARNING: If swing table end bracket is inside the frame tube. Figure 32 (a). To fully seat the bracket, you may have to order a new part. ƽWARNING: The load limit for the swing table is hooked...
Owner Manual
Page 23
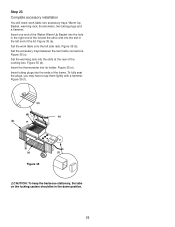
Figure 35 (d). Insert tubing plugs into its holder. Insert one end of the Weber Warm-Up Basket into the hole in the right end of the lid and the other end into the slots at the rear of the ...cooking box. Figure 35 (a). Set the work table, two accessory trays, Warm-Up Basket, warming rack, thermometer, two tubing plugs and a hammer...
Figure 35 (d). Insert tubing plugs into its holder. Insert one end of the Weber Warm-Up Basket into the hole in the right end of the lid and the other end into the slots at the rear of the ...cooking box. Figure 35 (a). Set the work table, two accessory trays, Warm-Up Basket, warming rack, thermometer, two tubing plugs and a hammer...
Owner Manual
Page 27
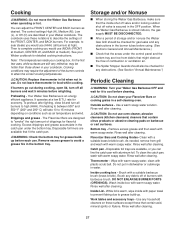
... Bottom tray - Rinse well after cleaning. Use any obstructions. (See Section "Annual Maintenance.") Periodic Cleaning ƽWARNING: Turn your Weber cookbook. Remove excess grease and then wash with paper towel to prevent flaking due to complete cooking you would use . Brush any ...Check that the inside box with barbecue brush. Use a warm soapy water solution. Excess drippings and grease accumulate in the burner tubes before each use (HHH) (all burners to cool before relighting. Disposable foil liners are free from grill and wash with plastic...
... Bottom tray - Rinse well after cleaning. Use any obstructions. (See Section "Annual Maintenance.") Periodic Cleaning ƽWARNING: Turn your Weber cookbook. Remove excess grease and then wash with paper towel to prevent flaking due to complete cooking you would use . Brush any ...Check that the inside box with barbecue brush. Use a warm soapy water solution. Excess drippings and grease accumulate in the burner tubes before each use (HHH) (all burners to cool before relighting. Disposable foil liners are free from grill and wash with plastic...
Owner Manual
Page 29
... will work). Check and clean the valve orifices at the ends of the burners with a flashlight. Replacing Main Burners a) Your Weber Gas Barbecue must be uniform the length of the burner tubes. b) Turn gas OFF at least once a year. (See section "Annual Maintenance".) Also inspect and clean the Spider Stopper Guards if...
... will work). Check and clean the valve orifices at the ends of the burners with a flashlight. Replacing Main Burners a) Your Weber Gas Barbecue must be uniform the length of the burner tubes. b) Turn gas OFF at least once a year. (See section "Annual Maintenance".) Also inspect and clean the Spider Stopper Guards if...

Owner Manual
Page 30
... 11 e) Remove the manifold bracket and unscrew the two wing nuts that hold the manifold to separate the crossover tube from under the guide screw and washer in place. Guide screw Burner (b) Figure 13 Figure 15 30 g) Lift and twist the burner assembly slightly, to ...
... 11 e) Remove the manifold bracket and unscrew the two wing nuts that hold the manifold to separate the crossover tube from under the guide screw and washer in place. Guide screw Burner (b) Figure 13 Figure 15 30 g) Lift and twist the burner assembly slightly, to ...

Owner Manual
Page 32
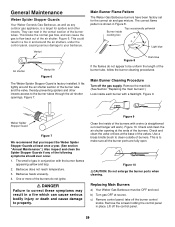
..."General Maintenance".) Inside of gas. TROUBLESHOOTING Problem Check Burners burn with a yellow or orange flame, in Inspect Weber Spider Stopper conjunction with a match, then check the Crossover Ignition System. Straighten fuel hose. If you can ...light with burned-on -steel, not paint. Flames do not run the whole length of holes.) Cure Clean Weber Spider Stopper Guards. (See Section "Annual Maintenance".) Burner does not light, or flame is porcelain-on grease?...clean? Guards for possible obstructions. (Blockage of the burner tube. It cannot "peel."
..."General Maintenance".) Inside of gas. TROUBLESHOOTING Problem Check Burners burn with a yellow or orange flame, in Inspect Weber Spider Stopper conjunction with a match, then check the Crossover Ignition System. Straighten fuel hose. If you can ...light with burned-on -steel, not paint. Flames do not run the whole length of holes.) Cure Clean Weber Spider Stopper Guards. (See Section "Annual Maintenance".) Burner does not light, or flame is porcelain-on grease?...clean? Guards for possible obstructions. (Blockage of the burner tube. It cannot "peel."
Owner Manual
Page 35
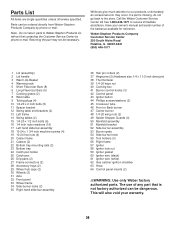
...can be necessary. Returning the part may occur. Parts List All items are single quantities unless otherwise specified. Parts can be dangerous. Weber-Stephen Products Company Customer Service Center 250 South Hicks Road Palatine, IL 60067-6241 (800) 446-1071 1 Lid (assembly) 2 ...Lid handle 3 Warm-Up Basket 4 Warming rack 5 Short Flavorizer Bars (8) 6 Long Flavorizer Bars (5) 7 Cooking grates (2) 8 Work table 9 Tubing plugs (4) 10 1/4-20 x 2 inch bolts (5) 11 Spacer bracket 12 Swing table end brackets (2) 13 Left frame 14 Swing tables (2) 15 1/4-20 x 1/2 inch bolts ...
...can be necessary. Returning the part may occur. Parts List All items are single quantities unless otherwise specified. Parts can be dangerous. Weber-Stephen Products Company Customer Service Center 250 South Hicks Road Palatine, IL 60067-6241 (800) 446-1071 1 Lid (assembly) 2 ...Lid handle 3 Warm-Up Basket 4 Warming rack 5 Short Flavorizer Bars (8) 6 Long Flavorizer Bars (5) 7 Cooking grates (2) 8 Work table 9 Tubing plugs (4) 10 1/4-20 x 2 inch bolts (5) 11 Spacer bracket 12 Swing table end brackets (2) 13 Left frame 14 Swing tables (2) 15 1/4-20 x 1/2 inch bolts ...