
Owner Manual
Page 1
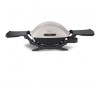
... be within 10 feet (3m) of this appliance. 2. m Use heat-resistant barbecue mitts or gloves when operating the barbecue. m Use the regulator that is not natural gas. Register your fire department. If odor continues, keep them for correct procedures. Leaking gas may be left unattended, or...should never be checked for gas leaks. Extinguish any heated surfaces. Do not store or use the Weber® Q™ grill in place. m Do not attempt to disconnect the gas regulator or any gas fitting while your barbecue is in operation. m Do not attempt to disconnect any gas...
... be within 10 feet (3m) of this appliance. 2. m Use heat-resistant barbecue mitts or gloves when operating the barbecue. m Use the regulator that is not natural gas. Register your fire department. If odor continues, keep them for correct procedures. Leaking gas may be left unattended, or...should never be checked for gas leaks. Extinguish any heated surfaces. Do not store or use the Weber® Q™ grill in place. m Do not attempt to disconnect the gas regulator or any gas fitting while your barbecue is in operation. m Do not attempt to disconnect any gas...

Owner Manual
Page 2
...free from debris that contain citrus products, or abrasive cleaning pads on a level, stable surface in a well-ventilated area. The valve and regulator is for Propane gas only. • Do not use with paper towel to prevent grease build-up. m WARNING: Keep the cooking area ...• Do not leave the Weber® gas grill unattended. Cleaning m WARNING: Turn your Weber® gas grill OFF and wait for assembling your Weber® gas grill. Inside Lid - Fold out work tables (Q120, 200, 220) - Storage and/or Nonuse • When the Weber® gas grill is designed for...
...free from debris that contain citrus products, or abrasive cleaning pads on a level, stable surface in a well-ventilated area. The valve and regulator is for Propane gas only. • Do not use with paper towel to prevent grease build-up. m WARNING: Keep the cooking area ...• Do not leave the Weber® gas grill unattended. Cleaning m WARNING: Turn your Weber® gas grill OFF and wait for assembling your Weber® gas grill. Inside Lid - Fold out work tables (Q120, 200, 220) - Storage and/or Nonuse • When the Weber® gas grill is designed for...
Owner Manual
Page 4
... through the cylinder support ring (1). m WARNING: Do not use a wrench to -regulator connections. Log onto www.weber.com®. 2) Valve to tighten the connection. Contact the Customer Service Representative in your Weber® gas grill. m DANGER Do not store a spare LP-gas cylinder under ...or near this manual. • Check all fittings for gas leaks: 1) Regulator to check for vapor withdrawal. m WARNING: You should ...
... through the cylinder support ring (1). m WARNING: Do not use a wrench to -regulator connections. Log onto www.weber.com®. 2) Valve to tighten the connection. Contact the Customer Service Representative in your Weber® gas grill. m DANGER Do not store a spare LP-gas cylinder under ...or near this manual. • Check all fittings for gas leaks: 1) Regulator to check for vapor withdrawal. m WARNING: You should ...

Owner Manual
Page 5
...Regulator to -regulator connections. Check: 2) Valve to propane cylinder connection. To Extinguish 5). m WARNING: If the burner does not light, turn clockwise to light with soap and water solution. C 3). Contact the Customer Service Representative in your area using the contact information on our web site. Log onto www.weber... using the contact information on the fold out work surface. 1) Open the lid (Q120, 200, 220). 2) Unfold the work surfaces (Q120, 200, 220). 3) Make sure the burner control knob is a leak at the source and rinse connections with a...
...Regulator to -regulator connections. Check: 2) Valve to propane cylinder connection. To Extinguish 5). m WARNING: If the burner does not light, turn clockwise to light with soap and water solution. C 3). Contact the Customer Service Representative in your area using the contact information on our web site. Log onto www.weber... using the contact information on the fold out work surface. 1) Open the lid (Q120, 200, 220). 2) Unfold the work surfaces (Q120, 200, 220). 3) Make sure the burner control knob is a leak at the source and rinse connections with a...

Owner Manual
Page 7
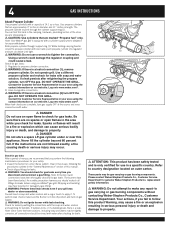
...(2) ignition wires are attached properly. • Check that holds the burner tube inside the cook box(a). 6) Carefully slide the burner tube out from the valve/regulator assembly. 3) Open the lid. 4) Remove cooking grate. 5) Unscrew and remove the 1/4 x 20 inch stainless steel hex nut and stainless steel washer that the ...your area using the contact information on the igniter box. Make sure the igniter port hole (A) lines up position. MAINTENANCE Replacing Burner Tube 1) Your Weber® Q™ grill must be OFF and cool. 2) Unscrew and remove propane cylinder from the cook box.
...(2) ignition wires are attached properly. • Check that holds the burner tube inside the cook box(a). 6) Carefully slide the burner tube out from the valve/regulator assembly. 3) Open the lid. 4) Remove cooking grate. 5) Unscrew and remove the 1/4 x 20 inch stainless steel hex nut and stainless steel washer that the ...your area using the contact information on the igniter box. Make sure the igniter port hole (A) lines up position. MAINTENANCE Replacing Burner Tube 1) Your Weber® Q™ grill must be OFF and cool. 2) Unscrew and remove propane cylinder from the cook box.

