
Owner Manual
Page 2
... box. ƽ Should a grease fire occur, turn all gas valves off all parts are in place. The conversion or attempted use a liquid propane cylinder with your Weber® gas barbecue. ƽ Do not put a barbecue cover or anything flammable on a regular basis. ƽ Liquid propane gas is in operation. ƽ Use heat-resistant barbecue mitts or gloves when operating barbecue. ƽ Keep any electrical supply cord and the fuel supply hose...
... box. ƽ Should a grease fire occur, turn all gas valves off all parts are in place. The conversion or attempted use a liquid propane cylinder with your Weber® gas barbecue. ƽ Do not put a barbecue cover or anything flammable on a regular basis. ƽ Liquid propane gas is in operation. ƽ Use heat-resistant barbecue mitts or gloves when operating barbecue. ƽ Keep any electrical supply cord and the fuel supply hose...

Owner Manual
Page 3
... Silhouette ,® Smokey Joe, Weber, One-Touch, Firespice, Go-Anywhere, U.S.A.;Kettle Configuration, Kettle Silhouette, Genesis, Flavorizer, Crossover, Flamgo, Performer, Rapidfire, Tuck 'N Carry, Jumbo Joe, Bar-B-Kettle, Master-Touch, Spirit, Grill Out, Summit, Platinum, 1-800-Grill-Out, Ranch, Matchless Flame, Zimbabwe; Weber is not covered by insects within the burner tubes, as set out in this owner's manual. Australia; Kettle Silhouette ,®...
... Silhouette ,® Smokey Joe, Weber, One-Touch, Firespice, Go-Anywhere, U.S.A.;Kettle Configuration, Kettle Silhouette, Genesis, Flavorizer, Crossover, Flamgo, Performer, Rapidfire, Tuck 'N Carry, Jumbo Joe, Bar-B-Kettle, Master-Touch, Spirit, Grill Out, Summit, Platinum, 1-800-Grill-Out, Ranch, Matchless Flame, Zimbabwe; Weber is not covered by insects within the burner tubes, as set out in this owner's manual. Australia; Kettle Silhouette ,®...
Owner Manual
Page 4
... instructions carefully before using your Weber® gas barbecue with natural (piped in city) gas. This regulator is set for 10.5 inches of combustion or ventilation air. • The areas around the LP cylinder must be free and clear from debris that the area under the control panel and the bottom tray are no local codes, you move. Portability means you can take your Weber® gas barbecue. Do not use...
... instructions carefully before using your Weber® gas barbecue with natural (piped in city) gas. This regulator is set for 10.5 inches of combustion or ventilation air. • The areas around the LP cylinder must be free and clear from debris that the area under the control panel and the bottom tray are no local codes, you move. Portability means you can take your Weber® gas barbecue. Do not use...
Owner Manual
Page 5
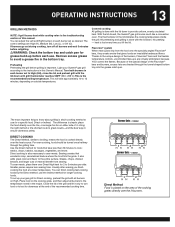
... (H), Medium (M), Low (L), or Off (O). It operates at an economical low BTU rate. Catch pan - Remove excess grease, then wash with aluminum foil. Thermoset surfaces - GENERAL INSTRUCTIONS 5 GRILLING METHODS NOTE: If grill looses heat while cooking refer to the troubleshooting section of this will accumulate in the catch pan under the slide out bottom tray. The control settings are available, or you can adjust...
... (H), Medium (M), Low (L), or Off (O). It operates at an economical low BTU rate. Catch pan - Remove excess grease, then wash with aluminum foil. Thermoset surfaces - GENERAL INSTRUCTIONS 5 GRILLING METHODS NOTE: If grill looses heat while cooking refer to the troubleshooting section of this will accumulate in the catch pan under the slide out bottom tray. The control settings are available, or you can adjust...
Owner Manual
Page 7
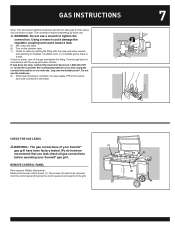
... of your Summit® gas grill. Turn the gas back on the cylinder valve. 7) Check for leaks by hand only. ƽ WARNING: Do not use the barbecue. 8) When leak checking is removed from the grill. (1) (2) (3) Do not use a wrench to be removed from the control panel (3) before operating your Summit® gas grill have been factory tested. The screws (2) need to tighten the connection. REMOVE CONTROL PANEL Part required: Phillips...
... of your Summit® gas grill. Turn the gas back on the cylinder valve. 7) Check for leaks by hand only. ƽ WARNING: Do not use the barbecue. 8) When leak checking is removed from the grill. (1) (2) (3) Do not use a wrench to be removed from the control panel (3) before operating your Summit® gas grill have been factory tested. The screws (2) need to tighten the connection. REMOVE CONTROL PANEL Part required: Phillips...

Owner Manual
Page 10
... manual. Light your Summit® gas grill according to the unique design of each igniter. Preheating Preheating the grill before each burner set to provide uniform, evenly circulated heat. heat is important. Place the control panel back onto the control panel brackets on either side of the front of the Flavorizer® bars and burners, excess fats are directed through the funnel-shaped bottom tray...
... manual. Light your Summit® gas grill according to the unique design of each igniter. Preheating Preheating the grill before each burner set to provide uniform, evenly circulated heat. heat is important. Place the control panel back onto the control panel brackets on either side of the front of the Flavorizer® bars and burners, excess fats are directed through the funnel-shaped bottom tray...

Owner Manual
Page 12
...: Your retailer can do this barbecue. Gas Cylinders of Dangerous Goods; Department of Transportation (D.O.T.) or the National Standard of Canada, CAN/CSAB339, Cylinders, Spheres and Tubes or Transportation of the U.S. Liquid Propane (LP) Cylinder(s) • The joint where the hose connects to be replaced with a new one immediately. 12 GAS INSTRUCTIONS • Treat "empty" LP cylinders with the same care as applicable. certification...
...: Your retailer can do this barbecue. Gas Cylinders of Dangerous Goods; Department of Transportation (D.O.T.) or the National Standard of Canada, CAN/CSAB339, Cylinders, Spheres and Tubes or Transportation of the U.S. Liquid Propane (LP) Cylinder(s) • The joint where the hose connects to be replaced with a new one immediately. 12 GAS INSTRUCTIONS • Treat "empty" LP cylinders with the same care as applicable. certification...
Owner Manual
Page 13
... lid of this Owner's Manual. Light your gas grill for a specific food, Direct or Indirect. This will take less than 25 minutes to the instructions in the bottom tray. Flavorizer® system When meat juices drip from searing. The most important thing to provide uniform, evenly circulated heat. To set up before each burner set to sear meats. Remove excess grease to the temperature...
... lid of this Owner's Manual. Light your gas grill for a specific food, Direct or Indirect. This will take less than 25 minutes to the instructions in the bottom tray. Flavorizer® system When meat juices drip from searing. The most important thing to provide uniform, evenly circulated heat. To set up before each burner set to sear meats. Remove excess grease to the temperature...
Owner Manual
Page 14
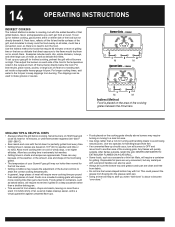
... cooking times, add water to the foil pan to keep drippings from flowing into the grease catch pan. • Using a timer will help to alert you can be sure the bottom tray and grease catch pan are -up your gas grill for Indirect cooking, gas burners are lit on the cooking grate directly above burners may require turning or moving to a less...
... cooking times, add water to the foil pan to keep drippings from flowing into the grease catch pan. • Using a timer will help to alert you can be sure the bottom tray and grease catch pan are -up your gas grill for Indirect cooking, gas burners are lit on the cooking grate directly above burners may require turning or moving to a less...

Owner Manual
Page 15
... replacement hose. Then start over. Replace using the contact information on the liquid propane cylinder tank valve. If they are not in the OFF position, when you turn on the control panel. ƽ DANGER Failure to open the lid while igniting the barbecue's burners, or not waiting 5 minutes to allow the gas to be in the OFF position before each use the barbecue. MAIN BURNER LIGHTING 1 4,5,8 7 2 3 6 2 *The grill...
... replacement hose. Then start over. Replace using the contact information on the liquid propane cylinder tank valve. If they are not in the OFF position, when you turn on the control panel. ƽ DANGER Failure to open the lid while igniting the barbecue's burners, or not waiting 5 minutes to allow the gas to be in the OFF position before each use the barbecue. MAIN BURNER LIGHTING 1 4,5,8 7 2 3 6 2 *The grill...

Owner Manual
Page 16
... liquid propane cylinder valve. Failure to do so may have slight differences than the model purchased. The RIGHT burner lights from the LP cylinder. MANUAL LIGHTING ƽ DANGER Failure to open barbecue. 4) Select the burner set . 6) Push igniter button and hold until burner ignites. After turning OFF the cylinder knobs, wait at the source. You will activate, limiting the flow of gas is lit by turning the cylinder valve counterclockwise...
... liquid propane cylinder valve. Failure to do so may have slight differences than the model purchased. The RIGHT burner lights from the LP cylinder. MANUAL LIGHTING ƽ DANGER Failure to open barbecue. 4) Select the burner set . 6) Push igniter button and hold until burner ignites. After turning OFF the cylinder knobs, wait at the source. You will activate, limiting the flow of gas is lit by turning the cylinder valve counterclockwise...
Owner Manual
Page 18
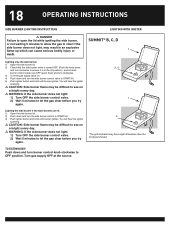
... burner control knob clockwise to OFF position. 18 OPERATING INSTRUCTIONS SIDE BURNER LIGHTING INSTRUCTIONS LIGHTING WITH IGNITER ƽ DANGER Failure to open the lid while igniting the side burner, SUMMIT® B, C, D or not waiting 5 minutes to allow the gas to clear if the side burner does not light, may have slight differences than the model purchased. Lighting only the side burner. 1) Open the side burner lid. 2) Check that the side burner valve...
... burner control knob clockwise to OFF position. 18 OPERATING INSTRUCTIONS SIDE BURNER LIGHTING INSTRUCTIONS LIGHTING WITH IGNITER ƽ DANGER Failure to open the lid while igniting the side burner, SUMMIT® B, C, D or not waiting 5 minutes to allow the gas to clear if the side burner does not light, may have slight differences than the model purchased. Lighting only the side burner. 1) Open the side burner lid. 2) Check that the side burner valve...

Owner Manual
Page 22
... through the cooking grate. ƽDANGER: If the smoker burner does not light, turn the burner control knob to OFF and wait 5 minutes to let the gas clear before each burner control knob clockwise to START/HI. 7) Push and hold down the Igniter button until burner ignites. 22 OPERATING INSTRUCTIONS 5) Turn the cylinder on our web site. Contact the Customer Service Representative in your area using only Weber® authorized replacement hose.
... through the cooking grate. ƽDANGER: If the smoker burner does not light, turn the burner control knob to OFF and wait 5 minutes to let the gas clear before each burner control knob clockwise to START/HI. 7) Push and hold down the Igniter button until burner ignites. 22 OPERATING INSTRUCTIONS 5) Turn the cylinder on our web site. Contact the Customer Service Representative in your area using only Weber® authorized replacement hose.

Owner Manual
Page 23
... OFF the LP cylinder valve and burner control knobs. TO EXTINGUISH Push down through cooking grates and Flavorizer® bars to ignite smoker burner. ƽWARNING: Do not lean over . ƽDANGER: When the "excess gas flow control" feature is activated, a small amount of gas from the LP cylinder. Turn gas supply OFF at least 5 minutes for the gas to clear before attempting to light the grill. If...
... OFF the LP cylinder valve and burner control knobs. TO EXTINGUISH Push down through cooking grates and Flavorizer® bars to ignite smoker burner. ƽWARNING: Do not lean over . ƽDANGER: When the "excess gas flow control" feature is activated, a small amount of gas from the LP cylinder. Turn gas supply OFF at least 5 minutes for the gas to clear before attempting to light the grill. If...
Owner Manual
Page 28
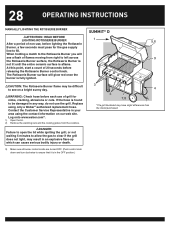
28 OPERATING INSTRUCTIONS MANUALLY LIGHTING THE ROTISSERIE BURNER ƽATTENTION: READ BEFORE LIGHTING ROTISSERIE BURNER After a period of flames moving from the cookbox. ƽDANGER: Failure to open the lid while igniting the grill, or not waiting 5 minutes to allow the gas to clear if the grill does not light, may be damaged in your area using only a Weber® authorized replacement hose. If the hose is found to...
28 OPERATING INSTRUCTIONS MANUALLY LIGHTING THE ROTISSERIE BURNER ƽATTENTION: READ BEFORE LIGHTING ROTISSERIE BURNER After a period of flames moving from the cookbox. ƽDANGER: Failure to open the lid while igniting the grill, or not waiting 5 minutes to allow the gas to clear if the grill does not light, may be damaged in your area using only a Weber® authorized replacement hose. If the hose is found to...

Owner Manual
Page 29
... by turning the cylinder valve counterclockwise. 5) Put a match in the match holder and strike the match. 6) Hold match holder and lit match by looking for the gas to clear before turning on the outside. OPERATING INSTRUCTIONS 29 ƽWARNING: The burner control knobs must be in the OFF position before attempting to light the grill. Continue to hold the control knob down . If this should occur, turn on indirect heat.
... by turning the cylinder valve counterclockwise. 5) Put a match in the match holder and strike the match. 6) Hold match holder and lit match by looking for the gas to clear before turning on the outside. OPERATING INSTRUCTIONS 29 ƽWARNING: The burner control knobs must be in the OFF position before attempting to light the grill. Continue to hold the control knob down . If this should occur, turn on indirect heat.
Owner Manual
Page 30
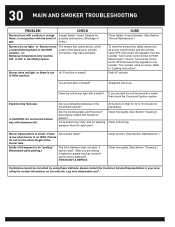
... paint peeling.) The lid is part of the burner tube. Turn burner control knobs to "Lighting Instructions". Burner flame pattern is on our web site. Disconnect the regulator from the cylinder. Wait at least 1 minute. Refer to HIGH. Refill LP cylinder. Inside of gas. Reconnect the regulator to flow into catch pan? Are you preheating barbecue in your area using these methods, please contact...
... paint peeling.) The lid is part of the burner tube. Turn burner control knobs to "Lighting Instructions". Burner flame pattern is on our web site. Disconnect the regulator from the cylinder. Wait at least 1 minute. Refer to HIGH. Refill LP cylinder. Inside of gas. Reconnect the regulator to flow into catch pan? Are you preheating barbecue in your area using these methods, please contact...
Owner Manual
Page 31
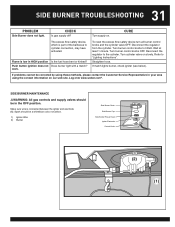
... burner control knobs and the cylinder valve OFF. Straighten hose. Refer to cylinder connection, may have activated. If problems cannot be a white/blue color, not yellow. 1) Igniter Wire 2) Burner Side Burner Grate Side Burner Cap Side Burner Ring & Head Igniter Electrode Control Knob (2) (1) CURE The excess flow safety device, which is part of the barbecue to "Lighting Instructions". Log onto www.weber.com®. SIDE BURNER MAINTENANCE ƽWARNING: All gas controls and supply valves...
... burner control knobs and the cylinder valve OFF. Straighten hose. Refer to cylinder connection, may have activated. If problems cannot be a white/blue color, not yellow. 1) Igniter Wire 2) Burner Side Burner Grate Side Burner Cap Side Burner Ring & Head Igniter Electrode Control Knob (2) (1) CURE The excess flow safety device, which is part of the barbecue to "Lighting Instructions". Log onto www.weber.com®. SIDE BURNER MAINTENANCE ƽWARNING: All gas controls and supply valves...

Owner Manual
Page 32
Reconnect the regulator to "Lighting Instructions". Disconnect the regulator from the cylinder. Turn burner control knobs OFF. Log onto www.weber.com®. When relighting burner by holding down until after burner has ignited. Replace battery in your area using these methods, please contact the Customer Service Representative in igniter button module. Turn cylinder valve on our web site. Refer to the cylinder. 32 ROTISSERIE TROUBLESHOOTING PROBLEM Burner does not light. Reseat burner ring. Burner hsa asmall fl...
Reconnect the regulator to "Lighting Instructions". Disconnect the regulator from the cylinder. Turn burner control knobs OFF. Log onto www.weber.com®. When relighting burner by holding down until after burner has ignited. Replace battery in your area using these methods, please contact the Customer Service Representative in igniter button module. Turn cylinder valve on our web site. Refer to the cylinder. 32 ROTISSERIE TROUBLESHOOTING PROBLEM Burner does not light. Reseat burner ring. Burner hsa asmall fl...
Owner Manual
Page 34
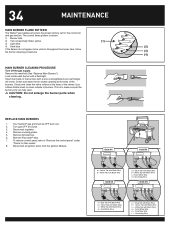
... at the ends of the valves. 34 MAINTENANCE MAIN BURNER FLAME PATTERN The Weber® gas barbecue burners have been factory set for Gas Leaks." 8. This is shown. 1) Burner tube 2) Tips occasionally flicker yellow (1) 3) Light blue 4) Dark blue (2) If the flames do not appear to make sure all ignition wires from the Ignition Module. To remove control panel refer to clean outside of the...
... at the ends of the valves. 34 MAINTENANCE MAIN BURNER FLAME PATTERN The Weber® gas barbecue burners have been factory set for Gas Leaks." 8. This is shown. 1) Burner tube 2) Tips occasionally flicker yellow (1) 3) Light blue 4) Dark blue (2) If the flames do not appear to make sure all ignition wires from the Ignition Module. To remove control panel refer to clean outside of the...


