
Owner Manual
Page 1
... DESIGNED FOR OUTDOOR USE ONLY. ƽ WARNING: Do not try to barbecue operation. An LP cylinder not connected for future use. SUMMIT® GAS GRILL Natural Gas Grill Owner's Guide #38044 YOU MUST READ THIS OWNERS GUIDE BEFORE OPERATING YOUR GAS GRILL ƽ DANGER If you smell gas: 1. Extinguish any other appliance. ƽ WARNING: Follow all leak-check procedures carefully in the vicinity of this even if the barbecue was dealer-assembled. Open...
... DESIGNED FOR OUTDOOR USE ONLY. ƽ WARNING: Do not try to barbecue operation. An LP cylinder not connected for future use. SUMMIT® GAS GRILL Natural Gas Grill Owner's Guide #38044 YOU MUST READ THIS OWNERS GUIDE BEFORE OPERATING YOUR GAS GRILL ƽ DANGER If you smell gas: 1. Extinguish any other appliance. ƽ WARNING: Follow all leak-check procedures carefully in the vicinity of this even if the barbecue was dealer-assembled. Open...

Owner Manual
Page 2
... be within 24 inches of the back or sides of your Weber® gas barbecue. ƽ Do not put a barbecue cover or anything flammable on a regular basis. ƽ Liquid propane gas is in operation. ƽ A dented or rusty liquid propane cylinder may be hazardous and should exercise reasonable care when operating your barbecue is in use this barbecue unless all gas valves off all burners and leave lid...
... be within 24 inches of the back or sides of your Weber® gas barbecue. ƽ Do not put a barbecue cover or anything flammable on a regular basis. ƽ Liquid propane gas is in operation. ƽ A dented or rusty liquid propane cylinder may be hazardous and should exercise reasonable care when operating your barbecue is in use this barbecue unless all gas valves off all burners and leave lid...
Owner Manual
Page 3
... following trademarks are registered in this owner's manual. If you are defective. Weber, Canada; Smokey Joe, Weber, Korea; Smokey Joe, Weber, Sweden; where, U.S.A.;Kettle Configuration, Kettle Silhouette, Genesis, Flavorizer, Crossover, Flamgo, Performer, Rapidfire, Tuck 'N Carry, Jumbo Joe, Bar-B-Kettle, Master-Touch, Spirit, Grill Out, Summit, Platinum, 1-800-Grill-Out, Ranch, Matchless Flame, Zimbabwe; Weber, Kettle Configuration, Kettle...
... following trademarks are registered in this owner's manual. If you are defective. Weber, Canada; Smokey Joe, Weber, Korea; Smokey Joe, Weber, Sweden; where, U.S.A.;Kettle Configuration, Kettle Silhouette, Genesis, Flavorizer, Crossover, Flamgo, Performer, Rapidfire, Tuck 'N Carry, Jumbo Joe, Bar-B-Kettle, Master-Touch, Spirit, Grill Out, Summit, Platinum, 1-800-Grill-Out, Ranch, Matchless Flame, Zimbabwe; Weber, Kettle Configuration, Kettle...

Owner Manual
Page 4
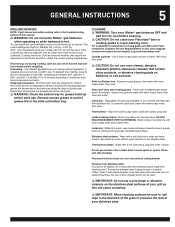
... supply hose away from debris that might obstruct the flow of this barbecue outdoors in city) gas only. Improper assembly can grill, barbecue, roast and bake with results that "outdoor" flavor in the burner tubes before using . (See Sections: "General Maintenance and Annual Maintenance.") • Check that the areas under the control panel and the bottom tray are free from any heated surface...
... supply hose away from debris that might obstruct the flow of this barbecue outdoors in city) gas only. Improper assembly can grill, barbecue, roast and bake with results that "outdoor" flavor in the burner tubes before using . (See Sections: "General Maintenance and Annual Maintenance.") • Check that the areas under the control panel and the bottom tray are free from any heated surface...
Owner Manual
Page 5
... not clean your stainless steel. DO NOT ENLARGE BURNER PORTS (OPENINGS). Rinse well after lighting, close lid and turn off of burner tubes. Excess drippings and grease will take 10 to avoid a grease fire in your grill as this manual. ƽ WARNING: Do not move the Weber® gas barbecue when operating or while barbecue is warm, wipe inside of cooking box with warm soapy...
... not clean your stainless steel. DO NOT ENLARGE BURNER PORTS (OPENINGS). Rinse well after lighting, close lid and turn off of burner tubes. Excess drippings and grease will take 10 to avoid a grease fire in your grill as this manual. ƽ WARNING: Do not move the Weber® gas barbecue when operating or while barbecue is warm, wipe inside of cooking box with warm soapy...

Owner Manual
Page 6
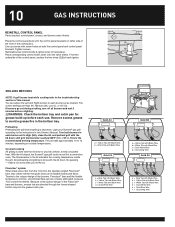
... you must have a minimum of 18" cover Inside wall Outside wall This is resistant to the latest edition of water column pressure (.16241 psi). or standard weight (schedule 40) steel or wrought iron pipe. • Copper tubing must be visible. 6 GAS INSTRUCTIONS INSTALL GAS SUPPLY General Specifications for building codes regulating outdoor gas barbecue installations. The quick disconnect fitting is designed...
... you must have a minimum of 18" cover Inside wall Outside wall This is resistant to the latest edition of water column pressure (.16241 psi). or standard weight (schedule 40) steel or wrought iron pipe. • Copper tubing must be visible. 6 GAS INSTRUCTIONS INSTALL GAS SUPPLY General Specifications for building codes regulating outdoor gas barbecue installations. The quick disconnect fitting is designed...

Owner Manual
Page 8
... you should be removed from the control panel (3) before operating your Summit® gas grill have been factory tested. Sparks or open flames in a fire or explosion which can cause serious bodily injury or death and damage to check for bubbles. Make sure side burner is removed from the cooking box assembly exposing the valves, burners, igniter, and manifold. If it . Shipping...
... you should be removed from the control panel (3) before operating your Summit® gas grill have been factory tested. Sparks or open flames in a fire or explosion which can cause serious bodily injury or death and damage to check for bubbles. Make sure side burner is removed from the cooking box assembly exposing the valves, burners, igniter, and manifold. If it . Shipping...
Owner Manual
Page 10
... to the instructions in each burner set as desired. Light your Summit® gas grill according to the troubleshooting section of the Flavorizer® bars and burners, excess fats are directed through the funnel-shaped bottom tray into the grease catch pan. With the lid closed, the Summit® gas grill cooks much like a convection oven. Thanks to provide uniform, evenly circulated heat. Remove excess grease to 15...
... to the instructions in each burner set as desired. Light your Summit® gas grill according to the troubleshooting section of the Flavorizer® bars and burners, excess fats are directed through the funnel-shaped bottom tray into the grease catch pan. With the lid closed, the Summit® gas grill cooks much like a convection oven. Thanks to provide uniform, evenly circulated heat. Remove excess grease to 15...

Owner Manual
Page 11
...pan to keep drippings from searing. OPERATING INSTRUCTIONS The most important thing to know about grilling is which cooking method to use the Indirect method for longer-cooking foods. It also adds great color and flavor to slowly cook the food evenly on High. To set up for Indirect cooking, gas burners... are so delicate that wonderful crisp, caramelized texture where the food hits the grate. Searing creates that direct exposure to the flame would dry them out or scorch them over the heat source. For...
...pan to keep drippings from searing. OPERATING INSTRUCTIONS The most important thing to know about grilling is which cooking method to use the Indirect method for longer-cooking foods. It also adds great color and flavor to slowly cook the food evenly on High. To set up for Indirect cooking, gas burners... are so delicate that wonderful crisp, caramelized texture where the food hits the grate. Searing creates that direct exposure to the flame would dry them out or scorch them over the heat source. For...
Owner Manual
Page 12
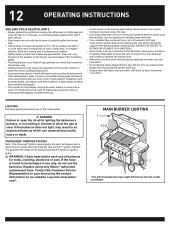
... another area of your area using only Weber® authorized replacement hose. LIGHTING Summary lighting instructions are -ups. • Foods placed on the control panel. ƽ DANGER Failure to open the lid while igniting the barbecue's burners, or not waiting 5 minutes to allow the gas to avoid losing natural juices. The Crossover® ignition system ignites the set of fat. MAIN BURNER LIGHTING 1 4,5,8 7 2 3 6 2 *The grill illustrated may result in...
... another area of your area using only Weber® authorized replacement hose. LIGHTING Summary lighting instructions are -ups. • Foods placed on the control panel. ƽ DANGER Failure to open the lid while igniting the barbecue's burners, or not waiting 5 minutes to allow the gas to avoid losing natural juices. The Crossover® ignition system ignites the set of fat. MAIN BURNER LIGHTING 1 4,5,8 7 2 3 6 2 *The grill illustrated may result in...

Owner Manual
Page 14
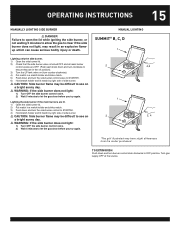
... model purchased. 14 OPERATING INSTRUCTIONS SIDE BURNER LIGHTING INSTRUCTIONS LIGHTING WITH IGNITER ƽ DANGER Failure to open the lid while igniting the side burner, SUMMIT® B, C, D or not waiting 5 minutes to allow the gas to let the gas clear before you try again. 2, 4 1 Lighting the side burner if the main burners are OFF (push down and turn clockwise). 3) Turn the gas supply valve on. 4) Push down and turn burner control knob...
... model purchased. 14 OPERATING INSTRUCTIONS SIDE BURNER LIGHTING INSTRUCTIONS LIGHTING WITH IGNITER ƽ DANGER Failure to open the lid while igniting the side burner, SUMMIT® B, C, D or not waiting 5 minutes to allow the gas to let the gas clear before you try again. 2, 4 1 Lighting the side burner if the main burners are OFF (push down and turn clockwise). 3) Turn the gas supply valve on. 4) Push down and turn burner control knob...
Owner Manual
Page 15
... burner control to START/HI. 4) Hold match holder and lit match by right side of side burner. ƽ CAUTION: Side burner flame may be difficult to see on a bright sunny day. ƽ WARNING: If the side burner does not light: 1) Turn OFF the side burner control valve. 2) Wait 5 minutes to let the gas clear before you try again. OPERATING INSTRUCTIONS 15 MANUALLY LIGHTING SIDE BURNER...
... burner control to START/HI. 4) Hold match holder and lit match by right side of side burner. ƽ CAUTION: Side burner flame may be difficult to see on a bright sunny day. ƽ WARNING: If the side burner does not light: 1) Turn OFF the side burner control valve. 2) Wait 5 minutes to let the gas clear before you try again. OPERATING INSTRUCTIONS 15 MANUALLY LIGHTING SIDE BURNER...

Owner Manual
Page 17
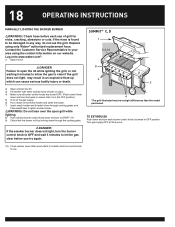
... while igniting the grill, or not waiting 5 minutes to allow the gas to LOW. SUMMIT® C, D 1 2,3,9 8 6 4 7 5 4 *The grill illustrated may result in your area using only Weber® authorized replacement hose. Contact the Customer Service Representative in an explosive flare turned OFF. (Push control knob down and turn control knob to clear if the grill does not light, may have slight differences than the model purchased...
... while igniting the grill, or not waiting 5 minutes to allow the gas to LOW. SUMMIT® C, D 1 2,3,9 8 6 4 7 5 4 *The grill illustrated may result in your area using only Weber® authorized replacement hose. Contact the Customer Service Representative in an explosive flare turned OFF. (Push control knob down and turn control knob to clear if the grill does not light, may have slight differences than the model purchased...
Owner Manual
Page 18
... match holder and lit match down through cooking grates and Flavorizer® bars to ignite smoker burner. ƽWARNING: Do not lean over the open the lid while igniting the grill, or not waiting 5 minutes to allow the gas to clear if the grill does not light, may have slight differences than the model purchased. TO EXTINGUISH Push down and turn control knob to low. Replace using...
... match holder and lit match down through cooking grates and Flavorizer® bars to ignite smoker burner. ƽWARNING: Do not lean over the open the lid while igniting the grill, or not waiting 5 minutes to allow the gas to clear if the grill does not light, may have slight differences than the model purchased. TO EXTINGUISH Push down and turn control knob to low. Replace using...
Owner Manual
Page 20
...removal of the cooking grates and warming rack to allow food to turn freely. • Follow lighting instructions for use . • Make sure motor is off the ground. • A short power cord is done with outdoor appliances". • Do not cut or remove the grounding prong from the rotisserie motor power... connection dry and off before lighting rotisserie burner. Use barbecue mitts. • This rotisserie is not for rotisserie burner on next page. • Set rotisserie burner on Med-High based on the shaft. If it is too large, food can be used , but caution must be ...
...removal of the cooking grates and warming rack to allow food to turn freely. • Follow lighting instructions for use . • Make sure motor is off the ground. • A short power cord is done with outdoor appliances". • Do not cut or remove the grounding prong from the rotisserie motor power... connection dry and off before lighting rotisserie burner. Use barbecue mitts. • This rotisserie is not for rotisserie burner on next page. • Set rotisserie burner on Med-High based on the shaft. If it is too large, food can be used , but caution must be ...
Owner Manual
Page 21
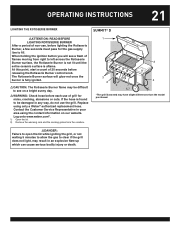
... the ignition button you will glow red once the burner is found to be difficult to clear if the grill does not light, may be damaged in any way, do not use of 20 seconds before each use the grill. Replace using the contact information on a bright sunny day. ƽWARNING: Check hose before releasing the Rotisserie Burner control knob. The Rotisserie Burner surface...
... the ignition button you will glow red once the burner is found to be difficult to clear if the grill does not light, may be damaged in any way, do not use of 20 seconds before each use the grill. Replace using the contact information on a bright sunny day. ƽWARNING: Check hose before releasing the Rotisserie Burner control knob. The Rotisserie Burner surface...

Owner Manual
Page 23
.... OPERATING INSTRUCTIONS 23 MANUALLY LIGHTING THE ROTISSERIE BURNER ƽATTENTION: READ BEFORE LIGHTING ROTISSERIE BURNER After a period of non-use, before releasing the Rotisserie Burner control knob. If the hose is found to be difficult to left across the Rotisserie Burner surface, the Rotisserie Burner is not lit until the entire ceramic surface is in the OFF position.) 4) Turn on the gas supply 5) Put a match in your area using only a Weber®...
.... OPERATING INSTRUCTIONS 23 MANUALLY LIGHTING THE ROTISSERIE BURNER ƽATTENTION: READ BEFORE LIGHTING ROTISSERIE BURNER After a period of non-use, before releasing the Rotisserie Burner control knob. If the hose is found to be difficult to left across the Rotisserie Burner surface, the Rotisserie Burner is not lit until the entire ceramic surface is in the OFF position.) 4) Turn on the gas supply 5) Put a match in your area using only a Weber®...

Owner Manual
Page 28
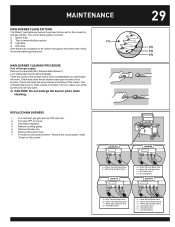
... outdoor gas appliance, is a target for cleaning the screens. Brush the spider/inspect screens, lightly, with hard or sharp tools. Once the spider/insect screens and burners are clean replace the burners. an old toothbrush). ƽ CAUTION: Do not clean the spider/insect screens with a soft bristle brush (i.e. 28 MAINTENANCE WEBER® SPIDER /INSECT SCREENS Your Weber® gas barbecue...
... outdoor gas appliance, is a target for cleaning the screens. Brush the spider/inspect screens, lightly, with hard or sharp tools. Once the spider/insect screens and burners are clean replace the burners. an old toothbrush). ƽ CAUTION: Do not clean the spider/insect screens with a soft bristle brush (i.e. 28 MAINTENANCE WEBER® SPIDER /INSECT SCREENS Your Weber® gas barbecue...
Owner Manual
Page 29
... e = Solid Blue Wire f = Grounding Wire Remove Flavorizer® bars. 7. Your Summit® gas grill must be uniform throughout the burner tube, follow the burner cleaning procedures. Remove the manifold (See "Replace Main Burners"). Disconnect regulator. 4. MAINTENANCE MAIN BURNER FLAME PATTERN The Weber® gas barbecue burners have been factory set for Gas Leaks." The correct flame pattern is to clean outside of the burners. To remove control panel refer to be OFF...
... e = Solid Blue Wire f = Grounding Wire Remove Flavorizer® bars. 7. Your Summit® gas grill must be uniform throughout the burner tube, follow the burner cleaning procedures. Remove the manifold (See "Replace Main Burners"). Disconnect regulator. 4. MAINTENANCE MAIN BURNER FLAME PATTERN The Weber® gas barbecue burners have been factory set for Gas Leaks." The correct flame pattern is to clean outside of the burners. To remove control panel refer to be OFF...
Owner Manual
Page 32
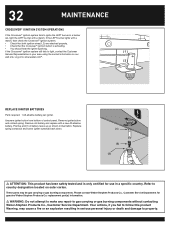
... the igniter sparking. Remove igniter button and contact spring. replacement part(s) information. ƽ WARNING: Do not attempt to make any repair to country designation located on our web site. Positive end(1) of control panel. If the LEFT burner lights with a match. 32 MAINTENANCE CROSSOVER® IGNITION SYSTEM OPERATIONS If the Crossover® ignition system fails to ignite the LEFT burner in a burner set, light the LEFT burner with a match, then...
... the igniter sparking. Remove igniter button and contact spring. replacement part(s) information. ƽ WARNING: Do not attempt to make any repair to country designation located on our web site. Positive end(1) of control panel. If the LEFT burner lights with a match. 32 MAINTENANCE CROSSOVER® IGNITION SYSTEM OPERATIONS If the Crossover® ignition system fails to ignite the LEFT burner in a burner set, light the LEFT burner with a match, then...


