
Owner Manual
Page 1
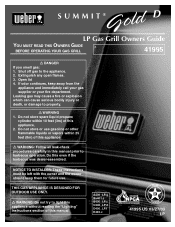
... fire department. SUMMIT® LP Gas Grill Owners Guide YOU MUST READ THIS OWNERS GUIDE # BEFORE OPERATING YOUR GAS GRILL 41995 ƽ DANGER If you smell gas: 1. THIS GAS APPLIANCE IS DESIGNED FOR OUTDOOR USE ONLY. ƽ WARNING: Do not try to barbecue operation. Do not store or use . Do not store spare liquid propane cylinder within 25 feet (8m) of this even if the barbecue was dealer-assembled. Extinguish any open flames. 3.
... fire department. SUMMIT® LP Gas Grill Owners Guide YOU MUST READ THIS OWNERS GUIDE # BEFORE OPERATING YOUR GAS GRILL 41995 ƽ DANGER If you smell gas: 1. THIS GAS APPLIANCE IS DESIGNED FOR OUTDOOR USE ONLY. ƽ WARNING: Do not try to barbecue operation. Do not store or use . Do not store spare liquid propane cylinder within 25 feet (8m) of this even if the barbecue was dealer-assembled. Extinguish any open flames. 3.
Owner Manual
Page 2
... burners go out while in operation. ƽ A dented or rusty liquid propane cylinder may still be dangerous. See instructions in the "Assembly Instruction" section of the Owner's Guide. Move away from the liquid propane cylinder: 1. The unit must be within 24 inches of the top, bottom, back or sides of the cooking box. ƽ Should a grease fire occur, turn all gas valves off all parts are in a natural gas...
... burners go out while in operation. ƽ A dented or rusty liquid propane cylinder may still be dangerous. See instructions in the "Assembly Instruction" section of the Owner's Guide. Move away from the liquid propane cylinder: 1. The unit must be within 24 inches of the top, bottom, back or sides of the cooking box. ƽ Should a grease fire occur, turn all gas valves off all parts are in a natural gas...
Owner Manual
Page 4
... the ORIGINAL PURCHASER of this Weber® gas grill that prove defective under normal use , removal, return, or replacement of its equipment; If the cylinder has a defect, malfunctions, or you are limited in connection with your satisfaction, then call the cylinder manufacturer's customer service center. This Limited Warranty does not cover any parts, contact the Customer service representative in this Limited Warranty...
... the ORIGINAL PURCHASER of this Weber® gas grill that prove defective under normal use , removal, return, or replacement of its equipment; If the cylinder has a defect, malfunctions, or you are limited in connection with your satisfaction, then call the cylinder manufacturer's customer service center. This Limited Warranty does not cover any parts, contact the Customer service representative in this Limited Warranty...

Owner Manual
Page 5
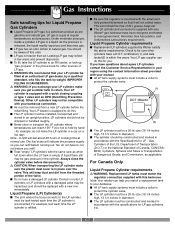
...-B149.1 Natural Gas and Propane Installation Code. The valves, orifices, hose and regulator are for use by children. • If there are no local codes, you can be free and clear from debris that might obstruct the flow of water column (pressure). • This Weber® gas barbecue is stored indoors, the gas supply must be DISCONNECTED and the LP cylinder stored outdoors in a well-ventilated space. • LP cylinder must...
...-B149.1 Natural Gas and Propane Installation Code. The valves, orifices, hose and regulator are for use by children. • If there are no local codes, you can be free and clear from debris that might obstruct the flow of water column (pressure). • This Weber® gas barbecue is stored indoors, the gas supply must be DISCONNECTED and the LP cylinder stored outdoors in a well-ventilated space. • LP cylinder must...

Owner Manual
Page 6
... bottom tray for the first few uses, while surfaces are available, or you can adjust the Left and Right burners in your Weber® gas barbecue OFF and wait for flavorful cooking. You can line the catch pan with water. ƽ CAUTION: Do not use . The control settings are available that contain acid, mineral spirits or xylene. Preheating - Excess drippings and grease will...
... bottom tray for the first few uses, while surfaces are available, or you can adjust the Left and Right burners in your Weber® gas barbecue OFF and wait for flavorful cooking. You can line the catch pan with water. ƽ CAUTION: Do not use . The control settings are available that contain acid, mineral spirits or xylene. Preheating - Excess drippings and grease will...

Owner Manual
Page 8
... Gas Line 63. Bottom Tray 74. Rotisserie Fork 10. Manifold 24. Front Panel 33. Lid Assembly 51. 1/4 - 20 x 1 1/4 inch Bolt 52. 12 inch Cook Grate 53. 10 - 24 Stainless Steel Hex Nut 54. Battery Shield Assembly 69. Smoker Assembly 7. Warm-Up™ Basket 5. 8 inch Cooking Grate 6. Crossover® Tube 19. Large Control Knob 31. Caster Assembly 45. Rear Frame Rail 78. Flavorizor® Bar Assembly w/ Smoker 9. Negative Ignition Switch Wire 25. IR Burner 60. Manifold Assembly 71. Smoker Burner Tube...
... Gas Line 63. Bottom Tray 74. Rotisserie Fork 10. Manifold 24. Front Panel 33. Lid Assembly 51. 1/4 - 20 x 1 1/4 inch Bolt 52. 12 inch Cook Grate 53. 10 - 24 Stainless Steel Hex Nut 54. Battery Shield Assembly 69. Smoker Assembly 7. Warm-Up™ Basket 5. 8 inch Cooking Grate 6. Crossover® Tube 19. Large Control Knob 31. Caster Assembly 45. Rear Frame Rail 78. Flavorizor® Bar Assembly w/ Smoker 9. Negative Ignition Switch Wire 25. IR Burner 60. Manifold Assembly 71. Smoker Burner Tube...

Owner Manual
Page 27
...;WARNING: Only use this barbecue. ƽNEVER fill the tank beyond 80% full. Otherwise you will result in the OFF position, but you check for the materials, workmanship and performance of liquid propane cylinders, see Section "Operating". Check by weight or volume. Be sure there are by a qualified attendant. Gas Instructions Fill liquid propane cylinder Note - The phone number is closed. The...
...;WARNING: Only use this barbecue. ƽNEVER fill the tank beyond 80% full. Otherwise you will result in the OFF position, but you check for the materials, workmanship and performance of liquid propane cylinders, see Section "Operating". Check by weight or volume. Be sure there are by a qualified attendant. Gas Instructions Fill liquid propane cylinder Note - The phone number is closed. The...

Owner Manual
Page 29
.... Remove control panel Completely remove the control panel (4) from the grill. (1) (2) (2) (3) (4) Remove the Front Panel by sliding the panel up and out of the control panel and lift off. Put your Summit® gas grill have been factory tesated. Remove the burner control knobs (1). We do however recommend that you leak check all gas connections before the control panel is removed from the cooking box assembly exposing the valves, burners, igniter, and manifold...
.... Remove control panel Completely remove the control panel (4) from the grill. (1) (2) (2) (3) (4) Remove the Front Panel by sliding the panel up and out of the control panel and lift off. Put your Summit® gas grill have been factory tesated. Remove the burner control knobs (1). We do however recommend that you leak check all gas connections before the control panel is removed from the cooking box assembly exposing the valves, burners, igniter, and manifold...
Owner Manual
Page 33
.... size (18 1/4 inches high, 12 1/4 inches in low areas and prevent dispersion. certification(1), and date tested(2) is a liquid. s The cylinder should not be gas pressure in a car on a hot day). for LP gas cylinders, T.C. s Do not use . s The LP cylinder must match the regulator connection supplied with the specifications for example: do not have a D.O.T. For Canada Only Liquid Propane Cylinder requirements ƽ WARNING: Replacement LP tanks must be...
.... size (18 1/4 inches high, 12 1/4 inches in low areas and prevent dispersion. certification(1), and date tested(2) is a liquid. s The cylinder should not be gas pressure in a car on a hot day). for LP gas cylinders, T.C. s Do not use . s The LP cylinder must match the regulator connection supplied with the specifications for example: do not have a D.O.T. For Canada Only Liquid Propane Cylinder requirements ƽ WARNING: Replacement LP tanks must be...

Owner Manual
Page 34
... control settings are virtually eliminated, because YOU control the flames. If burners go out during cooking, turn food or to test for grease build-up your lid reaches 500˚-550˚F (260˚-288˚C). Light your Owner's Manual. Preheating Preheating the grill before grilling is important. Light your Summit® gas grill according to the instructions in your Summit® gas grill according to the instructions in this manual. Covered...
... control settings are virtually eliminated, because YOU control the flames. If burners go out during cooking, turn food or to test for grease build-up your lid reaches 500˚-550˚F (260˚-288˚C). Light your Owner's Manual. Preheating Preheating the grill before grilling is important. Light your Summit® gas grill according to the instructions in your Summit® gas grill according to the instructions in this manual. Covered...

Owner Manual
Page 35
... hot area. • Use tongs rather than a shallow baking pan. • Trim excess fat from burning. NEVER USE WATER TO EXTINGUISH FLAMES ON A GAS GRILL. • Some foods, such as a casserole or thin fish fillets, will require a container for Indirect cooking, gas burners are clean and free from debris. • Do not line the funnel-shaped bottom tray with the added...
... hot area. • Use tongs rather than a shallow baking pan. • Trim excess fat from burning. NEVER USE WATER TO EXTINGUISH FLAMES ON A GAS GRILL. • Some foods, such as a casserole or thin fish fillets, will require a container for Indirect cooking, gas burners are clean and free from debris. • Do not line the funnel-shaped bottom tray with the added...
Owner Manual
Page 36
... explosive flame-up which can turn on the LP cylinder valve, the "excess gas flow control" feature will hear the igniter sparking. 7) Check that it . Replace using the contact information sheet provided with a match. 8) After the LEFT burner is still flowing to START/HI in selected burner set. 6) Push igniter button and hold until burner ignites. To Extinguish Push down and turn each use the barbecue. Crossover® Ignition System...
... explosive flame-up which can turn on the LP cylinder valve, the "excess gas flow control" feature will hear the igniter sparking. 7) Check that it . Replace using the contact information sheet provided with a match. 8) After the LEFT burner is still flowing to START/HI in selected burner set. 6) Push igniter button and hold until burner ignites. To Extinguish Push down and turn each use the barbecue. Crossover® Ignition System...

Owner Manual
Page 37
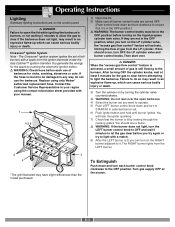
... on the liquid propane cylinder valve. Operating Instructions Manual Lighting ƽ DANGER Failure to open barbecue. 5) Push LEFT burner control knob down and turn to START/HI. 6) Insert match holder and lit match down through cooking grates and Flavorizor® bars to ignite LEFT burner in each selected burner set. ƽ WARNING: If the burner does not light, turn the LEFT burner control knob to OFF and wait 5 minutes to let the gas clear before...
... on the liquid propane cylinder valve. Operating Instructions Manual Lighting ƽ DANGER Failure to open barbecue. 5) Push LEFT burner control knob down and turn to START/HI. 6) Insert match holder and lit match down through cooking grates and Flavorizor® bars to ignite LEFT burner in each selected burner set. ƽ WARNING: If the burner does not light, turn the LEFT burner control knob to OFF and wait 5 minutes to let the gas clear before...

Owner Manual
Page 40
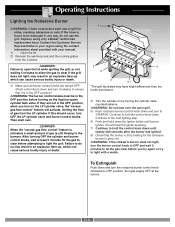
... you turn OFF the LP cylinder valve and burner control knobs. To Extinguish Push down the Igniter button until burner ignites. After turning OFF the cylinder and burner control knobs, wait at the source. Replace using only Weber® authorized replacement hose Contact the Customer Service Representative in your region using the contact information sheet provided with your manual. 1) Open the grill lid. ƽDANGER: Failure to open grill while lighting. 6) Push smoker burner control knob down and turn...
... you turn OFF the LP cylinder valve and burner control knobs. To Extinguish Push down the Igniter button until burner ignites. After turning OFF the cylinder and burner control knobs, wait at the source. Replace using only Weber® authorized replacement hose Contact the Customer Service Representative in your region using the contact information sheet provided with your manual. 1) Open the grill lid. ƽDANGER: Failure to open grill while lighting. 6) Push smoker burner control knob down and turn...
Owner Manual
Page 41
... on the liquid propane cylinder tank valve. Replace using the contact information sheet provided with a match. 10) Close smoker cover after wood starts to smolder and turn each use the grill. Contact the Customer Service Representative in the match holder and strike the match. 7) Insert match holder and lit match down and turn control knob to low. D-8 If the hose is lit by turning the cylinder valve counterclockwise. 6) Put a match in your manual. 1) Open the lid...
... on the liquid propane cylinder tank valve. Replace using the contact information sheet provided with a match. 10) Close smoker cover after wood starts to smolder and turn each use the grill. Contact the Customer Service Representative in the match holder and strike the match. 7) Insert match holder and lit match down and turn control knob to low. D-8 If the hose is lit by turning the cylinder valve counterclockwise. 6) Put a match in your manual. 1) Open the lid...
Owner Manual
Page 44
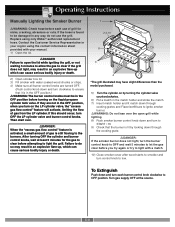
... LP cylinder valve, the "excess gas flow control" feature will hear the igniter sparking. 7) Continue to light the grill. If this should occur, turn clockwise to ensure that the burner is still flowing to open grill. 5) Push rotisserie burner control knob down until burner ignites. Replace using the contact information sheet provided with your manual. 1) Open the lid. 2) Remove the warming rack and the cooking grates from the LP cylinder. Operating Instructions Lighting the Rotisserie Burner ƽWARNING: Check hose...
... LP cylinder valve, the "excess gas flow control" feature will hear the igniter sparking. 7) Continue to light the grill. If this should occur, turn clockwise to ensure that the burner is still flowing to open grill. 5) Push rotisserie burner control knob down until burner ignites. Replace using the contact information sheet provided with your manual. 1) Open the lid. 2) Remove the warming rack and the cooking grates from the LP cylinder. Operating Instructions Lighting the Rotisserie Burner ƽWARNING: Check hose...

Owner Manual
Page 45
... liquid propane cylinder tank valve. Failure to do not use of grill for the rotisserie burner to glow red. ƽWARNING: If the rotisserie burner does not light, turn OFF the LP cylinder valve and burner control knobs. Continue to the next lighting step. 8) Continue to hold the control knob down and turn to OFF position. Replace using the contact information sheet provided with a match. Operating Instructions Manually Lighting the Rotisserie Burner ƽWARNING: Check hose before you turn on the LP cylinder valve...
... liquid propane cylinder tank valve. Failure to do not use of grill for the rotisserie burner to glow red. ƽWARNING: If the rotisserie burner does not light, turn OFF the LP cylinder valve and burner control knobs. Continue to the next lighting step. 8) Continue to hold the control knob down and turn to OFF position. Replace using the contact information sheet provided with a match. Operating Instructions Manually Lighting the Rotisserie Burner ƽWARNING: Check hose before you turn on the LP cylinder valve...

Owner Manual
Page 46
.... Main & Smoker Burner Troubleshooting Problem Check Burners burn with a yellow or Inspect Weber® Insect / Spider orange flame, in the All burners on slowly. The excess flow safety device, which is erratic. Turn burner control knobs to flow into catch pan? Wait at least 1 minute. Turn burner control knobs OFF. Reconnect the regulator to "Lighting Instructions". Turn cylinder valve on high for possible instructions. Refer to the cylinder. If you preheating barbecue in...
.... Main & Smoker Burner Troubleshooting Problem Check Burners burn with a yellow or Inspect Weber® Insect / Spider orange flame, in the All burners on slowly. The excess flow safety device, which is erratic. Turn burner control knobs to flow into catch pan? Wait at least 1 minute. Turn burner control knobs OFF. Reconnect the regulator to "Lighting Instructions". Turn cylinder valve on high for possible instructions. Refer to the cylinder. If you preheating barbecue in...

Owner Manual
Page 48
.... Replace battery in your region using the contact information sheet provided with your manual. Burner does not light or burner has a small flickering flame. Refer to the cylinder. The excess flow safety device, which is part of the grill to HIGH. Turn burner control knobs to cylinder connection, may have activated. Turn cylinder valve on slowly. Rotisserie Troubleshooting Problem Burner does not light. Wait at least 1 minute. Turn burner control knobs OFF. Reseat burner ring. Disconnect the regulator...
.... Replace battery in your region using the contact information sheet provided with your manual. Burner does not light or burner has a small flickering flame. Refer to the cylinder. The excess flow safety device, which is part of the grill to HIGH. Turn burner control knobs to cylinder connection, may have activated. Turn cylinder valve on slowly. Rotisserie Troubleshooting Problem Burner does not light. Wait at least 1 minute. Turn burner control knobs OFF. Reseat burner ring. Disconnect the regulator...

Owner Manual
Page 49
.... Remove the manifold. Check and clean the valve orifices at the ends of the burners. Brush the spider/inspect screens, lightly, with hard or sharp tools. Do not dislodge the spider/ insect screens or enlarge the screen openings. Annual Maintenance Inspection and cleaning of the burner tubes. Look inside of the burners with a wire (a straightenedout coat hanger will work). Use a Steel...
.... Remove the manifold. Check and clean the valve orifices at the ends of the burners. Brush the spider/inspect screens, lightly, with hard or sharp tools. Do not dislodge the spider/ insect screens or enlarge the screen openings. Annual Maintenance Inspection and cleaning of the burner tubes. Look inside of the burners with a wire (a straightenedout coat hanger will work). Use a Steel...


