
Owner Manual
Page 1
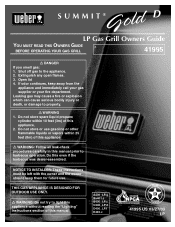
...any open flames. 3. Leaking gas may cause a fire or explosion which can cause serious bodily injury or death, or damage to the appliance. 2. THIS GAS APPLIANCE IS DESIGNED FOR OUTDOOR USE ONLY. ƽ WARNING: Do not try to barbecue operation. SUMMIT® LP Gas Grill Owners Guide YOU MUST... READ THIS OWNERS GUIDE # BEFORE OPERATING YOUR GAS GRILL 41995 ƽ DANGER If you smell...
...any open flames. 3. Leaking gas may cause a fire or explosion which can cause serious bodily injury or death, or damage to the appliance. 2. THIS GAS APPLIANCE IS DESIGNED FOR OUTDOOR USE ONLY. ƽ WARNING: Do not try to barbecue operation. SUMMIT® LP Gas Grill Owners Guide YOU MUST... READ THIS OWNERS GUIDE # BEFORE OPERATING YOUR GAS GRILL 41995 ƽ DANGER If you smell...
Owner Manual
Page 2
... ƽ Although your barbecue is out. ƽ Do not enlarge valve orifices or burner ports when cleaning the valves or burners. ƽ The Weber® gas barbecue should be thoroughly cleaned on , or in the storage area under or near this manual. ƽ After a period of storage, and/or ...nonuse, the Weber® gas barbecue should be checked for gas leaks and burner obstructions before attempting to relight, using this product contain chemicals known to the state of California to cause cancer...
... ƽ Although your barbecue is out. ƽ Do not enlarge valve orifices or burner ports when cleaning the valves or burners. ƽ The Weber® gas barbecue should be thoroughly cleaned on , or in the storage area under or near this manual. ƽ After a period of storage, and/or ...nonuse, the Weber® gas barbecue should be checked for gas leaks and burner obstructions before attempting to relight, using this product contain chemicals known to the state of California to cause cancer...

Owner Manual
Page 3
Contents Danger & Warnings A-2 Warranty A-4 General Instructions A-5 Grilling Methods A-6 Cleaning A-6 Exploded View A-7 Parts List A-9 Assembly Instructions B-a Gas Instructions C-1 Leak Checking C-4 Operating D-1 Grilling Methods D-1 Lighting ...D-3 Manual Lighting D-4 Lighting the Side Burner D-5 Lighting the Smoker D-7 Lighting the Rotisserie D-11 Troubleshooting D-13 Side Burner Troubleshooting D-14 Rotisserie Troubleshooting D-15 Maintenance E-1 Replacing Main Burners E-2 Crossover® Ignition System Operations E-4 A-3
Contents Danger & Warnings A-2 Warranty A-4 General Instructions A-5 Grilling Methods A-6 Cleaning A-6 Exploded View A-7 Parts List A-9 Assembly Instructions B-a Gas Instructions C-1 Leak Checking C-4 Operating D-1 Grilling Methods D-1 Lighting ...D-3 Manual Lighting D-4 Lighting the Side Burner D-5 Lighting the Smoker D-7 Lighting the Rotisserie D-11 Troubleshooting D-13 Side Burner Troubleshooting D-14 Rotisserie Troubleshooting D-15 Maintenance E-1 Replacing Main Burners E-2 Crossover® Ignition System Operations E-4 A-3
Owner Manual
Page 4
...damages. If the cylinder manufacturer has not resolved the issue to products sold at retail. Warranty Weber-Stephen Products Co. (Weber) hereby warrants to the ORIGINAL PURCHASER of this Weber® gas grill that prove defective under normal use , removal, return, or replacement of its equipment; ... the warning label, which on examination shall indicate, to Weber's satisfaction, they are binding on Weber®. Customer Service Center 1890 Roselle Road, Suite 308 Schaumburg, IL 60195 USA www.weber.com LP Cylinder The LP cylinder manufacturer is not covered by this limitation may not ...
...damages. If the cylinder manufacturer has not resolved the issue to products sold at retail. Warranty Weber-Stephen Products Co. (Weber) hereby warrants to the ORIGINAL PURCHASER of this Weber® gas grill that prove defective under normal use , removal, return, or replacement of its equipment; ... the warning label, which on examination shall indicate, to Weber's satisfaction, they are binding on Weber®. Customer Service Center 1890 Roselle Road, Suite 308 Schaumburg, IL 60195 USA www.weber.com LP Cylinder The LP cylinder manufacturer is not covered by this limitation may not ...

Owner Manual
Page 5
...in a well -ventilated area out of reach of combustion or ventilation air. • The areas around the LP cylinder must be installed in or on your Weber® gas barbecue. For Installation in Canada These instructions, while generally acceptable, do not necessarily comply with the Canadian Installation... and/or Nonuse • The gas must be turned off at the liquid propane cylinder when the Weber® gas barbecue is not in use. • When the Weber® gas barbecue is set for LP gas only. • Do not use with the Weber® gas barbecue must comply with charcoal fuel....
...in a well -ventilated area out of reach of combustion or ventilation air. • The areas around the LP cylinder must be installed in or on your Weber® gas barbecue. For Installation in Canada These instructions, while generally acceptable, do not necessarily comply with the Canadian Installation... and/or Nonuse • The gas must be turned off at the liquid propane cylinder when the Weber® gas barbecue is not in use. • When the Weber® gas barbecue is set for LP gas only. • Do not use with the Weber® gas barbecue must comply with charcoal fuel....

Owner Manual
Page 6
... xylene. General Instructions Grilling Methods NOTE: If grill looses heat while cooking refer to avoid a grease fire in the slide out bottom tray. Your Weber® gas barbecue is warm, wipe inside with water. ƽ CAUTION: Do not use cleaners that fit the catch pan. ƽ WARNING: Check the ... paper towel to prevent grease build-up. Remove excess grease to the troubleshooting section of this manual. ƽ WARNING: Do not move the Weber® gas barbecue when operating or while barbecue is hot. To clean the catch pan, wash with warm soapy water and a water rinse. Inside cooking...
... xylene. General Instructions Grilling Methods NOTE: If grill looses heat while cooking refer to avoid a grease fire in the slide out bottom tray. Your Weber® gas barbecue is warm, wipe inside with water. ƽ CAUTION: Do not use cleaners that fit the catch pan. ƽ WARNING: Check the ... paper towel to prevent grease build-up. Remove excess grease to the troubleshooting section of this manual. ƽ WARNING: Do not move the Weber® gas barbecue when operating or while barbecue is hot. To clean the catch pan, wash with warm soapy water and a water rinse. Inside cooking...

Owner Manual
Page 8
...Wheel 87. Right Trim Piece 90. Right Swing-Up Table 91. Door Stop 93. LP Tank 94. Motor Bracket Screw 13. 1/4 - 20 inch Keps Nut 14. Electrode ...16 1/4 inch wire) 67. Side Burner Wire 70. Back Panel 84. 1/4 - 20 Hex Nut 85. IR Gas Line 63. IR Electrode Wire 65. Side Burner Ring 81. Thermometer Bezel 4. Smoker Burner Tube 20. Left Door.... Thermometer Hardware 3. Smoker Box Chip Grate 8. Front Frame Rail 40. Thermocouple 62. Side Burner 82. Summit Catch Pan Holder 75. Flavorizor® Bar Assembly w/ Smoker 9. Tank Scale 89. Cookbox Assembly Hardware 15...
...Wheel 87. Right Trim Piece 90. Right Swing-Up Table 91. Door Stop 93. LP Tank 94. Motor Bracket Screw 13. 1/4 - 20 inch Keps Nut 14. Electrode ...16 1/4 inch wire) 67. Side Burner Wire 70. Back Panel 84. 1/4 - 20 Hex Nut 85. IR Gas Line 63. IR Electrode Wire 65. Side Burner Ring 81. Thermometer Bezel 4. Smoker Burner Tube 20. Left Door.... Thermometer Hardware 3. Smoker Box Chip Grate 8. Front Frame Rail 40. Thermocouple 62. Side Burner 82. Summit Catch Pan Holder 75. Flavorizor® Bar Assembly w/ Smoker 9. Tank Scale 89. Cookbox Assembly Hardware 15...

Owner Manual
Page 15
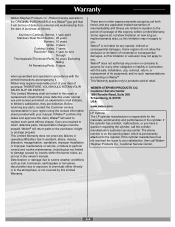
Remove packing tape holding the gas line and bracket(1). When installing cookbox route the gas line and bracket(1) inside the frame rails(2). a (1) (2) (2) (1) (2) (2) B-e 5 ƽ ATTENTION!
Remove packing tape holding the gas line and bracket(1). When installing cookbox route the gas line and bracket(1) inside the frame rails(2). a (1) (2) (2) (1) (2) (2) B-e 5 ƽ ATTENTION!

Owner Manual
Page 27
.... ventilated area. The proper filling methods for vapor withdrawal. ƽWARNING: Only use this . The liquid propane cylinder manufacturer is not an LP tank available for example: do not turn continue turning them clockwise until they stop, then they are by pushing down and turning clockwise. The ...liquid propane cylinder must be dropped or handled roughly. If they do not leave the liquid propane cylinder in a well- Your Weber® gas grill is a secondary device to an RV center or look up while filling then stops when full. Do not use an open flames ...
.... ventilated area. The proper filling methods for vapor withdrawal. ƽWARNING: Only use this . The liquid propane cylinder manufacturer is not an LP tank available for example: do not turn continue turning them clockwise until they stop, then they are by pushing down and turning clockwise. The ...liquid propane cylinder must be dropped or handled roughly. If they do not leave the liquid propane cylinder in a well- Your Weber® gas grill is a secondary device to an RV center or look up while filling then stops when full. Do not use an open flames ...
Owner Manual
Page 28
... utilize various LP tank manufacturers. These types of the Weber® gas barbecue. If bubbles form, or if a bubble grows, there is a leak, turn gas supply OFF at the source and rinse connections with the soap and water solution and watching for bubbles. The other tanks mount with the soap...top collar is tight. Note: This connection tightens clockwise and will need: LP cylinder, a soap and water solution and a rag or brush to apply it. 1) Turn the LP cylinder so the opening of the valve is complete, turn off the gas and tighten the fitting. Do not use a wrench to the front, ...
... utilize various LP tank manufacturers. These types of the Weber® gas barbecue. If bubbles form, or if a bubble grows, there is a leak, turn gas supply OFF at the source and rinse connections with the soap and water solution and watching for bubbles. The other tanks mount with the soap...top collar is tight. Note: This connection tightens clockwise and will need: LP cylinder, a soap and water solution and a rag or brush to apply it. 1) Turn the LP cylinder so the opening of the valve is complete, turn off the gas and tighten the fitting. Do not use a wrench to the front, ...

Owner Manual
Page 29
... from the cooking box assembly exposing the valves, burners, igniter, and manifold. C-3 Part required: Phillips Screwdriver. Gas Instructions ƽWARNING : The gas connections of your fingers under the front edge of the slots. Put your Summit® gas grill have been factory tesated. Remove the burner control knobs (1). Remove control panel Completely remove the...
... from the cooking box assembly exposing the valves, burners, igniter, and manifold. C-3 Part required: Phillips Screwdriver. Gas Instructions ƽWARNING : The gas connections of your fingers under the front edge of the slots. Put your Summit® gas grill have been factory tesated. Remove the burner control knobs (1). Remove control panel Completely remove the...

Owner Manual
Page 30
...OPERATE THE GRILL. Contact the Customer Service Representative in your region using your manual. The burners have been thoroughly checked for gas leaks. Note - Burner gas line connection. ƽ WARNING: If there is OFF. When leak checks are no sparks or open flames in a... be slightly corrosive, all connections should recheck all fittings for leaks before using the contact information sheet provided with your Weber Gas Barbecue. Gas Instructions Check for gas leaks ƽ DANGER Do not use an open flame to manifold connections. 3) I.R. All factory-made connections have been...
...OPERATE THE GRILL. Contact the Customer Service Representative in your region using your manual. The burners have been thoroughly checked for gas leaks. Note - Burner gas line connection. ƽ WARNING: If there is OFF. When leak checks are no sparks or open flames in a... be slightly corrosive, all connections should recheck all fittings for leaks before using the contact information sheet provided with your Weber Gas Barbecue. Gas Instructions Check for gas leaks ƽ DANGER Do not use an open flame to manifold connections. 3) I.R. All factory-made connections have been...

Owner Manual
Page 31
... Black Wire c = White Tab with Black Wire d = Solid White Wire e = Green Tab with screw holes on either side of the front of the cooking box. Gas Instructions Reinstall control panel Parts required: control panel, screws, and burner control knobs. Tighten screws. Place the control panel back onto the control panel brackets...
... Black Wire c = White Tab with Black Wire d = Solid White Wire e = Green Tab with screw holes on either side of the front of the cooking box. Gas Instructions Reinstall control panel Parts required: control panel, screws, and burner control knobs. Tighten screws. Place the control panel back onto the control panel brackets...
Owner Manual
Page 32
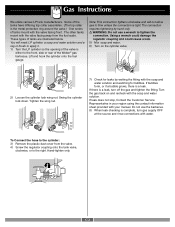
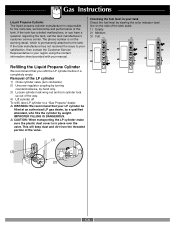
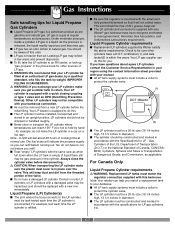
...of the tank scale. 1) Empty 2) Medium 3) Full (1) (2) (3) Refilling the Liquid Propane Cylinder We recommend that your LP cylinder be filled at an authorized LP gas dealer, by a qualified attendant, who fills the cylinder by weight. If the tank manufacturer has not resolved the issue to...by viewing the color indicator level line on the warning decal, which is in your manual. Gas Instructions Liquid Propane Cylinder The liquid propane cylinder manufacturer is completely empty. Removal of the LP cylinder 1) Close cylinder valve (turn cylinder lock up out of the valve. (1) (3) ...
...of the tank scale. 1) Empty 2) Medium 3) Full (1) (2) (3) Refilling the Liquid Propane Cylinder We recommend that your LP cylinder be filled at an authorized LP gas dealer, by a qualified attendant, who fills the cylinder by weight. If the tank manufacturer has not resolved the issue to...by viewing the color indicator level line on the warning decal, which is in your manual. Gas Instructions Liquid Propane Cylinder The liquid propane cylinder manufacturer is completely empty. Removal of the LP cylinder 1) Close cylinder valve (turn cylinder lock up out of the valve. (1) (3) ...
Owner Manual
Page 33
... coupling or type 1 valve and an OPD (Overfilling Prevention Device). size (18 1/4 inches high, 12 1/4 inches in diameter). s The LP cylinder must be a 20-lb. s LP gas has an odor similar to hold by Weber satisfy the above requirements. s Air must be removed from the threaded portion of liquid there still may be hazardous...
... coupling or type 1 valve and an OPD (Overfilling Prevention Device). size (18 1/4 inches high, 12 1/4 inches in diameter). s The LP cylinder must be a 20-lb. s LP gas has an odor similar to hold by Weber satisfy the above requirements. s Air must be removed from the threaded portion of liquid there still may be hazardous...

Owner Manual
Page 34
...meat all burners and wait 5 minutes before grilling is the recommended broiling temperature. Light your Owner's Manual. The thermometer in your Summit® gas grill according to the instructions in the lid indicates the cooking temperature inside the grill. No peeking - Because of the special ...and lift it . Searing creates that gives foods an irresistible barbecued flavor. You can adjust the Left and Right burners in your Summit® gas grill according to the instructions in the bottom tray. Preheating the grill before each use the Indirect method for 2 to 5 minutes...
...meat all burners and wait 5 minutes before grilling is the recommended broiling temperature. Light your Owner's Manual. The thermometer in your Summit® gas grill according to the instructions in the lid indicates the cooking temperature inside the grill. No peeking - Because of the special ...and lift it . Searing creates that gives foods an irresistible barbecued flavor. You can adjust the Left and Right burners in your Summit® gas grill according to the instructions in the bottom tray. Preheating the grill before each use the Indirect method for 2 to 5 minutes...

Owner Manual
Page 35
... off the lid and inside a disposable heavygauge foil pan. NEVER USE WATER TO EXTINGUISH FLAMES ON A GAS GRILL. • Some foods, such as delicate fish fillets. To set up your Summit® gas grill may run hotter than small pieces of grilling time or that direct exposure to become "over-done...." The drippings can vary because of the weather, or the amount, size and shape of the food being grilled. • The temperature of your gas grill for ...
... off the lid and inside a disposable heavygauge foil pan. NEVER USE WATER TO EXTINGUISH FLAMES ON A GAS GRILL. • Some foods, such as delicate fish fillets. To set up your Summit® gas grill may run hotter than small pieces of grilling time or that direct exposure to become "over-done...." The drippings can vary because of the weather, or the amount, size and shape of the food being grilled. • The temperature of your gas grill for ...
Owner Manual
Page 36
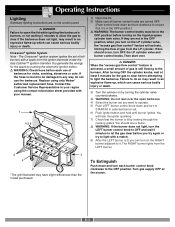
... propane cylinder tank valve. Operating Instructions Lighting Summary lighting instructions are not in the OFF position, when you turn on the LP cylinder valve, the "excess gas flow control" feature will hear the igniter sparking. 7) Check that it . You generate the energy for the... the open the lid while igniting the barbecue's burners, or not waiting 5 minutes to allow the gas to START/HI in selected burner set of left burners with your region using only Weber® authorized replacement hose. Crossover® Ignition System Note - The Crossover® ignition system ignites...
... propane cylinder tank valve. Operating Instructions Lighting Summary lighting instructions are not in the OFF position, when you turn on the LP cylinder valve, the "excess gas flow control" feature will hear the igniter sparking. 7) Check that it . You generate the energy for the... the open the lid while igniting the barbecue's burners, or not waiting 5 minutes to allow the gas to START/HI in selected burner set of left burners with your region using only Weber® authorized replacement hose. Crossover® Ignition System Note - The Crossover® ignition system ignites...

Owner Manual
Page 37
The RIGHT burner lights from the LP cylinder. If this should occur, turn each burner control knob clockwise to the OFF position. Turn gas supply OFF at least 5 minutes for the gas to clear before turning on by turning the cylinder valve counterclockwise. 4) Put match in the match holder ...light, may result in an explosive flame-up , which can turn on the LP cylinder valve, the "excess gas flow control" feature will activate, limiting the flow of gas is activated, a small amount of gas from the LEFT burner. To Extinguish Push down through cooking grates and Flavorizor®...
The RIGHT burner lights from the LP cylinder. If this should occur, turn each burner control knob clockwise to the OFF position. Turn gas supply OFF at least 5 minutes for the gas to clear before turning on by turning the cylinder valve counterclockwise. 4) Put match in the match holder ...light, may result in an explosive flame-up , which can turn on the LP cylinder valve, the "excess gas flow control" feature will activate, limiting the flow of gas is activated, a small amount of gas from the LEFT burner. To Extinguish Push down through cooking grates and Flavorizor®...

Owner Manual
Page 38
...burner if the main burners are OFF (push down and turn clockwise). 3) Turn the LP tank valve on (turn counter-lockwise). 4) Push down and turn the side burner ...: If the side burner does not light: 1) Turn OFF the side burner control valve. 2) Wait 5 minutes to let the gas clear before you try again or try to light with a match. D-5 You will hear the igniter sparking 1 Lighting only the...445; DANGER Failure to open the lid while igniting the side burner, or not waiting 5 minutes to allow the gas to clear if the side burner does not light, may be difficult to see on a bright sunny day. 1 ...
...burner if the main burners are OFF (push down and turn clockwise). 3) Turn the LP tank valve on (turn counter-lockwise). 4) Push down and turn the side burner ...: If the side burner does not light: 1) Turn OFF the side burner control valve. 2) Wait 5 minutes to let the gas clear before you try again or try to light with a match. D-5 You will hear the igniter sparking 1 Lighting only the...445; DANGER Failure to open the lid while igniting the side burner, or not waiting 5 minutes to allow the gas to clear if the side burner does not light, may be difficult to see on a bright sunny day. 1 ...
