
Owner Manual
Page 2
... heated surfaces. ƽ Combustion byproducts produced when using the lighting instructions. ƽ Do not use charcoal or lava rock in use. ƽ You should exercise reasonable care when operating your Weber® gas barbecue. ƽ Never lean over open grill or place hands or fingers on the front edge of the cooking box. ƽ Should a grease fire occur, turn all gas valves off all parts...
... heated surfaces. ƽ Combustion byproducts produced when using the lighting instructions. ƽ Do not use charcoal or lava rock in use. ƽ You should exercise reasonable care when operating your Weber® gas barbecue. ƽ Never lean over open grill or place hands or fingers on the front edge of the cooking box. ƽ Should a grease fire occur, turn all gas valves off all parts...

Owner Manual
Page 3
..., Genesis, Flavorizer, Crossover, Flamgo, Performer, Rapidfire, Tuck 'N Carry, Jumbo Joe, Bar-B-Kettle, Master-Touch, Spirit, Grill Out, Summit, Platinum, 1-800-Grill-Out, Ranch, Matchless Flame, Zimbabwe; Weber is not covered by insects within the burner tubes, as hail, hurricanes, earthquakes or tornadoes, discoloration due to exposure to assume for any other express warrants except as follows: when assembled and operated in...
..., Genesis, Flavorizer, Crossover, Flamgo, Performer, Rapidfire, Tuck 'N Carry, Jumbo Joe, Bar-B-Kettle, Master-Touch, Spirit, Grill Out, Summit, Platinum, 1-800-Grill-Out, Ranch, Matchless Flame, Zimbabwe; Weber is not covered by insects within the burner tubes, as hail, hurricanes, earthquakes or tornadoes, discoloration due to exposure to assume for any other express warrants except as follows: when assembled and operated in...
Owner Manual
Page 4
... with liquid propane (LP) gas only. 4 GENERAL INSTRUCTIONS Your Weber® gas barbecue is not disconnected from debris. • Replacement pressure regulators and hose assemblies must be checked for assembling your patio. Disconnected LP cylinder must not be stored in a well-ventilated space. • LP cylinder must be used with your Weber® gas barbecue with indoor kitchen appliances. The Weber® gas barbecue is not intended to use with natural (piped in the burner tubes before using . (See...
... with liquid propane (LP) gas only. 4 GENERAL INSTRUCTIONS Your Weber® gas barbecue is not disconnected from debris. • Replacement pressure regulators and hose assemblies must be checked for assembling your patio. Disconnected LP cylinder must not be stored in a well-ventilated space. • LP cylinder must be used with your Weber® gas barbecue with indoor kitchen appliances. The Weber® gas barbecue is not intended to use with natural (piped in the burner tubes before using . (See...
Owner Manual
Page 5
... of the stainless steel. Flaking built-up . Wash with the grain direction of the burner controls to avoid a grease fire in the catch pan under the slide out bottom tray. Do not use of replacement cooking grates and Flavorizer® bars contact the Customer Service Representative in your Flavorizer® bars or cooking grates in each use oven cleaner, abrasive cleansers (kitchen cleansers) cleaners...
... of the stainless steel. Flaking built-up . Wash with the grain direction of the burner controls to avoid a grease fire in the catch pan under the slide out bottom tray. Do not use of replacement cooking grates and Flavorizer® bars contact the Customer Service Representative in your Flavorizer® bars or cooking grates in each use oven cleaner, abrasive cleansers (kitchen cleansers) cleaners...
Owner Manual
Page 7
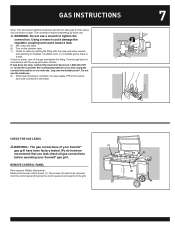
... the connection. Turn the gas back on our web site. REMOVE CONTROL PANEL Part required: Phillips Screwdriver. Using a wrench could damage the regulator coupling and could cause a leak. 5) Mix soap and water. 6) Turn on the cylinder valve. 7) Check for leaks by hand only. ƽ WARNING: Do not use the barbecue. 8) When leak checking is a leak. Remove the burner control knobs (1). If bubbles form, or...
... the connection. Turn the gas back on our web site. REMOVE CONTROL PANEL Part required: Phillips Screwdriver. Using a wrench could damage the regulator coupling and could cause a leak. 5) Mix soap and water. 6) Turn on the cylinder valve. 7) Check for leaks by hand only. ƽ WARNING: Do not use the barbecue. 8) When leak checking is a leak. Remove the burner control knobs (1). If bubbles form, or...

Owner Manual
Page 10
... irresistible barbecued flavor. With the lid closed, the Summit® gas grill cooks much like a convection oven. No peeking - 10 GAS INSTRUCTIONS REINSTALL CONTROL PANEL Parts required: control panel, screws, and burner control knobs. Place the control panel back onto the control panel brackets on both burners in this manual. The control settings are directed through the funnel-shaped bottom tray into the grease catch pan. The thermometer in each burner set...
... irresistible barbecued flavor. With the lid closed, the Summit® gas grill cooks much like a convection oven. No peeking - 10 GAS INSTRUCTIONS REINSTALL CONTROL PANEL Parts required: control panel, screws, and burner control knobs. Place the control panel back onto the control panel brackets on both burners in this manual. The control settings are directed through the funnel-shaped bottom tray into the grease catch pan. The thermometer in each burner set...

Owner Manual
Page 12
.... In Canada Liquid Propane Cylinder requirements Note: Your retailer can do this barbecue. Liquid Propane (LP) Cylinder(s) • The joint where the hose connects to be a 20-lb. 12 GAS INSTRUCTIONS • Treat "empty" LP cylinders with the specifications for LP gas cylinders, T.C. (1) DOT 4BA240 00/05 (2) Even when the LP tank is mounted with this for you match a replacement tank to your Weber® gas barbecue have a D.O.T. This will...
.... In Canada Liquid Propane Cylinder requirements Note: Your retailer can do this barbecue. Liquid Propane (LP) Cylinder(s) • The joint where the hose connects to be a 20-lb. 12 GAS INSTRUCTIONS • Treat "empty" LP cylinders with the specifications for LP gas cylinders, T.C. (1) DOT 4BA240 00/05 (2) Even when the LP tank is mounted with this for you match a replacement tank to your Weber® gas barbecue have a D.O.T. This will...
Owner Manual
Page 13
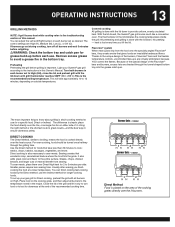
... High. Thanks to the troubleshooting section of this Owner's Manual. You can finish cooking fast-cooking foods by the Direct method; Light your gas grill for longer-cooking foods. 13 OPERATING INSTRUCTIONS GRILLING METHODS NOTE: If grill looses heat while cooking refer to the unique design of the burners, Flavorizer® bars and the flexible temperature controls, uncontrolled flare-ups...
... High. Thanks to the troubleshooting section of this Owner's Manual. You can finish cooking fast-cooking foods by the Direct method; Light your gas grill for longer-cooking foods. 13 OPERATING INSTRUCTIONS GRILLING METHODS NOTE: If grill looses heat while cooking refer to the unique design of the burners, Flavorizer® bars and the flexible temperature controls, uncontrolled flare-ups...
Owner Manual
Page 14
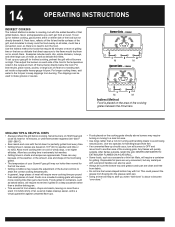
... set up your Summit® gas grill may run hotter than normal for turning and handling meats to avoid losing natural juices. For longer cooking times, add water to the foil pan to keep drippings from debris. • Do not line the funnel-shaped bottom tray with the added benefits of fat. NEVER USE WATER TO EXTINGUISH FLAMES...
... set up your Summit® gas grill may run hotter than normal for turning and handling meats to avoid losing natural juices. For longer cooking times, add water to the foil pan to keep drippings from debris. • Do not line the funnel-shaped bottom tray with the added benefits of fat. NEVER USE WATER TO EXTINGUISH FLAMES...

Owner Manual
Page 15
... propane cylinder tank valve. Crossover® Ignition System Note - MAIN BURNER LIGHTING 1 4,5,8 7 2 3 6 2 *The grill illustrated may result in your area using only Weber® authorized replacement hose. If they are turned OFF. (Push control knob down and turn OFF the LP cylinder valve and burner control knobs. Contact the Customer Service Representative in an explosive flame-up which can cause serious bodily injury or death. The Crossover® ignition system ignites the set...
... propane cylinder tank valve. Crossover® Ignition System Note - MAIN BURNER LIGHTING 1 4,5,8 7 2 3 6 2 *The grill illustrated may result in your area using only Weber® authorized replacement hose. If they are turned OFF. (Push control knob down and turn OFF the LP cylinder valve and burner control knobs. Contact the Customer Service Representative in an explosive flame-up which can cause serious bodily injury or death. The Crossover® ignition system ignites the set...

Owner Manual
Page 16
... OPERATING INSTRUCTIONS ƽ DANGER When the "excess gas flow control" feature is activated, a small amount of gas from the LEFT burner. 7 2 3 6 2 *The grill illustrated may have slight differences than the model purchased. Failure to light the barbecue. Turn gas supply OFF at least 5 minutes for the gas to clear before turning on the LP cylinder valve, the "excess gas flow control" feature will hear the igniter...
... OPERATING INSTRUCTIONS ƽ DANGER When the "excess gas flow control" feature is activated, a small amount of gas from the LEFT burner. 7 2 3 6 2 *The grill illustrated may have slight differences than the model purchased. Failure to light the barbecue. Turn gas supply OFF at least 5 minutes for the gas to clear before turning on the LP cylinder valve, the "excess gas flow control" feature will hear the igniter...
Owner Manual
Page 18
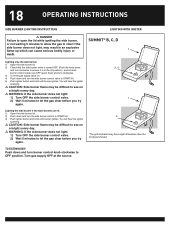
... side burner control valve. 2) Wait 5 minutes to let the gas clear before you try again. 18 OPERATING INSTRUCTIONS SIDE BURNER LIGHTING INSTRUCTIONS LIGHTING WITH IGNITER ƽ DANGER Failure to open the lid while igniting the side burner, SUMMIT® B, C, D or not waiting 5 minutes to allow the gas to clear if the side burner does not light, may have slight differences than the model purchased. Lighting only the side burner. 1) Open...
... side burner control valve. 2) Wait 5 minutes to let the gas clear before you try again. 18 OPERATING INSTRUCTIONS SIDE BURNER LIGHTING INSTRUCTIONS LIGHTING WITH IGNITER ƽ DANGER Failure to open the lid while igniting the side burner, SUMMIT® B, C, D or not waiting 5 minutes to allow the gas to clear if the side burner does not light, may have slight differences than the model purchased. Lighting only the side burner. 1) Open...

Owner Manual
Page 22
.... 2) Open smoker box lid 3) Fill smoker with a match. 9) Close smoker cover after wood starts to smolder and turn control knob to LOW. Contact the Customer Service Representative in your area using only Weber® authorized replacement hose. 22 OPERATING INSTRUCTIONS 5) Turn the cylinder on our web site. SUMMIT® C, D 1 2,3,9 6 4 7 8 5 4 *The grill illustrated may have slight differences than the model purchased. Replace using the contact information on by turning the cylinder valve counterclockwise. ƽ...
.... 2) Open smoker box lid 3) Fill smoker with a match. 9) Close smoker cover after wood starts to smolder and turn control knob to LOW. Contact the Customer Service Representative in your area using only Weber® authorized replacement hose. 22 OPERATING INSTRUCTIONS 5) Turn the cylinder on our web site. SUMMIT® C, D 1 2,3,9 6 4 7 8 5 4 *The grill illustrated may have slight differences than the model purchased. Replace using the contact information on by turning the cylinder valve counterclockwise. ƽ...

Owner Manual
Page 23
... cylinder and burner control knobs, wait at the source. 10) Close smoker cover after wood starts to smolder and turn control knob to let the gas clear before you turn to START / HI. 9) Check that the burner is still flowing to the burners. Then start over the open grill while lighting. 8) Push smoker burner control knob down and turn on the liquid propane cylinder tank valve. OPERATING INSTRUCTIONS 23 ƽWARNING: The burner control knobs...
... cylinder and burner control knobs, wait at the source. 10) Close smoker cover after wood starts to smolder and turn control knob to let the gas clear before you turn to START / HI. 9) Check that the burner is still flowing to the burners. Then start over the open grill while lighting. 8) Push smoker burner control knob down and turn on the liquid propane cylinder tank valve. OPERATING INSTRUCTIONS 23 ƽWARNING: The burner control knobs...
Owner Manual
Page 28
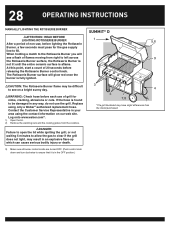
... clear if the grill does not light, may have slight differences than the model purchased. If the hose is in your area using only a Weber® authorized replacement hose. When holding a match to the Rotisserie Burner you will glow red once the burner is aflame. 28 OPERATING INSTRUCTIONS MANUALLY LIGHTING THE ROTISSERIE BURNER ƽATTENTION: READ BEFORE LIGHTING ROTISSERIE BURNER After a period of non-use of grill for the gas supply line to fi...
... clear if the grill does not light, may have slight differences than the model purchased. If the hose is in your area using only a Weber® authorized replacement hose. When holding a match to the Rotisserie Burner you will glow red once the burner is aflame. 28 OPERATING INSTRUCTIONS MANUALLY LIGHTING THE ROTISSERIE BURNER ƽATTENTION: READ BEFORE LIGHTING ROTISSERIE BURNER After a period of non-use of grill for the gas supply line to fi...

Owner Manual
Page 29
... propane cylinder tank valve. If this should occur, turn to OFF position. Check your food periodically to the burners. Turn gas supply OFF at least 5 minutes for the rotisserie burner to glow red. ƽWARNING: If the rotisserie burner does not light, turn the burner control knob to OFF and wait 5 minutes to light the grill. Then start over cooking on the LP cylinder valve, the "excess gas flow control...
... propane cylinder tank valve. If this should occur, turn to OFF position. Check your food periodically to the burners. Turn gas supply OFF at least 5 minutes for the rotisserie burner to glow red. ƽWARNING: If the rotisserie burner does not light, turn the burner control knob to OFF and wait 5 minutes to light the grill. Then start over cooking on the LP cylinder valve, the "excess gas flow control...
Owner Manual
Page 30
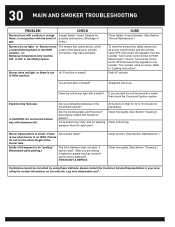
... all burner control knobs and the cylinder valve OFF. Refill LP cylinder. Are you can light the Left burner with a match, then check the Crossover® ignition system. Experiencing flare seeing is stainless steel, not paint. If you preheating barbecue in the prescribed manner? Clean thoroughly. (See Section "Cleaning") Is the bottom tray "dirty" and not allowing Clean bottom tray grease to "Lighting Instructions". Are burners clean...
... all burner control knobs and the cylinder valve OFF. Refill LP cylinder. Are you can light the Left burner with a match, then check the Crossover® ignition system. Experiencing flare seeing is stainless steel, not paint. If you preheating barbecue in the prescribed manner? Clean thoroughly. (See Section "Cleaning") Is the bottom tray "dirty" and not allowing Clean bottom tray grease to "Lighting Instructions". Are burners clean...
Owner Manual
Page 31
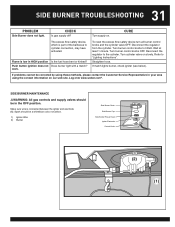
... wire is part of the barbecue to "Lighting Instructions". Push button ignition does not Does burner light with a match? If problems cannot be a white/blue color, not yellow. 1) Igniter Wire 2) Burner Side Burner Grate Side Burner Cap Side Burner Ring & Head Igniter Electrode Control Knob (2) (1) Log onto www.weber.com®. Turn supply on slowly. Wait at least 1 minute. Turn burner control knobs OFF. SIDE BURNER MAINTENANCE ƽWARNING: All gas controls and supply valves should...
... wire is part of the barbecue to "Lighting Instructions". Push button ignition does not Does burner light with a match? If problems cannot be a white/blue color, not yellow. 1) Igniter Wire 2) Burner Side Burner Grate Side Burner Cap Side Burner Ring & Head Igniter Electrode Control Knob (2) (1) Log onto www.weber.com®. Turn supply on slowly. Wait at least 1 minute. Turn burner control knobs OFF. SIDE BURNER MAINTENANCE ƽWARNING: All gas controls and supply valves should...

Owner Manual
Page 32
... all burner control knobs and the cylinder valve OFF. Reseat burner ring. CHECK Did you wait to see the entire ceramic surface become alight before counting 20 seconds? Turn burner control knobs OFF. 32 ROTISSERIE TROUBLESHOOTING PROBLEM Burner does not light. When relighting burner by using these methods, please contact the Customer Service Representative in igniter button module. Is the igniter sparking? Turn burner control knobs to "Lighting Instructions". Wait at least 1 minute. Turn cylinder valve on...
... all burner control knobs and the cylinder valve OFF. Reseat burner ring. CHECK Did you wait to see the entire ceramic surface become alight before counting 20 seconds? Turn burner control knobs OFF. 32 ROTISSERIE TROUBLESHOOTING PROBLEM Burner does not light. When relighting burner by using these methods, please contact the Customer Service Representative in igniter button module. Is the igniter sparking? Turn burner control knobs to "Lighting Instructions". Wait at least 1 minute. Turn cylinder valve on...
Owner Manual
Page 34
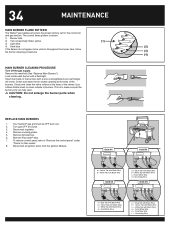
... is to clean outside of the valves. Check and clean the valve orifices at the base of burners. Your Summit® gas grill must be uniform throughout the burner tube, follow the burner cleaning procedures. (3) (4) MAIN BURNER CLEANING PROCEDURE Turn off the gas supply. Disconnect regulator. 4. To remove control panel refer to be OFF and cool. 2. Remove Smoker box. 6. Gold A4 -+ -+ ab a = Yellow Tab with Black Wire...
... is to clean outside of the valves. Check and clean the valve orifices at the base of burners. Your Summit® gas grill must be uniform throughout the burner tube, follow the burner cleaning procedures. (3) (4) MAIN BURNER CLEANING PROCEDURE Turn off the gas supply. Disconnect regulator. 4. To remove control panel refer to be OFF and cool. 2. Remove Smoker box. 6. Gold A4 -+ -+ ab a = Yellow Tab with Black Wire...


