
Owner Manual
Page 1
... TO INSTALLER: These instructions must be left with the owner and the owner should keep away from the appliance and immediately call your gas supplier or your fire department. SUMMIT® GAS GRILL Natural Gas Grill Owner's Guide #38050 YOU MUST READ THIS OWNERS GUIDE BEFORE OPERATING YOUR GAS GRILL ƽ DANGER If you smell gas: 1. Extinguish any other appliance . 2. Do not store or use . An LP cylinder not connected...
... TO INSTALLER: These instructions must be left with the owner and the owner should keep away from the appliance and immediately call your gas supplier or your fire department. SUMMIT® GAS GRILL Natural Gas Grill Owner's Guide #38050 YOU MUST READ THIS OWNERS GUIDE BEFORE OPERATING YOUR GAS GRILL ƽ DANGER If you smell gas: 1. Extinguish any other appliance . 2. Do not store or use . An LP cylinder not connected...

Owner Manual
Page 2
... supply hose away from liquid propane cylinder. 2. Call your barbecue is in use. ƽ You should exercise reasonable care when operating your Weber® gas barbecue. ƽ Never lean over open grill or place hands or fingers on the front edge of the cooking box. ƽ Should a grease fire occur, turn all gas valves off all parts are in operation. ƽ A dented or rusty liquid propane cylinder...
... supply hose away from liquid propane cylinder. 2. Call your barbecue is in use. ƽ You should exercise reasonable care when operating your Weber® gas barbecue. ƽ Never lean over open grill or place hands or fingers on the front edge of the cooking box. ƽ Should a grease fire occur, turn all gas valves off all parts are in operation. ƽ A dented or rusty liquid propane cylinder...
Owner Manual
Page 3
... the sale, installation, use and service and which on Weber. Weber, South Africa: Smokey Joe, Weber, Kettle Configuration, Spain; WARRANTY 3 Weber-Stephen Products Co. (Weber) hereby warrants to the ORIGINAL PURCHASER of this Weber® gas grill that prove defective under normal use , removal, return, or replacement of its equipment; Weber is not covered by insects within the burner tubes, as set out in this owner's manual. ©2006...
... the sale, installation, use and service and which on Weber. Weber, South Africa: Smokey Joe, Weber, Kettle Configuration, Spain; WARRANTY 3 Weber-Stephen Products Co. (Weber) hereby warrants to the ORIGINAL PURCHASER of this Weber® gas grill that prove defective under normal use , removal, return, or replacement of its equipment; Weber is not covered by insects within the burner tubes, as set out in this owner's manual. ©2006...

Owner Manual
Page 4
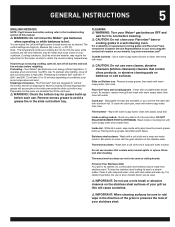
...: Your Weber® gas barbecue shall not be used under the control panel and the bottom tray are difficult to them. This appliance and its individual manual shutoff valve during any pressure testing of the grill. ƽ WARNING: The entire cooking box gets hot when in the food. The natural gas supply is a portable outdoor cooking appliance. 4 GENERAL INSTRUCTIONS Your Weber® gas barbecue is...
...: Your Weber® gas barbecue shall not be used under the control panel and the bottom tray are difficult to them. This appliance and its individual manual shutoff valve during any pressure testing of the grill. ƽ WARNING: The entire cooking box gets hot when in the food. The natural gas supply is a portable outdoor cooking appliance. 4 GENERAL INSTRUCTIONS Your Weber® gas barbecue is...
Owner Manual
Page 5
... lighting, close lid and turn off of replacement cooking grates and Flavorizer® bars contact the Customer Service Representative in the direction of this manual. ƽ WARNING: Do not move the Weber® gas barbecue when operating or while barbecue is warm, wipe inside your cookbook. It operates at an economical low BTU rate. Remove excess grease to preserve the look of cooking box...
... lighting, close lid and turn off of replacement cooking grates and Flavorizer® bars contact the Customer Service Representative in the direction of this manual. ƽ WARNING: Do not move the Weber® gas barbecue when operating or while barbecue is warm, wipe inside your cookbook. It operates at an economical low BTU rate. Remove excess grease to preserve the look of cooking box...

Owner Manual
Page 6
.... • The dust covers (supplied plastic plugs) help keep the open ends of natural gas when connections are general requirements taken from the source when the barbecue is designed to a 1/2 inch NPT thread from the gas source. 6 GAS INSTRUCTIONS INSTALL GAS SUPPLY General Specifications for building codes regulating outdoor gas barbecue installations. In absence of Local Codes, you check for outdoor, underground use. • Gas piping in contact...
.... • The dust covers (supplied plastic plugs) help keep the open ends of natural gas when connections are general requirements taken from the source when the barbecue is designed to a 1/2 inch NPT thread from the gas source. 6 GAS INSTRUCTIONS INSTALL GAS SUPPLY General Specifications for building codes regulating outdoor gas barbecue installations. In absence of Local Codes, you check for outdoor, underground use. • Gas piping in contact...

Owner Manual
Page 8
...quick disconnect is removed from the cooking box assembly exposing the valves, burners, igniter, and manifold. To perform leak checks: Slide back the collar of the hose into the ...operating your Summit® gas grill. 8 GAS INSTRUCTIONS CHECK FOR GAS LEAKS ƽWARNING : The gas connections of your Summit® gas grill have been thoroughly checked for gas leaks. Remove the burner control knobs (1). Put your barbecue was dealer or store assembled. Remove the Front Panel by wetting the connections with water after checking for leaks. ƽ WARNING: Do not ignite burners...
...quick disconnect is removed from the cooking box assembly exposing the valves, burners, igniter, and manifold. To perform leak checks: Slide back the collar of the hose into the ...operating your Summit® gas grill. 8 GAS INSTRUCTIONS CHECK FOR GAS LEAKS ƽWARNING : The gas connections of your Summit® gas grill have been thoroughly checked for gas leaks. Remove the burner control knobs (1). Put your barbecue was dealer or store assembled. Remove the Front Panel by wetting the connections with water after checking for leaks. ƽ WARNING: Do not ignite burners...
Owner Manual
Page 10
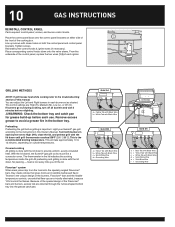
... refer to High (HH), close the lid, and preheat grill with the lid down onto the valve stems. From the underside of the control panel, replace the two wires (1,2) of each burner set to the troubleshooting section of the cooking box. Light your Summit® gas grill according to the instructions in each igniter. heat is the recommended broiling temperature. Flavorizer® system When meat...
... refer to High (HH), close the lid, and preheat grill with the lid down onto the valve stems. From the underside of the control panel, replace the two wires (1,2) of each burner set to the troubleshooting section of the cooking box. Light your Summit® gas grill according to the instructions in each igniter. heat is the recommended broiling temperature. Flavorizer® system When meat...

Owner Manual
Page 11
...25 minutes to 5 minutes per side. Use the Direct method for doneness at a lower temperature. Searing creates that direct exposure to sear meats. To sear meats, place them . Place food on the cooking grate, and then adjust all burners on all benefit from an oven... rack set up your gas grill for Indirect cooking, gas burners are so delicate that wonderful crisp, caramelized texture where the food hits the grate. OPERATING INSTRUCTIONS The most important thing to know about grilling is which cooking method to turn the food. Heat rises, reflects off the burner(s) directly...
...25 minutes to 5 minutes per side. Use the Direct method for doneness at a lower temperature. Searing creates that direct exposure to sear meats. To sear meats, place them . Place food on the cooking grate, and then adjust all burners on all benefit from an oven... rack set up your gas grill for Indirect cooking, gas burners are so delicate that wonderful crisp, caramelized texture where the food hits the grate. OPERATING INSTRUCTIONS The most important thing to know about grilling is which cooking method to turn the food. Heat rises, reflects off the burner(s) directly...
Owner Manual
Page 12
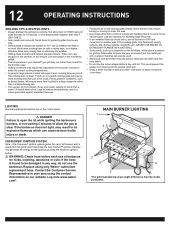
...;-288˚C). • Sear meats and cook with the lid down for turning and handling meats to another area of the cooking grate. Set all burners to OFF and move food to avoid losing natural juices. Replace using the contact information on HIGH heat and close lid; 12 OPERATING INSTRUCTIONS GRILLING TIPS & HELPFUL HINTS • Always preheat the grill before each use the barbecue.
...;-288˚C). • Sear meats and cook with the lid down for turning and handling meats to another area of the cooking grate. Set all burners to OFF and move food to avoid losing natural juices. Replace using the contact information on HIGH heat and close lid; 12 OPERATING INSTRUCTIONS GRILLING TIPS & HELPFUL HINTS • Always preheat the grill before each use the barbecue.

Owner Manual
Page 14
...; CAUTION: Side burner flame may be difficult to see on . 4) Push down and turn the side burner control valve to START/HI. 3) Push igniter button and hold until burner ignites. 14 OPERATING INSTRUCTIONS SIDE BURNER LIGHTING INSTRUCTIONS LIGHTING WITH IGNITER ƽ DANGER Failure to open the lid while igniting the side burner, SUMMIT® B, C, D or not waiting 5 minutes to allow the gas to OFF position...
...; CAUTION: Side burner flame may be difficult to see on . 4) Push down and turn the side burner control valve to START/HI. 3) Push igniter button and hold until burner ignites. 14 OPERATING INSTRUCTIONS SIDE BURNER LIGHTING INSTRUCTIONS LIGHTING WITH IGNITER ƽ DANGER Failure to open the lid while igniting the side burner, SUMMIT® B, C, D or not waiting 5 minutes to allow the gas to OFF position...
Owner Manual
Page 15
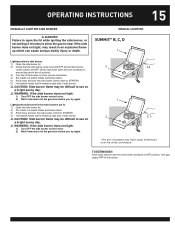
... grill illustrated may result in a match holder and strike match. 3) Push down and turn burner control knob clockwise to OFF position. OPERATING INSTRUCTIONS 15 MANUALLY LIGHTING SIDE BURNER ƽ DANGER Failure to open the lid while igniting the side burner, or not waiting 5 minutes to allow the gas to clear if the side burner does not light, may have slight differences from the model purchased. MANUAL LIGHTING SUMMIT® B, Cc, D 1 Lighting only...
... grill illustrated may result in a match holder and strike match. 3) Push down and turn burner control knob clockwise to OFF position. OPERATING INSTRUCTIONS 15 MANUALLY LIGHTING SIDE BURNER ƽ DANGER Failure to open the lid while igniting the side burner, or not waiting 5 minutes to allow the gas to clear if the side burner does not light, may have slight differences from the model purchased. MANUAL LIGHTING SUMMIT® B, Cc, D 1 Lighting only...
Owner Manual
Page 17
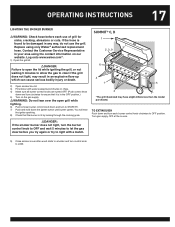
... Customer Service Representative in any way, do not use of grill for nicks, cracking, abrasions or cuts. OPERATING INSTRUCTIONS 17 LIGHTING THE SMOKER BURNER ƽWARNING: Check hose before you try again or try to light with water soaked wood chunks or chips. 4) Make sure all burner control knobs are -up which can cause serious bodily injury or death. 2) Open smoker box lid 3) Fill smoker with a match.
... Customer Service Representative in any way, do not use of grill for nicks, cracking, abrasions or cuts. OPERATING INSTRUCTIONS 17 LIGHTING THE SMOKER BURNER ƽWARNING: Check hose before you try again or try to light with water soaked wood chunks or chips. 4) Make sure all burner control knobs are -up which can cause serious bodily injury or death. 2) Open smoker box lid 3) Fill smoker with a match.
Owner Manual
Page 18
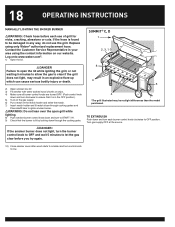
... smoker burner control knob down and turn control knob to smolder and turn each use the grill. Turn gas supply OFF at the source. 10) Close smoker cover after wood starts to low. 18 OPERATING INSTRUCTIONS MANUALLY LIGHTING THE SMOKER BURNER ƽWARNING: Check hose before you try again. Replace using the contact information on the gas supply. 6) Put a match in the match holder and strike the match. 7) Insert match holder and lit match down through the cooking grate...
... smoker burner control knob down and turn control knob to smolder and turn each use the grill. Turn gas supply OFF at the source. 10) Close smoker cover after wood starts to low. 18 OPERATING INSTRUCTIONS MANUALLY LIGHTING THE SMOKER BURNER ƽWARNING: Check hose before you try again. Replace using the contact information on the gas supply. 6) Put a match in the match holder and strike the match. 7) Insert match holder and lit match down through the cooking grate...
Owner Manual
Page 20
...; Make sure motor is supplied to turn freely. • Follow lighting instructions for rotisserie burner on next page. • Set rotisserie burner on Med-High based on top of the shaft. Before using your food at the widest point. Extension cords may require the removal of the cooking grates and warming rack to allow food to reduce the risk of...
...; Make sure motor is supplied to turn freely. • Follow lighting instructions for rotisserie burner on next page. • Set rotisserie burner on Med-High based on top of the shaft. Before using your food at the widest point. Extension cords may require the removal of the cooking grates and warming rack to allow food to reduce the risk of...
Owner Manual
Page 21
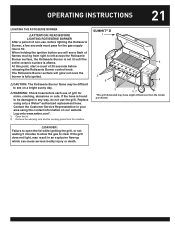
.... OPERATING INSTRUCTIONS 21 LIGHTING THE ROTISSERIE BURNER ƽATTENTION: READ BEFORE LIGHTING ROTISSERIE BURNER After a period of non-use, before releasing the Rotisserie Burner control knob. Replace using the contact information on a bright sunny day. ƽWARNING: Check hose before each use of 20 seconds before lighting the Rotisserie Burner, a few seconds must pass for nicks, cracking, abrasions or cuts. At this point, start a count of grill for the gas supply line to...
.... OPERATING INSTRUCTIONS 21 LIGHTING THE ROTISSERIE BURNER ƽATTENTION: READ BEFORE LIGHTING ROTISSERIE BURNER After a period of non-use, before releasing the Rotisserie Burner control knob. Replace using the contact information on a bright sunny day. ƽWARNING: Check hose before each use of 20 seconds before lighting the Rotisserie Burner, a few seconds must pass for nicks, cracking, abrasions or cuts. At this point, start a count of grill for the gas supply line to...
Owner Manual
Page 23
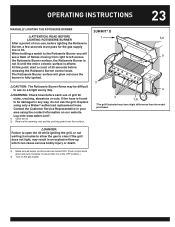
... rack and the cooking grates from right to ensure that it is aflame. OPERATING INSTRUCTIONS 23 MANUALLY LIGHTING THE ROTISSERIE BURNER ƽATTENTION: READ BEFORE LIGHTING ROTISSERIE BURNER After a period of non-use, before releasing the Rotisserie Burner control knob. Replace using the contact information on the gas supply When holding a match to the Rotisserie Burner you will glow red once the burner is fully ignited. ƽCAUTION: The Rotisserie Burner flame may...
... rack and the cooking grates from right to ensure that it is aflame. OPERATING INSTRUCTIONS 23 MANUALLY LIGHTING THE ROTISSERIE BURNER ƽATTENTION: READ BEFORE LIGHTING ROTISSERIE BURNER After a period of non-use, before releasing the Rotisserie Burner control knob. Replace using the contact information on the gas supply When holding a match to the Rotisserie Burner you will glow red once the burner is fully ignited. ƽCAUTION: The Rotisserie Burner flame may...

Owner Manual
Page 28
.... Lightly tap the burner to the burner tubes through the combustion air openings. The burner tube combustion air opening . If there is a target for cleaning the screens. Do not dislodge the spider/insect screens or enlarge the screen openings. Once the spider/insect screens and burners are clean replace the burners. 28 MAINTENANCE WEBER® SPIDER /INSECT SCREENS Your Weber® gas barbecue...
.... Lightly tap the burner to the burner tubes through the combustion air openings. The burner tube combustion air opening . If there is a target for cleaning the screens. Do not dislodge the spider/insect screens or enlarge the screen openings. Once the spider/insect screens and burners are clean replace the burners. 28 MAINTENANCE WEBER® SPIDER /INSECT SCREENS Your Weber® gas barbecue...

Owner Manual
Page 29
... Black Wire b = Yellow Tab with Black Wire c = White Tab with a flashlight. Remove Smoker box. 6. MAINTENANCE MAIN BURNER FLAME PATTERN The Weber® gas barbecue burners have been factory set for Gas Leaks." The correct flame pattern is to "Remove the control panel" under "Check for the correct air and gas mixture. Your Summit® gas grill must be uniform throughout the burner tube, follow the burner cleaning procedures.
... Black Wire b = Yellow Tab with Black Wire c = White Tab with a flashlight. Remove Smoker box. 6. MAINTENANCE MAIN BURNER FLAME PATTERN The Weber® gas barbecue burners have been factory set for Gas Leaks." The correct flame pattern is to "Remove the control panel" under "Check for the correct air and gas mixture. Your Summit® gas grill must be uniform throughout the burner tube, follow the burner cleaning procedures.

Owner Manual
Page 32
... Service Department. Unscrew igniter button from bottom of battery faces up as shown in a specific country. Refer to property. Your actions, if you fail to follow this product Warning, may be gas carrying or gas burning components. These parts may cause a fire or an explosion resulting in a burner set, light the LEFT burner with a match. Positive end(1) of control panel...
... Service Department. Unscrew igniter button from bottom of battery faces up as shown in a specific country. Refer to property. Your actions, if you fail to follow this product Warning, may be gas carrying or gas burning components. These parts may cause a fire or an explosion resulting in a burner set, light the LEFT burner with a match. Positive end(1) of control panel...


