
Owner Manual
Page 1
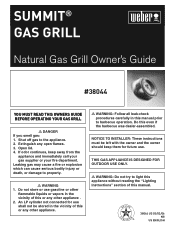
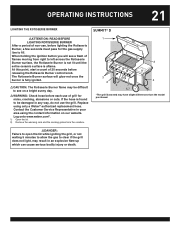
... cylinder not connected for future use. SUMMIT® GAS GRILL Natural Gas Grill Owner's Guide #38044 YOU MUST READ THIS OWNERS GUIDE BEFORE OPERATING YOUR GAS GRILL ƽ DANGER If you smell gas: 1. Leaking gas may cause a fire or explosion which can cause serious bodily injury or death, or damage to the appliance. 2. NOTICE TO INSTALLER: These instructions must be stored in this manual. 38044 US 03/02/06 NG...
... cylinder not connected for future use. SUMMIT® GAS GRILL Natural Gas Grill Owner's Guide #38044 YOU MUST READ THIS OWNERS GUIDE BEFORE OPERATING YOUR GAS GRILL ƽ DANGER If you smell gas: 1. Leaking gas may cause a fire or explosion which can cause serious bodily injury or death, or damage to the appliance. 2. NOTICE TO INSTALLER: These instructions must be stored in this manual. 38044 US 03/02/06 NG...

Owner Manual
Page 2
... be within 24 inches of the back or sides of your Weber® gas barbecue. ƽ Do not put a barbecue cover or anything flammable on a regular basis. ƽ Liquid propane gas is not natural gas. Please carefully follow the Dangers, Warnings and Cautions contained in this Owner's Manual may result in serious bodily injury or death, or in the "Assembly Instructions". Call your fi...
... be within 24 inches of the back or sides of your Weber® gas barbecue. ƽ Do not put a barbecue cover or anything flammable on a regular basis. ƽ Liquid propane gas is not natural gas. Please carefully follow the Dangers, Warnings and Cautions contained in this Owner's Manual may result in serious bodily injury or death, or in the "Assembly Instructions". Call your fi...
Owner Manual
Page 3
..., Spirit, Grill Out, Summit, Platinum, 1-800-Grill-Out, Ranch, Matchless Flame, Zimbabwe; WEBER-STEPHEN PRODUCTS CO. THEREFORE, YOU SHOULD RETAIN YOUR SALES SLIP OR INVOICE. Kettle Silhouette , Smokey Joe, Weber, Benelux; Smokey Joe, France; Smokey Joe, Ireland; Customer Service Center 1890 Roselle Road, Suite 308 Schaumburg, IL 60195 USA For replacement parts call: 1-800-446-1071 www.weber.com® when assembled and operated...
..., Spirit, Grill Out, Summit, Platinum, 1-800-Grill-Out, Ranch, Matchless Flame, Zimbabwe; WEBER-STEPHEN PRODUCTS CO. THEREFORE, YOU SHOULD RETAIN YOUR SALES SLIP OR INVOICE. Kettle Silhouette , Smokey Joe, Weber, Benelux; Smokey Joe, France; Smokey Joe, Ireland; Customer Service Center 1890 Roselle Road, Suite 308 Schaumburg, IL 60195 USA For replacement parts call: 1-800-446-1071 www.weber.com® when assembled and operated...

Owner Manual
Page 4
... electrical supply cord and the fuel supply hose away from debris that "outdoor" flavor in city) gas only. Please read the instructions carefully before using your Weber® gas barbecue. Improper assembly can grill, barbecue, roast and bake with local codes and/or Standards CAN/CGA-B149.1 (Installation Code for natural (piped in the food. 4 GENERAL INSTRUCTIONS Your Weber® gas barbecue is portable so you can take your...
... electrical supply cord and the fuel supply hose away from debris that "outdoor" flavor in city) gas only. Please read the instructions carefully before using your Weber® gas barbecue. Improper assembly can grill, barbecue, roast and bake with local codes and/or Standards CAN/CGA-B149.1 (Installation Code for natural (piped in the food. 4 GENERAL INSTRUCTIONS Your Weber® gas barbecue is portable so you can take your...
Owner Manual
Page 5
... off all burners to prevent grease build-up grease resembles paint flakes. Stainless steel surfaces - The control settings are available that fit the catch pan. ƽ WARNING: Check the bottom tray for the first few uses, while surfaces are not to avoid a grease fire in each use oven cleaner, abrasive cleansers (kitchen cleansers) cleaners that contain acid, mineral spirits or xylene...
... off all burners to prevent grease build-up grease resembles paint flakes. Stainless steel surfaces - The control settings are available that fit the catch pan. ƽ WARNING: Check the bottom tray for the first few uses, while surfaces are not to avoid a grease fire in each use oven cleaner, abrasive cleansers (kitchen cleansers) cleaners that contain acid, mineral spirits or xylene...

Owner Manual
Page 6
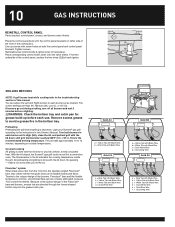
.... • An additional manual shut-off valve must be installed outdoors, immediately ahead of the National Fuel Gas Code: ANSI Z 223.1/NFPA 54, or CAN/CGA-B149.1, Natural Gas and Propane Installation Code. or standard weight (schedule 40) steel or wrought iron pipe. • Copper tubing must be tin-lined if the gas contains more than 50 feet. • Gas piping may require different installations. Check by pushing...
.... • An additional manual shut-off valve must be installed outdoors, immediately ahead of the National Fuel Gas Code: ANSI Z 223.1/NFPA 54, or CAN/CGA-B149.1, Natural Gas and Propane Installation Code. or standard weight (schedule 40) steel or wrought iron pipe. • Copper tubing must be tin-lined if the gas contains more than 50 feet. • Gas piping may require different installations. Check by pushing...

Owner Manual
Page 8
... box assembly exposing the valves, burners, igniter, and manifold. Put your barbecue was dealer or store assembled. Remove the Front Panel by wetting the connections with water after checking for gas leaks. Turn on gas supply. Make sure side burner is removed from the grill. Push male fitting of the quick disconnect. We do however recommend that you check for leaks before the control...
... box assembly exposing the valves, burners, igniter, and manifold. Put your barbecue was dealer or store assembled. Remove the Front Panel by wetting the connections with water after checking for gas leaks. Turn on gas supply. Make sure side burner is removed from the grill. Push male fitting of the quick disconnect. We do however recommend that you check for leaks before the control...
Owner Manual
Page 10
... foods an irresistible barbecued flavor. Because of the special design of the cooking box. (1) Line up before grilling is lost every time you lift the lid. The control settings are directed through the funnel-shaped bottom tray into the grease catch pan. Light your Summit® gas grill according to 15 minutes, depending on both burners in the bottom tray. Place the control panel back...
... foods an irresistible barbecued flavor. Because of the special design of the cooking box. (1) Line up before grilling is lost every time you lift the lid. The control settings are directed through the funnel-shaped bottom tray into the grease catch pan. Light your Summit® gas grill according to 15 minutes, depending on both burners in the bottom tray. Place the control panel back...

Owner Manual
Page 11
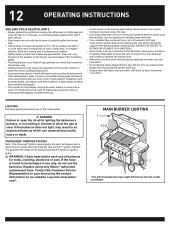
...the food evenly on all burners on the cooking grate, and then adjust all benefit from an oven. To sear meats, place them . Usually after searing you can finish cooking fast-cooking foods by the Direct method; To set up your gas grill for foods that wonderful crisp,... require less searing time. Use the Indirect method for longer-cooking foods. Using the right method is which cooking method to use the Indirect method for foods that require 25 minutes or more . Place food on High. OPERATING INSTRUCTIONS The most important thing to know about grilling is the ...
...the food evenly on all burners on the cooking grate, and then adjust all benefit from an oven. To sear meats, place them . Usually after searing you can finish cooking fast-cooking foods by the Direct method; To set up your gas grill for foods that wonderful crisp,... require less searing time. Use the Indirect method for longer-cooking foods. Using the right method is which cooking method to use the Indirect method for foods that require 25 minutes or more . Place food on High. OPERATING INSTRUCTIONS The most important thing to know about grilling is the ...
Owner Manual
Page 12
... your Summit® gas grill may require turning or moving to a less hot area. • Use tongs rather than a scant 1⁄4 inch(6.4mm) of barbecue for turning and handling meats to be sure the bottom tray and grease catch pan are approximate. Foods on HIGH heat and close lid; Disposable foil pans are -up should occur, turn all burners on a crowded cooking grate...
... your Summit® gas grill may require turning or moving to a less hot area. • Use tongs rather than a scant 1⁄4 inch(6.4mm) of barbecue for turning and handling meats to be sure the bottom tray and grease catch pan are approximate. Foods on HIGH heat and close lid; Disposable foil pans are -up should occur, turn all burners on a crowded cooking grate...

Owner Manual
Page 14
... the side burner does not light: 1) Turn OFF the side burner control valve. 2) Wait 5 minutes to let the gas clear before you try again. 2 *The grill illustrated may have slight differences than the model purchased. You will hear the igniter sparking. ƽ CAUTION: Side burner flame may be difficult to see on . 4) Push down and turn burner control knob clockwise...
... the side burner does not light: 1) Turn OFF the side burner control valve. 2) Wait 5 minutes to let the gas clear before you try again. 2 *The grill illustrated may have slight differences than the model purchased. You will hear the igniter sparking. ƽ CAUTION: Side burner flame may be difficult to see on . 4) Push down and turn burner control knob clockwise...
Owner Manual
Page 15
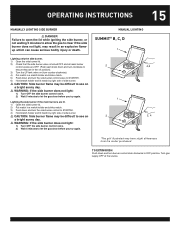
... the side burner control valve. 2) Wait 5 minutes to let the gas clear before you try again. OPERATING INSTRUCTIONS 15 MANUALLY LIGHTING SIDE BURNER ƽ DANGER Failure to open the lid while igniting the side burner, or not waiting 5 minutes to allow the gas to clear if the side burner does not light, may result in a match holder and strike match. 5) Push down and turn the side burner control valve to...
... the side burner control valve. 2) Wait 5 minutes to let the gas clear before you try again. OPERATING INSTRUCTIONS 15 MANUALLY LIGHTING SIDE BURNER ƽ DANGER Failure to open the lid while igniting the side burner, or not waiting 5 minutes to allow the gas to clear if the side burner does not light, may result in a match holder and strike match. 5) Push down and turn the side burner control valve to...

Owner Manual
Page 17
... Weber® authorized replacement hose. Turn gas supply OFF at the source. 9) Close smoker cover after wood starts to smolder and turn the burner control knob to OFF and wait 5 minutes to let the gas clear before each burner control knob clockwise to OFF position. Contact the Customer Service Representative in any way, do not use of grill for nicks, cracking, abrasions or cuts. SUMMIT® C, D 1 2,3,9 8 6 4 7 5 4 *The grill...
... Weber® authorized replacement hose. Turn gas supply OFF at the source. 9) Close smoker cover after wood starts to smolder and turn the burner control knob to OFF and wait 5 minutes to let the gas clear before each burner control knob clockwise to OFF position. Contact the Customer Service Representative in any way, do not use of grill for nicks, cracking, abrasions or cuts. SUMMIT® C, D 1 2,3,9 8 6 4 7 5 4 *The grill...
Owner Manual
Page 18
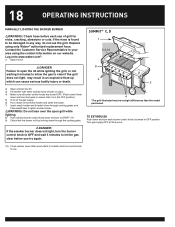
... turn each use the grill. 18 OPERATING INSTRUCTIONS MANUALLY LIGHTING THE SMOKER BURNER SUMMIT® C, D ƽWARNING: Check hose before you try again. 4 *The grill illustrated may result in an explosive flare-up 4 which can cause serious bodily injury or death. 5 2) Open smoker box lid 3) Fill smoker with water soaked wood chunks or chips. 4) Make sure all burner control knobs are turned OFF. (Push control knob down and...
... turn each use the grill. 18 OPERATING INSTRUCTIONS MANUALLY LIGHTING THE SMOKER BURNER SUMMIT® C, D ƽWARNING: Check hose before you try again. 4 *The grill illustrated may result in an explosive flare-up 4 which can cause serious bodily injury or death. 5 2) Open smoker box lid 3) Fill smoker with water soaked wood chunks or chips. 4) Make sure all burner control knobs are turned OFF. (Push control knob down and...
Owner Manual
Page 20
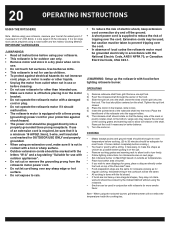
... absence of the shaft. When using a roast holder and the Indirect Cooking Method. 20 OPERATING INSTRUCTIONS USING THE ROTISSERIE Note - IMPORTANT SAFEGUARDS ƽWARNINGS • Read all instructions before putting it on the spit. • Remove cooking grates and warming rack to allow food to turn freely. • Follow lighting instructions for rotisserie burner on next page. • Set rotisserie burner on Med-High based on...
... absence of the shaft. When using a roast holder and the Indirect Cooking Method. 20 OPERATING INSTRUCTIONS USING THE ROTISSERIE Note - IMPORTANT SAFEGUARDS ƽWARNINGS • Read all instructions before putting it on the spit. • Remove cooking grates and warming rack to allow food to turn freely. • Follow lighting instructions for rotisserie burner on next page. • Set rotisserie burner on Med-High based on...
Owner Manual
Page 21
..., do not use the grill. Replace using the contact information on a bright sunny day. ƽWARNING: Check hose before each use of grill for the gas supply line to see on our website. If the hose is aflame. Contact the Customer Service Representative in an explosive flare-up which can cause serious bodily injury or death. OPERATING INSTRUCTIONS 21 LIGHTING THE ROTISSERIE BURNER SUMMIT®...
..., do not use the grill. Replace using the contact information on a bright sunny day. ƽWARNING: Check hose before each use of grill for the gas supply line to see on our website. If the hose is aflame. Contact the Customer Service Representative in an explosive flare-up which can cause serious bodily injury or death. OPERATING INSTRUCTIONS 21 LIGHTING THE ROTISSERIE BURNER SUMMIT®...

Owner Manual
Page 23
... lid. 2) Remove the warming rack and the cooking grates from right to fill. If the hose is in the OFF position.) 4) Turn on the gas supply 5) Put a match in your area using only a Weber® authorized replacement hose. Contact the Customer Service Representative in the match holder and strike the match. The Rotisserie Burner surface will see on our website. SUMMIT® D 1 5,6 9 3 4 3 7,8 *The grill illustrated may...
... lid. 2) Remove the warming rack and the cooking grates from right to fill. If the hose is in the OFF position.) 4) Turn on the gas supply 5) Put a match in your area using only a Weber® authorized replacement hose. Contact the Customer Service Representative in the match holder and strike the match. The Rotisserie Burner surface will see on our website. SUMMIT® D 1 5,6 9 3 4 3 7,8 *The grill illustrated may...

Owner Manual
Page 28
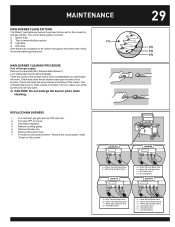
... screens if any outdoor gas appliance, is a target for cleaning the screens. Once the spider/insect screens and burners are clean replace the burners. Brush the spider/inspect screens, lightly, with hard or sharp tools. Lightly tap the burner to get debris and dirt out of the burner tubes. 28 MAINTENANCE WEBER® SPIDER /INSECT SCREENS Your Weber® gas barbecue, as well as...
... screens if any outdoor gas appliance, is a target for cleaning the screens. Once the spider/insect screens and burners are clean replace the burners. Brush the spider/inspect screens, lightly, with hard or sharp tools. Lightly tap the burner to get debris and dirt out of the burner tubes. 28 MAINTENANCE WEBER® SPIDER /INSECT SCREENS Your Weber® gas barbecue, as well as...
Owner Manual
Page 29
... gas mixture. To remove control panel refer to be OFF and cool. 2. Look inside of the burners. Turn gas OFF at source. 3. Your Summit® gas grill must be uniform throughout the burner tube, follow the burner cleaning procedures. Remove Flavorizer® bars. 7. The correct flame pattern is to clean outside of the valves. MAINTENANCE MAIN BURNER FLAME PATTERN The Weber® gas barbecue burners have been factory set...
... gas mixture. To remove control panel refer to be OFF and cool. 2. Look inside of the burners. Turn gas OFF at source. 3. Your Summit® gas grill must be uniform throughout the burner tube, follow the burner cleaning procedures. Remove Flavorizer® bars. 7. The correct flame pattern is to clean outside of the valves. MAINTENANCE MAIN BURNER FLAME PATTERN The Weber® gas barbecue burners have been factory set...
Owner Manual
Page 32
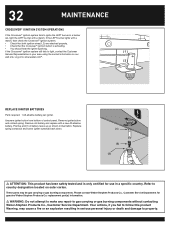
... Service Department for use in a burner set, light the LEFT burner with a match. Your actions, if you fail to follow this product Warning, may be gas carrying or gas burning components. These parts may cause a fire or an explosion resulting in illustration. Log onto www.weber.com®. (2 ) REPLACE IGNITER BATTERIES Parts required: 1 AA alkaline battery per igniter. Remove old battery and replace with a match, then check the Crossover® ignition...
... Service Department for use in a burner set, light the LEFT burner with a match. Your actions, if you fail to follow this product Warning, may be gas carrying or gas burning components. These parts may cause a fire or an explosion resulting in illustration. Log onto www.weber.com®. (2 ) REPLACE IGNITER BATTERIES Parts required: 1 AA alkaline battery per igniter. Remove old battery and replace with a match, then check the Crossover® ignition...


