
Owner Manual
Page 2
... or explosive vapors can help to pre- Do not suitable for repair. The smaller the gauge number, the heavier the cord. (NOTE: The correct 2 Read the entire instruction manual before assembling and using this unit. Always disconnect unit from power source before unplugging. Turn off all other parts of fire, electric shock, and serious injury. ricocheting into openings. S Always wear a respirator or...
... or explosive vapors can help to pre- Do not suitable for repair. The smaller the gauge number, the heavier the cord. (NOTE: The correct 2 Read the entire instruction manual before assembling and using this unit. Always disconnect unit from power source before unplugging. Turn off all other parts of fire, electric shock, and serious injury. ricocheting into openings. S Always wear a respirator or...

Owner Manual
Page 3
... recommended procedures described in the instruction manual performed by your authorized service dealer. Replace damaged parts before using a damp cloth. Wipe off properly. S Check air intake openings and tubes frequently, always with a clean dry cloth. S Keep the extension cord clear of grounding be added to this unit, including housing, switch, motor, etc., must be diagnosed and repaired by your authorized service dealer. S Ground Fault Circuit...
... recommended procedures described in the instruction manual performed by your authorized service dealer. Replace damaged parts before using a damp cloth. Wipe off properly. S Check air intake openings and tubes frequently, always with a clean dry cloth. S Keep the extension cord clear of grounding be added to this unit, including housing, switch, motor, etc., must be diagnosed and repaired by your authorized service dealer. S Ground Fault Circuit...

Owner Manual
Page 4
.... Keep vents and tubes free of air can be stopped and the impeller blades no longer turning to ricochet which could set the col- This plug will require the use the collection bag shoulder strap when vacuuming to vacuum water or other ) and will fit into a polarized extension cord only one way. S Use only recommended attachments and replacement parts to recommended procedures...
.... Keep vents and tubes free of air can be stopped and the impeller blades no longer turning to ricochet which could set the col- This plug will require the use the collection bag shoulder strap when vacuuming to vacuum water or other ) and will fit into a polarized extension cord only one way. S Use only recommended attachments and replacement parts to recommended procedures...
Owner Manual
Page 5
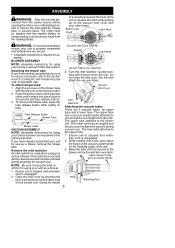
... tube. Ensure unit is unplugged. 2. Upper Vacuum Tube Vacuum Assist Handle Hook 5 Retaining Post Tube Release Button Blower Tube Blower outlet VACUUM ASSEMBLY NOTE: Assembly instructions for using your other hand. sion cord is properly assembled and all fasteners are secure. connect from the rotating blades. Vacuum Inlet Cover Inlet Restrictor Attaching the vacuum tubes There are explained in the previous section...
... tube. Ensure unit is unplugged. 2. Upper Vacuum Tube Vacuum Assist Handle Hook 5 Retaining Post Tube Release Button Blower Tube Blower outlet VACUUM ASSEMBLY NOTE: Assembly instructions for using your other hand. sion cord is properly assembled and all fasteners are secure. connect from the rotating blades. Vacuum Inlet Cover Inlet Restrictor Attaching the vacuum tubes There are explained in the previous section...

Owner Manual
Page 6
...the unit will still operate. ing the tip of the elbow tube and the hole for vacuum use. Close the inlet cover and make sure it . SELECT AN EXTENSION CORD Use only a 120 A.C. Push the small end of air from the blower. NOTE: If you are unable to power your other hand....latch while pulling up on the vacuum assist handle with the grooves on the vacuum assist handle. Adjust the strap to the upper vacuum tube, first align the arrows on left shoulder. 4. Remove the collection bag. 5. Latch Area Vacuum Assist Handle 3. To attach the lower vacuum tube to allow a free flow ...
...the unit will still operate. ing the tip of the elbow tube and the hole for vacuum use. Close the inlet cover and make sure it . SELECT AN EXTENSION CORD Use only a 120 A.C. Push the small end of air from the blower. NOTE: If you are unable to power your other hand....latch while pulling up on the vacuum assist handle with the grooves on the vacuum assist handle. Adjust the strap to the upper vacuum tube, first align the arrows on left shoulder. 4. Remove the collection bag. 5. Latch Area Vacuum Assist Handle 3. To attach the lower vacuum tube to allow a free flow ...

Owner Manual
Page 7
... USING YOUR UNIT KNOW YOUR ELECTRIC BLOWER/VACUUM READ THIS INSTRUCTION MANUAL AND SAFETY RULES BEFORE OPERATING YOUR UNIT. Otherwise, loss of the various controls and adjustments. The cord must be undamaged. Plug connectors must be : D Specifically marked as suitable for future reference. Insert the cord receptacle into the recessed plug. CAUTION: Failure to use multiple cords. The extension cord used to familiarize yourself with the location of power...
... USING YOUR UNIT KNOW YOUR ELECTRIC BLOWER/VACUUM READ THIS INSTRUCTION MANUAL AND SAFETY RULES BEFORE OPERATING YOUR UNIT. Otherwise, loss of the various controls and adjustments. The cord must be undamaged. Plug connectors must be : D Specifically marked as suitable for future reference. Insert the cord receptacle into the recessed plug. CAUTION: Failure to use multiple cords. The extension cord used to familiarize yourself with the location of power...

Owner Manual
Page 8
... into your unit at high speed. Carefully reach into piles, or removing debris from the warranty, the operator must maintain unit as walks, large stones, vehicles, and fences. MAINTENANCE WARNING: Disconnect power source before using the unit. BLOWER TUBE The BLOWER TUBE is designed to direct the flow of these positions to turn on this unit does not cover items that can ricochet...
... into your unit at high speed. Carefully reach into piles, or removing debris from the warranty, the operator must maintain unit as walks, large stones, vehicles, and fences. MAINTENANCE WARNING: Disconnect power source before using the unit. BLOWER TUBE The BLOWER TUBE is designed to direct the flow of these positions to turn on this unit does not cover items that can ricochet...
Owner Manual
Page 9
... the power source. Clear all remaining steps. 2. Have parts replaced by moving the switch to latch properly or if it will not be held open , remove the vacuum tubes. If your authorized service dealer. Inspect the blower and all contents (grass, leaves, etc.). Discontinue use , inspect complete unit for loose or damaged parts. SERVICE HOW TO REMOVE AN OBJECT FROM THE AIR INTAKE...
... the power source. Clear all remaining steps. 2. Have parts replaced by moving the switch to latch properly or if it will not be held open , remove the vacuum tubes. If your authorized service dealer. Inspect the blower and all contents (grass, leaves, etc.). Discontinue use , inspect complete unit for loose or damaged parts. SERVICE HOW TO REMOVE AN OBJECT FROM THE AIR INTAKE...

Owner Manual
Page 10
... WEED EATER. CAUSE 1. Extension cord discon-- Mechanical failure Unit 1. Mechanical failure vibrates abnormally. Reconnect extension cord. 3. Reset circuit breaker or fuse. 4. not turn 2. freely. 1. LIMITED WARRANTY WEED EATER, a division of 1975. ries and/or attachments not specifically recommended by improper handling, improper maintenance or alteration, or the use during the warranty period. Additionally, this warranty any unanswered questions concerning this product. This warranty does not cover predelivery set...
... WEED EATER. CAUSE 1. Extension cord discon-- Mechanical failure Unit 1. Mechanical failure vibrates abnormally. Reconnect extension cord. 3. Reset circuit breaker or fuse. 4. not turn 2. freely. 1. LIMITED WARRANTY WEED EATER, a division of 1975. ries and/or attachments not specifically recommended by improper handling, improper maintenance or alteration, or the use during the warranty period. Additionally, this warranty any unanswered questions concerning this product. This warranty does not cover predelivery set...

Parts List
Page 1
... -- switch) Button -- Door Latch Assy. Part No. 530403833 530095599 530403769 530403989 530403842 530403850 Description Spring -- Vac Bag Tube -- Wiring Harness (incl. Motor Washer Impeller Nut -- Vacuum Inlet Tube -- Elbow Kit--Upper/Lower Tube w/handle Tube -- PARTS LIST NO. 530086358 DATE Replaces 07/11/06 530086358 -- 04/06/05 WARNING All repairs, adjustments and maintenance not described in the Operator's Manual must be performed by qualified service personnel. Blower...
... -- switch) Button -- Door Latch Assy. Part No. 530403833 530095599 530403769 530403989 530403842 530403850 Description Spring -- Vac Bag Tube -- Wiring Harness (incl. Motor Washer Impeller Nut -- Vacuum Inlet Tube -- Elbow Kit--Upper/Lower Tube w/handle Tube -- PARTS LIST NO. 530086358 DATE Replaces 07/11/06 530086358 -- 04/06/05 WARNING All repairs, adjustments and maintenance not described in the Operator's Manual must be performed by qualified service personnel. Blower...

Parts List
Page 2
... -- Door Assy. -- Wiring Harness (incl. Warning n = NEW PART NUMBER FOR THIS IPL K = REFER TO THE SERVICE REFERENCE INDICATED FOR MORE INFORMATION. (LOCATED AT END OF IPL) Switch Assy. Door Latch Assy. Lower Vac Not Shown 530403871 Decal -- PARTS LIST NO. 530086358 DATE Replaces 07/11/06 530086358 -- 04/06/05 WARNING All repairs, adjustments and maintenance not described in the Operator's Manual must be performed...
... -- Door Assy. -- Wiring Harness (incl. Warning n = NEW PART NUMBER FOR THIS IPL K = REFER TO THE SERVICE REFERENCE INDICATED FOR MORE INFORMATION. (LOCATED AT END OF IPL) Switch Assy. Door Latch Assy. Lower Vac Not Shown 530403871 Decal -- PARTS LIST NO. 530086358 DATE Replaces 07/11/06 530086358 -- 04/06/05 WARNING All repairs, adjustments and maintenance not described in the Operator's Manual must be performed...


