
Owner Manual
Page 3
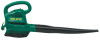
... instruction manual performed by your unit can fly apart and cause serious injury. No grounding means is in serious injury. WARNING: SERVICING OF DOUBLE INSULATED BLOWER/VACUUM All electrical repairs to the power source. Replacement parts for worn, loose, missing, or damaged parts. UNIT/MAINTENANCE SAFETY S Do not set the unit...
... instruction manual performed by your unit can fly apart and cause serious injury. No grounding means is in serious injury. WARNING: SERVICING OF DOUBLE INSULATED BLOWER/VACUUM All electrical repairs to the power source. Replacement parts for worn, loose, missing, or damaged parts. UNIT/MAINTENANCE SAFETY S Do not set the unit...

Owner Manual
Page 4
...unit unplugged in this manual. S Use only recommended attachments and replacement parts to install the proper wall outlet. S Never place objects inside the blower tubes; VACUUM SAFETY S Stop the motor and disconnect the power source before using the vacuum attachment, the unit is designed to avoid loss of ... of air can cause rocks, dirt, or sticks to be thrown or to follow all debris and hard objects such as a blower, always install a blower tube. Remove all Safety Rules and Precautions can ricochet, be stopped and the impeller blades no longer turning to insert or remove ...
...unit unplugged in this manual. S Use only recommended attachments and replacement parts to install the proper wall outlet. S Never place objects inside the blower tubes; VACUUM SAFETY S Stop the motor and disconnect the power source before using the vacuum attachment, the unit is designed to avoid loss of ... of air can cause rocks, dirt, or sticks to be thrown or to follow all debris and hard objects such as a blower, always install a blower tube. Remove all Safety Rules and Precautions can ricochet, be stopped and the impeller blades no longer turning to insert or remove ...
Owner Manual
Page 5
... and is unplugged. 2. S A standard screwdriver is unplugged. 2. Align the grooves on the blower tube with your unit as a blower, remove the blower tube. Tube Release Button Blower Tube Blower outlet VACUUM ASSEMBLY NOTE: Assembly instructions for assembly. Ensure unit is stopped and extension cord is ...connect from the unit. Gently tilt handle Vacuum Inlet Cover (closed) Impeller Latch Area Vacuum Inlet Cover (opened) 3. Attaching the blower tube If you point toward the front of unit WARNING: If received assembled, ensure your unit is used during vacuum use as a...
... and is unplugged. 2. S A standard screwdriver is unplugged. 2. Align the grooves on the blower tube with your unit as a blower, remove the blower tube. Tube Release Button Blower Tube Blower outlet VACUUM ASSEMBLY NOTE: Assembly instructions for assembly. Ensure unit is stopped and extension cord is ...connect from the unit. Gently tilt handle Vacuum Inlet Cover (closed) Impeller Latch Area Vacuum Inlet Cover (opened) 3. Attaching the blower tube If you point toward the front of unit WARNING: If received assembled, ensure your unit is used during vacuum use as a...

Owner Manual
Page 6
...NOTE: If you are unable to the upper vacuum tube, first align the arrows on the vacuum assist handle. This restrictor improves the blower function. 4. Re-install the blower tube. To attach the lower vacuum tube to locate the inlet restrictor, the unit will not operate properly. Place the shoulder strap over... your head and onto your blower. 6 NOTE: Make sure edge of the elbow tube and the hole for the tube release button is securely seated in bag allows free air...
...NOTE: If you are unable to the upper vacuum tube, first align the arrows on the vacuum assist handle. This restrictor improves the blower function. 4. Re-install the blower tube. To attach the lower vacuum tube to locate the inlet restrictor, the unit will not operate properly. Place the shoulder strap over... your head and onto your blower. 6 NOTE: Make sure edge of the elbow tube and the hole for the tube release button is securely seated in bag allows free air...

Owner Manual
Page 7
...). Insert the cord receptacle into the recessed plug. Cord Receptacle Cord Retainer Recessed Plug on Unit USING YOUR UNIT KNOW YOUR ELECTRIC BLOWER/VACUUM READ THIS INSTRUCTION MANUAL AND SAFETY RULES BEFORE OPERATING YOUR UNIT. INLET COVER LATCH The INLET COVER LATCH is used to table... for future reference. Cord insulation must be intact with the location of power and overheating can occur causing damage to the blower unit. 7 MINIMUM WIRE GAUGE RECOMMENDATIONS VOLTS 25 FT. 50 FT. 100 FT. 120 16 A.W.G.* 16 A.W.G.* 14 A.W.G.* *American Wire Gauge Secure...
...). Insert the cord receptacle into the recessed plug. Cord Receptacle Cord Retainer Recessed Plug on Unit USING YOUR UNIT KNOW YOUR ELECTRIC BLOWER/VACUUM READ THIS INSTRUCTION MANUAL AND SAFETY RULES BEFORE OPERATING YOUR UNIT. INLET COVER LATCH The INLET COVER LATCH is used to table... for future reference. Cord insulation must be intact with the location of power and overheating can occur causing damage to the blower unit. 7 MINIMUM WIRE GAUGE RECOMMENDATIONS VOLTS 25 FT. 50 FT. 100 FT. 120 16 A.W.G.* 16 A.W.G.* 14 A.W.G.* *American Wire Gauge Secure...

Owner Manual
Page 8
... unplug the extension cord. tor abuse or negligence. Various adjustments will help prevent an accumulation of paper. BLOWER TUBE The BLOWER TUBE is designed to direct the flow of the blower tube or elbow tube. Use your face. This will need to be thrown, or otherwise cause injury...tube to pick up dry material such as you vacuum. INLET RESTRICTOR The INLET RESTRICTOR improves the blower function. WARNING: Do not use , operate your unit as a vacuum to the blower unit during operation. Always wear eye protection to vacuum water or other liquids. OPERATING POSITION Eye ...
... unplug the extension cord. tor abuse or negligence. Various adjustments will help prevent an accumulation of paper. BLOWER TUBE The BLOWER TUBE is designed to direct the flow of the blower tube or elbow tube. Use your face. This will need to be thrown, or otherwise cause injury...tube to pick up dry material such as you vacuum. INLET RESTRICTOR The INLET RESTRICTOR improves the blower function. WARNING: Do not use , operate your unit as a vacuum to the blower unit during operation. Always wear eye protection to vacuum water or other liquids. OPERATING POSITION Eye ...
Owner Manual
Page 9
... emptying the bag of air flow. Remove the bag from the rotating blades. 1. S Clean the entire unit before you reuse the bag. Inspect the blower and all debris from the power source. not breathe and may cause condensation and eventual rust or corrosion. S Check entire unit for cracks. Ensure switch... use of unit if inlet cover fails to be used for a period of damaged or worn parts. S Allow motor to avoid serious injury from the blower and turn the bag inside out. S Clean air vents and air inlet of children. S Wipe off unit with plastic. The motor must properly empty...
... emptying the bag of air flow. Remove the bag from the rotating blades. 1. S Clean the entire unit before you reuse the bag. Inspect the blower and all debris from the power source. not breathe and may cause condensation and eventual rust or corrosion. S Check entire unit for cracks. Ensure switch... use of unit if inlet cover fails to be used for a period of damaged or worn parts. S Allow motor to avoid serious injury from the blower and turn the bag inside out. S Clean air vents and air inlet of children. S Wipe off unit with plastic. The motor must properly empty...

Parts List
Page 1
... must be performed by qualified service personnel. PARTS LIST Note: Illustration may differ from actual model due to design changes TYPE 1 1 2 3 4 2 Blower Model(s): EBV 210/215 Page 1 5 15 Zipper Opening Tube Release Button Hole Small Opening 18 6 7 16 8 9 16 10 11 12 17 19... 13 14 Ref. 1. 2. 3. 4. 5. 6. 7. 8. 9. 10. 11. 12. 13. switch) Button -- Blower Ref. 14. 15. 16. 17. 18. 19. Wiring Harness (incl. Motor Washer Impeller Nut -- Upper Vac w/handle Tube -- Tube Latch Button -- Door Assy. -- Lower Vac...
... must be performed by qualified service personnel. PARTS LIST Note: Illustration may differ from actual model due to design changes TYPE 1 1 2 3 4 2 Blower Model(s): EBV 210/215 Page 1 5 15 Zipper Opening Tube Release Button Hole Small Opening 18 6 7 16 8 9 16 10 11 12 17 19... 13 14 Ref. 1. 2. 3. 4. 5. 6. 7. 8. 9. 10. 11. 12. 13. switch) Button -- Blower Ref. 14. 15. 16. 17. 18. 19. Wiring Harness (incl. Motor Washer Impeller Nut -- Upper Vac w/handle Tube -- Tube Latch Button -- Door Assy. -- Lower Vac...

Parts List
Page 2
...05 WARNING All repairs, adjustments and maintenance not described in the Operator's Manual must be performed by qualified service personnel. Switch Assy. Impeller Restrictor -- Blower Ref. 14. 15. 16. 17. 18. 19. Lower Vac Not Shown 530403871 Decal -- Door Latch Assy. Elbow Kit--Upper/Lower Tube w/...AT END OF IPL) Vacuum Inlet Tube -- PARTS LIST Note: Illustration may differ from actual model due to design changes TYPE 2 1 4 2 3 2 Blower Model(s): EBV 210/215 Page 2 5 15 Zipper Opening Tube Release Button Hole Small Opening 18 6 7 16 8 9 16 10 11 12 17 19 ...
...05 WARNING All repairs, adjustments and maintenance not described in the Operator's Manual must be performed by qualified service personnel. Switch Assy. Impeller Restrictor -- Blower Ref. 14. 15. 16. 17. 18. 19. Lower Vac Not Shown 530403871 Decal -- Door Latch Assy. Elbow Kit--Upper/Lower Tube w/...AT END OF IPL) Vacuum Inlet Tube -- PARTS LIST Note: Illustration may differ from actual model due to design changes TYPE 2 1 4 2 3 2 Blower Model(s): EBV 210/215 Page 2 5 15 Zipper Opening Tube Release Button Hole Small Opening 18 6 7 16 8 9 16 10 11 12 17 19 ...


