

Owner Manual
Page 2
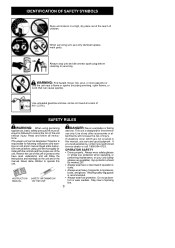
... wire, rope, string, etc. You can be dangerous! IDENTIFICATION OF SAFETY SYMBOLS DANGER: Use only specified trimmer head, spool, and 0.065 inch (1.65 mm) recommended trimmer line. Unit is designed for thrown objects. They can be blinded/injured. WARNING: Read the operator's manual ...hearing protection and safety glasses marked Z87. Never allow children to follow these instructions may result in moving parts. Save operator's manual. Trimmer line can be caught in serious injury. Always wear heavy, long pants, long sleeves, boots and gloves. Failure to operate this ...
... wire, rope, string, etc. You can be dangerous! IDENTIFICATION OF SAFETY SYMBOLS DANGER: Use only specified trimmer head, spool, and 0.065 inch (1.65 mm) recommended trimmer line. Unit is designed for thrown objects. They can be blinded/injured. WARNING: Read the operator's manual ...hearing protection and safety glasses marked Z87. Never allow children to follow these instructions may result in moving parts. Save operator's manual. Trimmer line can be caught in serious injury. Always wear heavy, long pants, long sleeves, boots and gloves. Failure to operate this ...
Owner Manual
Page 3
... need assistance, contact your unit (safety glasses are not covered in this unit. S Always wear face or dust mask if operation is responsible for line trimmer use only. Stay clear of children. Restrict the use only identical replacement parts. INSTRUCTION SAFETY INFORMATION MANUAL ON THE UNIT DANGER: Never use of the...
... need assistance, contact your unit (safety glasses are not covered in this unit. S Always wear face or dust mask if operation is responsible for line trimmer use only. Stay clear of children. Restrict the use only identical replacement parts. INSTRUCTION SAFETY INFORMATION MANUAL ON THE UNIT DANGER: Never use of the...
Owner Manual
Page 4
...Install required shield properly before remov- Bystanders should be equipped with a temperature limiting muffler and spark arresting screen which can damage the trimmer head and be caught in the fingers, hands, and joints of children. Do not use wire, rope, string, etc. S ... it stops. S Keep others including children, animals, bystanders, and helpers at least 50 feet (15 meters) away. S Use only recommended WEED EATER accessories and replacement parts. FUEL SAFETY S Mix and pour fuel outdoors. S Keep others away when making carburetor adjustments. S Use only for...
...Install required shield properly before remov- Bystanders should be equipped with a temperature limiting muffler and spark arresting screen which can damage the trimmer head and be caught in the fingers, hands, and joints of children. Do not use wire, rope, string, etc. S ... it stops. S Keep others including children, animals, bystanders, and helpers at least 50 feet (15 meters) away. S Use only recommended WEED EATER accessories and replacement parts. FUEL SAFETY S Mix and pour fuel outdoors. S Keep others away when making carburetor adjustments. S Use only for...

Owner Manual
Page 5
... upper shaft (the shafts lock into slot as shown. 3. SHAFT ASSEMBLY CAUTION: When assembling shaft, place the unit on underside of shield, see KNOW YOUR TRIMMER illustration in bracket. 4. For proper orientation of shield) is normal for the fuel filter to carburetor adjustments and testing done by turning clockwise. ADJUSTING THE...
... upper shaft (the shafts lock into slot as shown. 3. SHAFT ASSEMBLY CAUTION: When assembling shaft, place the unit on underside of shield, see KNOW YOUR TRIMMER illustration in bracket. 4. For proper orientation of shield) is normal for the fuel filter to carburetor adjustments and testing done by turning clockwise. ADJUSTING THE...

Owner Manual
Page 6
... read and follow instructions printed on the starter rope. Mix gasoline and oil at a ratio of 2- Shaft Locking Sleeve Assembly Assist Handle Muffler Trimmer Head Shield Throttle Trigger Primer Bulb Line Limiter Blade Spark Plug STOP Switch Starter Handle Choke Lever Fuel Mix Fill Cap STOP SWITCH The STOP... (4 liters) of 40:1. FUELING ENGINE WARNING: Remove fuel cap slowly when refueling. Compare the illustrations with your unit to the HALF CHOKE position. Poulan/WEED EATER brand synthetic oil is used to aid in the safety rules before fueling your unit.
... read and follow instructions printed on the starter rope. Mix gasoline and oil at a ratio of 2- Shaft Locking Sleeve Assembly Assist Handle Muffler Trimmer Head Shield Throttle Trigger Primer Bulb Line Limiter Blade Spark Plug STOP Switch Starter Handle Choke Lever Fuel Mix Fill Cap STOP SWITCH The STOP... (4 liters) of 40:1. FUELING ENGINE WARNING: Remove fuel cap slowly when refueling. Compare the illustrations with your unit to the HALF CHOKE position. Poulan/WEED EATER brand synthetic oil is used to aid in the safety rules before fueling your unit.

Owner Manual
Page 7
... a flat surface. 2. If engine still does not run 10 seconds, then move choke to the FULL CHOKE position. HOW TO START YOUR UNIT WARNING: The trimmer head will cause permanent engine damage and void the limited warranty. Avoid any contact with the choke lever in the RUN position, move the choke...
... a flat surface. 2. If engine still does not run 10 seconds, then move choke to the FULL CHOKE position. HOW TO START YOUR UNIT WARNING: The trimmer head will cause permanent engine damage and void the limited warranty. Avoid any contact with the choke lever in the RUN position, move the choke...
Owner Manual
Page 8
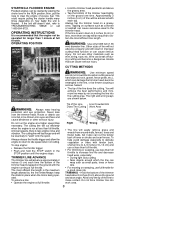
... rope, etc. The right and wrong ways are shown below. Never lean over the trimmer head. To advance line: S Operate the engine at full throttle. Tip of line will easily remove grass and weeds from your right to TROUBLESHOOTING TABLE or call 1-800-554-6723. S Near objects around.... WARNING: Always wear hearing protection and eye protection. The cutting line will advance approximately 2 inches (5 cm) each tap. Do not force trimmer line into eyes and face and cause blindness or other materials such as small posts, trees or fence wire. S For trimming or scalping, ...
... rope, etc. The right and wrong ways are shown below. Never lean over the trimmer head. To advance line: S Operate the engine at full throttle. Tip of line will easily remove grass and weeds from your right to TROUBLESHOOTING TABLE or call 1-800-554-6723. S Near objects around.... WARNING: Always wear hearing protection and eye protection. The cutting line will advance approximately 2 inches (5 cm) each tap. Do not force trimmer line into eyes and face and cause blindness or other materials such as small posts, trees or fence wire. S For trimming or scalping, ...

Owner Manual
Page 9
... carburetor adjustments. The fanning action of unit if debris shield is ideal for repairs under warranty. Keep the line parallel to side. Sweeping MOWING -- Your trimmer is damaged. HELPFUL TIP IMPORTANT: Have all repairs other flammable solvent. 3. CHECK FOR LOOSE FASTENERS AND PARTS S Spark Plug Boot S Air Filter S Housing Screws S ..., do not clean filter in soap and water. 4. Wash the filter in gasoline or other than an authorized service dealer performs work on the product, WEED EATER may not pay for mowing in the STOP position. Button Air Filter Air Filter Cover 9
... carburetor adjustments. The fanning action of unit if debris shield is ideal for repairs under warranty. Keep the line parallel to side. Sweeping MOWING -- Your trimmer is damaged. HELPFUL TIP IMPORTANT: Have all repairs other flammable solvent. 3. CHECK FOR LOOSE FASTENERS AND PARTS S Spark Plug Boot S Air Filter S Housing Screws S ..., do not clean filter in soap and water. 4. Wash the filter in gasoline or other than an authorized service dealer performs work on the product, WEED EATER may not pay for mowing in the STOP position. Button Air Filter Air Filter Cover 9

Owner Manual
Page 10
... 3. REPLACING THE TRIMMER HEAD 1. The trimmer head will not require any object. Adjustments may be spinning during this prod- S Turn idle speed screw counterclockwise to ensure the engine starts easier and runs better. After 50 hours of 0.065 inch (1.65 mm) diameter WEED EATER brand line. Remove...of use, we recommend that your muffler be serviced or replaced by your body away from turning while removing and installing trimmer head. Remove trimmer head by hand while running and making idle speed adjustments. Only tighten hand tight! leased. To adjust idle speed: ...
... 3. REPLACING THE TRIMMER HEAD 1. The trimmer head will not require any object. Adjustments may be spinning during this prod- S Turn idle speed screw counterclockwise to ensure the engine starts easier and runs better. After 50 hours of 0.065 inch (1.65 mm) diameter WEED EATER brand line. Remove...of use, we recommend that your muffler be serviced or replaced by your body away from turning while removing and installing trimmer head. Remove trimmer head by hand while running and making idle speed adjustments. Only tighten hand tight! leased. To adjust idle speed: ...


