Owner Manual
Page 2
... with loosing hanging straps, ties, tassels, etc. Store unit unplugged. 2 Do not wear jewelry, loose clothing, or clothing with damaged cord. Stop unit and remove battery pack before removing them from the cut your or others. S Do not overreach. Failure to water. Blades can be dangerous! Do not use can seriously...
... with loosing hanging straps, ties, tassels, etc. Store unit unplugged. 2 Do not wear jewelry, loose clothing, or clothing with damaged cord. Stop unit and remove battery pack before removing them from the cut your or others. S Do not overreach. Failure to water. Blades can be dangerous! Do not use can seriously...
Owner Manual
Page 3
... followed to persons who read, understand, and follow all instructions. Never allow children to operate this unit to reduce the risk of this unit. Remove battery pack from blades. Do not grab or hold unit by the blades, which could be more of toxic plants such as poison ivy thrown by...
... followed to persons who read, understand, and follow all instructions. Never allow children to operate this unit to reduce the risk of this unit. Remove battery pack from blades. Do not grab or hold unit by the blades, which could be more of toxic plants such as poison ivy thrown by...
Owner Manual
Page 4
...may overheat and cause burns. Check with local code for jobs explained in an explosive or corrosive environment. The battery pack or conductor may explode. UNIT SAFETY S Inspect unit before performing maintenance. Have damaged parts repaired or ...batteries, take care not to operate; S Never immerse any other replacement parts and accessories as recommended. S Inspect charger cord periodically and if damaged, have to be toxic if swallowed. Damaged parts must be thrown by your authorized service dealer. Make sure all service and maintenance not ex- S Use only WEED EATER...
...may overheat and cause burns. Check with local code for jobs explained in an explosive or corrosive environment. The battery pack or conductor may explode. UNIT SAFETY S Inspect unit before performing maintenance. Have damaged parts repaired or ...batteries, take care not to operate; S Never immerse any other replacement parts and accessories as recommended. S Inspect charger cord periodically and if damaged, have to be toxic if swallowed. Damaged parts must be thrown by your authorized service dealer. Make sure all service and maintenance not ex- S Use only WEED EATER...
Owner Manual
Page 5
...using the hedge trimmer, ensure all fasteners are not intended to 4 months for a double insulated appliance must be grounded. S Recharge the battery pack every 3 to be recommended by the manufacturer. IMPORTANT! DO NOT CUT OPEN, BURN OR INCINERATE. The symbol (square within a ... 1.3 Amp/Hour Sealed for Life No maintenance required WINTER STORAGE S Fully charge for safe disposal of grounding. DISPOSE OF YOUR OLD BATTERIES SAFELY. Safety precautions must be some charge present in serious injury. A double insulated appliance is necessary. 5 no assembly is marked with...
...using the hedge trimmer, ensure all fasteners are not intended to 4 months for a double insulated appliance must be grounded. S Recharge the battery pack every 3 to be recommended by the manufacturer. IMPORTANT! DO NOT CUT OPEN, BURN OR INCINERATE. The symbol (square within a ... 1.3 Amp/Hour Sealed for Life No maintenance required WINTER STORAGE S Fully charge for safe disposal of grounding. DISPOSE OF YOUR OLD BATTERIES SAFELY. Safety precautions must be some charge present in serious injury. A double insulated appliance is necessary. 5 no assembly is marked with...
Owner Manual
Page 6
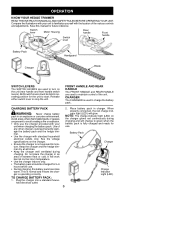
... hedge trimmer dry at normal room temperature. Do not place the charger in operating position for future reference. hold electrical outlet. 2. Battery Pack Charger Charge Indicator Light (LED) 6 OPERATION KNOW YOUR HEDGE TRIMMER READ THIS INSTRUCTION MANUAL AND SAFETY RULES BEFORE OPERATING YOUR UNIT...will glow. S Use the charger indoors only. This is normal and means the charger is used to start. TO CHARGE BATTERY PACK: 1. Place battery pack in an explosive or corrosive environment. Release either switch lever to moisture. See the voltage specifications on the unit (rear...
... hedge trimmer dry at normal room temperature. Do not place the charger in operating position for future reference. hold electrical outlet. 2. Battery Pack Charger Charge Indicator Light (LED) 6 OPERATION KNOW YOUR HEDGE TRIMMER READ THIS INSTRUCTION MANUAL AND SAFETY RULES BEFORE OPERATING YOUR UNIT...will glow. S Use the charger indoors only. This is normal and means the charger is used to start. TO CHARGE BATTERY PACK: 1. Place battery pack in an explosive or corrosive environment. Release either switch lever to moisture. See the voltage specifications on the unit (rear...
Owner Manual
Page 7
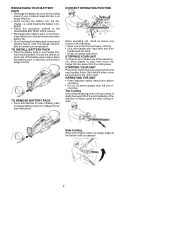
... the latches on side of your hedge trimmer (see illustration). CORRECT OPERATING POSITION When operating unit, stand as the cutting power of battery pack to release battery pack from the cutting area. S Keep unit below waist level. Top Cutting Use a wide sweeping motion for the following: S ...Wear eye protection and heavy clothing. avoid draining the battery completely. STARTING YOUR UNIT Press both latches on each side of the switch levers, allow blades to hedge trimmer. S Do not recharge the...
... the latches on side of your hedge trimmer (see illustration). CORRECT OPERATING POSITION When operating unit, stand as the cutting power of battery pack to release battery pack from the cutting area. S Keep unit below waist level. Top Cutting Use a wide sweeping motion for the following: S ...Wear eye protection and heavy clothing. avoid draining the battery completely. STARTING YOUR UNIT Press both latches on each side of the switch levers, allow blades to hedge trimmer. S Do not recharge the...
Owner Manual
Page 8
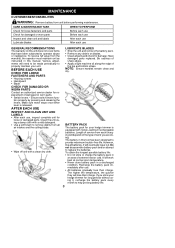
...of the top and bottom straps. The higher the temperature, the quicker they will eventually wear out. MAINTENANCE CUSTOMER RESPONSIBILITIES WARNING: Remove battery from the warranty, the operator must maintain unit as instructed in this manual. Make sure motor stops once either lever is equipped with... and clean unit and labels Lubricate blades WHEN TO PERFORM Before each use Before each use After each use After each use . S All batteries gradually lose their charge. If you are doing. S Switch levers -- NOTE: Ensure handles remain clean and dry. Length of work best ...
...of the top and bottom straps. The higher the temperature, the quicker they will eventually wear out. MAINTENANCE CUSTOMER RESPONSIBILITIES WARNING: Remove battery from the warranty, the operator must maintain unit as instructed in this manual. Make sure motor stops once either lever is equipped with... and clean unit and labels Lubricate blades WHEN TO PERFORM Before each use Before each use After each use After each use . S All batteries gradually lose their charge. If you are doing. S Switch levers -- NOTE: Ensure handles remain clean and dry. Length of work best ...
Owner Manual
Page 9
...vibration 1. Keep away from the hedge trimmer. Battery needs charging. 3. Blades clogged with debris. 3. Damaged blades. 1. S Consult your authorized service dealer. 9 Battery needs charging. 4. S This product contains nickel--cadmium batteries. Remove battery and check connectors. Cover the terminals with ...Contact your local waste authority for infor- Nickel--cadmium batteries must be operating. Debris stopping blade. Charge battery pack. 3. Cut at a slower pace. 2. S Stop the unit and remove the battery pack when not in fire or serious personal injury....
...vibration 1. Keep away from the hedge trimmer. Battery needs charging. 3. Blades clogged with debris. 3. Damaged blades. 1. S Consult your authorized service dealer. 9 Battery needs charging. 4. S This product contains nickel--cadmium batteries. Remove battery and check connectors. Cover the terminals with ...Contact your local waste authority for infor- Nickel--cadmium batteries must be operating. Debris stopping blade. Charge battery pack. 3. Cut at a slower pace. 2. S Stop the unit and remove the battery pack when not in fire or serious personal injury....

Parts List
Page 1
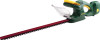
Description 1. 545124415 Charger 2. 545124416 Battery 3. 545124414 Handguard Not Shown 545117506 Manual = New Part Number For This IPL = Refer to design changes. Parts List No. Part No. Date 11/30/06 545103458 NEW ® PARTS LIST NOTE : Illustration may differ from actual model due to the Service Reference Indicated for more information.(Located at the END of the IPL) MODEL HTC2200 Page: 1 1. 2 3. Ref.
Description 1. 545124415 Charger 2. 545124416 Battery 3. 545124414 Handguard Not Shown 545117506 Manual = New Part Number For This IPL = Refer to design changes. Parts List No. Part No. Date 11/30/06 545103458 NEW ® PARTS LIST NOTE : Illustration may differ from actual model due to the Service Reference Indicated for more information.(Located at the END of the IPL) MODEL HTC2200 Page: 1 1. 2 3. Ref.


