

Owner Manual
Page 1
WEEDEATER 20V CORDLESS STRING TRIMMER Model: LT 20V a cGio5 218549 Owner's Manual TOLL-FREE HELPLINE: 1.800-554-6723 A Read all safety rules and instructions carefully before operating this tool.
WEEDEATER 20V CORDLESS STRING TRIMMER Model: LT 20V a cGio5 218549 Owner's Manual TOLL-FREE HELPLINE: 1.800-554-6723 A Read all safety rules and instructions carefully before operating this tool.

Owner Manual
Page 2
CONTENTS Contents Product Specifications General Safety Rules Symbols Know Your String Trimmer Assembly Operation Battery Charger Maintenance Environmentally Safe Battery Disposal Troubleshooting Warranty SPECIFICATIONS 20V LITHIUM-ION TRIMMER Type Speed Line Size Cutting Swath Weight (With Battery Pack) BATTERY PACK Type Output Voltage Chargering Time plillilllimillikr Do-v-v-ered by an ENERGY STAR qualified battery chaigei for a ENERGY STAR hotter environment 2 2 3-5 6-7 8 9-11 12-16 17-18 19 -20 21 22 23 Cordless, battery-operated 7500 RPM 0,065in...
CONTENTS Contents Product Specifications General Safety Rules Symbols Know Your String Trimmer Assembly Operation Battery Charger Maintenance Environmentally Safe Battery Disposal Troubleshooting Warranty SPECIFICATIONS 20V LITHIUM-ION TRIMMER Type Speed Line Size Cutting Swath Weight (With Battery Pack) BATTERY PACK Type Output Voltage Chargering Time plillilllimillikr Do-v-v-ered by an ENERGY STAR qualified battery chaigei for a ENERGY STAR hotter environment 2 2 3-5 6-7 8 9-11 12-16 17-18 19 -20 21 22 23 Cordless, battery-operated 7500 RPM 0,065in...

Owner Manual
Page 3
... Instructions listed below may result in electric shock, fire, and/or serious personal injury. • Do not operate power tools in explosive atmospheres, such as in the presence of electric shock. • Do not handle plug or tool with wet hands. • Never allow adults to operate the equipment without proper instruction. • Always wear safety glasses with side shields. use with the switch...
... Instructions listed below may result in electric shock, fire, and/or serious personal injury. • Do not operate power tools in explosive atmospheres, such as in the presence of electric shock. • Do not handle plug or tool with wet hands. • Never allow adults to operate the equipment without proper instruction. • Always wear safety glasses with side shields. use with the switch...

Owner Manual
Page 4
... in handling batteries In order not to avoid risk. 4 Do not use only. • Battery tools do not store outside or in the machine. • Use only identical manufacturer's replacement parts and accessories. GENERAL SAFETY RULES • Check the work area before servicing, cleaning or removing material from the gardening appliance. • Use only the type and size batteries (Sku 966-709801). • Store idle appliances - Use of...
... in handling batteries In order not to avoid risk. 4 Do not use only. • Battery tools do not store outside or in the machine. • Use only identical manufacturer's replacement parts and accessories. GENERAL SAFETY RULES • Check the work area before servicing, cleaning or removing material from the gardening appliance. • Use only the type and size batteries (Sku 966-709801). • Store idle appliances - Use of...

Owner Manual
Page 5
... them frequently and use them these instructions also. Children who are specially designed to filter out microscopic particles. 5 If you do this type of work, To reduce your view of a child who may use this power tool. GENERAL SAFETY RULES • Do not point the string trimmer in the direction of people or pets, • Never run into the path...
... them frequently and use them these instructions also. Children who are specially designed to filter out microscopic particles. 5 If you do this type of work, To reduce your view of a child who may use this power tool. GENERAL SAFETY RULES • Do not point the string trimmer in the direction of people or pets, • Never run into the path...

Owner Manual
Page 6
... load /min Per Minute Revolutions, strokes, surface speed, orbits etc., per second) W Watts Power min Minutes Time r.'„,, Alternating Current Type of current Direct Current Type or a characteristic of the following symbols may be used on this equipment. Proper interpretation of injury user must read and if;'N ltel understand operator's manual before using this product. ..,,--, Eye Protection Wear eye protection...
... load /min Per Minute Revolutions, strokes, surface speed, orbits etc., per second) W Watts Power min Minutes Time r.'„,, Alternating Current Type of current Direct Current Type or a characteristic of the following symbols may be used on this equipment. Proper interpretation of injury user must read and if;'N ltel understand operator's manual before using this product. ..,,--, Eye Protection Wear eye protection...

Owner Manual
Page 7
... understand the warnings and instructions In this Owner's Manual, do not attempt to use this product. Before beginning power tool operation, always wear safety goggles or safety glasses with side shields. AWARNING To avoid serious personal injury, do not use this product until you have read this Owner's Manual thoroughly and understand it completely. The operation of any power tool can result in...
... understand the warnings and instructions In this Owner's Manual, do not attempt to use this product. Before beginning power tool operation, always wear safety goggles or safety glasses with side shields. AWARNING To avoid serious personal injury, do not use this product until you have read this Owner's Manual thoroughly and understand it completely. The operation of any power tool can result in...
Owner Manual
Page 8
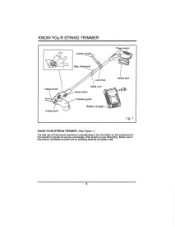
Before use of this product requires an understanding of the project you are attempting. KNOW YOu R STRING TRIMMER Auxiliary handle Trigger switch Edging Guide Cutting spool Edge Adjustment Lock Knob Height Lock Adjust button c7: Protective guard Battery charger Battery pack 110)1,11 :- , fig. 1 KNOW YOUR STRING TRIMMER (See Figure 1.) The safe use of this operator's manual as well as a knowledge of the information on the product and in this product, familiarize yourself with all operating features and safety rules. 8
Before use of this product requires an understanding of the project you are attempting. KNOW YOu R STRING TRIMMER Auxiliary handle Trigger switch Edging Guide Cutting spool Edge Adjustment Lock Knob Height Lock Adjust button c7: Protective guard Battery charger Battery pack 110)1,11 :- , fig. 1 KNOW YOUR STRING TRIMMER (See Figure 1.) The safe use of this operator's manual as well as a knowledge of the information on the product and in this product, familiarize yourself with all operating features and safety rules. 8

Owner Manual
Page 9
... the maximum run time/capacity.6. NOTE: The battery pack fits snugly into place and click. Do not use , 3. Grasp the trigger handle (2) firmly. It should slide into the handle to prevent accidental dislodging.lt may be required in order to be stored in the handle housing. 2. Fully charge battery before recharging. To remove (See Figure 2.) 1. ASSEMBLY BATTERY IMPORTANT! 1. This battery will click when they lock. 4. To install (See...
... the maximum run time/capacity.6. NOTE: The battery pack fits snugly into place and click. Do not use , 3. Grasp the trigger handle (2) firmly. It should slide into the handle to prevent accidental dislodging.lt may be required in order to be stored in the handle housing. 2. Fully charge battery before recharging. To remove (See Figure 2.) 1. ASSEMBLY BATTERY IMPORTANT! 1. This battery will click when they lock. 4. To install (See...

Owner Manual
Page 10
... the screw hole on the head. 5. GUARD (See Figure 3.) To avoid injury, always remove the battery pack before installing the guard, changing a cutting line, or making any other part of the trimmer. • Read, understand, and follow the Battery Charger instructions. Invert the grass trimmer to the trimmer head fastening the guard in the handle housing. 2. e latch buttons will click when they lock. 4, Do not use the grass trimmer until both sides lock. Grasp Ke trigger handle (2) firmly...
... the screw hole on the head. 5. GUARD (See Figure 3.) To avoid injury, always remove the battery pack before installing the guard, changing a cutting line, or making any other part of the trimmer. • Read, understand, and follow the Battery Charger instructions. Invert the grass trimmer to the trimmer head fastening the guard in the handle housing. 2. e latch buttons will click when they lock. 4, Do not use the grass trimmer until both sides lock. Grasp Ke trigger handle (2) firmly...
Owner Manual
Page 11
... Keep proper balance at all times for better control of balance and control for optimum control and balance. Do not over reach when operating the grass trimmer. Adjust the handle position to loosen the auxiliary handle (2), 2. HANDLE (See Figure 4.) 1, Turn the handle lock knob (1) counter-clockwise several turns to provide the best level of the tool in position by turning the knob clockwise. 4. Securely lock the handle in unexpected situations. ASSEMBLY ■t 2 O Fiq. 3 AWARNING To...
... Keep proper balance at all times for better control of balance and control for optimum control and balance. Do not over reach when operating the grass trimmer. Adjust the handle position to loosen the auxiliary handle (2), 2. HANDLE (See Figure 4.) 1, Turn the handle lock knob (1) counter-clockwise several turns to provide the best level of the tool in position by turning the knob clockwise. 4. Securely lock the handle in unexpected situations. ASSEMBLY ■t 2 O Fiq. 3 AWARNING To...
Owner Manual
Page 12
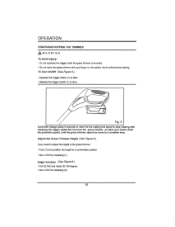
... grass trimmer spool has come to a complete stop . Adjust the Grass Trimmer Height (See Figure 6.) If you need to adjust the height of the grass trimmer: • Push (1) and position the height to a comfortable position • Now LOCK by releasing (2). 12 Edger function (See Figure 6.) • Pull (2) first and rotate (2) 180 degree. • Now LOCK by releasing (1). To Turn On/Off (See Figure 5.) • Squeeze the trigger switch (1) to start...
... grass trimmer spool has come to a complete stop . Adjust the Grass Trimmer Height (See Figure 6.) If you need to adjust the height of the grass trimmer: • Push (1) and position the height to a comfortable position • Now LOCK by releasing (2). 12 Edger function (See Figure 6.) • Pull (2) first and rotate (2) 180 degree. • Now LOCK by releasing (1). To Turn On/Off (See Figure 5.) • Squeeze the trigger switch (1) to start...
Owner Manual
Page 14
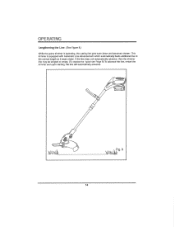
If the fine does not automatically advance, then the trimmer line may be tangled or empty. (To replace the spool see Page 9) To advance the line, restart the trimmer and upon starting, the line will automatically advance. 0 \ fig. 8 \Mak 14 This trimmer is operating, the cutting line gets worn down . OPERATING Lengthening the Line (See Figure 8.) While the grass trimmer is equipped with Automatic Line Advancement which automatically feeds additional line to the correct length as it wears down and becomes shorter.
If the fine does not automatically advance, then the trimmer line may be tangled or empty. (To replace the spool see Page 9) To advance the line, restart the trimmer and upon starting, the line will automatically advance. 0 \ fig. 8 \Mak 14 This trimmer is operating, the cutting line gets worn down . OPERATING Lengthening the Line (See Figure 8.) While the grass trimmer is equipped with Automatic Line Advancement which automatically feeds additional line to the correct length as it wears down and becomes shorter.

Owner Manual
Page 15
... area, move the grass trimmer in small stages. • When the grass trimmer is turned off and the spool stop srotating, the cutting line will cause spool wear and battery drain. • If the grass is higher than 6" (15 cm), trim in and out of the area being cut . OPERATING Trimmer Tips, Before each use • Make sure the protective guard is tightly Installed.Tighten the guard screw. • Make...
... area, move the grass trimmer in small stages. • When the grass trimmer is turned off and the spool stop srotating, the cutting line will cause spool wear and battery drain. • If the grass is higher than 6" (15 cm), trim in and out of the area being cut . OPERATING Trimmer Tips, Before each use • Make sure the protective guard is tightly Installed.Tighten the guard screw. • Make...

Owner Manual
Page 16
Remove and rewind the line spool, SEE MAINTENANCE SECTION for spool rewinding. 16 OPERATING • If the length of the cutting area gets smaller, the line is worn down and needs to be advanced more often. • If the grass trimmer is not cutting correctly, the cutting line may not be feeding properly.
Remove and rewind the line spool, SEE MAINTENANCE SECTION for spool rewinding. 16 OPERATING • If the length of the cutting area gets smaller, the line is worn down and needs to be advanced more often. • If the grass trimmer is not cutting correctly, the cutting line may not be feeding properly.

Owner Manual
Page 17
...Service part number 577-508001 CHECKING THE CHARGE If the battery pack does not charge properly: • Check the current at any time. Make sure that the outlet is not turned off. • Check that maximum run time can be achieved, This lithium-ion battery will illuminate in specific order to fully charge from a discharged state. 1, Plug...charge before first use to ensure that the charger contacts have not been shorted by debris or foreign material, • If the surrounding air temperature is not normal room temperature, move the charger and battery pack to a location where the ...
...Service part number 577-508001 CHECKING THE CHARGE If the battery pack does not charge properly: • Check the current at any time. Make sure that the outlet is not turned off. • Check that maximum run time can be achieved, This lithium-ion battery will illuminate in specific order to fully charge from a discharged state. 1, Plug...charge before first use to ensure that the charger contacts have not been shorted by debris or foreign material, • If the surrounding air temperature is not normal room temperature, move the charger and battery pack to a location where the ...

Owner Manual
Page 19
... trimmer while not in the charger until next use. • It is recommended to provide full power without power fade unlike typical batteries; MAINTENANCE LWARNING To avoid risk of fire, electric shock, or electrocution: • Do not use a damp cloth or detergent on the battery or battery charger, • Always remove the battery pack before cleaning, inspecting, or performing any time. • Once the battery...
... trimmer while not in the charger until next use. • It is recommended to provide full power without power fade unlike typical batteries; MAINTENANCE LWARNING To avoid risk of fire, electric shock, or electrocution: • Do not use a damp cloth or detergent on the battery or battery charger, • Always remove the battery pack before cleaning, inspecting, or performing any time. • Once the battery...
Owner Manual
Page 20
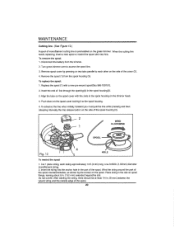
... outside edge of the spool. MAINTENANCE Cutting line (See Figure 12.) A spool of line through the opening(4) in the spool housing(3). 3, Align the tabs on the spool cover with the slots in the spool housing on the trimmer head. 4, Push down on the spool cover locking it to the spool housing. 5. Disconnect the battery from the spool housing (3). To replace the spool: 1, Replace the spool (1) with new line, To remove the spool: 1. Insert the end of monofilament cutting line is preinstalled on...
... outside edge of the spool. MAINTENANCE Cutting line (See Figure 12.) A spool of line through the opening(4) in the spool housing(3). 3, Align the tabs on the spool cover with the slots in the spool housing on the trimmer head. 4, Push down on the spool cover locking it to the spool housing. 5. Disconnect the battery from the spool housing (3). To replace the spool: 1, Replace the spool (1) with new line, To remove the spool: 1. Insert the end of monofilament cutting line is preinstalled on...

Owner Manual
Page 22
SOLUTION To secure the battery pack, make sure the latches on the top of line Rewind spool with line or replace with your model. Charge the battery pack according to the instructions included with pre-wound spool Mis-fed line Remove spool and rewind line 22 Defective power switch. Unit will not start when switch trigger is depressed. Return to place of purchase Line won't feed Out of the battery pack snap into place. Battery is not secure. TROUBLESHOOTING PROBLEM Motor fails to start . POSSIBLE CAUSE Battery is not charged.
SOLUTION To secure the battery pack, make sure the latches on the top of line Rewind spool with line or replace with your model. Charge the battery pack according to the instructions included with pre-wound spool Mis-fed line Remove spool and rewind line 22 Defective power switch. Unit will not start when switch trigger is depressed. Return to place of purchase Line won't feed Out of the battery pack snap into place. Battery is not secure. TROUBLESHOOTING PROBLEM Motor fails to start . POSSIBLE CAUSE Battery is not charged.

Owner Manual
Page 23
... to use , abuse, neglect, accident, improper maintenance, or alteration; WEEDEATER , at its own discretion, will replace any unit found to be defective, through normal use , and that have been maintained in accordance with the instructions in the owners' manual supplied with the product from new. Batteries must be valid. ITEMS NOT COVERED BY WARRANTY: 1. The unit, if it has not been operated and...
... to use , abuse, neglect, accident, improper maintenance, or alteration; WEEDEATER , at its own discretion, will replace any unit found to be defective, through normal use , and that have been maintained in accordance with the instructions in the owners' manual supplied with the product from new. Batteries must be valid. ITEMS NOT COVERED BY WARRANTY: 1. The unit, if it has not been operated and...


