Owner Manual
Page 2
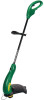
...on the unit. Safety Glasses or similar eye protection Hazard Zone Boots 15 m 50 ft. S Use a voltage supply as suitable for line trimmer use in Canada "W"). The appliance plug will fit into the extension cord, reverse the plug. This plug will fit into the wall outlet,... presence of flammable liquids or gases to avoid creating a fire or explosion and/or causing damage to reduce the risk of unit. WARNING: Trimmer line throws ob- If it still does not fit, contact a qualified electrician to avoid the possibility of injury. SAFETY RULES WARNING: When using ...
...on the unit. Safety Glasses or similar eye protection Hazard Zone Boots 15 m 50 ft. S Use a voltage supply as suitable for line trimmer use in Canada "W"). The appliance plug will fit into the extension cord, reverse the plug. This plug will fit into the wall outlet,... presence of flammable liquids or gases to avoid creating a fire or explosion and/or causing damage to reduce the risk of unit. WARNING: Trimmer line throws ob- If it still does not fit, contact a qualified electrician to avoid the possibility of injury. SAFETY RULES WARNING: When using ...
Owner Manual
Page 3
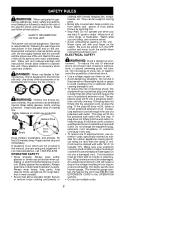
...this measure of children. S Do not use wire, rope, string, etc. UNIT SAFETY S Inspect unit before performing maintenance, or when changing trimmer line. Replacement parts for this unit, including housing, switch, motor, locking sleeve assembly, wires, etc., must be diagnosed and repaired by the extension... S Keep the extension cord clear of injury at the rate for which can come dangerously close to disconnect unit. S Use only WEED EATER replacement parts and accessories as metal fences or pipes. pliance is marked with water or any other part that are not intended to...
...this measure of children. S Do not use wire, rope, string, etc. UNIT SAFETY S Inspect unit before performing maintenance, or when changing trimmer line. Replacement parts for this unit, including housing, switch, motor, locking sleeve assembly, wires, etc., must be diagnosed and repaired by the extension... S Keep the extension cord clear of injury at the rate for which can come dangerously close to disconnect unit. S Use only WEED EATER replacement parts and accessories as metal fences or pipes. pliance is marked with water or any other part that are not intended to...
Owner Manual
Page 5
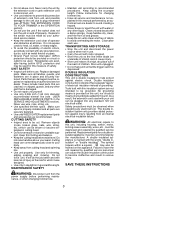
... of the unit into rear notches. ASSIST HANDLE The ASSIST HANDLE is where you attach your unit to familiarize yourself with 0.065 inch Trimmer Line RECESSED PLUG The RECESSED PLUG is used to twist the lower portion of the various controls and adjustments. Shield Cutting Head 4. Save this...Squeeze the trigger switch to stop. Ensure the cutting head remains free to rotate and the line is used to help hold and guide the unit. TRIMMER HEAD The TRIMMER HEAD holds the cutting line and rotates during edging. 5 EDGE GUIDE The EDGE GUIDE protects the unit from contacting the ...
... of the unit into rear notches. ASSIST HANDLE The ASSIST HANDLE is where you attach your unit to familiarize yourself with 0.065 inch Trimmer Line RECESSED PLUG The RECESSED PLUG is used to twist the lower portion of the various controls and adjustments. Shield Cutting Head 4. Save this...Squeeze the trigger switch to stop. Ensure the cutting head remains free to rotate and the line is used to help hold and guide the unit. TRIMMER HEAD The TRIMMER HEAD holds the cutting line and rotates during edging. 5 EDGE GUIDE The EDGE GUIDE protects the unit from contacting the ...

Owner Manual
Page 6
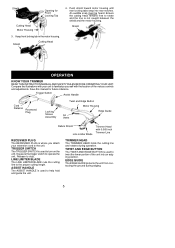
...and become a dangerous missile that can be thrown into eyes and face and cause blindness or other cutting devices. Do not force trimmer line into material being operated. Never lean over , keep the shield in operating position, you . S Keep unit below waist level. Allow...edging allow the tip of the trimmer head about 3 inches (8 cm) above ground EDGING POSITION While holding the trimmer in place when the tool is thrown away from the trimmer line. Edging SCALPING The scalping technique removes unwanted vegetation. This technique increases line wear. 6 Insure the plug and...
...and become a dangerous missile that can be thrown into eyes and face and cause blindness or other cutting devices. Do not force trimmer line into material being operated. Never lean over , keep the shield in operating position, you . S Keep unit below waist level. Allow...edging allow the tip of the trimmer head about 3 inches (8 cm) above ground EDGING POSITION While holding the trimmer in place when the tool is thrown away from the trimmer line. Edging SCALPING The scalping technique removes unwanted vegetation. This technique increases line wear. 6 Insure the plug and...

Owner Manual
Page 7
...on this can be made periodically to side. Discontinue use , inspect complete unit for replacing line and ensuring optimum performance. If using a damp cloth with your unit. Sweeping MOWING Your trimmer is damaged. Avoid pressing the head into the ground as the existing spool. Make sure motor... to use of the cap. S Trigger Switch -- To receive full value from cutting head components when performing any type of the rotating line can scalp the ground and damage the tool. S Hold spool and unscrew cap by pressing and releasing the trigger switch. Clean the unit...
...on this can be made periodically to side. Discontinue use , inspect complete unit for replacing line and ensuring optimum performance. If using a damp cloth with your unit. Sweeping MOWING Your trimmer is damaged. Avoid pressing the head into the ground as the existing spool. Make sure motor... to use of the cap. S Trigger Switch -- To receive full value from cutting head components when performing any type of the rotating line can scalp the ground and damage the tool. S Hold spool and unscrew cap by pressing and releasing the trigger switch. Clean the unit...

Owner Manual
Page 8
... ring. S Stop the unit and disconnect the power source when not in place. S Carry the unit with 0.065 inch Trimmer Line Line Guide Ring Cap Assembly Assist Handle Bolt Carriage, 1/4-20 Wing Nut Shield Assembly Edge Guide PART NUMBER 952711602 530403949 530403810 530403805 530403886 530016152 530403914 530403824 ... in a high, dry place out of the reach of 0.065 inch (1.65 mm) diameter round WEED EATER brand line. Spool USER REPLACEABLE SERVICE PARTS REPLACEMENT PART Spool with motor stopped. S Store unit and extension cord indoors in slot while screwing cap on the spool (...
... ring. S Stop the unit and disconnect the power source when not in place. S Carry the unit with 0.065 inch Trimmer Line Line Guide Ring Cap Assembly Assist Handle Bolt Carriage, 1/4-20 Wing Nut Shield Assembly Edge Guide PART NUMBER 952711602 530403949 530403810 530403805 530403886 530016152 530403914 530403824 ... in a high, dry place out of the reach of 0.065 inch (1.65 mm) diameter round WEED EATER brand line. Spool USER REPLACEABLE SERVICE PARTS REPLACEMENT PART Spool with motor stopped. S Store unit and extension cord indoors in slot while screwing cap on the spool (...

Owner Manual
Page 9
... 0.065 inch (1.65 mm) dia. Check line routing. 2. Remove cover and pull 4 inches (10 cm) of line outside of line to be operating. CAUSE 1. Crowding trimmer line against material being cut . 1. Line does not advance or breaks while cutting. 1. Contact your authorized service dealer. 3. line. 2. Replace spool. 3. Cut with tip of line fully extended. 4. TROUBLESHOOTING TABLE WARNING: Always...
... 0.065 inch (1.65 mm) dia. Check line routing. 2. Remove cover and pull 4 inches (10 cm) of line outside of line to be operating. CAUSE 1. Crowding trimmer line against material being cut . 1. Line does not advance or breaks while cutting. 1. Contact your authorized service dealer. 3. line. 2. Replace spool. 3. Cut with tip of line fully extended. 4. TROUBLESHOOTING TABLE WARNING: Always...


