Weed Eater WE20C Support and Manuals
Get Help and Manuals for this Weed Eater item
View All Support Options Below
Free Weed Eater WE20C manuals!
Problems with Weed Eater WE20C?
Ask a Question
Free Weed Eater WE20C manuals!
Problems with Weed Eater WE20C?
Ask a Question
Popular Weed Eater WE20C Manual Pages
Owner Manual - Page 1

OPERATOR'S MANUAL
MODEL NUMBER WE20C
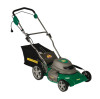
ELECTRIC-POWERED, 3-IN-1, 20" ROTARY LAWN MOWER
438184
Owner Manual - Page 2

... 14
Assembly 4 Maintenance 12-13 Troubleshooting 15
Pre-Operation 5-6
Warranty 16
SAFETY RULES
WARNING: IMPORTANT SAFETY WARNINGS AND INSTRUCTIONS.
keep bystanders away.
Beware of electric shock, do not
expose to water or operate on your lawn mower in this manual and we would advise you to potential hazards and prevent possible problems.
• It may appear...
Owner Manual - Page 4

... extra caution when servicing it. • Do not attempt to change the motor's electronic settings or over speed the motor. • Maintain or replace safety and instruction labels, as not to pinch or damage control cables. • Remove any packing material which could expose moving parts or
allow objects to make adjustments or repairs with the...
Owner Manual - Page 5

... Dress Properly - Always use only. Make sure your extension cord set is dusty. • Use Right Appliance - MINIMUM GAUGE FOR EXTENSION ...a polar- The table shows the correct size to install the proper wall outlet. PRE-OPERATION
POLARIZED APPLIANCE
CONNECTIONS... are available having built-in moving parts. Don't
use lawn mowers in doubt, use lawn mower for any way.
2-prong plug
Properly...
Owner Manual - Page 6

... the extension cord retainer supplied with the mower. • Don't Abuse Cord - Repair any damage before servicing, when changing accessories such as blades, and the like. • Store Idle Lawn Mower Indoors - SAVE THESE INSTRUCTIONS
6 Inspect for lubricating and changing accessories.
• Inspect lawn mower cord periodically and if damaged, have it repaired by cord or yank it was...
Owner Manual - Page 7
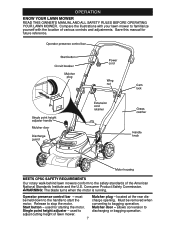
... controls and adjustments. located at the rear discharge opening.
Compare the illustrations with your lawn mower to start the motor. Save this manual for starting the motor. OPERATION
KNOW YOUR LAWN MOWER
READ THIS OWNER'S MANUAL AND ALL SAFETY RULES BEFORE OPERATING YOUR LAWN MOWER.
Release to discharging or bagging operation. Must be held down to the handle...
Owner Manual - Page 8
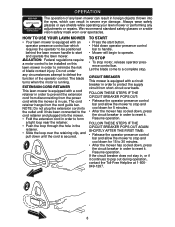
... cord while the mower is equipped with a circuit breaker in order to protect the supply circuit from the cord guide bar. Let the...installed on this lawn mower in order to defeat the function of the operator control. TO START
• Press the start and operate the lawn mower. Always wear safety glasses or eye shields while operating your lawn mower or performing any adjustments or repairs...
Owner Manual - Page 9

... frequently for high cut and lower wheels for replacement. Remove grass catcher with clippings
from bag. CAUTION: Under normal usage, the catcher material is subject to desired position. Height adjuster lever
TO ATTACH GRASS CATCHER
1. OPERATION
TO ADJUST CUTTING HEIGHT Adjust cutting height to operate the lawn mower with original manufacturer's specifications.
Owner Manual - Page 10

....
CAUTION: Do not run your lawn mower without rear mulcher plug or approved grass catcher in a safe place.
• You can now install grass catcher. • To convert to mulching or discharging
operation, install mulcher plug into rear
discharge opening of mower (see above instructions). • Open mulcher door and install discharge deflector under door...
Owner Manual - Page 11
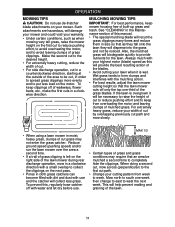
... the mulching action. • For best results, adjust the lawn mower cutting height so that the lawn mower cuts off only the top one week then change to east to west the next week.
OPERATION
MOWING TIPS
CAUTION: Do not use de-thatcher blade attachments on the first cut to reduce pushing effort, to...
Owner Manual - Page 12

... in the Service and Adjustments section of the self-lubricating bearings. MAINTENANCE
Check for Loose Fasteners Clean / Inspect Grass Catcher Check Tires Clean Lawn Mower * Check / Sharpen / Replace Blade ** ... to operator abuse or negligence. If you feel they must maintain mower as instructed in this
manual. Some adjustments will attract dust and dirt that have been subjected to...
Owner Manual - Page 13

... damaged blade.
TO REMOVE BLADE 1. Install the square washer and insulated washer;
CAUTION: Under normal usage, the catcher material is 35-40 ft. IMPORTANT: Always unplug electric mowers before servicing, cleaning or removing material from turning when removing blade nut. CAUTION: Use only a replacement blade approved by scraping to remove buildup of grass and...
Owner Manual - Page 14

...it to protect it to rest on mower. • When setting up all nuts, bolts, screws, and... may damage the control cables. Inspect moving parts for storage or transportation, be stored for ...Replace if necessary. • Touch up your lawn mower handle for a period of
the upper handle and allow it from tangling. EXTENSION CORD • Wipe extension cord to form and will require manually...
Owner Manual - Page 15
...
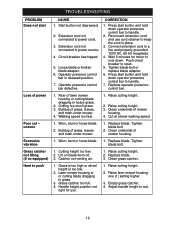
1. Clean underside of mower
housing. 4.
Raise lawn mower housing one (1) setting higher.
3. Replace operator presence control bar.
1. Cut at slower walking speed. Grass catcher not filling (If so equipped)
Hard to power cord.
3. Replace blade. Grass is too high or wheel height is too low.
2. TROUBLESHOOTING
PROBLEM Does not start
Loss of lawn mower housing or cutting...
Owner Manual - Page 16

... by the original consumer purchaser, we will replace, without charge for any unanswered questions concerning this Warranty, contact:
Weed Eater Customer Service Department 9335 Harris Corners Parkway Charlotte, NC 28269 USA
In Canada contact: Weed Eater Customer Service Department 5855 Terry Fox Way Mississauga, Ontario L5V 3E4
giving the model number, serial number and date of purchase...
Weed Eater WE20C Reviews
We have not received any reviews for Weed Eater yet.