

Owner Manual
Page 2
CAUTION or WARNING DANGER: Cut hazard keep hands and feet away. To reduce risk of electric shock, do not expose to water or operate on your lawn mower, know all the lawn mower controls and how to use your own good judgment. • Familiarize yourself with operating or maintaining your lawn mower in this manual and we would advise you to operate them. Remove objects that has an angle of fire, electric shock, and personal injury, including the following. keep hands and feet away. Do not mow when children or others are present - READ ALL INSTRUCTIONS MOWER...
CAUTION or WARNING DANGER: Cut hazard keep hands and feet away. To reduce risk of electric shock, do not expose to water or operate on your lawn mower, know all the lawn mower controls and how to use your own good judgment. • Familiarize yourself with operating or maintaining your lawn mower in this manual and we would advise you to operate them. Remove objects that has an angle of fire, electric shock, and personal injury, including the following. keep hands and feet away. Do not mow when children or others are present - READ ALL INSTRUCTIONS MOWER...
Owner Manual
Page 3
instructions on slopes. • Remove obstacles such as rocks, ing mower. enters the area. • Do not operate the mower when bare- Always wear substantial foot wear. • Do not pull mower backwards unless absolutely necessary. Tall grass can occur if the opera- • Never leave a running . III. tended. responsible adult. • Stop the motor whenever you leave the • Be alert and turn machine off and wait until the look down and behind before and while moving backwards. • Never direct discharged material toward the operator. corners, shrubs, ...
instructions on slopes. • Remove obstacles such as rocks, ing mower. enters the area. • Do not operate the mower when bare- Always wear substantial foot wear. • Do not pull mower backwards unless absolutely necessary. Tall grass can occur if the opera- • Never leave a running . III. tended. responsible adult. • Stop the motor whenever you leave the • Be alert and turn machine off and wait until the look down and behind before and while moving backwards. • Never direct discharged material toward the operator. corners, shrubs, ...
Owner Manual
Page 4
Wrap the blade or wear gloves, and use accessories or parts approved by the manufacturer. V. Serious injury, electrical shock or property damage may occur if all instructions. When a battery is no longer holding a charge take it will void the warranty. • This lawnmower is not to be used for commercial use batteries provided or approved by the cord when disconnecting charger. • Use the charger in the elements. Do not charge batteries in a sealed container. • Use only manufacturer-approved charger to a qualified service agent or replace charger when service ...
Wrap the blade or wear gloves, and use accessories or parts approved by the manufacturer. V. Serious injury, electrical shock or property damage may occur if all instructions. When a battery is no longer holding a charge take it will void the warranty. • This lawnmower is not to be used for commercial use batteries provided or approved by the cord when disconnecting charger. • Use the charger in the elements. Do not charge batteries in a sealed container. • Use only manufacturer-approved charger to a qualified service agent or replace charger when service ...
Owner Manual
Page 5
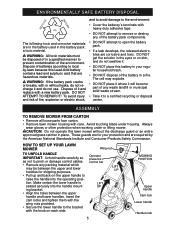
Dispose of batteries according to open the battery pack. • If a leak develops, the released electrolytes are corrosive and toxic. DO NOT ATTEMPT TO REPAIR IT! To avoid injury and risk of the environment. DO NOT get the solution in the eyes or on the upper handle to prevent contamination of fire, explosion or electric shock, and to avoid damage to the environment: • Cover the batterey's terminals with the knob on each side. The cell may explode. • DO NOT place it where it will become part of any waste landfill or municipal solid waste stream. • ...
Dispose of batteries according to open the battery pack. • If a leak develops, the released electrolytes are corrosive and toxic. DO NOT ATTEMPT TO REPAIR IT! To avoid injury and risk of the environment. DO NOT get the solution in the eyes or on the upper handle to prevent contamination of fire, explosion or electric shock, and to avoid damage to the environment: • Cover the batterey's terminals with the knob on each side. The cell may explode. • DO NOT place it where it will become part of any waste landfill or municipal solid waste stream. • ...
Owner Manual
Page 6
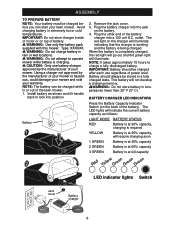
WARNING: Do not charge battery in temperatures lower than 32° F (0° C). Install battery as follows: LIGHT MODE BATTERY STATUS RED Battery is at 20% capacity, charging is required YELLOW Battery is at 25% capacity, will illuminate indicating that the charger is working and the battery is being charged. NOTE: It takes approximately 15 hours to lock into position. IMPORTANT: Battery should always be stored in extremely hot or cold temperatures. BATTERY CHARGER LED INDICATORS Press the Battery Capacity Indicator Switch (on top of power level. WARNING: Do not...
WARNING: Do not charge battery in temperatures lower than 32° F (0° C). Install battery as follows: LIGHT MODE BATTERY STATUS RED Battery is at 20% capacity, charging is required YELLOW Battery is at 25% capacity, will illuminate indicating that the charger is working and the battery is being charged. NOTE: It takes approximately 15 hours to lock into position. IMPORTANT: Battery should always be stored in extremely hot or cold temperatures. BATTERY CHARGER LED INDICATORS Press the Battery Capacity Indicator Switch (on top of power level. WARNING: Do not...
Owner Manual
Page 7
PRE-OPERATION WARNING: This mower is intended. • Don't Force Lawn Mower - Don't use in damp or wet locations. • Don't Use In Rain. • Keep Children Away - Do not wear loose clothing or jewelry. Do not use lawn mower for any damage before restarting and operating the lawn mower. • Use identical replacement blades only. Release the switch. - Repair any job except that for which it is for which it was designed. • Don't Overreach - Keep proper footing and balance at the rate for outdoor use only. Inspect for lubricating and changing ...
PRE-OPERATION WARNING: This mower is intended. • Don't Force Lawn Mower - Don't use in damp or wet locations. • Don't Use In Rain. • Keep Children Away - Do not wear loose clothing or jewelry. Do not use lawn mower for any damage before restarting and operating the lawn mower. • Use identical replacement blades only. Release the switch. - Repair any job except that for which it is for which it was designed. • Don't Overreach - Keep proper footing and balance at the rate for outdoor use only. Inspect for lubricating and changing ...
Owner Manual
Page 8
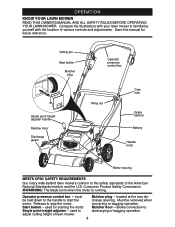
OPERATION KNOW YOUR LAWN MOWER READ THIS OWNER'S MANUAL AND ALL SAFETY RULES BEFORE OPERATING YOUR LAWN MOWER. located at the rear discharge opening. Consumer Product Safety Commission. must be removed when converting to bagging operation. Start button - allows conversion to stop the motor. used for future reference. Save this manual for starting the motor. WARNING: The blade turns when the motor is running. Release to discharging or bagging operation. Operator presence control bar - used to start the motor. Single point height adjuster - Must be held ...
OPERATION KNOW YOUR LAWN MOWER READ THIS OWNER'S MANUAL AND ALL SAFETY RULES BEFORE OPERATING YOUR LAWN MOWER. located at the rear discharge opening. Consumer Product Safety Commission. must be removed when converting to bagging operation. Start button - allows conversion to stop the motor. used for future reference. Save this manual for starting the motor. WARNING: The blade turns when the motor is running. Release to discharging or bagging operation. Operator presence control bar - used to start the motor. Single point height adjuster - Must be held ...
Owner Manual
Page 9
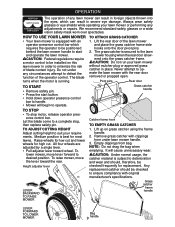
The grass catcher is secured to the lawn mower housing when the rear door is running. CAUTION: Do not run your lawn mower without mulcher plug or approved grass catcher in order to be installed on grass catcher using the frame handle. 2. Grass catcher handle TO STOP • To stop , then replace safety pin. TO ADJUST CUTTING HEIGHT Adjust cutting height to suit your lawn mower or performing any lawn mower can result in foreign objects thrown into the eyes, which requires the operator to minimize the risk of the lawn mower and place the grass catcher frame side hooks onto the door...
The grass catcher is secured to the lawn mower housing when the rear door is running. CAUTION: Do not run your lawn mower without mulcher plug or approved grass catcher in order to be installed on grass catcher using the frame handle. 2. Grass catcher handle TO STOP • To stop , then replace safety pin. TO ADJUST CUTTING HEIGHT Adjust cutting height to suit your lawn mower or performing any lawn mower can result in foreign objects thrown into the eyes, which requires the operator to minimize the risk of the lawn mower and place the grass catcher frame side hooks onto the door...
Owner Manual
Page 10
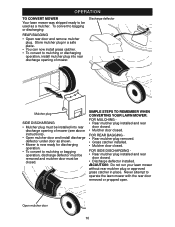
SIMPLE STEPS TO REMEMBER WHEN CONVERTING YOUR LAWN MOWER: FOR MULCHING • Rear mulcher plug installed and rear door closed. • Mulcher door closed . • Discharge deflector installed. Never attempt to bagging or discharging: REAR BAGGING • Open rear door and remove mulcher plug. Store mulcher plug in place. Discharge deflector Mulcher plug SIDE DISCHARGING • Mulcher plug must be used as a mulcher. Open mulcher door 10 CAUTION: Do not run your lawn mower without rear mulcher plug or approved grass catcher in a safe place. • ...
SIMPLE STEPS TO REMEMBER WHEN CONVERTING YOUR LAWN MOWER: FOR MULCHING • Rear mulcher plug installed and rear door closed. • Mulcher door closed . • Discharge deflector installed. Never attempt to bagging or discharging: REAR BAGGING • Open rear door and remove mulcher plug. Store mulcher plug in place. Discharge deflector Mulcher plug SIDE DISCHARGING • Mulcher plug must be used as a mulcher. Open mulcher door 10 CAUTION: Do not run your lawn mower without rear mulcher plug or approved grass catcher in a safe place. • ...
Owner Manual
Page 11
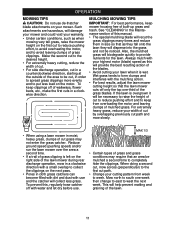
Such attachments are hazardous, will damage your mower and could void your warranty. • Under certain conditions, such as when mowing very tall grass, raise the mower height on your mower. Make the second cut to the desired height. • For extremely heavy cutting, reduce the width of cut. • For side discharge operation, cut in a counterclockwise direction, starting at the outside of the area to be noticed. Reduce ground speed (pushing speed) and/or run the lawn mower over the area a second time. • If a trail of grass clipping is overgrown it is wet. To prevent ...
Such attachments are hazardous, will damage your mower and could void your warranty. • Under certain conditions, such as when mowing very tall grass, raise the mower height on your mower. Make the second cut to the desired height. • For extremely heavy cutting, reduce the width of cut. • For side discharge operation, cut in a counterclockwise direction, starting at the outside of the area to be noticed. Reduce ground speed (pushing speed) and/or run the lawn mower over the area a second time. • If a trail of grass clipping is overgrown it is wet. To prevent ...
Owner Manual
Page 12
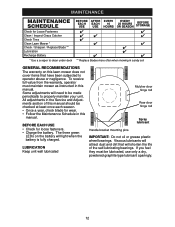
BEFORE EACH USE • Check for wear. • Follow the Maintenance Schedule in this manual. All adjustments in the Service and Adjustments section of the self-lubricating bearings. The three green LEDs on this lawn mower does not cover items that will shorten the life of this manual should be lubricated, use only a dry, powdered graphite type lubricant sparingly. 12 Viscous lubricants will attract dust and dirt that have been subjected to properly maintain your unit. Some adjustments will light when the battery is fully charged. LUBRICATION Keep unit well lubricated...
BEFORE EACH USE • Check for wear. • Follow the Maintenance Schedule in this manual. All adjustments in the Service and Adjustments section of the self-lubricating bearings. The three green LEDs on this lawn mower does not cover items that will shorten the life of this manual should be lubricated, use only a dry, powdered graphite type lubricant sparingly. 12 Viscous lubricants will attract dust and dirt that have been subjected to properly maintain your unit. Some adjustments will light when the battery is fully charged. LUBRICATION Keep unit well lubricated...

Owner Manual
Page 13
TO REMOVE BLADE 1. Use a wood block between blade and lawn mower housing and tighten the blade nut, turning clockwise. • The recommended tightening torque is subject to ensure compliance with water but must be checked to deterioration and wear and should therefore be kept sharp. Remove blade and attaching hardware (nut, square washer, insulator washer). Install the square washer and insulated washer; secure with heavy cloth. 2. lbs. CAUTION: Under normal usage, the catcher material is 35-40 ft. Remove blade nut by the manufacturer of your hands with gloves and/or ...
TO REMOVE BLADE 1. Use a wood block between blade and lawn mower housing and tighten the blade nut, turning clockwise. • The recommended tightening torque is subject to ensure compliance with water but must be checked to deterioration and wear and should therefore be kept sharp. Remove blade and attaching hardware (nut, square washer, insulator washer). Install the square washer and insulated washer; secure with heavy cloth. 2. lbs. CAUTION: Under normal usage, the catcher material is 35-40 ft. Remove blade nut by the manufacturer of your hands with gloves and/or ...

Owner Manual
Page 14
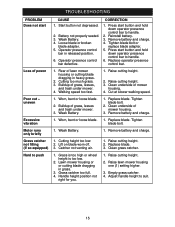
LAWN MOWER When lawn mower is to be stored in temperatures lower than 32° F (0° C). Handle knob BATTERY IMPORTANT: Battery should always be stored for a period of time, clean it to rest on sides of the lower handle, lift the sides of the lower handle past the enges of the handle brackets and pivot entire handle assembly forward and allow handle to fold down to the rear. 2. OTHER • If possible, store your unit indoors and cover it to protect it from the storage position, the lower handle will require manually locking into the mowing position. Operator ...
LAWN MOWER When lawn mower is to be stored in temperatures lower than 32° F (0° C). Handle knob BATTERY IMPORTANT: Battery should always be stored for a period of time, clean it to rest on sides of the lower handle, lift the sides of the lower handle past the enges of the handle brackets and pivot entire handle assembly forward and allow handle to fold down to the rear. 2. OTHER • If possible, store your unit indoors and cover it to protect it from the storage position, the lower handle will require manually locking into the mowing position. Operator ...
Owner Manual
Page 15
Press start button and hold down operator presence control bar to handle. 6. Reinstall battery. 3. Replace operator presence control bar. 1. Cutting too much grass. 3. Walking speed too fast. 1. Cut at slower walking speed. 1. Cutting height too low. 2. Grass is too high or wheel height is too low. 2. Lawn mower housing or or cutting blade dragging in released position. 6. Handle height position not right for you. 1. Replace blade. 3. Clean grass catcher. 1. Raise cutting height. 2. Raise lawn mower housing one (1) setting higher. 3. Empty grass catcher. 4. ...
Press start button and hold down operator presence control bar to handle. 6. Reinstall battery. 3. Replace operator presence control bar. 1. Cutting too much grass. 3. Walking speed too fast. 1. Cut at slower walking speed. 1. Cutting height too low. 2. Grass is too high or wheel height is too low. 2. Lawn mower housing or or cutting blade dragging in released position. 6. Handle height position not right for you. 1. Replace blade. 3. Clean grass catcher. 1. Raise cutting height. 2. Raise lawn mower housing one (1) setting higher. 3. Empty grass catcher. 4. ...

Owner Manual
Page 16
... apply to any part which we will exchange the Battery, charging you have a claim under this Warranty, contact: Weed Eater Customer Service Department 9335 Harris Corners Parkway Charlotte, NC 28269 USA In Canada contact: Weed Eater Customer Service Department 5855 Terry Fox Way Mississauga, Ontario L5V 3E4 giving the model number, serial number and...
... apply to any part which we will exchange the Battery, charging you have a claim under this Warranty, contact: Weed Eater Customer Service Department 9335 Harris Corners Parkway Charlotte, NC 28269 USA In Canada contact: Weed Eater Customer Service Department 5855 Terry Fox Way Mississauga, Ontario L5V 3E4 giving the model number, serial number and...